Creating and testing a firewall in Linux, Part 1.1 Virtual Lab
I decided to write an article in the wake of the course that I did last semester at the institute. Of course, here I will describe only the most important fundamentals and simplify everything as much as possible. I will try to give a little theoretical information, but mostly more links, pictures and practice.
So, we will talk about writing a firewall in a Linux environment. I will divide the whole article into several parts. What you are reading now is the first part, it is divided into three parts. Some topics are well known and documented, so I will try to separately give a minimum of theory on them and a separate practice. To all was interesting. And also links for deepening (often these will be English articles).
Content of the first part:
')
1.1 - Creating a virtual lab (so that we have where to work, I'll show you how to create a virtual network on your computer. The network will consist of 3 Linux ubuntu machines).
1.2 - Writing a simple module in Linux. Introducing Netfilter and intercepting traffic with it. We combine everything together, we test.
1.3 - Writing a simple char device. Adding a virtual file system - sysfs. Writing user interface. We combine everything together, we test.
The content of the second part:
Part 2. Not ready yet, but I think to cover the following topics: a brief introduction to the firewall tables. Stateless vs statefull firewall. Adding another module to load the rule tables (via the virtual sysfs file system from the first part, maybe I’ll just give the source code, because there’s basically nothing new here). Add a small proxy program in the user space and send the necessary traffic from the kernel to the proxy, work with the content of the traffic and on this basis make decisions about its future (add the ability to block individual sites). And also take a real known attack based on buffer overflow, take control over a remote computer with its help and see how our firewall can protect against this.
Perhaps the second part will be split into two, or changed. I would be very happy for your comments and suggestions both in the first part and in the second.
Our goal in this part is to write a program that will control all traffic at a very simple level. Namely, we will determine which packets can be skipped and which ones can be deleted. We will create a simple logging system to track the results, as well as a program for the user of course, through which you can read these results and manage the program a little. Such a trivial firewall or in Russian is the Firewall, the firewall is a complex of hardware and software on a computer network that monitors and filters the non-network packets passing through in accordance with specified rules. ( Wikipedia ).
In our case, the firewall function will be performed by a separate computer. It will look like this:
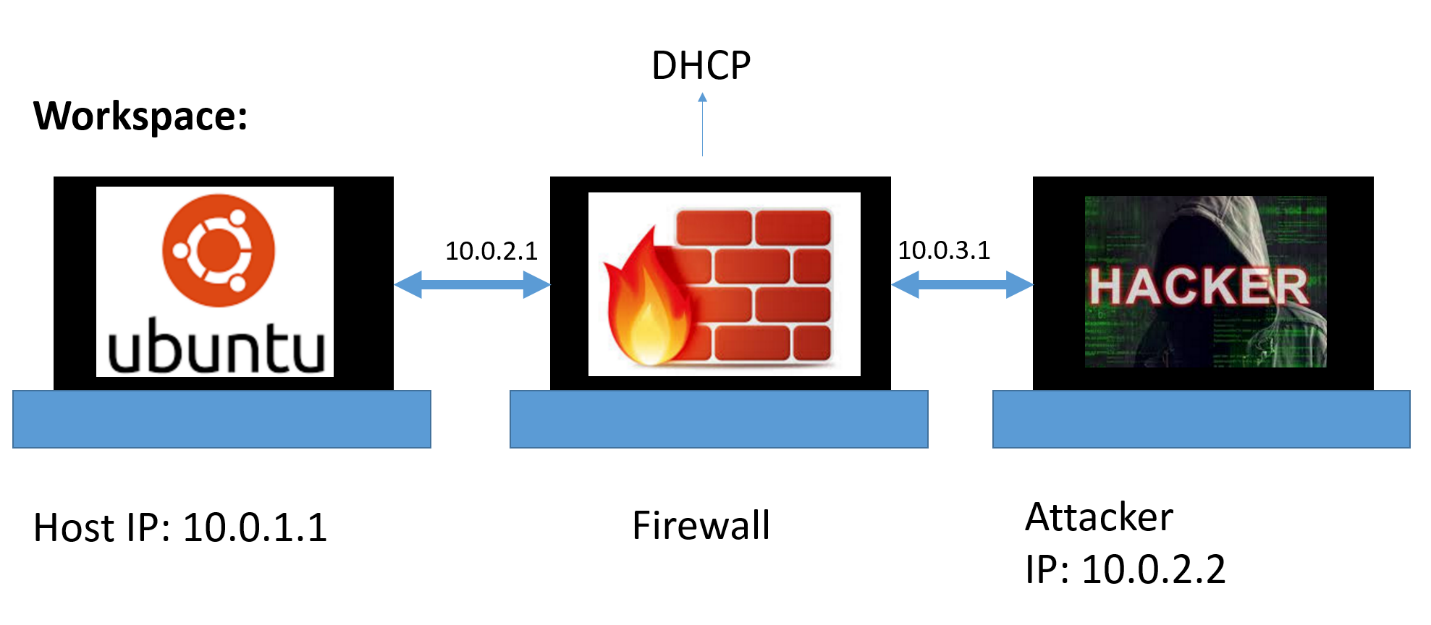
Let's watch. We will make a network in which there will be three virtual computers - host1, host2, fw and connect them as in the picture above.
host1 - will get a static IP address - 10.0.1.1. We will defend him.
host2 - which will be attacking in the last part and will have a static IP - 10.0.2.2
fw - will track all traffic, configure it as the interface for accessing the Internet, so that you can, when (read VC and news ) need to download the necessary software.

In a nutshell, DHCP (Dynamic Host Configuration Protocol) is a network protocol that allows computers to automatically obtain an IP address and other parameters necessary for working on a TCP / IP network. (Wikipedia).
That is, he will receive various settings himself, including IP, in order to be able, through this network interface, to go online without any headaches.
A little about virtual machines. In our case, a virtual machine is a program that will emulate a computer, so that we can run three operating systems on our computer at once. For those who are not at all familiar with the topic, they can start here .
We will use the free VirtualBox program, which allows you to create virtual networks on one computer. Of course, it doesn’t matter how to use it, the main thing is to be able to configure the network. The program is free, we search, download, set.
The next step is to add virtual machines. I will work with Linux Ubuntu 12, for "historical reasons". You can download the latest version. Especially if your computer is powerful enough. An image of Ubuntu can be found here .
I hope that the reader will cope with the addition of the image in the virtualbox and now you have something similar to the picture. I advise using the “clone” function in the virtualbox to quickly create two more machines. In my role as host1, host2 I’ve specially cut down the “light” versions of ubuntu, without a graphical interface (there’s not enough RAM for full-fledged ones).
Something like this should look like at the end
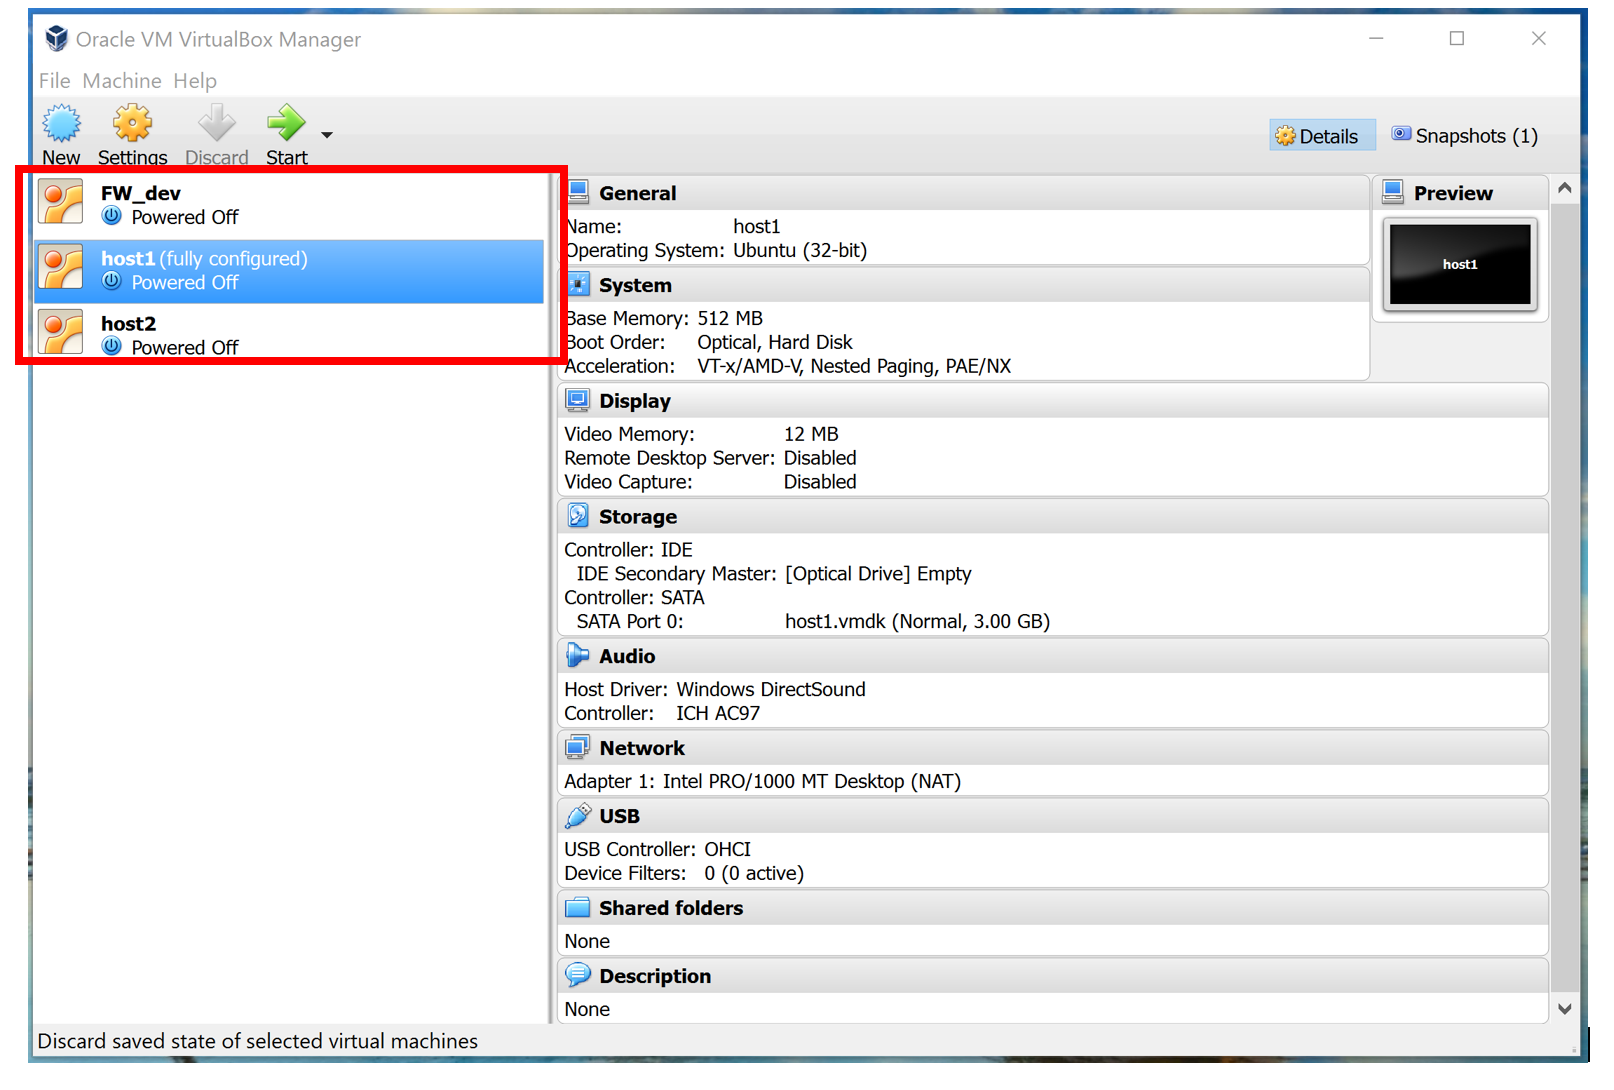
And so, I assume that you already have three virtual linux machines that we will now configure into one network and check that everything works before starting to write a program.
Go to settings and configure as in the photo:
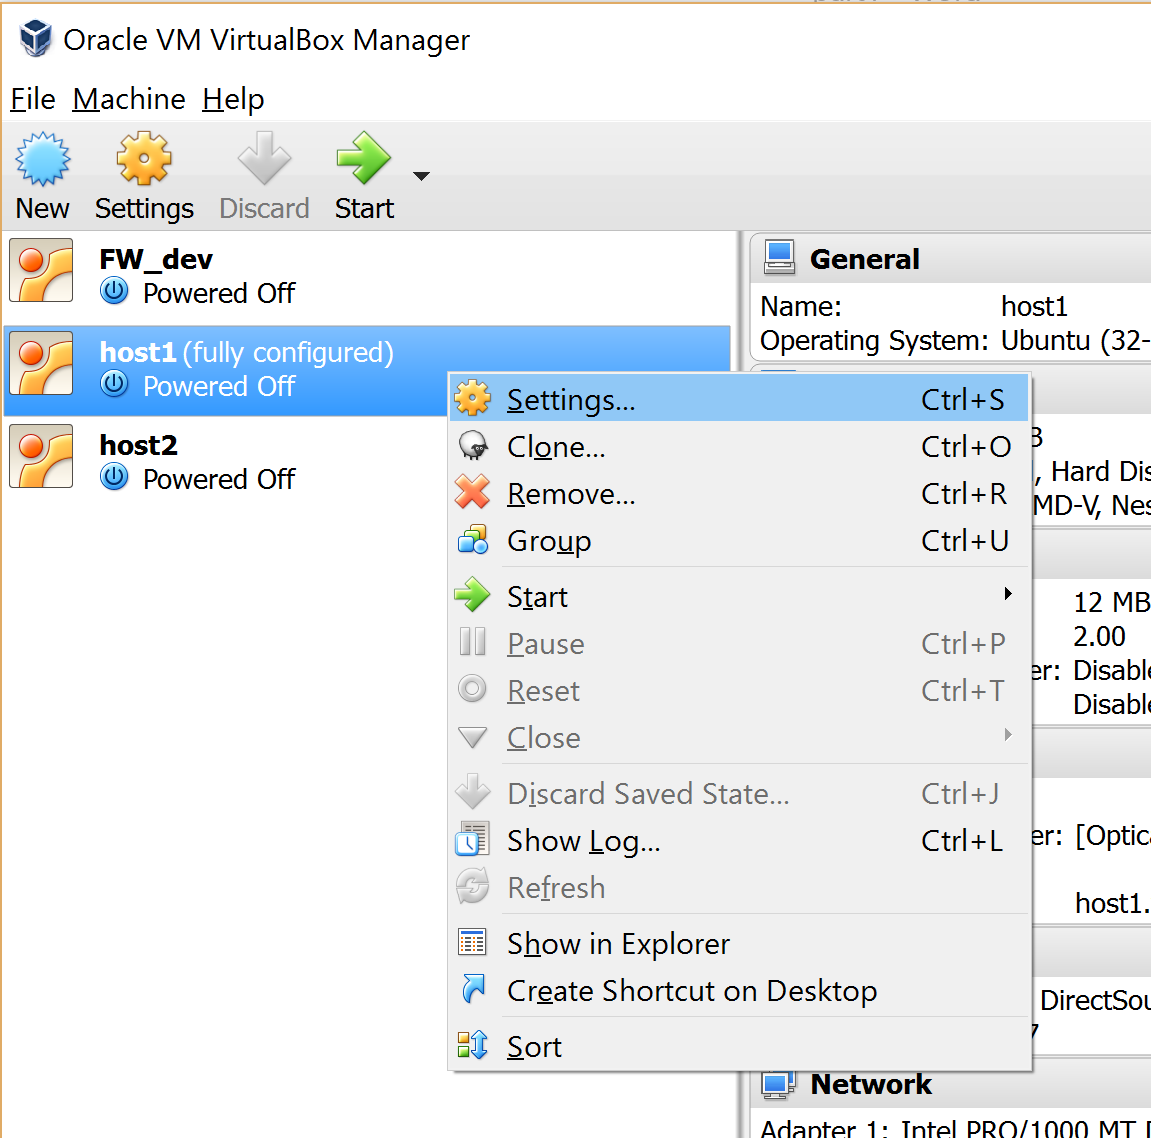
Add a network device:
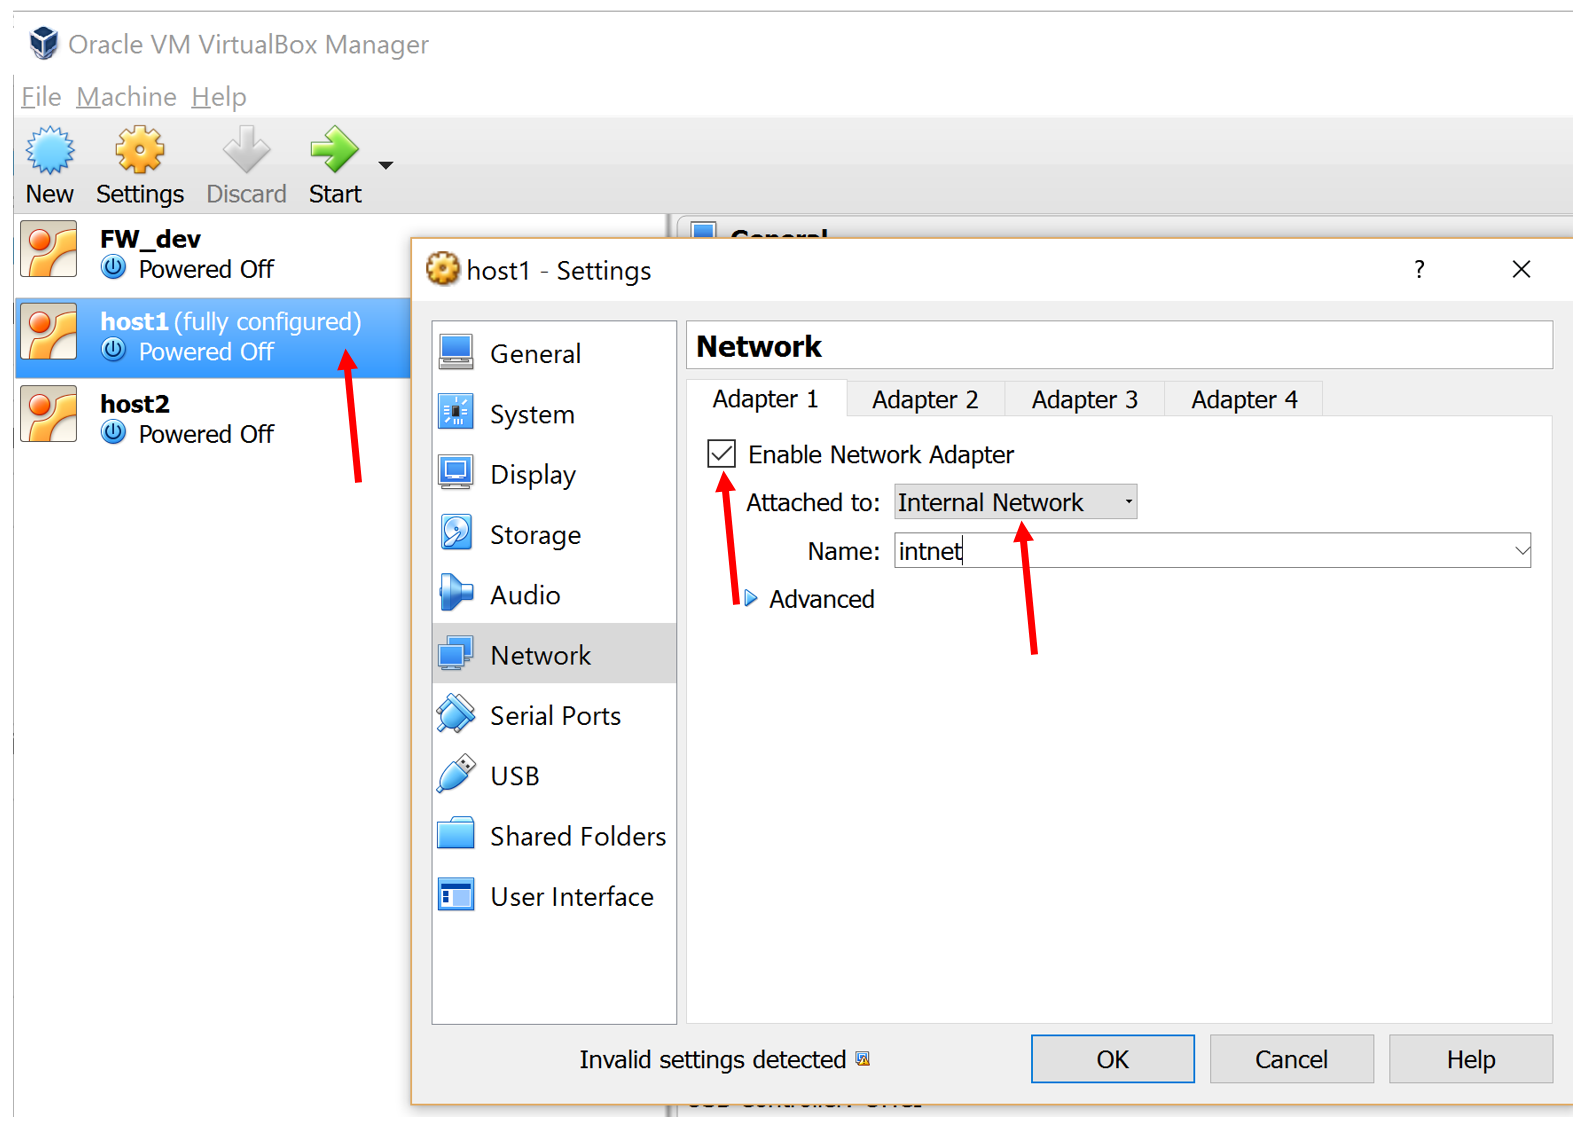
Now, linux "will think" that our computer has a network card, and if you look in Advanced, you will see that the cable is also inserted into it. Fine. Now you need to configure this card in the operating system. To do this, run host1.
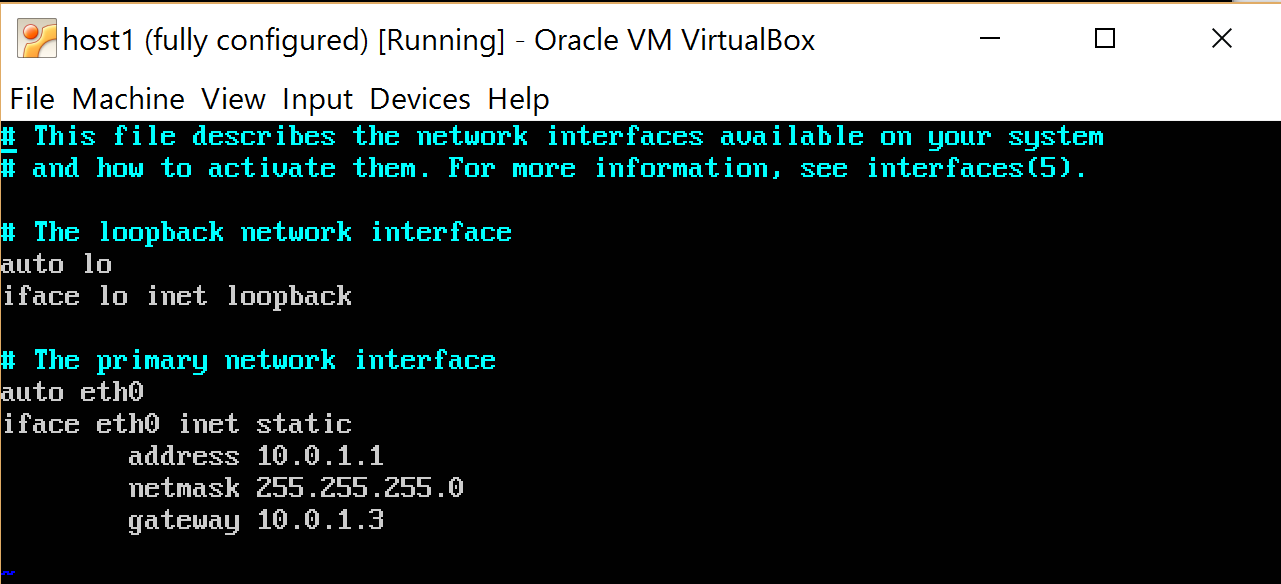
At this stage, I assume that the reader is aware of what an IP address is as it looks and why it is needed. I will edit in vi, you can in any other editor, but do not forget to give administrator rights (run from sudo) to be able to save.
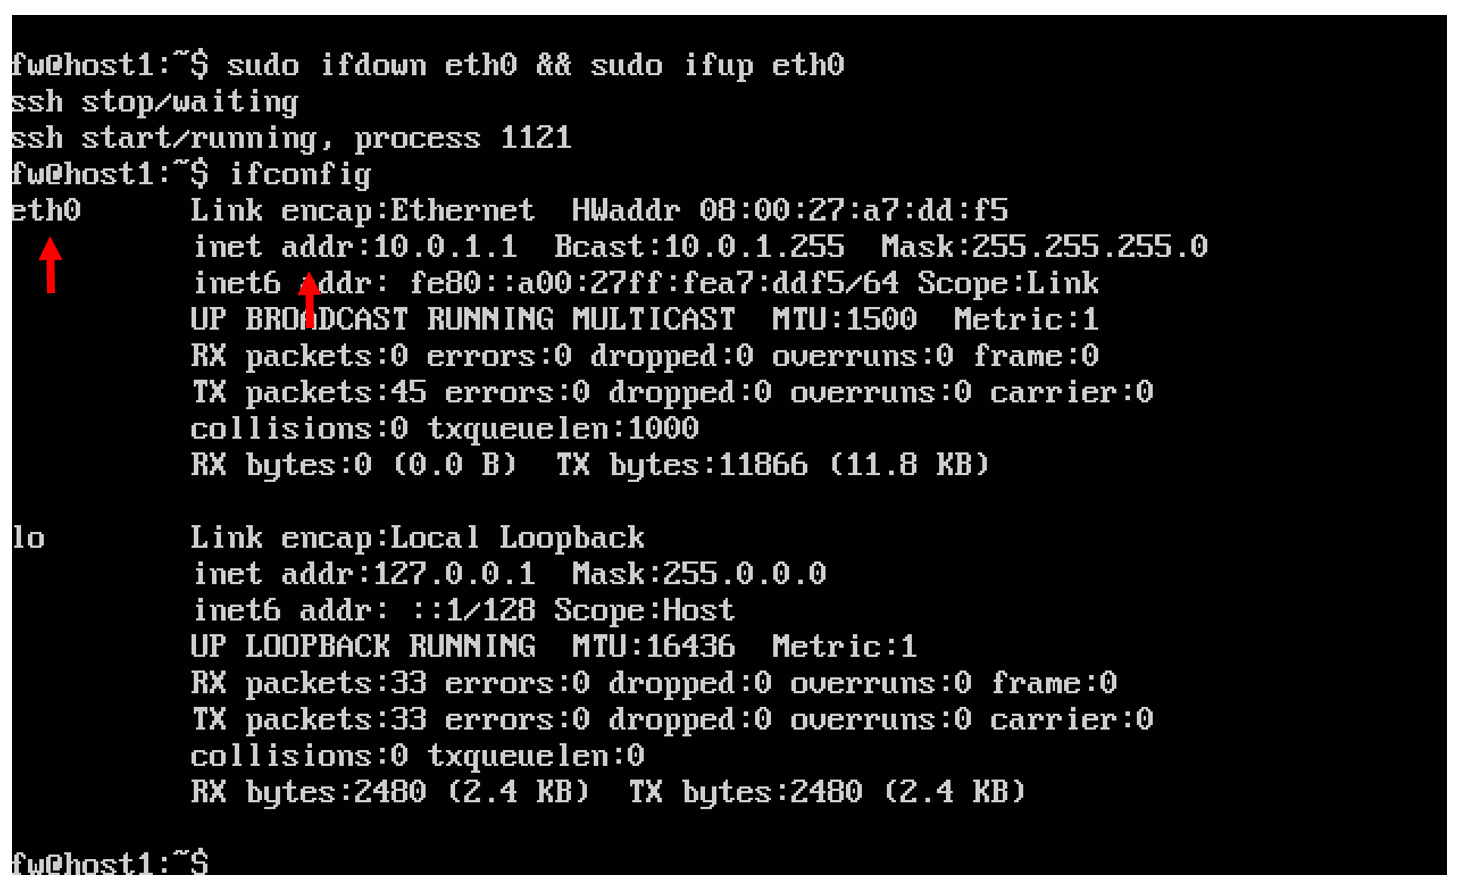
“We ask” the system to re-read the configuration file (in order not to reboot the machine):
We run ifconfig and check that we have a network card under the name eth0 , with IP == 10.0.1.1, a mask, etc., and so on.
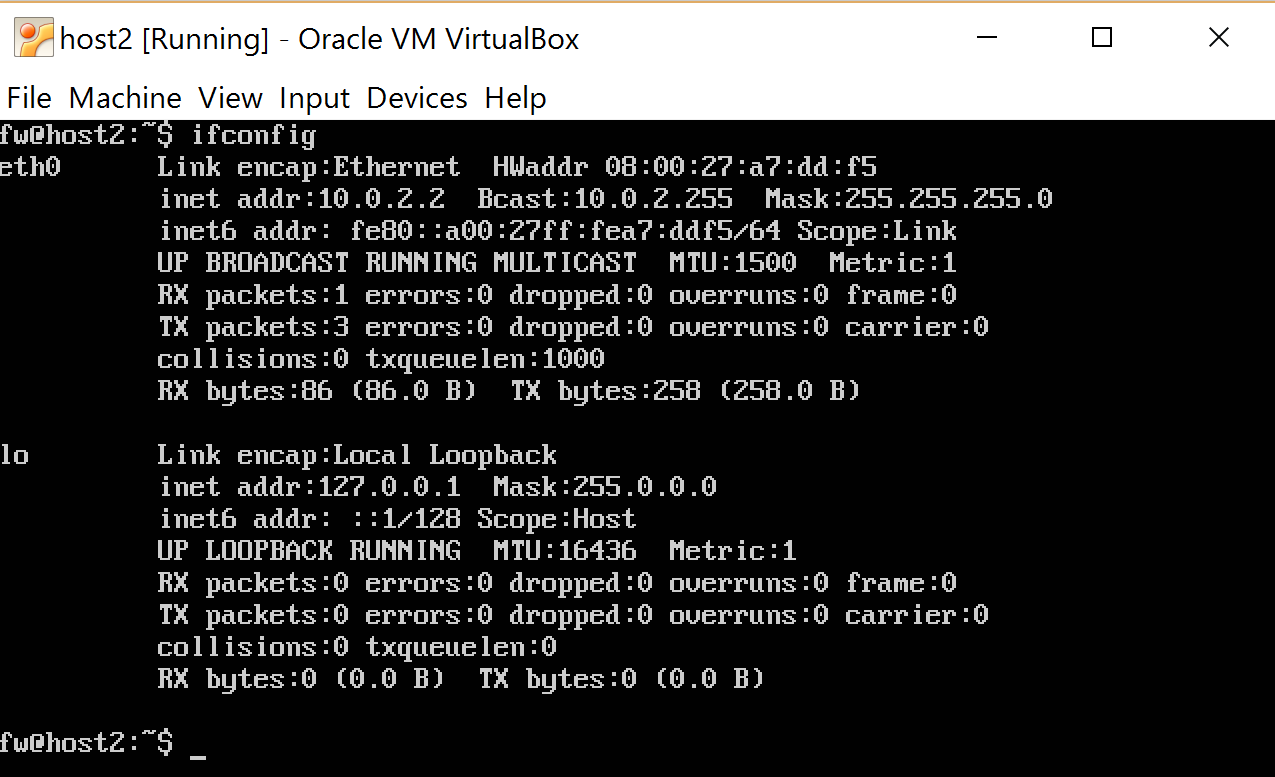
We do the same with host2, only set IP to 10.0.2.2, gateway 10.0.2.3 and don’t forget to “add” the network card in the virtualbox settings (after changing settings in virtualbox, the machine hung up for a couple of minutes and wrote waiting for network configuration ... This is due to the fact that by default, the network interface is configured as dhcp, that is, the operating system is waiting to dynamically obtain network settings, but in virtualbox, for this it must be configured as NAT, but we changed it, therefore The OS is trying to understand what is wrong. You can first load the OS, activate interfaces, then turn off the computer, change settings and restart).
Host2:
Now it's the turn of the main machine that will act as a firewall. I remind you that we will need three network cards, through one we will be able to go online if necessary, so it will be defined as NAT. The other two will be responsible for forwarding traffic from host1 -> host2 and back from host2 -> host1.
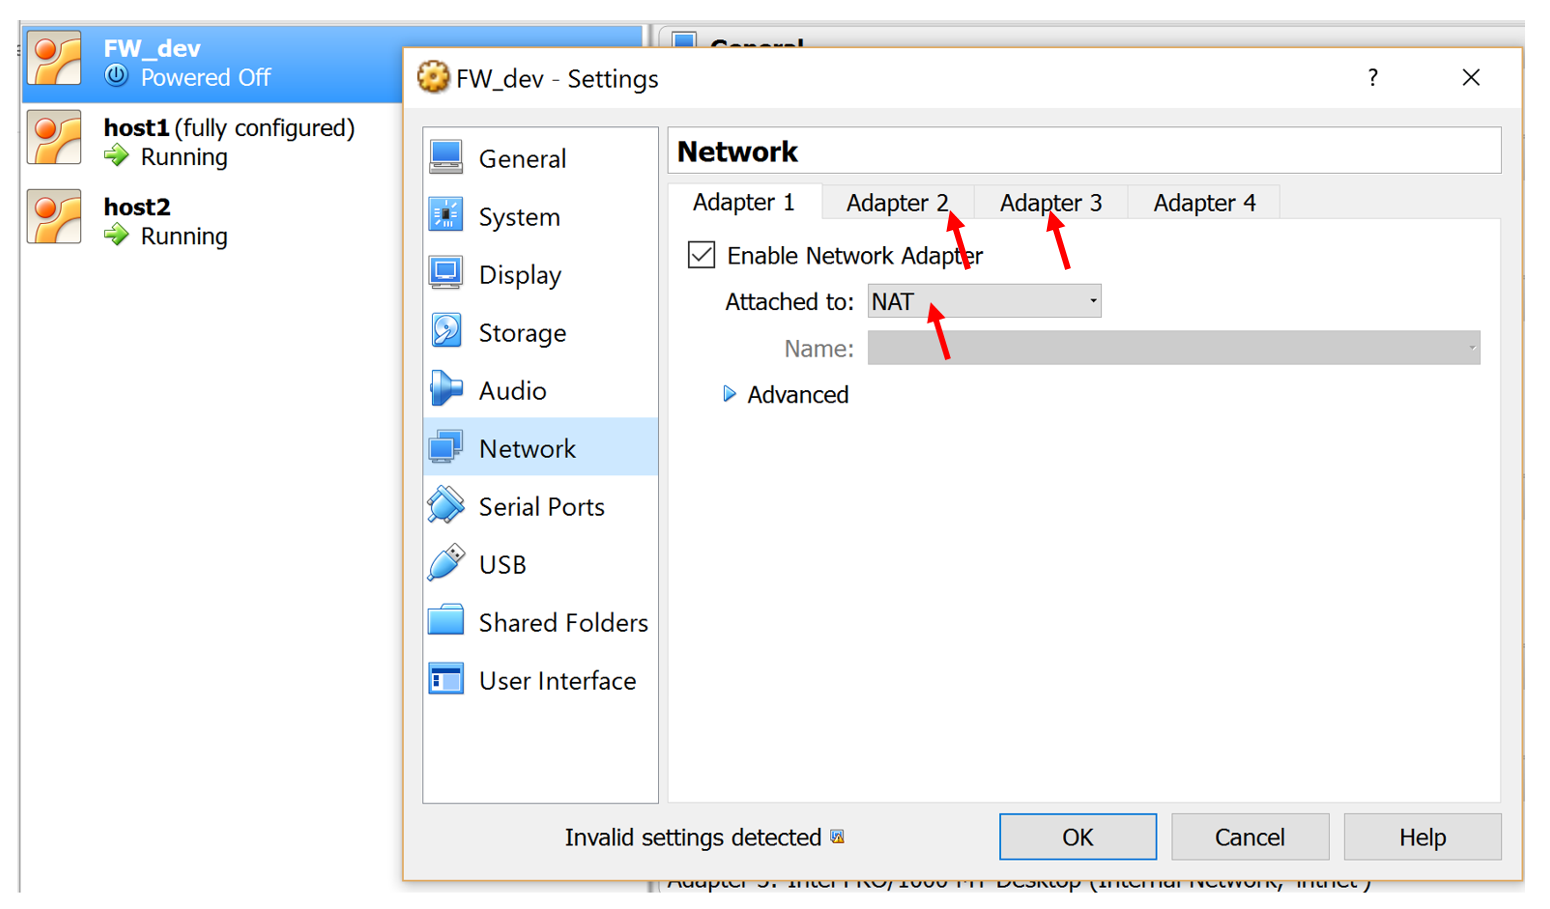
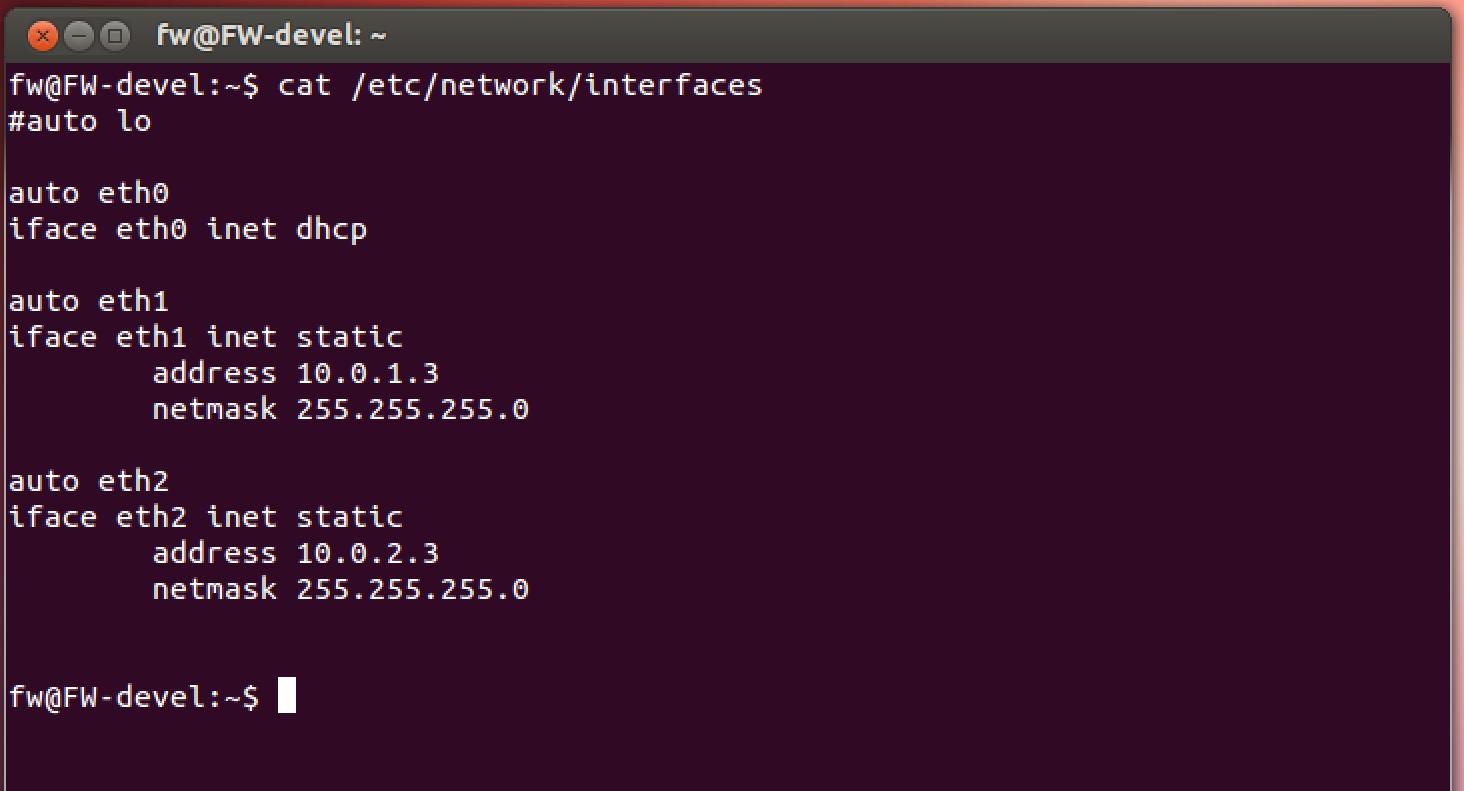
Adapter1 - should be set as NAT. The settings for Adapter2, Adapter3, are the same as in the previous examples (Internal network). We start, we begin to configure network cards. This is how the interfaces file should look.
And here is the final result of the configuration, after the restart:

The last thing left to do is to allow packet forwarding , so that the computer can take packets from one network interface (10.0.2.3) to which packets from host2 come and transfer them to another 10.0.1.3 network interface connected to host1, respectively.
Here everything is described in detail. To make the setting permanent, you need to change the following line in /etc/sysctl.conf :
You can do this in any convenient way, do not forget sudo. A lot of information about the configuration of the interfaces can be read here .
It remains to verify that everything is connected with each other and works. We will check the classic ping
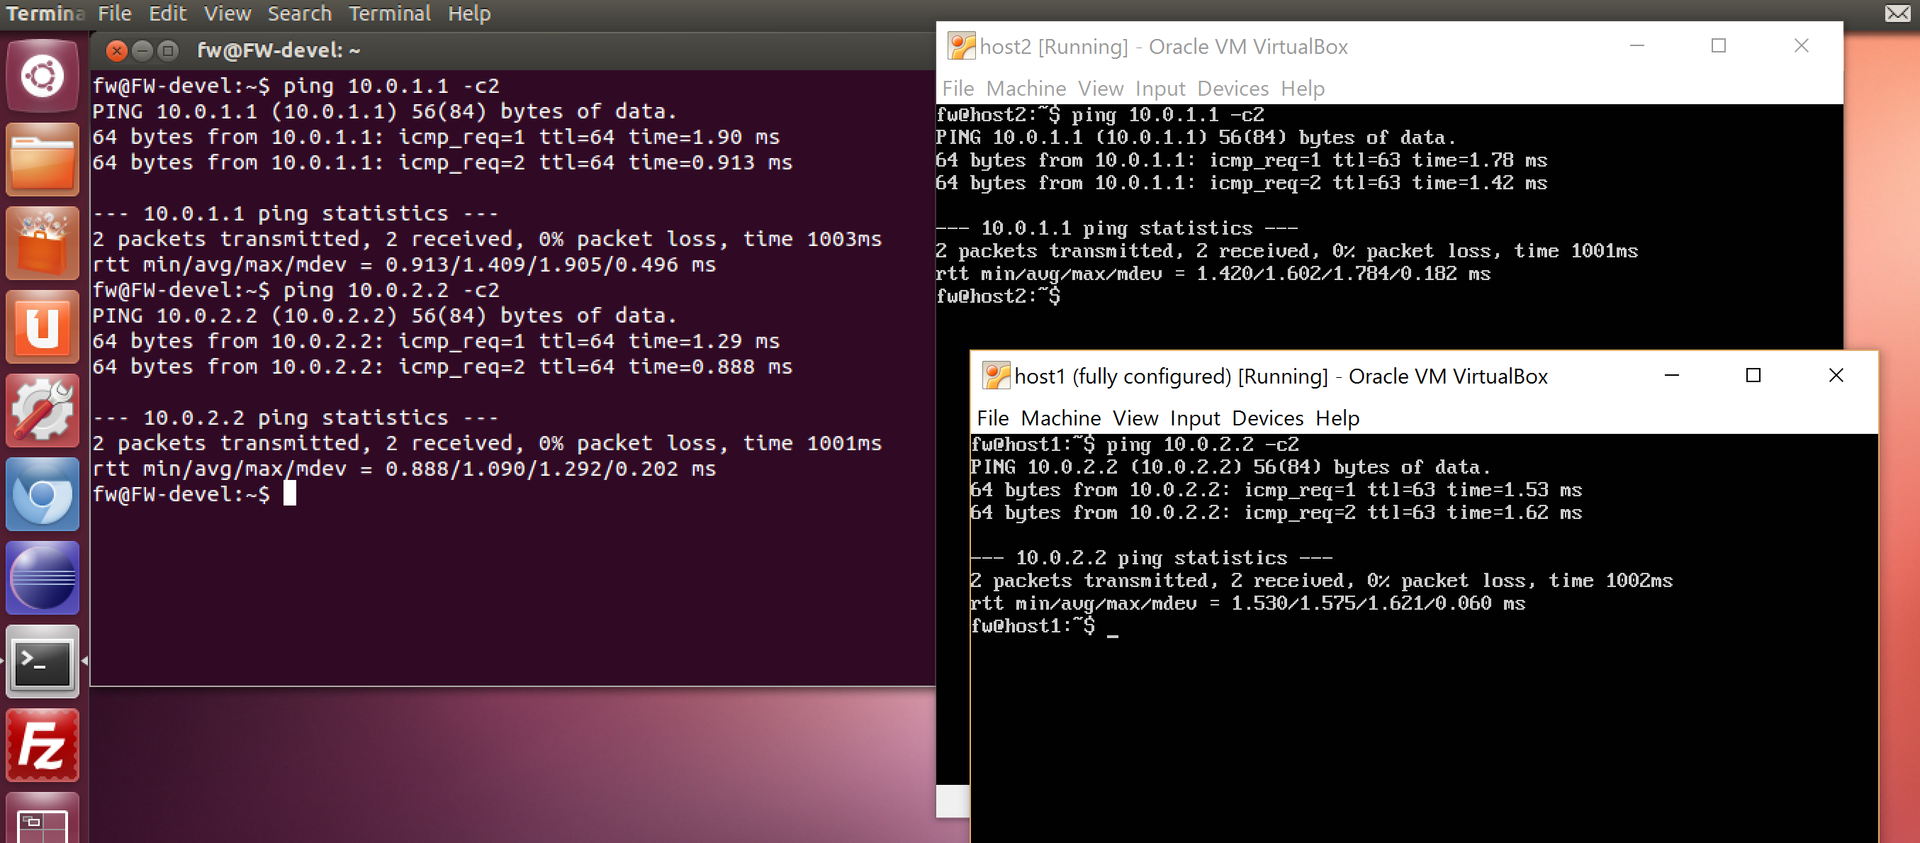
As can be seen in the picture, ping "passed" with host1 -> host2, host2 -> host1, fw -> host1, fw -> host2. Done, the lab is set up for future experiments.
» Network Screens
» Virtual Machines
How to allow forwarding
» Interface configuration
So, we will talk about writing a firewall in a Linux environment. I will divide the whole article into several parts. What you are reading now is the first part, it is divided into three parts. Some topics are well known and documented, so I will try to separately give a minimum of theory on them and a separate practice. To all was interesting. And also links for deepening (often these will be English articles).
Content of the first part:
')
1.1 - Creating a virtual lab (so that we have where to work, I'll show you how to create a virtual network on your computer. The network will consist of 3 Linux ubuntu machines).
1.2 - Writing a simple module in Linux. Introducing Netfilter and intercepting traffic with it. We combine everything together, we test.
1.3 - Writing a simple char device. Adding a virtual file system - sysfs. Writing user interface. We combine everything together, we test.
The content of the second part:
Hidden text
2.1 - Introduction to the second part. We look at the network and protocols. Wireshark.
2.2 - Firewall Tables. Transport Layer. TCP structures, UDP. Extend the firewall.
2.3 - Expanding functionality. We process the data in user space. libnetfilter_queue.
2.4 - (* Optionally) We study the real Buffer Overflow attack and prevent it with the help of our Firewall.
2.2 - Firewall Tables. Transport Layer. TCP structures, UDP. Extend the firewall.
2.3 - Expanding functionality. We process the data in user space. libnetfilter_queue.
2.4 - (* Optionally) We study the real Buffer Overflow attack and prevent it with the help of our Firewall.
Part 2. Not ready yet, but I think to cover the following topics: a brief introduction to the firewall tables. Stateless vs statefull firewall. Adding another module to load the rule tables (via the virtual sysfs file system from the first part, maybe I’ll just give the source code, because there’s basically nothing new here). Add a small proxy program in the user space and send the necessary traffic from the kernel to the proxy, work with the content of the traffic and on this basis make decisions about its future (add the ability to block individual sites). And also take a real known attack based on buffer overflow, take control over a remote computer with its help and see how our firewall can protect against this.
Perhaps the second part will be split into two, or changed. I would be very happy for your comments and suggestions both in the first part and in the second.
Introduction
Our goal in this part is to write a program that will control all traffic at a very simple level. Namely, we will determine which packets can be skipped and which ones can be deleted. We will create a simple logging system to track the results, as well as a program for the user of course, through which you can read these results and manage the program a little. Such a trivial firewall or in Russian is the Firewall, the firewall is a complex of hardware and software on a computer network that monitors and filters the non-network packets passing through in accordance with specified rules. ( Wikipedia ).
In our case, the firewall function will be performed by a separate computer. It will look like this:
Let's watch. We will make a network in which there will be three virtual computers - host1, host2, fw and connect them as in the picture above.
host1 - will get a static IP address - 10.0.1.1. We will defend him.
host2 - which will be attacking in the last part and will have a static IP - 10.0.2.2
fw - will track all traffic, configure it as the interface for accessing the Internet, so that you can, when (
In a nutshell, DHCP (Dynamic Host Configuration Protocol) is a network protocol that allows computers to automatically obtain an IP address and other parameters necessary for working on a TCP / IP network. (Wikipedia).
That is, he will receive various settings himself, including IP, in order to be able, through this network interface, to go online without any headaches.
Creating a virtual environment. Theory
A little about virtual machines. In our case, a virtual machine is a program that will emulate a computer, so that we can run three operating systems on our computer at once. For those who are not at all familiar with the topic, they can start here .
We will use the free VirtualBox program, which allows you to create virtual networks on one computer. Of course, it doesn’t matter how to use it, the main thing is to be able to configure the network. The program is free, we search, download, set.
The next step is to add virtual machines. I will work with Linux Ubuntu 12, for "historical reasons". You can download the latest version. Especially if your computer is powerful enough. An image of Ubuntu can be found here .
I hope that the reader will cope with the addition of the image in the virtualbox and now you have something similar to the picture. I advise using the “clone” function in the virtualbox to quickly create two more machines. In my role as host1, host2 I’ve specially cut down the “light” versions of ubuntu, without a graphical interface (there’s not enough RAM for full-fledged ones).
Something like this should look like at the end
Creating a virtual environment. Practice
And so, I assume that you already have three virtual linux machines that we will now configure into one network and check that everything works before starting to write a program.
Go to settings and configure as in the photo:
Add a network device:
Now, linux "will think" that our computer has a network card, and if you look in Advanced, you will see that the cable is also inserted into it. Fine. Now you need to configure this card in the operating system. To do this, run host1.
At this stage, I assume that the reader is aware of what an IP address is as it looks and why it is needed. I will edit in vi, you can in any other editor, but do not forget to give administrator rights (run from sudo) to be able to save.
$ sudo vi /etc/network/interfaces “We ask” the system to re-read the configuration file (in order not to reboot the machine):
$ sudo ifdown eth0 && sudo ifup eth0 We run ifconfig and check that we have a network card under the name eth0 , with IP == 10.0.1.1, a mask, etc., and so on.
We do the same with host2, only set IP to 10.0.2.2, gateway 10.0.2.3 and don’t forget to “add” the network card in the virtualbox settings (after changing settings in virtualbox, the machine hung up for a couple of minutes and wrote waiting for network configuration ... This is due to the fact that by default, the network interface is configured as dhcp, that is, the operating system is waiting to dynamically obtain network settings, but in virtualbox, for this it must be configured as NAT, but we changed it, therefore The OS is trying to understand what is wrong. You can first load the OS, activate interfaces, then turn off the computer, change settings and restart).
Host2:
Now it's the turn of the main machine that will act as a firewall. I remind you that we will need three network cards, through one we will be able to go online if necessary, so it will be defined as NAT. The other two will be responsible for forwarding traffic from host1 -> host2 and back from host2 -> host1.
Adapter1 - should be set as NAT. The settings for Adapter2, Adapter3, are the same as in the previous examples (Internal network). We start, we begin to configure network cards. This is how the interfaces file should look.
And here is the final result of the configuration, after the restart:
The last thing left to do is to allow packet forwarding , so that the computer can take packets from one network interface (10.0.2.3) to which packets from host2 come and transfer them to another 10.0.1.3 network interface connected to host1, respectively.
Here everything is described in detail. To make the setting permanent, you need to change the following line in /etc/sysctl.conf :
net.ipv4.ip_forward = 1 You can do this in any convenient way, do not forget sudo. A lot of information about the configuration of the interfaces can be read here .
Check
It remains to verify that everything is connected with each other and works. We will check the classic ping
As can be seen in the picture, ping "passed" with host1 -> host2, host2 -> host1, fw -> host1, fw -> host2. Done, the lab is set up for future experiments.
References:
» Network Screens
» Virtual Machines
How to allow forwarding
» Interface configuration
Source: https://habr.com/ru/post/315340/
All Articles