Why and how to transfer corporate email security to the cloud. Part 2

In the first part of this article, we talked about the main problems and needs of enterprises related to email security, as well as the general advantages and disadvantages of SaaS solutions for protecting corporate mail. Strictly speaking, we tried to answer the question "why."
The second part of the article is already devoted to a purely technical “how” question: here we will show the main steps in pre-setting the SaaS email security solution using the example of Panda Email Protection . Having pre-configured, you can already safely switch the mx-domain records and enjoy the "clean" mail.
Licensing
Panda Email Protection is provided as a service, and therefore each mailbox protected by the solution requires a separate license from the license pool available to the user.
')
The administrator can view the number of available and used licenses in Administration → Dashboard → Subscription Status.
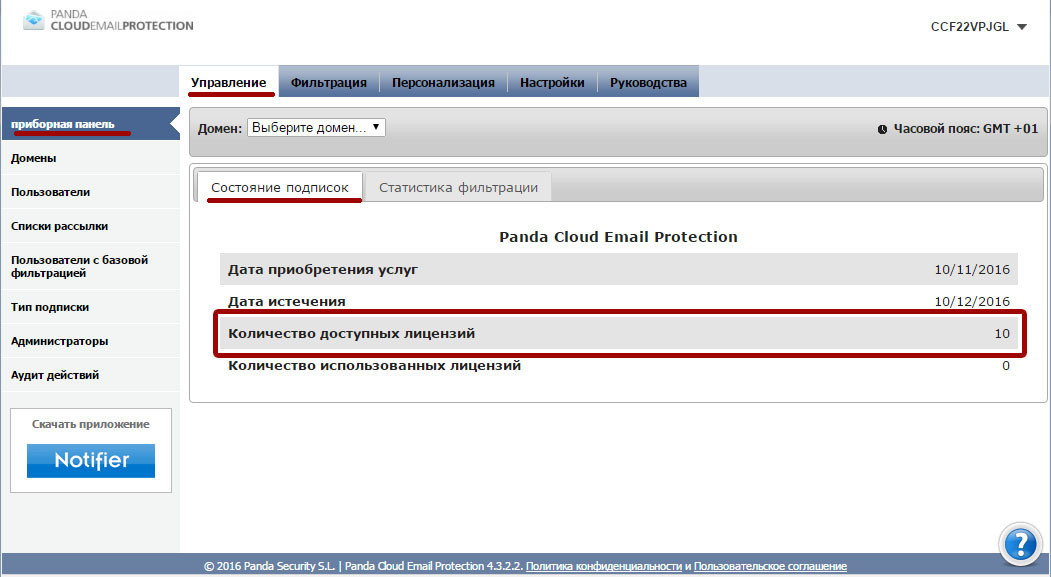
Consider the following points when calculating the total number of licenses required for your organization:
Domain Aliases
If the platform protects an existing domain (for example, “pandatest.ru”) with users already created within this domain, and you have another domain that is an alias of an existing domain (for example, “pandatest.com”), then the domain alias can be configured as a primary domain. All users in the primary domain will be simultaneously configured for a domain alias. These users do not require additional licenses.
Mail Address Aliases
Each license allows you to protect up to 5 email aliases associated with the main mailbox using the same license.
In order for the system to recognize mail address aliases under a single license, it is necessary that these aliases are correctly configured in the system. Mail address aliases can be configured manually or using automatic LDAP authorization, provided that the Enable alias detection option is enabled. Note that the detection of aliases is not available when using automatic authentication via SMTP. Thus, it is recommended that you use LDAP integration if your organization has a large number of email address aliases.
If your organization has aliases of email addresses protected by this solution, but they are not configured correctly as aliases in Email Protection, then the platform will spend one license for each such alias. In this case, you will need to check the mailbox configuration in Email Protection.
Initial Email Protection Account Setup
Before securing domains and corporate email users, you must perform certain initial configuration steps. All configuration steps are performed from the management console. The management console is accessible via the link mep.pandasecurity.com/admin . For authorization, you must use your unique registration data.
If the initial configuration is not fully performed before changing the MX records in your DNS to Email Protection, then incoming and outgoing emails will be returned back with a permanent error code. In this case, the letters never reach the addressee.
The configuration steps described in the configuration of outgoing mail filtering should be performed only if you want Email Protection to filter outgoing emails.
So, the basic steps for initial setup:
• Configure the domain (s) to be protected by the platform.
• Configure email addresses to be protected by the platform.
• Set up the platform if you want to redesign the user interface and communications sent to the email addresses protected by the solution.
• Change your MX records to redirect your mail to the Panda platform.
Next we describe in detail each of these steps.
Domain Setting
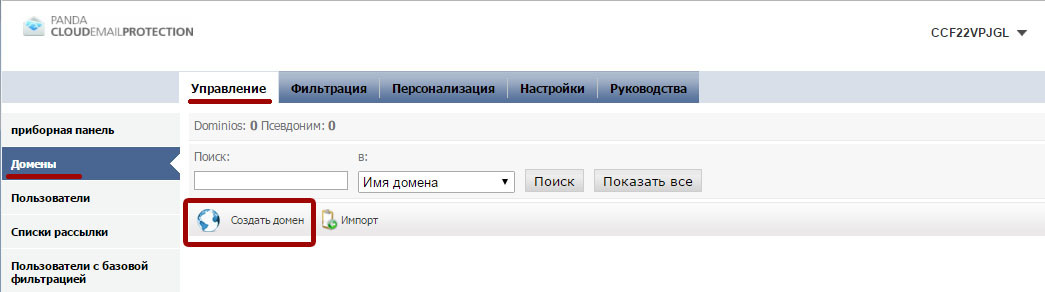
The first step is to configure the domain or domains that need to be protected by Email Protection. To do this, go to Manage → Domains . For each protected mail domain, set up a new domain by clicking on Create Domain .
Each new domain requires the following information:
Check the option Registered domain is an alias , if the configured domain is an alias of an existing domain that is already configured in the platform. In the Name field, specify the name of the protected domain (for example, “pandatest.ru”). Provide a contact email address to receive notifications for this domain (for example, notifications about the process of synchronizing users or when the domain reaches the maximum number of licenses available).
You can limit the maximum number of licenses that can be used by users of this domain.
In addition, you can choose the default language that will be used for the domain. All notifications for end users and the management console for users of this domain will be available in the specified language.
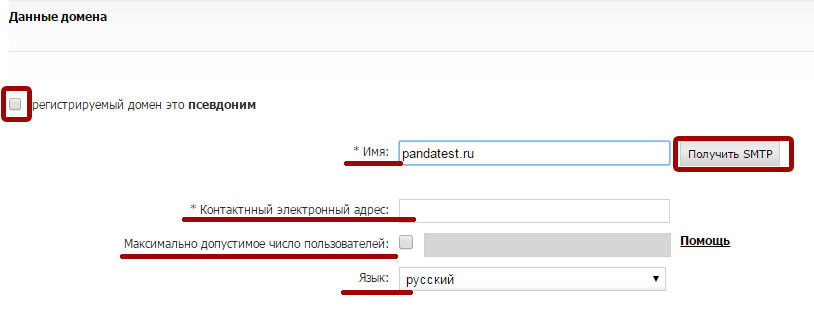
Then you need to configure the hostname or IP address where Panda Email Protection will deliver incoming emails after filtering them. This should be the current address where your email server is located. If you still have not redirected your MX records in DNS to Email Protection, use the Get SMTP button to automatically fill in the MX Host fields. Verify that this field indicates the current location of the mail server where the mailboxes to be protected are located.
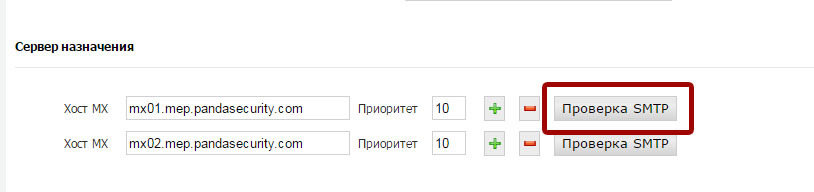
The platform allows you to set up multiple servers to which filtered messages will be delivered. Each of them can be configured with a different priority. Check that the Priority field contains a non-zero value, and also note that the MX host with the highest priority must have a minimum value.
After all the necessary MX hosts are configured correctly, click on SMTP Verification to verify that the platform can communicate with the specified MX hosts.
If there are problems with the connection, check that the Panda Email Protection data centers can establish an SMTP connection with your mail servers. Below are the ranges of IP-addresses of data centers:
188.94.13.128/25
92.54.22.0/24
92.54.27.0/24
Here you can either complete the configuration of the protected domain, or define a domain administrator . Using the provided registration data, the domain administrator will be able to log into the management console with his credentials to change the domain configuration settings:

After all the fields are configured, save the domain settings and go to the next step: setting up email addresses.
Mailbox Setup
Panda Email Protection requires you to configure each mailbox that must be protected by the platform. If you do not do this manually or in automatic authorization mode, Panda Email Protection will reject all incoming and / or outgoing emails if the solution processes incoming / outgoing mail of your organization .
There are two ways to configure protected mailboxes:
• Manually: An administrator manually registers each mailbox (or alias of postal addresses) separately. The administrator can also import a list of users (in .TXT or .CSV format).
• Automatic: The administrator must configure the protected domains using one of the available automatic registration procedures: SMTP or LDAP.
By the way, these methods are not mutually exclusive: the administrator can configure part of the boxes manually, and the rest - automatically. Both procedures can be used in parallel.
Manual user setup
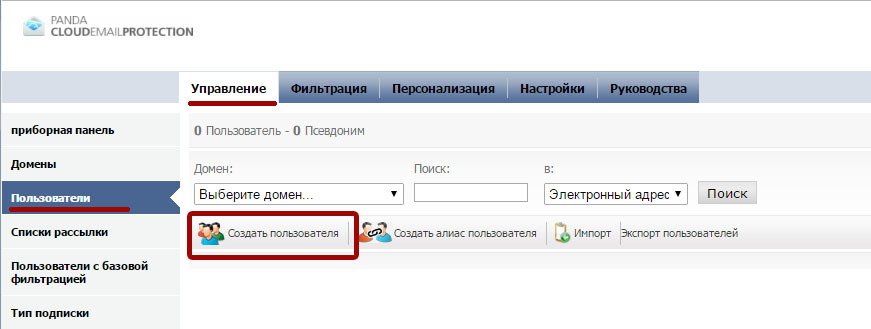
Mail addresses that must be protected by a solution can be added manually via the management console. Go to Manage → Users. This screen allows the administrator to create users with the primary mail address or alias of the mail address associated with the primary mailbox that already exists in the system.
To create a user with a primary email address, click Create user :
To create a new user in the system, the following minimum information is required:
• Domain : Select the domain that will contain the protected user's primary mailbox.
• Language : The default language. It will be used for management console and notifications for the user. By default, the system will select the language that was selected when creating the protected domain.
• First Name, Last Name : This information is used for administrative purposes when creating a list of users with their first and last names.
• User Login : The email address associated with the user in the protected domain. You only need to enter the name of the mailbox without the domain to which it belongs.
• Password : The system requires each user to have a password to access the user management console.
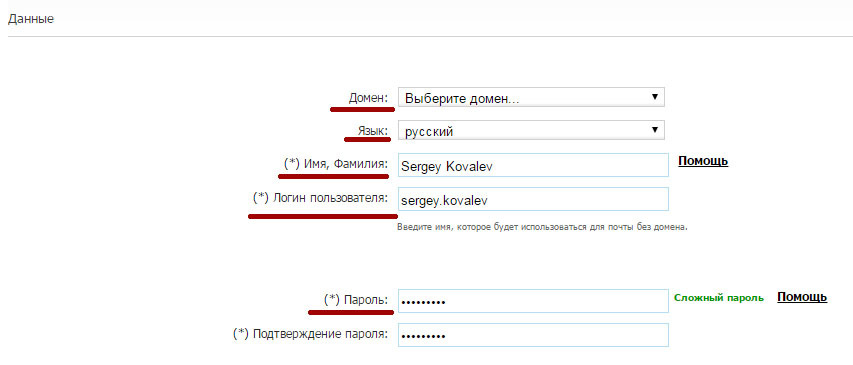
In the example above, we registered the following mailbox, which should be protected by the platform: “sergey.kovalev@pandatest.ru”. After you have specified all data of the protected user, save the settings.
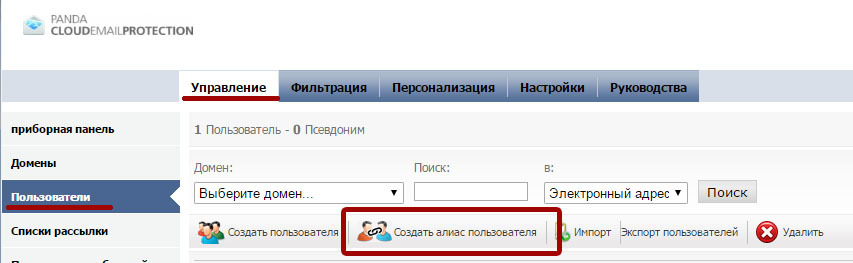
To configure the alias of the mailing address associated with the primary mailbox, go to Manage → Users and click Create User Alias .
To create a user alias, the following information is required:
• Domain in which the nickname will be created : The domain on which the alias of the mailing address is located. It should not be the same as the domain where the primary email address is located.
• Primary Domain : The domain containing the primary email address with which you want to associate the alias of the postal address to be created.
• Nickname : The name of the alias of the postal address that must be protected by the solution, without the "@" and domain.
• Primary account : Select the name of an existing primary mail account.
After you have entered all the alias data, save the settings.
Import mailboxes from the list
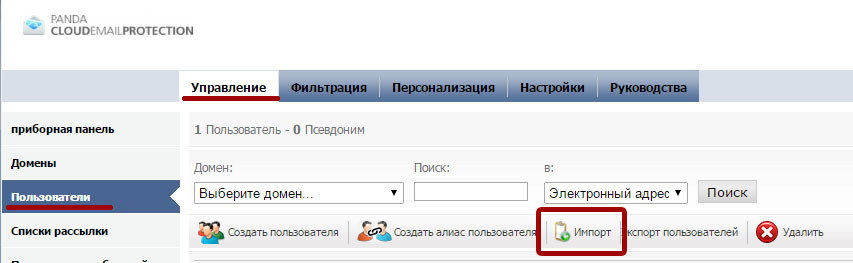
Email Protection allows an administrator to manually import a list of users from a file. To do this, go to Manage → Users → Import .
Before importing the list, prepare a file containing the names of the mailboxes (and aliases) that Email Protection should protect. The file to be imported must be in the form of a .CSV or .TXT file in the following format:
• Full name, email address, password
• Name, email address
• Name, e-mail address, password, comma-separated list of mail address aliases.
Password and comma separated list of aliases are optional. If there is no password, Email Protection will generate a random password during the import of users. Please note the following tips when creating complex passwords for users:
• Use uppercase and uppercase letters from “a” to “z”. Use numbers from 0 to 9
• Characters allowed: _. -
• Length: 8 to 64 characters.
The email address included in the imported file must be in any of the following two formats:
• including the domain to which the mailbox belongs:
Michael Perk, mperk@example.com, aras249gt
Anthony Perkins, aperkins@example.com, 32kios5d
Anthony Perkins, aperkins@example.com, aperkins.alias1@example.com, aperkins.alias2@example.com
• not including the domain to which the mailbox belongs:
Michael Perk, mperk, aras249gt
Anthony Perkins, aperkins, 32kios5d
Anthony Perkins, aperkins, aperkins.alias1, aperkins.alias2
It is very important to correctly import the file depending on whether the imported mailbox list contains a domain or not. If the domain is present in the file, then you must leave the Domain: field empty in the import menu. Otherwise the import will fail.
Given the previous points, select the file to import and click Import . The import process does not occur immediately. It may take several minutes depending on the number of users being imported. Email Protection will inform the account administrator about the results of the import process by email.
Automatic user registration via SMTP
Email Protection can be configured to automatically register users using the SMTP protocol. This automatic mechanism allows you to automatically initialize users who are not yet represented in the system at the time of processing the first message addressed to the protected mailbox.
Automatic user registration via SMTP is configured by domain. Go to Manage → Subscription type and select SMTP as shown in the picture:
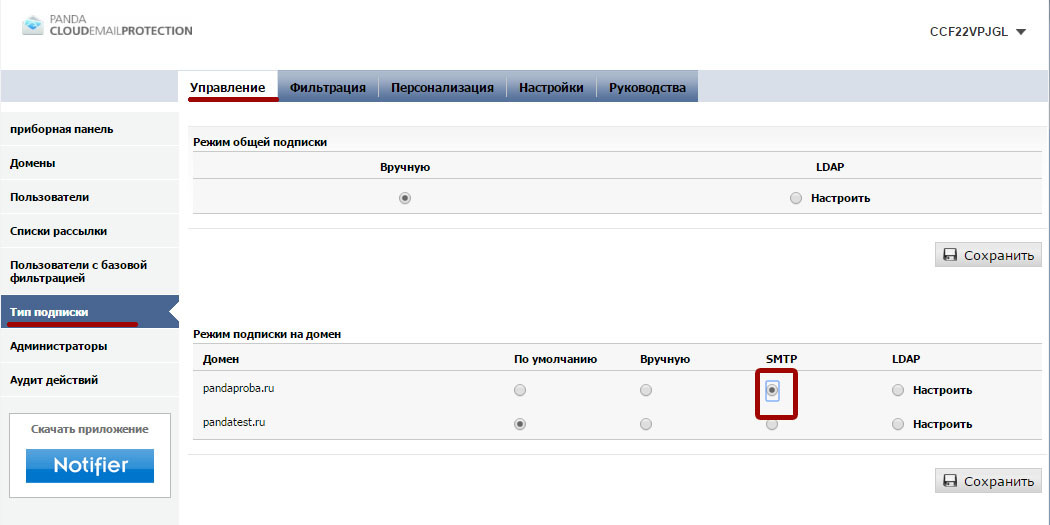
Then save the settings. After saving the settings, the system will ask the administrator to specify the email address of an existing user in the domain that you want to protect.
This is needed to verify that the email server is valid for automatic user registration via SMTP. If the check fails, your mail server is not suitable for automatic user registration.
As a rule, this is due to the fact that the mail server is not able to reject mail addresses from non-existent users in the organization. In Microsoft Exchange, this feature is known as “Recipient Validation” and must be enabled for automatic registration to work.
If this check fails, Email Protection will not allow you to configure automatic user registration via SMTP.
After setting up automatic registration via SMTP, the system will automatically initialize a new user when he receives the first message in Email Protection.
One important point to consider when you enable automatic registration via SMTP: all email addresses in your organization (it doesn’t matter if they are primary mailboxes or email address aliases) will be added to Email Protection as a primary mailbox. This is an important aspect when calculating the required number of licenses for an organization. If your organization actively uses mailbox aliases, then we advise you to enable automatic registration via LDAP, as well as detection of aliases.
Automatic user registration via LDAP (Active Directory)
The other automatic registration mechanism provided by the platform is the use of LDAP queries to the directory service in your organization. This is the recommended registration mechanism for medium and large organizations.
The main difference between auto-registration via SMTP and LDAP is that LDAP initialization allows you to detect mailbox aliases and automatically link them to main mailboxes.
Automatic registration through LDAP can be enabled globally or for each domain. We recommend that you configure it globally if all the domains protected by the solution are governed by the same domain controller or LDAP directory service. Set up automatic LDAP registration for each domain if your organization has an independent directory server for each domain.
Minimum requirements for setting up automatic registration through LDAP:
• Panda Security cloud servers must be able to connect to your directory service (Active Directory / Lotus / LDAP) at a public IP address or using a fully-qualified domain name available on the Internet.
• Panda Security's cloud servers will query your directory service using the LDAP or LDAPS protocols.
• Panda Security's cloud servers can make anonymous requests, although we recommend creating a dedicated user to perform LDAP requests.
• The ranges of IP addresses from which we will send requests to your directory service:
188.94.13.128/25
92.54.22.0/24
92.54.27.0/24
When integrating automatic registration via LDAP with Active Directory, you need to create a user who belongs to the Domain Users group with your registration data. Perform the following steps in your organization’s primary domain controller to create this user:
1. Create a user belonging to the Domain Users group.
2. The password assigned to the user may contain only letters, numbers and symbols "_" and "-". Please do not use other characters.
3. Indicate that the password cannot be changed by the user and its validity never ends.
After you have created a user, you must get the path to the unique name (Distinguished Name) of the user. To do this, open a window with the command line in your domain controller and run the following command:
dsquery.exe user –name [USER]
Example: If the user you created for LDAP queries was named “panda”, then the command to run and its output will be as follows:
dsquery.exe user –name pandaCN = panda, CN = Computers, DC = dctest, DC = local
The user for requests that must be configured in the management console will be the same as returned by the previous command:
'CN = panda, CN = Computers, DC = dctest, DC = local'
After you have received a unique name (Distinguished Name) of a user, set up automatic registration via LDAP in the Administration -> Subscription type -> LDAP [Configure] section.
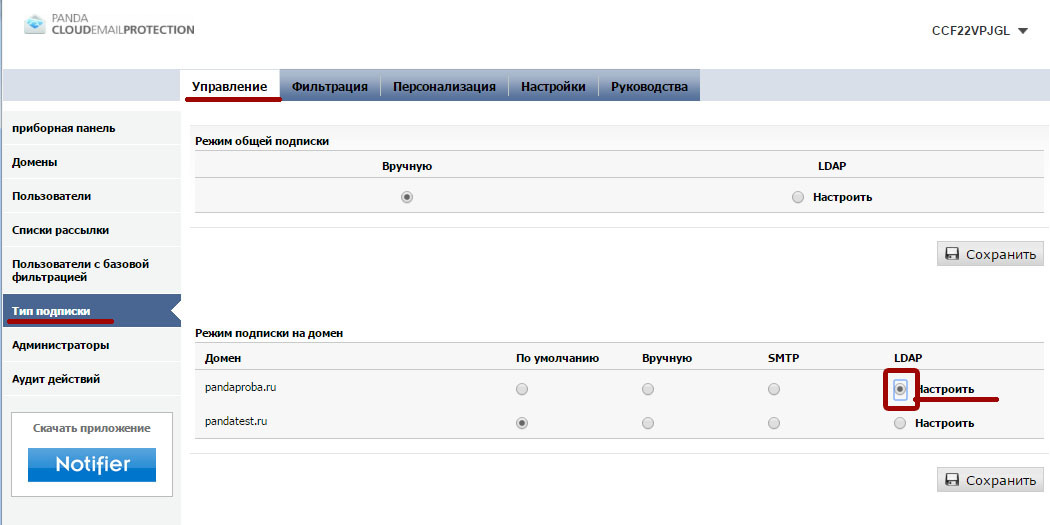
The following section describes the most common parameters used when setting up automatic registration via LDAP using Microsoft Active Directory:
LDAP server
• Active Directory. If you have another directory service, enter it here.

Compound
• Host : The IP address of the service or FQDN to be able to connect to your domain controller. Please note that this IP / FQDN must be accessible from the Panda cloud servers.
• Port : 389 (default).
• Anonymous Connection : [Not checked] Microsoft Active Directory does not allow anonymous connections. This option should remain unchecked.
• Username : A valid CN path must be entered here. Enter the CN path returned by the “dsquery.exe” command running on the domain controller: CN = panda, CN = Computers, DC = dctest, DC = local
• Password : Specify the password assigned to the user that was created for LDAP queries.

After all the data has been entered correctly, click the Check button. The system will check whether the Panda Security cloud servers can connect to the specified host and port, as well as the specified registration data. If an error occurs, please check again whether the connection from the Panda Security cloud servers to your infrastructure is permitted and whether the user credentials are correct.
Search capabilities
• Primary unique name: The starting point in the LDAP tree, from which Email Protection will “look” at the users in your organization.
It is recommended to set the starting point as close as possible to the root of the organization tree so that the solution can find all users regardless of the organizational unit in which they are configured. The primary unique name can be obtained from the user's CN created for LDAP queries. When configuring Active Directory, as a rule, it coincides with the part of the user's CN that starts with DC. In our example, this would be: DC = dctest, DC = local
• Level: Select this option if all users in your organization are located at the point where you are searching.
• Subtree: Select this option to search for users at this level and all other levels specified above in the LDAP structure. It is recommended to select this option when the Primary unique name has been configured close to the root of the tree.
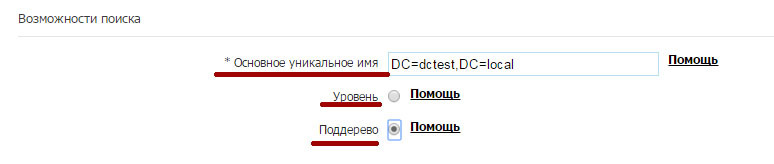
In our example, it is necessary to use the Subtree option in order to be able to search for users at the levels above the selected path.
Search username
These values will be populated automatically when you select the type of directory service used in your organization (Active Directory / Open LDAP / Lotus Domino). If you have configured Active Directory, you usually need to select the Attribute option that contains the email address.
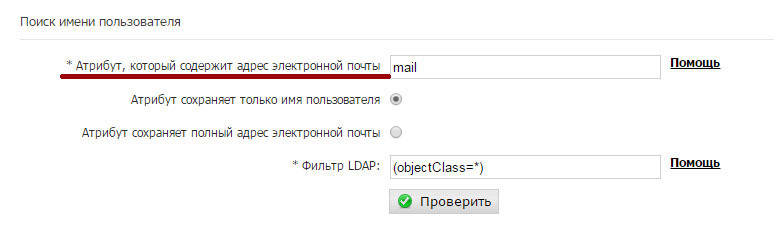
Then click the Check button to verify the settings for the directory service. The administrator will be asked to enter a valid primary email address for your organization (not an email address alias!), And the system will check if it can find it upon request to check the current settings.
If the specified email address is not found during verification, please check again the configuration specified in this section with your domain administrator. The scheme used in your organization may differ from the examples used here.
Search aliases
This feature makes automatic user registration via LDAP much more attractive than when using SMTP. We strongly recommend that you enable this option if you configured registration via LDAP.
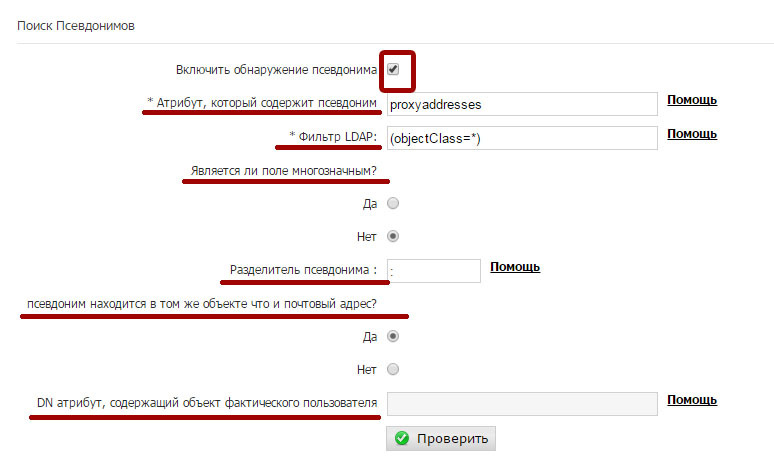
• Attribute that contains the alias : proxyAddresses. Most Active Directory + Exchange installations will use this attribute (proxyAddresses) to specify the alias of this user's email address.
• LDAP filter : (objectclass = *). You can specify various filter options here to get only the required information.
• Is the field multi-valued? Not
• Alias delimiter : Enter ':'
• Is the alias in the same object as the postal address? Yes
These values are usual for the standard Active directory scheme. After you have configured this section, you should check the settings using the "Check" button. Enter a valid email alias for your organization. The system should return the corresponding primary email address for the alias. The following figure shows how to configure this section, as well as the result of the check:
If the check did not return the primary email address associated with the specified alias of the mailing address, please check the values in this section again, along with your domain administrator, since Your corporate layout may differ from the standard layout provided with Microsoft products.
User data recovery
In this section, you can specify which attributes within your directory scheme contain the full user names in order to make it easier to determine during automatic registration in the system. A typical configuration for Microsoft Active Directory is as follows:
• Attribute that contains the user's last name : displayName
• Keeps first and last name together : Selected.
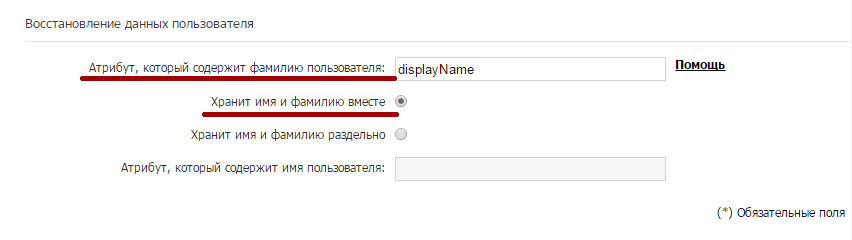
After specifying all the necessary information, save the settings.
Pay attention to the following points when specifying the necessary information to configure the registration mode via LDAP.
You must make the following settings:
• Verify that the connection to your domain controller is correct.
• Check that Email Protection is able to find users on your directory server (section Search for a username).
• If the Enable alias detection option is enabled, verify that Email Protection is able to return the primary email address by email alias.
If an error occurs during any of the previous checks, then save the configuration and return to the appropriate section later to reconfigure the options after checking the values with your Domain Administrator.
The example above corresponds to the Active Directory directory service. The specific configuration can vary greatly depending on the scheme used in your organization, or if the default Microsoft Active Directory scheme has been changed.
Platform personalization
After completing the domain and user settings, the platform is ready to protect users belonging to the configured domains. The next step is related to the personalization of the platform itself using the Personalization menu. It is recommended to configure the following basic parameters:
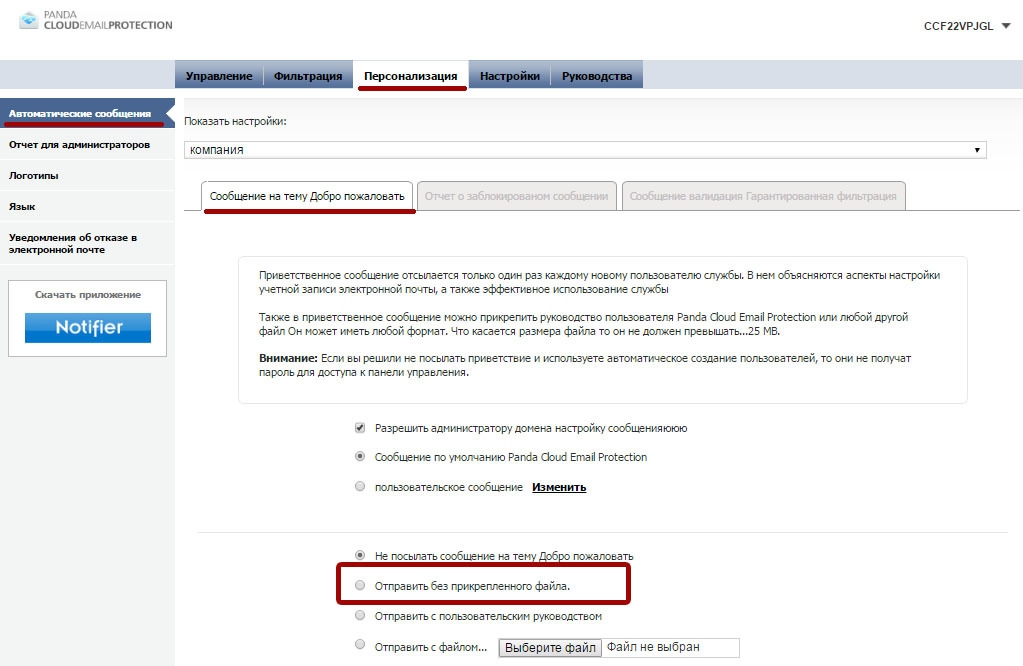
Post on topic Welcome
If you selected any of the available auto-registration modes (SMTP or LDAP), you can configure the platform to send invitation letters to automatically registered users. This message will contain registration data that will allow the user to access their user console. If you want your users to know that there is a control panel where they can manage their email filtering options and access spam messages stored in the system quarantine, then enable the corresponding option (it is disabled by default) .
Logos
The administrator can upload its logo, which will be included in all system notifications for users who are protected by this solution, as well as in the user management console. To do this, go to Personalization -> Logos .
Note that all personalization settings can be performed globally or for each domain separately. The level at which the personalization options will be applied can be selected using the “Show Settings” option at the top of the page.
Configuring your DNS server's MX records
After all previous steps have been completed, the platform will be ready to protect incoming emails destined for your organization. To integrate Email Protection into the email delivery system in your organization, modify the MX records of the protected domains to point to the following service hosts:
mx01.mep.pandasecurity.com mx02.mep.pandasecurity.com
The MX records listed here may vary depending on your configuration. Check your current MX-records of the service, for which go to the Guides -> Information about the settings . Check this section before making any changes to the DNS.
We advise you to specify the same priority (for example, “10”) for both MX records to achieve load balancing within the Email Protection platform.
Please note that Panda Security does not have access to your MX records. This task should be performed by you, because DNS records are available only to you.
After making the appropriate changes, Email Protection will begin to process incoming emails destined for your organization, blocking spam messages and delivering only “clean” emails to your mail servers.
Advanced Security Settings (Firewall)
Once the MX records of the domains protected by this solution have been changed, you can restrict the delivery of incoming emails to email servers protected by Email Protection, allowing the delivery of incoming emails only from a specific range of IP addresses belonging to the cloud-based Panda Security servers. The following are the ranges of IP addresses from which incoming mail is delivered to your organization:
188.94.13.128/25
92.54.22.0/24
92.54.27.0/24
Setting up outbound email filtering
Email Protection can also be configured to filter outgoing mail sent from your organization to the Internet. This step is optional. Outgoing mail filtering does not depend on incoming mail filtering. However, for outgoing mail filtering to work correctly, you must correctly configure incoming mail filtering (domains and users must be correctly configured in Email Protection).
To configure outgoing mail filtering via Email Protection, you need to define a “Smart Host” on your company's mail server so that all outgoing messages are delivered to the Panda Security cloud. Email Protection will filter your outgoing messages by sending only “clean” mail to the recipient's mail server.
When setting up “Smart Host” use the following hostname of the service:
smtp.mep.pandasecurity.com
The steps for configuring the host of the service used to send outgoing mail may vary depending on your configuration. The used Smart Host is specified in the management console (Guides -> Settings Information). Please check this section before making any changes to your email service.
SMTP session with your Smart Host must be configured as an Authenticated SMTP session. Use the same credentials (user and password) that were provided to you for access to the management console: mep.pandasecurity.com/admin .
Configure SPF records in your DNS
Regardless of whether you configured outgoing mail filtering or configured only incoming email filtering in Email Protection, we recommend that you change the SPF records of your domains to include the IP address ranges of our data centers. Do this if your outgoing traffic is filtered through the Panda Email Protection solution. Thus, you will be able to prevent situations when the recipient's mail servers will refuse to deliver letters coming from Panda Security's cloud servers. To do this, add the following ranges of IP addresses to your SPF records:
ip4: 188.94.13.128/25
ip4: 92.54.22.0/24
ip4: 92.54.27.0/24
An example of a domain-related SPF record:
"V = spf1 ip4: 188.94.13.128/25 ip4: 92.54.22.0/24 ip4: 92.54.27.0/24 ip4: [OTHER CUSTOMER IP ADDRESSES] ~ all"
We recommend that you add the Panda Security cloud server IP addresses to your current SPF records in your DNS.
Conclusion
So, after completing all the above actions, you can pre-set your account and redirect mail through the Panda Security servers. And the default Email Protection options allow you to immediately start filtering mail. Well, after that, the most interesting thing comes when you, having unique “execute or pardon” rights, can configure all the necessary filtering options to obtain the optimal level of corporate email security.
Email Protection to help you!
PS If you want to get free access to the service within a month, fill in the form on the website or send this information to the address .
Source: https://habr.com/ru/post/315286/
All Articles