Configure the Sharepoint Application Environment (SharePoint Add-ins)
The SharePoint application environment is a convenient and modern approach to adding functionality to SharePoint sites.
To enable, you will need:
• English language pack for SharePoint
• Certificate to support HTTPS
')
To enable the application environment in SharePoint. We will need to perform the following actions: (you can also customize by reference , but there are no very important facts).
1. Create DNS records for applications. Be sure to use a 4th level domain. This will provide an opportunity to avoid re-authorizing users for the application. Example created by CNAME: * .sharepoint.contoso.com
2. Order a wildcard certificate * .sharepoint.contoso.com with an external firm that supports the protection of the sharepoint.contoso.com domain. Be sure to use your domain!
There is one digression: In windows server 2016 IIS 10, the opportunity to make separate wildcard bindings has appeared. So if you already have a wildcard certificate for * .contoso.com, you can buy a wildcard certificate only to protect * .sharepoint.contoso.com it will be cheaper.
3. In Central Administration, we will start the services on the server to service the SharePoint applications:

4. Set up the necessary services for the application environment in SharePoint PowerShell:
- a. Subscription Settings service:
b. App Management service
5. To configure the auto-generated application link:
- a. go to the application section in central administration.

- b. Indicate the following (your) indicators

6. For the full operation of applications downloaded from the Internet, make sure that:
- a. Install English language pack
- b. Turn English on

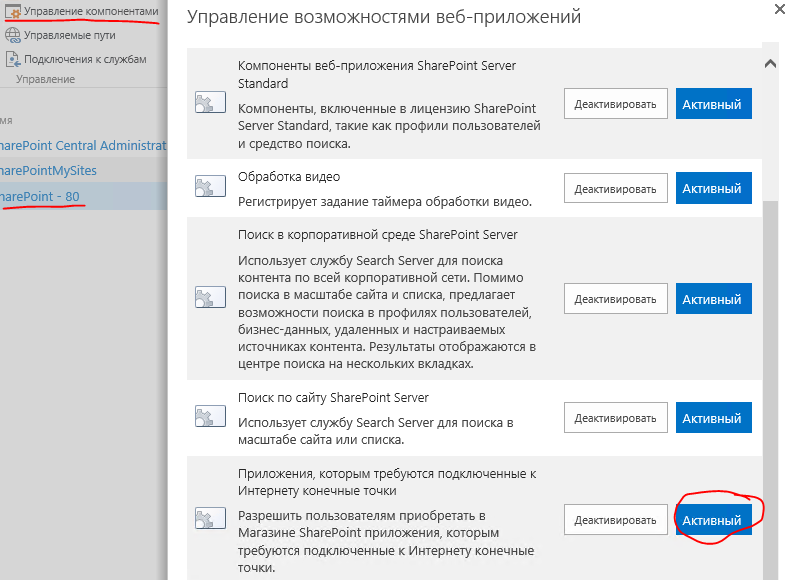
- c. Activate the Internet Endpoint Access Component in Central Administration.
7. Add the first application to install by users:
- a. Access the central administration tab of the application.
- b. Click on the "Buy Applications" link.
- c. After a few seconds, an application catalog will appear from the Internet.
If you have a proxy server, you may need additional settings.
Described in this article .
- d. Click on the app and click add and then confirm. At the end you will see the inscription: "You have received this application for all users in the organization."
- e. Now the application can be added to the custom site. It will appear in the site content when you click the add application button, among the standard ones shipped with SharePoint.
- f. Please note that the SharePoint server access to the Internet is very important, since all operations with applications take place via the Internet. Even at the time of the final installation on the sites of users, the application file is downloaded from the Internet (every time).
- g. It is also now possible to post your developed applications on the SharePoint portal
To enable, you will need:
• English language pack for SharePoint
• Certificate to support HTTPS
')
To enable the application environment in SharePoint. We will need to perform the following actions: (you can also customize by reference , but there are no very important facts).
1. Create DNS records for applications. Be sure to use a 4th level domain. This will provide an opportunity to avoid re-authorizing users for the application. Example created by CNAME: * .sharepoint.contoso.com
2. Order a wildcard certificate * .sharepoint.contoso.com with an external firm that supports the protection of the sharepoint.contoso.com domain. Be sure to use your domain!
There is one digression: In windows server 2016 IIS 10, the opportunity to make separate wildcard bindings has appeared. So if you already have a wildcard certificate for * .contoso.com, you can buy a wildcard certificate only to protect * .sharepoint.contoso.com it will be cheaper.
3. In Central Administration, we will start the services on the server to service the SharePoint applications:
4. Set up the necessary services for the application environment in SharePoint PowerShell:
- a. Subscription Settings service:
$account = Get-SPManagedAccount "contoso\spservice" # Sharepoint $appPoolSubSvc = New-SPServiceApplicationPool -Name SettingsServiceAppPool -Account $account # IIS $appSubSvc = New-SPSubscriptionSettingsServiceApplication -ApplicationPool $appPoolSubSvc -Name SettingsServiceApp -DatabaseName SP_SubscriptionSettingsService # Subscription Settings $proxySubSvc = New-SPSubscriptionSettingsServiceApplicationProxy -ServiceApplication $appSubSvc # Subscription Settings b. App Management service
$appPoolAppSvc = New-SPServiceApplicationPool -Name AppServiceAppPool -Account $account # IIS $appAppSvc = New-SPAppManagementServiceApplication -ApplicationPool $appPoolAppSvc -Name AppServiceApp -DatabaseName SP_AppManagementService # App Management $proxyAppSvc = New-SPAppManagementServiceApplicationProxy -ServiceApplication $appAppSvc # App Management 5. To configure the auto-generated application link:
- a. go to the application section in central administration.
- b. Indicate the following (your) indicators
6. For the full operation of applications downloaded from the Internet, make sure that:
- a. Install English language pack
- b. Turn English on
- c. Activate the Internet Endpoint Access Component in Central Administration.
7. Add the first application to install by users:
- a. Access the central administration tab of the application.
- b. Click on the "Buy Applications" link.
- c. After a few seconds, an application catalog will appear from the Internet.
If you have a proxy server, you may need additional settings.
Described in this article .
- d. Click on the app and click add and then confirm. At the end you will see the inscription: "You have received this application for all users in the organization."
- e. Now the application can be added to the custom site. It will appear in the site content when you click the add application button, among the standard ones shipped with SharePoint.
- f. Please note that the SharePoint server access to the Internet is very important, since all operations with applications take place via the Internet. Even at the time of the final installation on the sites of users, the application file is downloaded from the Internet (every time).
- g. It is also now possible to post your developed applications on the SharePoint portal
Source: https://habr.com/ru/post/315282/
All Articles