Texel density. Why and how to use it
This article is intended for 3d artists, technical artists, as well as all developers who are associated with 3D graphics, textures and technical tasks. In it, I will show how it can be useful to follow one texel, how to count it and what it can influence. The main actors are checker, models, textures, soap, UV and other joys of developing 3d content.

For a start, what is texel . Texel (an abbreviation for the two words "TEXture" and "ELement" - texture and element) - texture element, "point". The texture, in turn, is an array of texels. A texel can be a colored dot in an image. But, since a texture can be not only an image (a two-dimensional array of colored dots), but also other data arrays of various types and dimensions, texel, as a texture element, is a more general concept.
Texel density (texellation, texel (abbreviated as context) ) is a value that is the ratio of the texture size (in pixels) to the dimensions of the 3d model in the scene. Texel density characterizes the density, "quality" of the texture, in a general sense. Looks like this in the technical specifications: 256px / m, 128px / inch, and so on. Thus, texlexing determines what area of the texture will be given to the model based on its size. High texel density means greater texture detail, low - less, blurred texture.
Work with tekseleratsiey has the greatest value when working with the environment. This is due to the fact that occluded textures are more often used in the environment, texture atlases and individual objects are rarely distinguished on objects of the environment (for propses, perhaps). For example, for characters, absolute texceleration is not so important, because In general, all characters have similar physical dimensions. In the terms of reference for the character it may well be this: use 2 textures, 2048 * 2048 for the body, 1024 * 1024 for the head, and the artist's task is to squeeze the maximum texel, correctly making the UV scan. For elements of the environment, usually indicate absolute texel (for example, 256px / m), since they vary greatly in size (wall of the house, car, road, mailbox).
')
The division is conditional, but I think it will be useful to emphasize this. There is a relative texceleration (within the same model) and absolute - within the entire game / scene.
Relative texlexing must meet the following requirements:
Uniform texel density throughout the model (a slight increase in texel on small UV parts is allowed) There are a number of exceptions to this rule: important details should take up more space on the scan (and on the texture), for example, the character's face should have greater texel density. Those parts that are not visible or poorly visible should have a smaller texel (for example, the bottom of the car, the soles of the shoes of the character).
Maximum possible tekseleratsiya on unique models. This is a general quality requirement mentioned above.
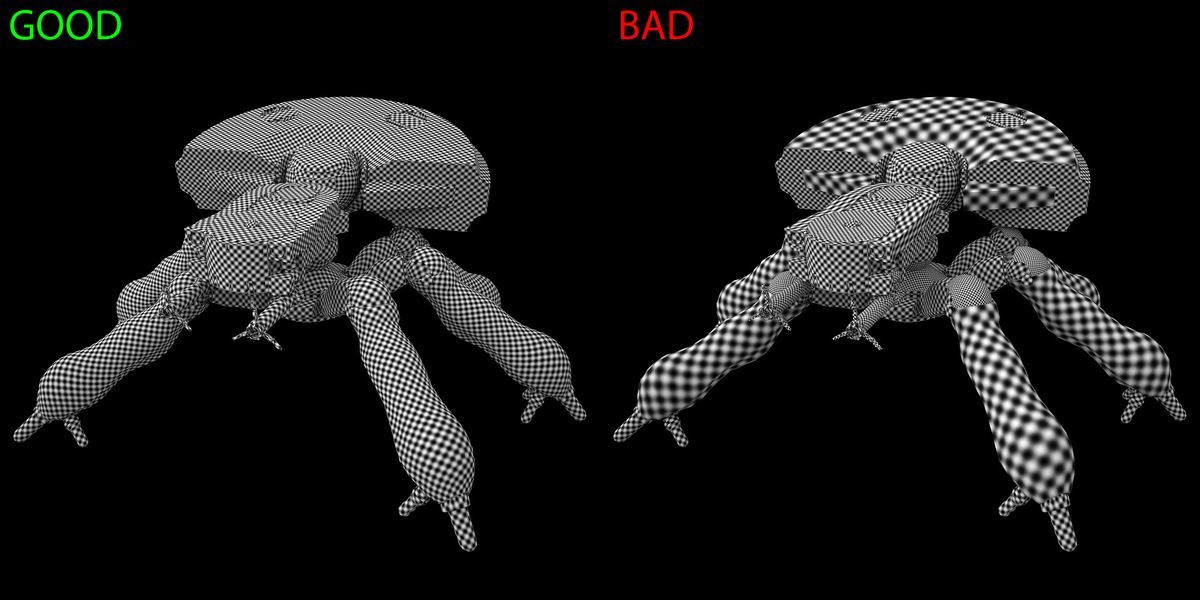
An example of good and bad texlation (Source: quixel.se/tutorial/uv-mapping-for-the-suite )

An example of an exception. Pay attention to the difference between the clarity of the texture on the face and clothing - and rightly so, because player attention is more directed to the face, not to clothes. (Source: Fallout 4)
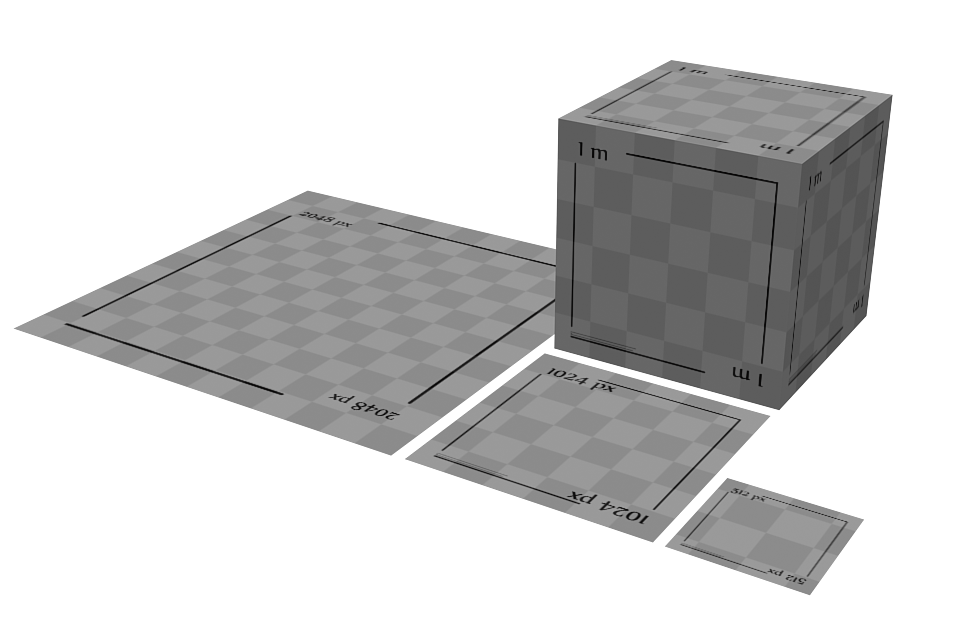
Texel is calculated very simply: you need to know the size of the geometry and the resolution of the texture, and then divide the resolution of the texture by the size of the geometry.

Look at the illustration. Here is a cube with dimensions of 1 m * 1 m and planes of different sizes. A texture of 1024 * 1024 pixels is applied to all objects, respectively, we have the following texel density for objects, from left to right: 512px / m, 1024px / m, 2048px / m. Only one texture is used, but the objects are different in size and, therefore, we get different texel density.
Also, 3d artists use various scripts and tools to calculate texel density. In addition to the counting method shown above (i.e. creating a special reference texture and manually fitting “under the squares”), there are a number of scripts for measuring and setting the required texel density:
3ds max
Advanced uv normalizer
Textools
Maya
Nightshade uv
UV Deluxe
Blender
UPD: Texel Density Checker:
mrven.ru/2017/03/update-my-blender-add-on-texel-density-checker-1-0-1
1. Editing UV, using tiles

From left to right: increased UV scan by half, unchanged, reduced by 2 times. Thus, in the illustration, all objects have one texel density equal to 1024px / m.
2. Resizing textures
For a large object, a large texture is used, for a smaller one, a smaller one.
3. Resizing an object. Yes, in this way it is possible to affect texel density, but in practice no one will make the car less than twice just because texel density does not have enough texture density?
1. Start with the right sizes.
In the engine, in the editor, you should set the reference scale and units of measurement. This should be done at the very beginning of development and stick to the end.
2. In the documentation, try to determine the importance of assets and, accordingly, the quality of the textures for them. Assets of the first plan (for example, weapons, hands in FPS, character in TPS, near the eyes of VR applications), items important for gameplay (for example, armor in Fallout 4, workbench, HL2 first-aid kit on the wall, etc.), objects of the environment and items far off. It does not hurt to make the tests directly in the engine with the reference textures, to estimate how it will look. For each type of asset, you can use your own texel density.
3. Continue to follow these values and, when setting the task, indicate them in the TOR.
Following one texel density for items of similar plans and one importance will make it possible to make the art of the game more solid, individual elements in the style of “You are not drawn well, you will be killed soon” will not fall out of it. Also, when using this approach, it will be less likely to spend resources inefficiently (in the driver simulator, on texture crutches of the canvas rail use textures of 1024 * 1024, for example).
4. While I was writing a draft Leonardo Iezzi did an excellent lesson on texel density. Be sure to read the Leonardo article if this topic is interesting.
0. What is texel density.
For a start, what is texel . Texel (an abbreviation for the two words "TEXture" and "ELement" - texture and element) - texture element, "point". The texture, in turn, is an array of texels. A texel can be a colored dot in an image. But, since a texture can be not only an image (a two-dimensional array of colored dots), but also other data arrays of various types and dimensions, texel, as a texture element, is a more general concept.
Texel density (texellation, texel (abbreviated as context) ) is a value that is the ratio of the texture size (in pixels) to the dimensions of the 3d model in the scene. Texel density characterizes the density, "quality" of the texture, in a general sense. Looks like this in the technical specifications: 256px / m, 128px / inch, and so on. Thus, texlexing determines what area of the texture will be given to the model based on its size. High texel density means greater texture detail, low - less, blurred texture.
1. Applicability texel density.
Work with tekseleratsiey has the greatest value when working with the environment. This is due to the fact that occluded textures are more often used in the environment, texture atlases and individual objects are rarely distinguished on objects of the environment (for propses, perhaps). For example, for characters, absolute texceleration is not so important, because In general, all characters have similar physical dimensions. In the terms of reference for the character it may well be this: use 2 textures, 2048 * 2048 for the body, 1024 * 1024 for the head, and the artist's task is to squeeze the maximum texel, correctly making the UV scan. For elements of the environment, usually indicate absolute texel (for example, 256px / m), since they vary greatly in size (wall of the house, car, road, mailbox).
')
2. Relative and absolute texseleration
The division is conditional, but I think it will be useful to emphasize this. There is a relative texceleration (within the same model) and absolute - within the entire game / scene.
Relative texlexing must meet the following requirements:
Uniform texel density throughout the model (a slight increase in texel on small UV parts is allowed) There are a number of exceptions to this rule: important details should take up more space on the scan (and on the texture), for example, the character's face should have greater texel density. Those parts that are not visible or poorly visible should have a smaller texel (for example, the bottom of the car, the soles of the shoes of the character).
Maximum possible tekseleratsiya on unique models. This is a general quality requirement mentioned above.
An example of good and bad texlation (Source: quixel.se/tutorial/uv-mapping-for-the-suite )
An example of an exception. Pay attention to the difference between the clarity of the texture on the face and clothing - and rightly so, because player attention is more directed to the face, not to clothes. (Source: Fallout 4)
3. How texel density is calculated
Texel is calculated very simply: you need to know the size of the geometry and the resolution of the texture, and then divide the resolution of the texture by the size of the geometry.
Look at the illustration. Here is a cube with dimensions of 1 m * 1 m and planes of different sizes. A texture of 1024 * 1024 pixels is applied to all objects, respectively, we have the following texel density for objects, from left to right: 512px / m, 1024px / m, 2048px / m. Only one texture is used, but the objects are different in size and, therefore, we get different texel density.
Also, 3d artists use various scripts and tools to calculate texel density. In addition to the counting method shown above (i.e. creating a special reference texture and manually fitting “under the squares”), there are a number of scripts for measuring and setting the required texel density:
3ds max
Advanced uv normalizer
Textools
Maya
Nightshade uv
UV Deluxe
Blender
UPD: Texel Density Checker:
mrven.ru/2017/03/update-my-blender-add-on-texel-density-checker-1-0-1
4. How can the assets be reduced to the same density?
1. Editing UV, using tiles
From left to right: increased UV scan by half, unchanged, reduced by 2 times. Thus, in the illustration, all objects have one texel density equal to 1024px / m.
2. Resizing textures
For a large object, a large texture is used, for a smaller one, a smaller one.
3. Resizing an object. Yes, in this way it is possible to affect texel density, but in practice no one will make the car less than twice just because texel density does not have enough texture density?
5. How to use texel density, conclusions and useful tips
1. Start with the right sizes.
In the engine, in the editor, you should set the reference scale and units of measurement. This should be done at the very beginning of development and stick to the end.
2. In the documentation, try to determine the importance of assets and, accordingly, the quality of the textures for them. Assets of the first plan (for example, weapons, hands in FPS, character in TPS, near the eyes of VR applications), items important for gameplay (for example, armor in Fallout 4, workbench, HL2 first-aid kit on the wall, etc.), objects of the environment and items far off. It does not hurt to make the tests directly in the engine with the reference textures, to estimate how it will look. For each type of asset, you can use your own texel density.
3. Continue to follow these values and, when setting the task, indicate them in the TOR.
Following one texel density for items of similar plans and one importance will make it possible to make the art of the game more solid, individual elements in the style of “You are not drawn well, you will be killed soon” will not fall out of it. Also, when using this approach, it will be less likely to spend resources inefficiently (in the driver simulator, on texture crutches of the canvas rail use textures of 1024 * 1024, for example).
4. While I was writing a draft Leonardo Iezzi did an excellent lesson on texel density. Be sure to read the Leonardo article if this topic is interesting.
Source: https://habr.com/ru/post/315146/
All Articles