Installing PROXMOX 4.3 on Soft-RAID 10 GPT
Good afternoon friends. Today I would like to share my personal experience in setting up Proxmox on soft-Raid 10.
What we have:
What we want:
What we do - the general plan of action:
Under the cut stage of the quest.
And now in stages.
First moment:
I connected the USB flash drive - if in brief - the installation disk was not found. I can not mount.
')
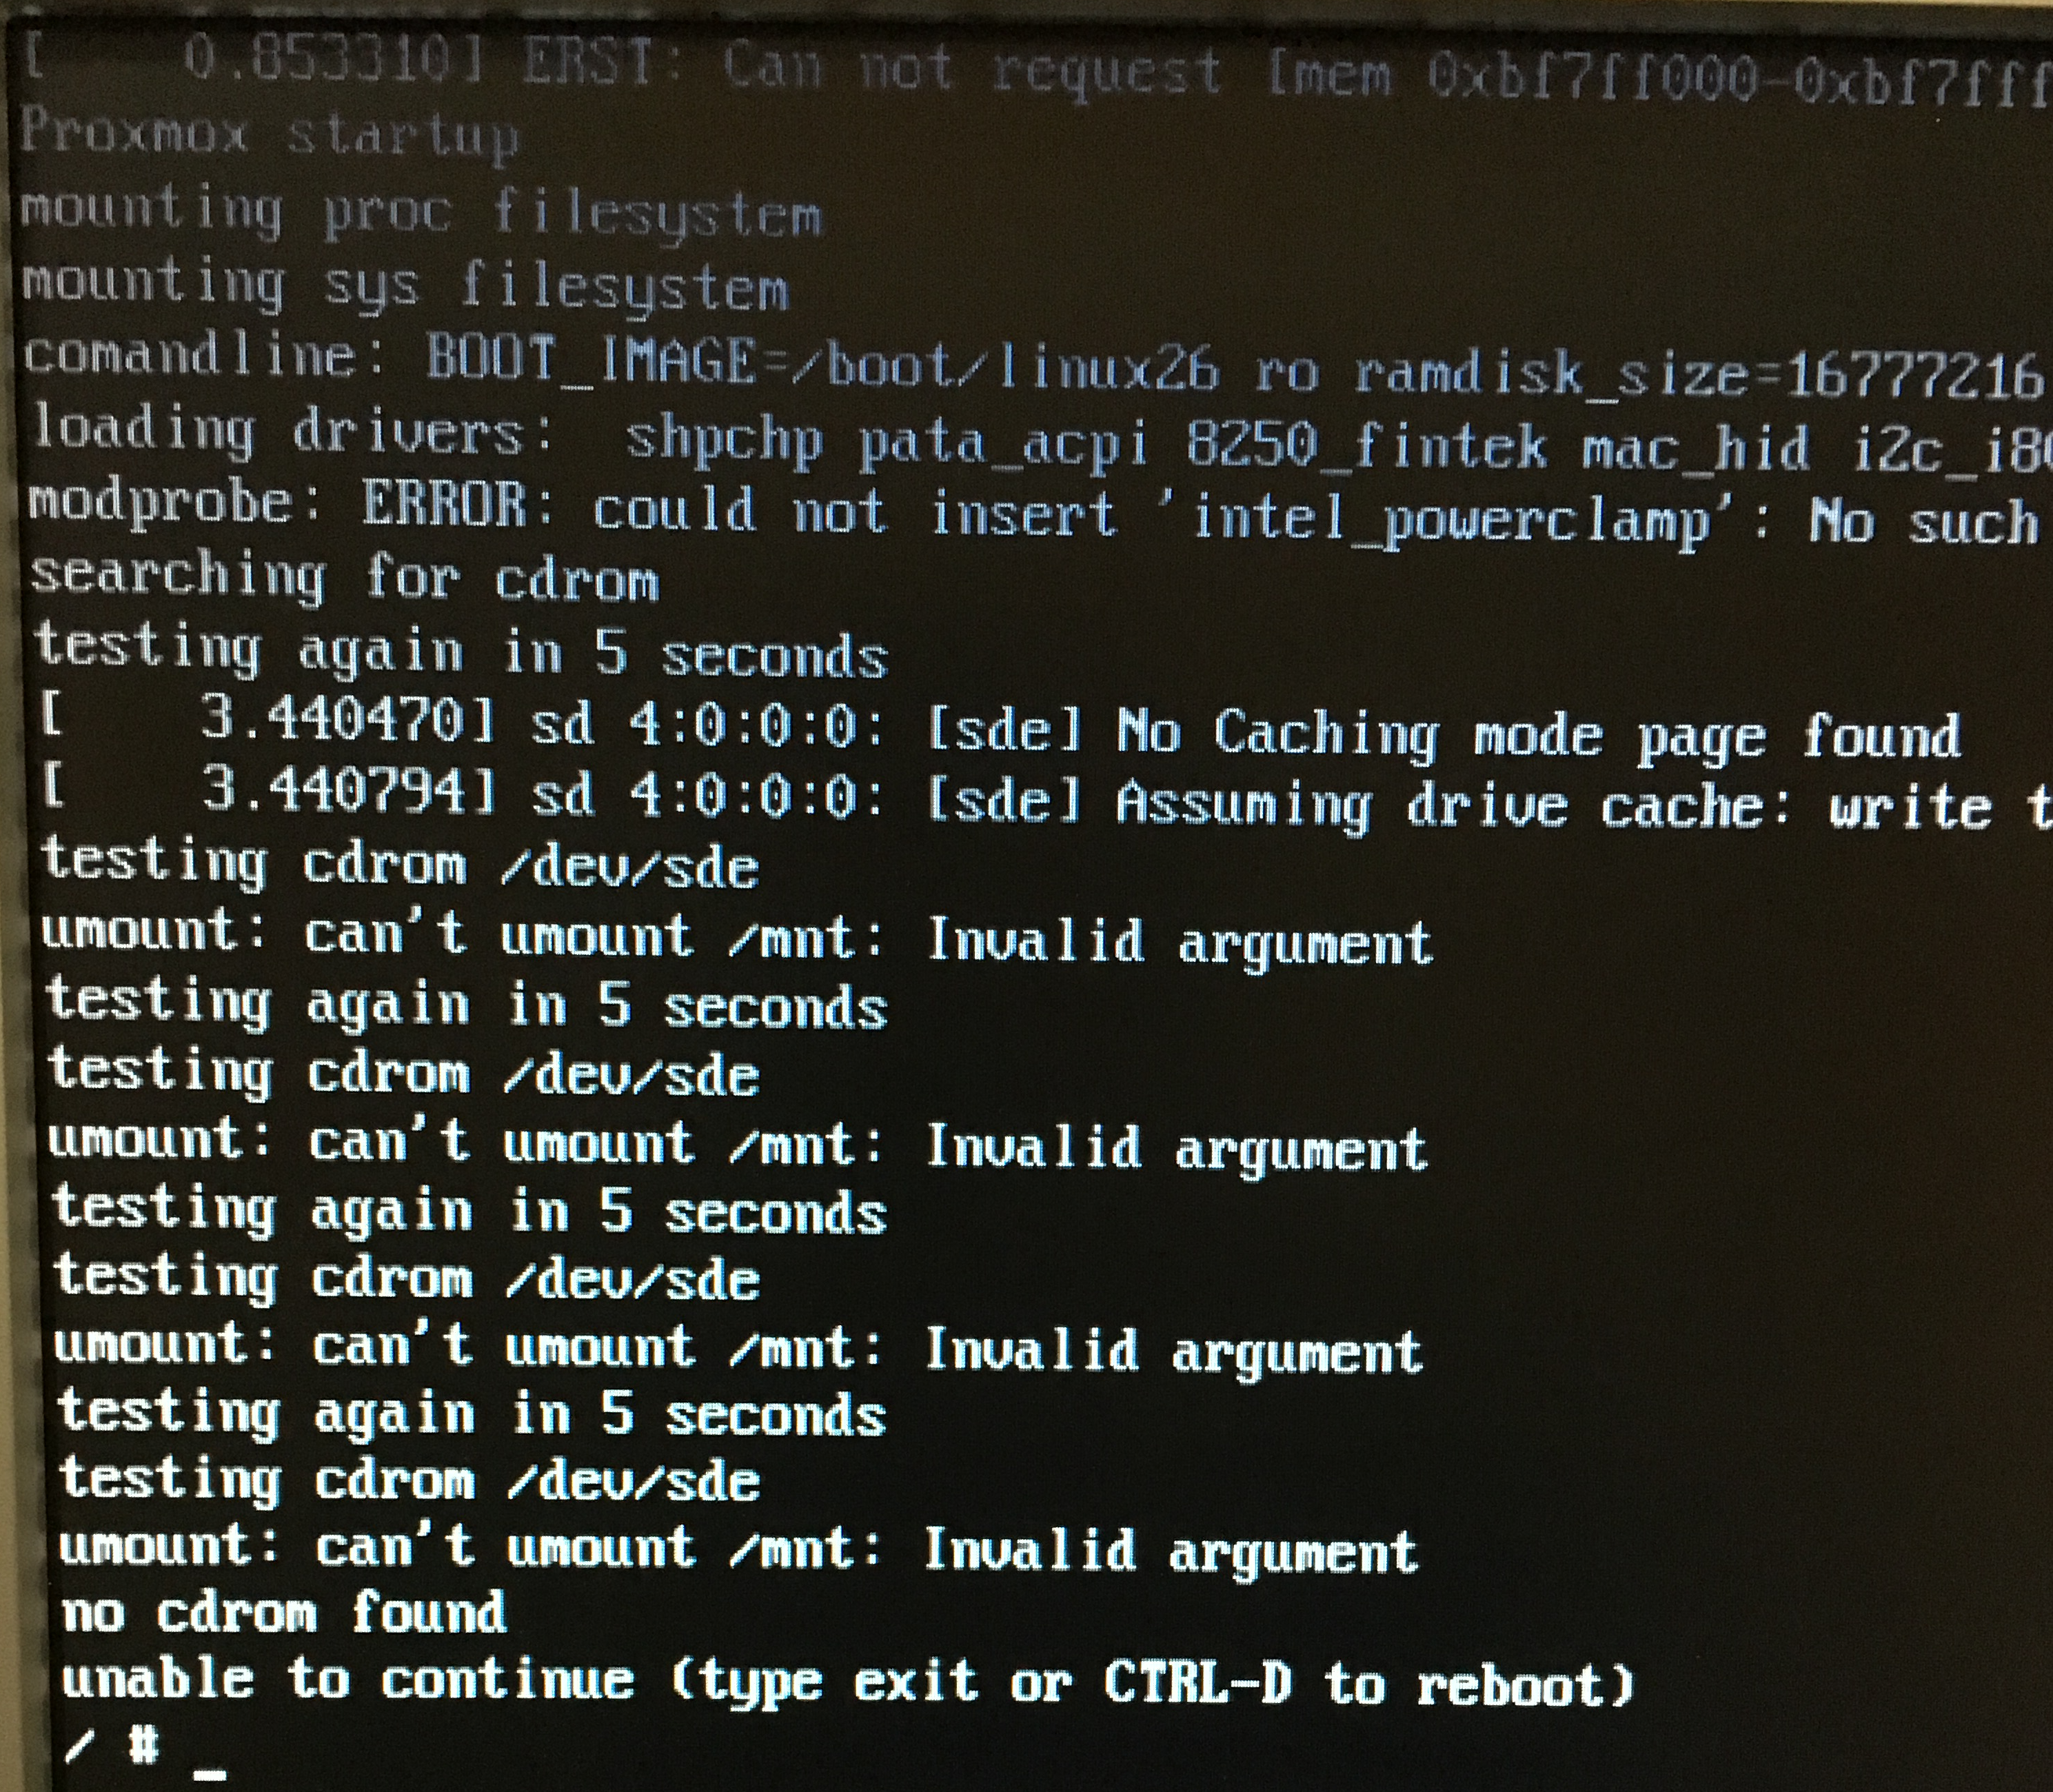
I did not understand what yes how, yes why. I recorded the image on a CD and connected a USB CDROM (since it was near)
The second point:
I connected the CDROM and the keyboard to the front ports of the server (there are two of them) to the server - the first thing I saw, on the first welcome screen of the proxmox, you cannot press anything without a mouse. That is, tab overlapping control buttons does not occur. Since the server was in a rack and it was problematic to climb behind it, began to stick in turns with the keyboard and mouse. I click “further” with the mouse, with the keyboard - I enter the data.
The installation consists of several steps:
PROXMOX is installed on the first disk, which he called as / dev / sda. I connect from my laptop to the address I specified during installation:
I update the system:
This is not the case. I do not plan to buy a license for support yet. I am changing the official subscription to their “free” repository.
I see there:
Change to:
And again updated and put the new system:
Now everything has been updated without hesitation and the system is in the new state. I put the packages to work with the raid:
Now we determine the exact size of the first disk, it will be useful to us in the following:
We see that exactly 1000GB - remember. Mark up the rest of the sections under our array. First, clear the partition table on three empty disks and mark up the disks under GPT:
Mark up:
Second:
Third:
Fourth:
Now we recreate the partitions in the same way as on the original first disk:
one.
2
3
Here we will need to know the size of the original first disc.
four.
We perform all these four steps for all our disks: sdb, sdc, sdd. Here's what I got:
This is the original:
And this is the second, third and fourth (with a difference in the drive letter).
Next, you need to clarify - if you are playing with this case for the first time and before that there was not even a RAID concept on the server, and most importantly on the hard drives, you can skip this point. If something didn’t work out, then RAID was probably already installed and there are superblocks on the hard drives that need to be removed.
Check out so:
You need to check all four disks.
Now configure mdadm
Create a config based on the example:
We empty:
Open:
Enter and save:
For now, we will leave the mail as it is, then we will return to it.
Now we are raising our RAID in degradation mode (skipping the first working hard drive).
And the second:
Here it is necessary to clarify the keys:
UDP After a mass of comments, I came out at one important point.
In the process of creating, I deliberately set the chunk size to 2048, instead of skipping this flag and leaving it by default. This flag significantly reduces performance. This is especially visually noticeable on Windows virtual machines.
That is, the right team to create should look like this:
and
Save the configuration:
Check the content:
Now we need to transfer the valid LVM array to three empty disks. To begin, create in the raid md1 - LVM-section:
And add it to the pve group:
Now we transfer the data from the original LVM to the newly created one:
The process is long. It took me about 10 hours. Interestingly, I launched it out of habit while being connected via SSH and by 1.3% realized that it’s not convenient to sit so much time with a laptop at work. I canceled the operation via CTRL + C, went to the physical server and tried to start the transfer command there, but the smart piece unsubscribed that the process was already underway and the command would not be executed a second time, and started drawing transfer percentages on a real screen. At least thanks :)
The process ended twice writing 100%. Remove the first disk from LVM:
We transfer the boot / boot to our new raid / md0, but first we format and mount the raid itself.
Create a directory and mount the raid there:
Copy the contents of live / boot:
Unmount the raid and delete the temporary directory:
Determine the UUID of the raid partition where the / boot is stored — this is needed in order to correctly write it to the / etc / fstab table:
/ dev / md0: UUID = "6b75c86a-0501-447c-8ef5-386224e48538" TYPE = "ext4"
Open the table and write the boot data at its end:
Register and save:
Now mount / boot:
Let the OS boot, even if the state is BOOT_DEGRADED (that is, the raid is degraded due to disk failure):
Register the ramfs download:
The bootloader's graphic mode is disabled:
Install the bootloader on all three disks:
Now a very important point. We take as a basis the second disk / dev / sd b , on which the system, bootloader and grub and transfer all this to the first disk / dev / sd a , which would later make it also part of our raid. To do this, consider the first disc as clean and mark it just like the others at the beginning of this article.
Zanulim and mark as GPT:
We break it into sections exactly like the other three:
Here we again need accurate knowledge of the size of the disk. Let me remind you, we received it with the command, which in this case should be applied to the / dev / sdb disk:
Since we have the same disks, the size has not changed - 1000Gb . Mark up the main section:
It should work like this:
It remains to add this disk to the common array. The second section is respectively in / md0, and the third is in / md1:
We are waiting for synchronization ...
This command shows the synchronization process in real time:
And if the first raid with / boot was synchronized immediately, then it took patience to synchronize the second (around 5 hours).
It remains to install the bootloader on the added disk (here you need to understand that you only need to do this after the disks have been fully synchronized).
Press Enter a couple of times without changing anything and at the last step we check all 4 disks.
md0 / md1 do not touch!
It remains to reboot the system and check that everything is in order:
The system booted normally (I even changed the BIOS loading order of the screws in the BIOS several times - it loads the same way).
Check arrays:
Four horseshoes in each raid indicate that all four discs are in operation. We look at the information on arrays (on the example of the first, more precisely zero).
We see that the array type is RAID10, all disks are in place, active and synchronized.
Now, it would be possible to play around with disabling the disks, changing the boot disk in the BIOS, but before that let us set up an administrator notification when the disks fail, and therefore the raid itself. Without notice, the raid will die slowly and painfully, and no one will know about it.
In Proxmox, postfix is already installed by default, I did not delete it, although I consciously understand that it would be easier to configure other MTAs.
We put the SASL library (I need it to work with our external mail server):
Create a file with data from which we will authenticate on our remote mail server:
There we write the line:
Now we create the transport file:
There we write:
Create a generic_map:
Here we write (we denote from whom the mail will be sent):
Create sender_relay (in fact, the route to the external server):
And we write there:
Hash files:
In the /etc/postfix/main.cf file, I got this working configuration:
Reboot postfix:
Now we need to return to the raid settings file and correct it a bit. We indicate to whom to receive letters of happiness and from whom they will come.
I have this:
Restart mdadm to re-read the settings:
Check through the console testing the raid and sending a letter:
I received two letters with information on both of the raids I created. It remains to add the test task to cron and remove the –test key. To send letters only when something happened:
Add a task (do not forget to click on Enter after the line and move the cursor down, so that an empty line would appear):
Testing will be done every morning at 5 am and if problems arise, mail will be sent.
That's all. Perhaps I was too smart with the postfix config - while trying to achieve a normal send via our external server, I added a lot of things. I would be grateful if you correct (simplify).
In the next article, I want to share the experience of moving virtual machines from our Esxi-6 hypervisor to this new Proxmox. I think it will be interesting.
UPD.
It is necessary to separately cancel the moment with a physical place on the / dev / data partition - this is the main partition created as LVM-Thin
When Proxmox was installed, it automatically marked / dev / sda, taking into account that it allocated 10% of the capacity of the partition, namely 100Gb, to the / root partition where the system, ISO, dumps and containers are stored. In the remaining space, he created the LVM-Thin partition, which is essentially not mounted anywhere (this is another subtlety of version> 4.2, after transferring the disks to GPT). And as you understand this section has become the size of 900Gb. When we picked up RAID10 from 4x 1Tb drives, we got the capacity (including the RAID1 + 0 reserve) - 2Tb
But when they copied LVM into a raid, they copied it as a container, with its size of 900Gb.
When you first enter the Proxmox admin panel, the attentive viewer may notice that poking to the local-lvm (pve1) section - we see these with 800Gb dimes
So in order to expand LVM-Thin to the full size of 1.9TB, we need to execute all one command:
After that, the system does not even need to restart.
You do not need to do resize2fs - and this is probably even impossible, because the system will start swearing at
And it will start correctly - this section is not mounted via fstab
In general, while I was trying to figure out how to expand the disk and read the Proxmox forum - in the meantime, the system was already showing a new size, both in the table and on the scale.

What we have:
- HP ProLiant DL120 G6 Server (10 GB RAM)
- 4x1000Gb SATA HDD - no physical RAID controller on board
- USB flash drive with PROXMOX 4.3 (more on this below)
What we want:
- Get the installation of PROXMOX 4.3 installed completely on the S-RAID 10 GPT, so that if any disk fails, the system will continue to work.
- Get a notification about the failure of a failed disk in the mail.
What we do - the general plan of action:
- Install PROXMOX 4.3
- Raise and test RAID10
- Set up email notifications
Under the cut stage of the quest.
And now in stages.
First moment:
I connected the USB flash drive - if in brief - the installation disk was not found. I can not mount.
')
I did not understand what yes how, yes why. I recorded the image on a CD and connected a USB CDROM (since it was near)
The second point:
I connected the CDROM and the keyboard to the front ports of the server (there are two of them) to the server - the first thing I saw, on the first welcome screen of the proxmox, you cannot press anything without a mouse. That is, tab overlapping control buttons does not occur. Since the server was in a rack and it was problematic to climb behind it, began to stick in turns with the keyboard and mouse. I click “further” with the mouse, with the keyboard - I enter the data.
The installation consists of several steps:
- Agree with their requirements
- Select the hard drive where the system is installed.
- Select a country and time zone
- Specify server name, addressing
- And actually wait a bit to scan the image on the server.
PROXMOX is installed on the first disk, which he called as / dev / sda. I connect from my laptop to the address I specified during installation:
root@pve1:~#ssh root@192.168.1.3 I update the system:
root@pve1:~#apt-get update I see at the exit
Ign http://ftp.debian.org jessie InRelease Get:1 http://ftp.debian.org jessie Release.gpg [2,373 B] Get:2 http://security.debian.org jessie/updates InRelease [63.1 kB] Get:3 http://ftp.debian.org jessie Release [148 kB] Get:4 https://enterprise.proxmox.com jessie InRelease [401 B] Ign https://enterprise.proxmox.com jessie InRelease Get:5 https://enterprise.proxmox.com jessie Release.gpg [401 B] Ign https://enterprise.proxmox.com jessie Release.gpg Get:6 http://ftp.debian.org jessie/main amd64 Packages [6,787 kB] Get:7 https://enterprise.proxmox.com jessie Release [401 B] Ign https://enterprise.proxmox.com jessie Release Get:8 http://security.debian.org jessie/updates/main amd64 Packages [313 kB] Get:9 https://enterprise.proxmox.com jessie/pve-enterprise amd64 Packages [401 B] Get:10 https://enterprise.proxmox.com jessie/pve-enterprise Translation-en_US [401 B] Get:11 https://enterprise.proxmox.com jessie/pve-enterprise Translation-en [401 B] Get:12 https://enterprise.proxmox.com jessie/pve-enterprise amd64 Packages [401 B] Get:13 https://enterprise.proxmox.com jessie/pve-enterprise Translation-en_US [401 B] Get:14 https://enterprise.proxmox.com jessie/pve-enterprise Translation-en [401 B] Get:15 https://enterprise.proxmox.com jessie/pve-enterprise amd64 Packages [401 B] Get:16 https://enterprise.proxmox.com jessie/pve-enterprise Translation-en_US [401 B] Get:17 https://enterprise.proxmox.com jessie/pve-enterprise Translation-en [401 B] Get:18 https://enterprise.proxmox.com jessie/pve-enterprise amd64 Packages [401 B] Get:19 https://enterprise.proxmox.com jessie/pve-enterprise Translation-en_US [401 B] Get:20 http://security.debian.org jessie/updates/contrib amd64 Packages [2,506 B] Get:21 https://enterprise.proxmox.com jessie/pve-enterprise Translation-en [401 B] Get:22 https://enterprise.proxmox.com jessie/pve-enterprise amd64 Packages [401 B] Err https://enterprise.proxmox.com jessie/pve-enterprise amd64 Packages HttpError401 Get:23 https://enterprise.proxmox.com jessie/pve-enterprise Translation-en_US [401 B] Get:24 http://security.debian.org jessie/updates/contrib Translation-en [1,211 B] Ign https://enterprise.proxmox.com jessie/pve-enterprise Translation-en_US Get:25 https://enterprise.proxmox.com jessie/pve-enterprise Translation-en [401 B] Ign https://enterprise.proxmox.com jessie/pve-enterprise Translation-en Get:26 http://security.debian.org jessie/updates/main Translation-en [169 kB] Get:27 http://ftp.debian.org jessie/contrib amd64 Packages [50.2 kB] Get:28 http://ftp.debian.org jessie/contrib Translation-en [38.5 kB] Get:29 http://ftp.debian.org jessie/main Translation-en [4,583 kB] Fetched 12.2 MB in 15s (778 kB/s) W: Failed to fetch https://enterprise.proxmox.com/debian/dists/jessie/pve-enterprise/binary-amd64/Packages HttpError401 E: Some index files failed to download. They have been ignored, or old ones used instead. This is not the case. I do not plan to buy a license for support yet. I am changing the official subscription to their “free” repository.
root@pve1:~#nano /etc/apt/sources.list.d/pve-enterprise.list I see there:
deb https://enterprise.proxmox.com/debian jessie pve-enterprise Change to:
deb http://download.proxmox.com/debian jessie pve-no-subscription And again updated and put the new system:
root@pve1:~#apt-get update && apt-get upgrade Now everything has been updated without hesitation and the system is in the new state. I put the packages to work with the raid:
root@pve1:~#apt-get install -y mdadm initramfs-tools parted Now we determine the exact size of the first disk, it will be useful to us in the following:
root@pve1:~#parted /dev/sda print Model: ATA MB1000EBNCF (scsi) Disk /dev/sda: 1000GB Sector size (logical/physical): 512B/512B Partition Table: gpt Disk Flags: Number Start End Size File system Name Flags 1 1049kB 10.5MB 9437kB primary bios_grub 2 10.5MB 1000MB 990MB ext4 primary 3 1000MB 1000GB 999GB primary We see that exactly 1000GB - remember. Mark up the rest of the sections under our array. First, clear the partition table on three empty disks and mark up the disks under GPT:
root@pve1:~#dd if=/dev/zero of=/dev/sb[bcd] bs=512 count=1 1+0 records in 1+0 records out 512 bytes (512 B) copied, 7.8537e-05 s, 6.5 MB/s Mark up:
Second:
root@pve1:~#parted /dev/sdb mklabel gpt Warning: The existing disk label on /dev/sdb will be destroyed and all data on this disk will be lost. Do you want to continue? Yes/No? yes Information: You may need to update /etc/fstab. Third:
root@pve1:~#parted /dev/sdc mklabel gpt Warning: The existing disk label on /dev/sdc will be destroyed and all data on this disk will be lost. Do you want to continue? Yes/No? yes Information: You may need to update /etc/fstab. Fourth:
root@pve1:~#parted /dev/sdd mklabel gpt Warning: The existing disk label on /dev/sdd will be destroyed and all data on this disk will be lost. Do you want to continue? Yes/No? yes Information: You may need to update /etc/fstab. Now we recreate the partitions in the same way as on the original first disk:
one.
root@pve1:~#parted /dev/sdb mkpart primary 1M 10M Information: You may need to update /etc/fstab. 2
root@pve1:~#parted /dev/sdb set 1 bios_grub on Information: You may need to update /etc/fstab. 3
root@pve1:~#parted /dev/sdb mkpart primary 10 1G Information: You may need to update /etc/fstab. Here we will need to know the size of the original first disc.
four.
root@pve1:~#parted /dev/sdb mkpart primary 1G 1000GB Information: You may need to update /etc/fstab. We perform all these four steps for all our disks: sdb, sdc, sdd. Here's what I got:
This is the original:
root@pve1:~#parted /dev/sda print Model: ATA MB1000EBNCF (scsi) Disk /dev/sda: 1000GB Sector size (logical/physical): 512B/512B Partition Table: gpt Disk Flags: Number Start End Size File system Name Flags 1 17.4kB 1049kB 1031kB bios_grub 2 1049kB 134MB 133MB fat32 boot, esp 3 134MB 1000GB 1000GB lvm And this is the second, third and fourth (with a difference in the drive letter).
root@pve1:~#parted /dev/sdb print Model: ATA MB1000EBNCF (scsi) Disk /dev/sdd: 1000GB Sector size (logical/physical): 512B/512B Partition Table: gpt Disk Flags: Number Start End Size File system Name Flags 1 1049kB 10.5MB 9437kB primary bios_grub 2 10.5MB 1000MB 990MB primary 3 1000MB 1000GB 999GB primary Next, you need to clarify - if you are playing with this case for the first time and before that there was not even a RAID concept on the server, and most importantly on the hard drives, you can skip this point. If something didn’t work out, then RAID was probably already installed and there are superblocks on the hard drives that need to be removed.
Check out so:
root@pve1:~#mdadm --misc --examine /dev/sda /dev/sda: MBR Magic : aa55 Partition[0] : 1953525167 sectors at 1 (type ee) You need to check all four disks.
Now configure mdadm
Create a config based on the example:
root@pve1:~#cp /etc/mdadm/mdadm.conf /etc/mdadm/mdadm.conf.orig We empty:
root@pve1:~#echo "" > /etc/mdadm/mdadm.conf Open:
root@pve1:~#nano /etc/mdadm/mdadm.conf Enter and save:
CREATE owner=root group=disk mode=0660 auto=yes MAILADDR user@mail.domain For now, we will leave the mail as it is, then we will return to it.
Now we are raising our RAID in degradation mode (skipping the first working hard drive).
- In / dev / md0 - I will have / boot
- In / dev / md1 - VML partition with system
root@pve1:~#mdadm --create /dev/md0 --metadata=0.90 --level=10 --chunk=2048 --raid-devices=4 missing /dev/sd[bcd]2 mdadm: array /dev/md0 started. And the second:
root@pve1:~#mdadm --create /dev/md1 --metadata=0.90 --level=10 --chunk=2048 --raid-devices=4 missing /dev/sd[bcd]3 mdadm: array /dev/md1 started. Here it is necessary to clarify the keys:
- --level = 10 - says that our RAID will be exactly 10
- --chunk = 2048 - cluster size on partition
- --raid-devices = 4 - four devices will take part in the raid
- missing / dev / sd [bcd] 2 - while we mark the first working section as missing, add the other three to the raid
UDP After a mass of comments, I came out at one important point.
In the process of creating, I deliberately set the chunk size to 2048, instead of skipping this flag and leaving it by default. This flag significantly reduces performance. This is especially visually noticeable on Windows virtual machines.
That is, the right team to create should look like this:
root@pve1:~#mdadm --create /dev/md0 --metadata=0.90 --level=10 --raid-devices=4 missing /dev/sd[bcd]2 and
root@pve1:~#mdadm --create /dev/md1 --metadata=0.90 --level=10 --raid-devices=4 missing /dev/sd[bcd]3 Save the configuration:
root@pve1:~#mdadm --detail --scan >> /etc/mdadm/mdadm.conf Check the content:
root@pve1:~# cat /etc/mdadm/mdadm.conf CREATE owner=root group=disk mode=0660 auto=yes MAILADDR user@mail.domain ARRAY /dev/md0 metadata=0.90 UUID=4df20dfa:4480524a:f7703943:85f444d5 ARRAY /dev/md1 metadata=0.90 UUID=432e3654:e288eae2:f7703943:85f444d5 Now we need to transfer the valid LVM array to three empty disks. To begin, create in the raid md1 - LVM-section:
root@pve1:~#pvcreate /dev/md1 -ff Physical volume "/dev/md1" successfully created And add it to the pve group:
root@pve1:~#vgextend pve /dev/md1 Volume group "pve" successfully extended Now we transfer the data from the original LVM to the newly created one:
root@pve1:~#pvmove /dev/sda3 /dev/md1 /dev/sda3: Moved: 0.0% The process is long. It took me about 10 hours. Interestingly, I launched it out of habit while being connected via SSH and by 1.3% realized that it’s not convenient to sit so much time with a laptop at work. I canceled the operation via CTRL + C, went to the physical server and tried to start the transfer command there, but the smart piece unsubscribed that the process was already underway and the command would not be executed a second time, and started drawing transfer percentages on a real screen. At least thanks :)
The process ended twice writing 100%. Remove the first disk from LVM:
root@pve1:~#vgreduce pve /dev/sda3 Removed "/dev/sda3" from volume group "pve" We transfer the boot / boot to our new raid / md0, but first we format and mount the raid itself.
root@pve1:~#mkfs.ext4 /dev/md0 mke2fs 1.42.12 (29-Aug-2014) Creating filesystem with 482304 4k blocks and 120720 inodes Filesystem UUID: 6b75c86a-0501-447c-8ef5-386224e48538 Superblock backups stored on blocks: 32768, 98304, 163840, 229376, 294912 Allocating group tables: done Writing inode tables: done Creating journal (8192 blocks): done Writing superblocks and filesystem accounting information: done Create a directory and mount the raid there:
root@pve1:~#mkdir /mnt/md0 root@pve1:~#mount /dev/md0 /mnt/md0 Copy the contents of live / boot:
root@pve1:~#cp -ax /boot/* /mnt/md0 Unmount the raid and delete the temporary directory:
root@pve1:~#umount /mnt/md0 root@pve1:~#rmdir /mnt/md0 Determine the UUID of the raid partition where the / boot is stored — this is needed in order to correctly write it to the / etc / fstab table:
root@pve1:~#blkid |grep md0 / dev / md0: UUID = "6b75c86a-0501-447c-8ef5-386224e48538" TYPE = "ext4"
Open the table and write the boot data at its end:
root@pve1:~#nano /etc/fstab Register and save:
UUID="6b75c86a-0501-447c-8ef5-386224e48538" /boot ext4 defaults 0 1 Now mount / boot:
root@pve1:~#mount /boot Let the OS boot, even if the state is BOOT_DEGRADED (that is, the raid is degraded due to disk failure):
root@pve1:~#echo "BOOT_DEGRADED=true" > /etc/initramfs-tools/conf.d/mdadm Register the ramfs download:
root@pve1:~#mkinitramfs -o /boot/initrd.img-`uname -r` The bootloader's graphic mode is disabled:
root@pve1:~#echo "GRUB_TERMINAL=console" >> /etc/default/grub Install the bootloader on all three disks:
root@pve1:~#grub-install /dev/sdb Installing for i386-pc platform. Installation finished. No error reported. root@pve1:~#grub-install /dev/sdc> Installing for i386-pc platform. Installation finished. No error reported. root@pve1:~#grub-install /dev/sdd Installing for i386-pc platform. Installation finished. No error reported. Now a very important point. We take as a basis the second disk / dev / sd b , on which the system, bootloader and grub and transfer all this to the first disk / dev / sd a , which would later make it also part of our raid. To do this, consider the first disc as clean and mark it just like the others at the beginning of this article.
Zanulim and mark as GPT:
root@pve1:~#dd if=/dev/zero of=/dev/sda bs=512 count=1 1+0 records in 1+0 records out 512 bytes (512 B) copied, 0.0157829 s, 32.4 kB/s root@pve1:~#parted /dev/sda mklabel gpt Information: You may need to update /etc/fstab. We break it into sections exactly like the other three:
root@pve1:~#parted /dev/sda mkpart primary 1M 10M Information: You may need to update /etc/fstab. root@pve1:~#parted /dev/sda set 1 bios_grub on Information: You may need to update /etc/fstab. root@pve1:~#parted /dev/sda mkpart primary 10 1G Information: You may need to update /etc/fstab. Here we again need accurate knowledge of the size of the disk. Let me remind you, we received it with the command, which in this case should be applied to the / dev / sdb disk:
root@pve1:~#parted /dev/sdb print Since we have the same disks, the size has not changed - 1000Gb . Mark up the main section:
root@pve1:~#parted /dev/sda mkpart primary 1G 1000Gb Information: You may need to update /etc/fstab. It should work like this:
root@pve1:~#parted /dev/sda print Model: ATA MB1000EBNCF (scsi) Disk /dev/sda: 1000GB Sector size (logical/physical): 512B/512B Partition Table: gpt Disk Flags: Number Start End Size File system Name Flags 1 1049kB 10.5MB 9437kB fat32 primary bios_grub 2 10.5MB 1000MB 990MB primary 3 1000MB 1000GB 999GB primary It remains to add this disk to the common array. The second section is respectively in / md0, and the third is in / md1:
root@pve1:~#mdadm --add /dev/md0 /dev/sda2 mdadm: added /dev/sda2 root@pve1:~#mdadm --add /dev/md1 /dev/sda3 mdadm: added /dev/sda3 We are waiting for synchronization ...
root@pve1:~#watch cat /proc/mdstat This command shows the synchronization process in real time:
Every 2.0s: cat /proc/mdstat Fri Nov 11 10:09:18 2016 Personalities : [raid10] md1 : active raid10 sda3[4] sdd3[3] sdc3[2] sdb3[1] 1951567872 blocks 2048K chunks 2 near-copies [4/3] [_UUU] [>....................] recovery = 0.5% (5080064/975783936) finish=284.8min speed=56796K/sec bitmap: 15/15 pages [60KB], 65536KB chunk md0 : active raid10 sda2[0] sdd2[3] sdc2[2] sdb2[1] 1929216 blocks 2048K chunks 2 near-copies [4/4] [UUUU] And if the first raid with / boot was synchronized immediately, then it took patience to synchronize the second (around 5 hours).
It remains to install the bootloader on the added disk (here you need to understand that you only need to do this after the disks have been fully synchronized).
root@pve1:~#dpkg-reconfigure grub-pc Press Enter a couple of times without changing anything and at the last step we check all 4 disks.
md0 / md1 do not touch!
It remains to reboot the system and check that everything is in order:
root@pve1:~#shutdown –r now The system booted normally (I even changed the BIOS loading order of the screws in the BIOS several times - it loads the same way).
Check arrays:
<source lang="vim">root@pve1:~#cat /proc/mdstat Personalities : [raid10] md1 : active raid10 sda3[0] sdd3[3] sdc3[2] sdb3[1] 1951567872 blocks 2048K chunks 2 near-copies [4/4] [UUUU] bitmap: 2/15 pages [8KB], 65536KB chunk md0 : active raid10 sda2[0] sdd2[3] sdc2[2] sdb2[1] 1929216 blocks 2048K chunks 2 near-copies [4/4] [UUUU] Four horseshoes in each raid indicate that all four discs are in operation. We look at the information on arrays (on the example of the first, more precisely zero).
root@pve1:~#mdadm --detail /dev/md0 /dev/md0: Version : 0.90 Creation Time : Thu Nov 10 15:12:21 2016 Raid Level : raid10 Array Size : 1929216 (1884.32 MiB 1975.52 MB) Used Dev Size : 964608 (942.16 MiB 987.76 MB) Raid Devices : 4 Total Devices : 4 Preferred Minor : 0 Persistence : Superblock is persistent Update Time : Fri Nov 11 10:07:47 2016 State : active Active Devices : 4 Working Devices : 4 Failed Devices : 0 Spare Devices : 0 Layout : near=2 Chunk Size : 2048K UUID : 4df20dfa:4480524a:f7703943:85f444d5 (local to host pve1) Events : 0.27 Number Major Minor RaidDevice State 0 8 2 0 active sync set-A /dev/sda2 1 8 18 1 active sync set-B /dev/sdb2 2 8 34 2 active sync set-A /dev/sdc2 3 8 50 3 active sync set-B /dev/sdd2 We see that the array type is RAID10, all disks are in place, active and synchronized.
Now, it would be possible to play around with disabling the disks, changing the boot disk in the BIOS, but before that let us set up an administrator notification when the disks fail, and therefore the raid itself. Without notice, the raid will die slowly and painfully, and no one will know about it.
In Proxmox, postfix is already installed by default, I did not delete it, although I consciously understand that it would be easier to configure other MTAs.
We put the SASL library (I need it to work with our external mail server):
root@pve1:/etc#apt-get install libsasl2-modules Create a file with data from which we will authenticate on our remote mail server:
root@pve1:~#touch /etc/postfix/sasl_passwd There we write the line:
[mail.domain.ru] pve1@domain.ru:password Now we create the transport file:
root@pve1:~#touch /etc/postfix/transport There we write:
domain.ru smtp:[mail.domain.ru] Create a generic_map:
root@pve1:~#touch /etc/postfix/generic Here we write (we denote from whom the mail will be sent):
root pve1@domain.ru Create sender_relay (in fact, the route to the external server):
root@pve1:~#touch /etc/postfix/sender_relay And we write there:
pve1@domain.ru smtp.domain.ru Hash files:
root@pve1:~#postmap transport root@pve1:~#postmap sasl_passwd root@pve1:~#postmap geniric root@pve1:~#postmap sender_relay In the /etc/postfix/main.cf file, I got this working configuration:
main.cf
# See /usr/share/postfix/main.cf.dist for a commented, more complete version
myhostname = domain.ru
smtpd_banner = $ myhostname ESMTP $ mail_name (Debian / GNU)
biff = no
# appending .domain is the MUA's job.
append_dot_mydomain = no
# Uncomment the next line to generate "delayed mail" warnings
#delay_warning_time = 4h
alias_maps = hash: / etc / aliases
alias_database = hash: / etc / aliases
mydestination = $ myhostname, localhost. $ mydomain, localhost
mynetworks = 127.0.0.0/8,192.168.1.0/24
inet_interfaces = loopback-only
recipient_delimiter = +
smtp_tls_loglevel = 1
smtp_tls_session_cache_database = btree: / var / lib / postfix / smtp_tls_session_cache
smtp_use_tls = no
tls_random_source = dev: / dev / urandom
## SASL Settings
smtpd_sasl_auth_enable = no
smtp_sasl_auth_enable = yes
smtpd_use_pw_server = yes
enable_server_options = yes
smtpd_pw_server_security_options = plain, login
smtp_sasl_password_maps = hash: / etc / postfix / sasl_passwd
smtp_sender_dependent_authentification = yes
sender_dependent_relayhost_maps = hash: / etc / postfix / sender_relay
smtpd_sasl_local_domain = $ myhostname
smtp_sasl_security_options = noanonymous
smtp_sasl_tls_security_options = noanonymous
smtpd_sasl_application_name = smtpd
smtp_always_send_ehlo = yes
relayhost =
transport_maps = hash: / etc / postfix / transport
smtp_generic_maps = hash: / etc / postfix / generic
disable_dns_lookups = yes
Reboot postfix:
root@pve1:~#/etc/init.d/postfix restart Now we need to return to the raid settings file and correct it a bit. We indicate to whom to receive letters of happiness and from whom they will come.
root@pve1:~#nano /etc/dmadm/mdadm.conf I have this:
CREATE owner=root group=disk mode=0660 auto=yes MAILADDR info@domain.ru MAILFROM pve1@dpmain.ru ARRAY /dev/md0 metadata=0.90 UUID=4df20dfa:4480524a:f7703943:85f444d5 ARRAY /dev/md1 metadata=0.90 UUID=432e3654:e288eae2:f7703943:85f444d5 Restart mdadm to re-read the settings:
root@pve1:~#/etc/init.d/mdadm restart Check through the console testing the raid and sending a letter:
root@pve1:~#mdadm --monitor --scan -1 --test --oneshot I received two letters with information on both of the raids I created. It remains to add the test task to cron and remove the –test key. To send letters only when something happened:
root@pve1:~#crontab -e Add a task (do not forget to click on Enter after the line and move the cursor down, so that an empty line would appear):
0 5 * * * mdadm --monitor --scan -1 –oneshot Testing will be done every morning at 5 am and if problems arise, mail will be sent.
That's all. Perhaps I was too smart with the postfix config - while trying to achieve a normal send via our external server, I added a lot of things. I would be grateful if you correct (simplify).
In the next article, I want to share the experience of moving virtual machines from our Esxi-6 hypervisor to this new Proxmox. I think it will be interesting.
UPD.
It is necessary to separately cancel the moment with a physical place on the / dev / data partition - this is the main partition created as LVM-Thin
When Proxmox was installed, it automatically marked / dev / sda, taking into account that it allocated 10% of the capacity of the partition, namely 100Gb, to the / root partition where the system, ISO, dumps and containers are stored. In the remaining space, he created the LVM-Thin partition, which is essentially not mounted anywhere (this is another subtlety of version> 4.2, after transferring the disks to GPT). And as you understand this section has become the size of 900Gb. When we picked up RAID10 from 4x 1Tb drives, we got the capacity (including the RAID1 + 0 reserve) - 2Tb
But when they copied LVM into a raid, they copied it as a container, with its size of 900Gb.
When you first enter the Proxmox admin panel, the attentive viewer may notice that poking to the local-lvm (pve1) section - we see these with 800Gb dimes
So in order to expand LVM-Thin to the full size of 1.9TB, we need to execute all one command:
lvextend /dev/pve/data -l +100%FREE After that, the system does not even need to restart.
You do not need to do resize2fs - and this is probably even impossible, because the system will start swearing at
root@pve1:~# resize2fs /dev/mapper/pve-data resize2fs 1.42.12 (29-Aug-2014) resize2fs: MMP: invalid magic number while trying to open /dev/mapper/pve-data Couldn't find valid filesystem superblock. And it will start correctly - this section is not mounted via fstab
In general, while I was trying to figure out how to expand the disk and read the Proxmox forum - in the meantime, the system was already showing a new size, both in the table and on the scale.
Source: https://habr.com/ru/post/315086/
All Articles