How to build RidgeRun SDK

The RidgeRun SDK itself is not a very common SDK, however, if you have to work with video for embedded systems, then you will probably be interested to rate this SDK (Official RidgeRun SDK website).
In my case, I made my assembly for the DM368 processors, and more specifically for the Leopard Board . And one of the first problems was the fact that the documentation on the wiki is far from being up to date, or not complete.
And so, first we need the CodeSourcery Toolchain cross compiler, or rather 2009q1-203 , and also, we need to install DVSDK 4 Texan tools. The site says that DVSDK can only work with Ubuntu 10.04 LTS 32-bit and nothing else.
And this is where the problems begin, since most of the repositories for 10.04 just don't exist anymore. At the time of this writing, the latest version of Ubuntu 16.04 LTS, but you shouldn’t use it either, in principle you can build RidgeRun on it, but you can’t make an img bootable SD card image file. The fact is that in older versions of Ubuntu, after 14.04 in the fdisk utility, which is included in the build-essential package, the command line arguments have been changed, and some have been deleted altogether. In the future, when building an img file, they will be needed, since, a little running ahead, u-boot installer uses them. You can certainly try to replace fdisk or the entire build-essential as workaround (which is not very easy), but personally it seemed to me the best solution once and for all is to make a separate virtual machine for the assembly, on which to put everything you need, still “live” repositories .
')
So, I will use the Ubuntu 14.04 virtual machine. Since the ARM toolchain and DVSDK 4 installers are written in Java, you will have to install it:
sudo apt-get install python-software-properties sudo add-apt-repository ppa:webupd8team/java sudo apt-get clean && sudo apt-get update sudo apt-get install oracle-java6-installer apt-get install fakeroot git-core gitk subversion For installing Java and changing the current version, there is a good article .
CodeSourcerychain
Install the CodeSourcery Toolchain, for this we need the following packages:
sudo apt-get install libgtk2.0-0:i386 libxtst6:i386 gtk2-engines-murrine:i386 libstdc++6 libxt6:i386 sudo apt-get install libdbus-glib-1-2:i386 libasound2:i386 And immediately make for it the directory / opt / codesourcery
mkdir -p /opt/codesourcery cd /opt/codesourcery/ Next, download the Toolchain and set the execution rights:
wget http://www.codesourcery.com/sgpp/lite/arm/portal/package4573/public/arm-none-linux-gnueabi/arm-2009q1-203-arm-none-linux-gnueabi.bin chmod ugo+x arm-2009q1-203-arm-none-linux-gnueabi.bin And run the installation:
./arm-2009q1-203-arm-none-linux-gnueabi.bin An error may occur that the installer could not find bash , then you need to run:
sudo ln -sf bash /bin/sh and start the installation again. To return "as it was", you need to run sudo ln -sf dash / bin / sh
During the installation process, the main thing is to specify the path to / opt / codesourcery / arm-2009q1
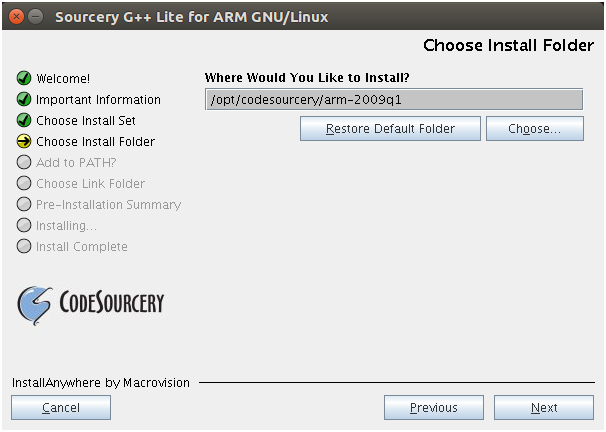
As further make itself will search for Toolchain there.
DVSDK 4
To install DVSDK 4, we do everything too, download, assign rights, install:
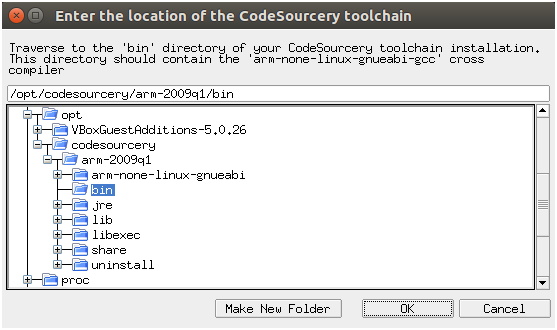
wget -c http://software-dl.ti.com/dsps/dsps_public_sw/sdo_sb/targetcontent/dvsdk/DVSDK_4_00/4_02_00_06/exports/dvsdk_dm368-evm_4_02_00_06_setuplinux sudo chmod a+wrx dvsdk_dm368-evm_4_02_00_06_setuplinux ./dvsdk_dm368-evm_4_02_00_06_setuplinux --forcehost Only you need to specify the path to the bin of the installed Toolchain: / opt / codesourcery / arm-2009q1 / bin
And it remains to install a standard set of utilities, if it is not already installed:
sudo apt-get install build-essential checkinstall RidgeRun SDK
The RidgeRun collector still needs Python-2.7.5, but on our host the version is higher, and does not want to work with another make in RidgeRun. You will have to build it from pods, but before that I recommend doing as much as possible with apt-get, because after installing Python-2.7.5, working on the apt version will not work, but will ask its version to check the current version of python using the python –version or python –V command. Therefore, we install additional packages that we may need.
sudo apt-get install libdbus-glib-1-dev sudo apt-get install libreadline-gplv2-dev libncursesw5-dev libssl-dev libsqlite3-dev tk-dev libgdbm-dev libc6-dev libbz2-dev sudo apt-get install autoconf2.59 libgtk2.0-dev bison flex mono-devel libexpect-perl libusb-dev curl minicom libtool libncurses5-dev sudo apt-get install texinfo quilt libcrypt-ssleay-perl ccache quilt Installing python is also quite simple, in just a few commands, the only thing that I did is under sudo:
wget http://python.org/ftp/python/2.7.5/Python-2.7.5.tgz tar -xvf Python-2.7.5.tgz cd Python-2.7.5 ./configure make sudo checkinstall dpkg -r python Much different from that described in this article , with the exception of the version.
Now everything is ready to start assembling RidgeRun itself, for this you need to send a request on the SDK page http://www.ridgerun.com/downloads , and the download link will be sent to the mail, the main thing from the list is to select the desired assembly in the E valuation SDK field Request , in my case, this is DM368 DM365 (for Leopardboard) .
After downloading, you also need to specify the rights to the file and execute:
sudo chmod a+x RidgeRun-SDK-DM36x-Turrialba-Eval-Linux-x86-Install.bin ./RidgeRun-SDK-DM36x-Turrialba-Eval-Linux-x86-Install.bin You can install many times, in different folders, in fact, the installer simply unpacks the files, so, for example, / home / demo / devdir is perfect. After installation, go to the installation directory and configure the SDK:
cd /home/demo/devdir make config First, make will download the necessary packages for RidgeRun to the downloads folder, and the configurator itself will open, in the Installer Configuration settings, in the Firmware deployment mode menu, for the start, it's better to choose the SD card.

After exiting the configurator, a file will be created, bspconfig in the images folder, the actual BSP configuration. Before assembly, you can additionally check the paths:
cd /home/demo/devdir make env And try building the SDK:
make If we get an assembly error if (! Defined (@val)) { you will have to manually delete the defined one so that it would just be if (! @Val) { and restart the build process. In general, you need to be prepared for any surprises, for example, since in the configurator if you select something other than Hello Word example , for example , a QT Hello World application , the assembly will not work anymore. This will not work because make is looking for a QT package, which is no longer at this address. Therefore, it’s best to first try building the SDK.
The build results, all in the directory / home / demo / devdir / images , but there is no img file we need to create, to create it:
make install After that, an image of the SD card, sdcard.img , which you need to write, will be created in the images folder. I never managed to make friends with VirtualBox with a card reader, so I use Win32 Disk Imager .
If everything is going well, you can try building a Qt example, for this you need to download the file http://pkgs.fedoraproject.org/repo/pkgs/qt/qt-everywhere-opensource-src-4.8.4.tar.gz (for now it is located here, it can be moved again, and it can be found by file name) in the download folder of the SDK itself. You can also create a file of the same name with the prefix sha1 , in the image and likeness of the others, qt-everywhere-opensource-src-4.8.4.tar.gz.sha1 , and you can take sha1 from the file page, i.e. 89c5ecba180cae74c66260ac732dc5cb, and an empty qt-everywhere-opensource-src-4.8.4.tar.gz.verified file to “trick” make, as if he had already downloaded it and checked it.
For the example with GStream , you need to assemble and install it, the autoconf automake autopoint libtool libraries ( see above ) should already be installed, and you need to download the GStream itself:
wget http://gstreamer.freedesktop.org/src/gstreamer/gstreamer-1.2.3.tar.xz Unpack, configure, build, install:
./autogen.sh --noconfigure && GST_PLUGINS_GOOD_DIR=$(pkg-config --variable=pluginsdir gstreamer-plugins-bad-1.0) ./configure make make install it is also better to add plugins:
wget http://gstreamer.freedesktop.org/src/gst-plugins-base/gst-plugins-base-1.2.3.tar.xz ./configure --prefix=/usr \ --with-package-name="GStreamer Base Plugins 1.2.3 BLFS" \ --with-package-origin="http://www.linuxfromscratch.org/blfs/view/svn/" && make make install It remains to restart the sdk build, I prefer to do
make clean before the build to get a “clean” image.In conclusion, I want to note that your applications can be put in the myapps folder of the sdk itself, just register them in configs in the same way as the examples so that you can work with them from the menu. And when configuring, do not forget to specify network settings in the Generic SDK configuration menu, (IPv6 does not work at all, maybe because this is an eval version, and it may never work).
Useful links:
» RidgeRun SDK Official Website
» RidgeRun SDK Wiki
» Spread RidgeRun SDK Errors
» Getting Started with the Leopard Board DM365
» Code Sourcery ARM toolchain 2009q1-203
» DVSDK 4 DM365
Source: https://habr.com/ru/post/314848/
All Articles