Cicerone - simple navigation in Android application

In this scheme, not the skeleton of the ancient inhabitant of the water depths and not the metro scheme of a certain megalopolis, this is a map of transitions on the screens of a very real Android application! But, despite the complexity, we managed to successfully implement it, and the decision to issue in the form of a small library, which will be discussed in the article.
To avoid questions about the name in advance, I’ll clarify: Cicerone ( “che-che-ro-non” ) is an obsolete word with Italian roots, with the meaning “guide for foreigners”.
In our projects we try to adhere to architectural approaches that allow us to separate the logic from the display.
Since I prefer MVP in this respect, the word “presenter” will often appear later in the text, but I want to note that the solution presented does not limit you in choosing the architecture (you can even use the “everything in Fragment” approach in the classical approach) and even in this case, Cicerone will give your profit!).
Navigation is more business logic, so I prefer to assign responsibility for transitions to the presenter. But in Android, not everything is so smooth: for making transitions between an Activity, switching Fragments, or changing the View inside a container
- you can’t do without dependence on Context, which you don’t want to transfer to the logic layer, thereby linking it to the platform, complicating testing and risking memory leaks (if you forget to clear the link);
- you must take into account the life cycle of the container (for example, java.lang.IllegalStateException: Can not perform this action afterSaveInstanceState with Fragments).
Therefore, there was a solution implemented in Cicerone.
I think it’s worth starting with the structure.
Structure
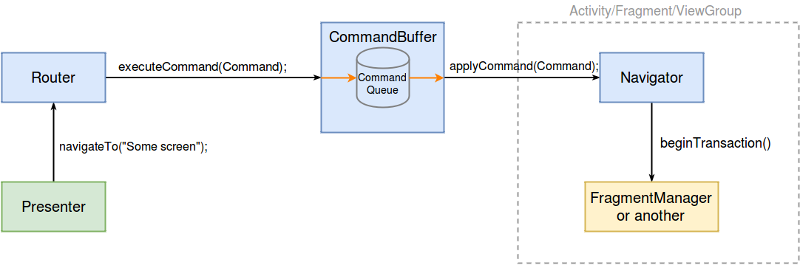
There are four entities on the diagram:
- Command is the simplest transition command that Navigator performs.
- Navigator is a direct implementation of “screen switching” inside the container.
- Router is a class that turns high-level navigation calls to a presenter into a set of Command.
- CommandBuffer - is responsible for the safety of the called navigation commands if at the time of their call there is no possibility to make the transition.
Now about each more.
Transition teams
We noticed that any transition map (even quite complicated, as in the first image) can be implemented using four basic transitions, combining which we get the desired behavior.
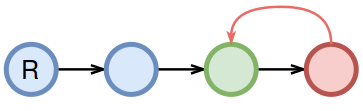
Forward

Forward (String screenKey, Object transitionData) is a command that transitions to a new screen by adding it to the current screen chain.
screenKey is a unique key for each screen.
transitionData - data needed by the new screen.
The letter R denotes the root screen, its only feature is that when you exit from this screen, we will exit the application.
Back
Back () is a command that removes the last active screen from the chain and returns to the previous one. When you call on the root screen is expected to exit the application.
Backto

BackTo (String screenKey) - a command that allows you to return to any of the screens in the chain, it is enough to specify its key. If there are two screens in the chain with the same key, then the last one (the “right” one) will be selected.
It should be noted that if the specified screen is not found, or pass null in the key parameter, the transition to the root screen will be made.
In practice, this command is very convenient. For example, for authorization: two screens. Phone -> SMS, and then access to the one from which the authorization was launched.
Replace
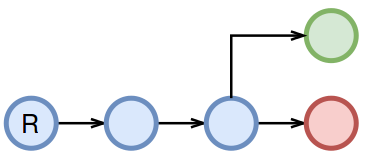
Replace (String screenKey, Object transitionData) is a command that replaces the active screen with a new one.
Someone may argue that this result can be achieved by calling Back and Forward commands in succession, but then we will exit the application on the root screen!
That's all! In practice, these four teams are enough to build any transitions. But there is another command that does not apply to navigation, but is very useful in practice.
Systemmessage

SystemMessage (String message) - a command that displays a system message (Alert, Toast, Snack, etc.).
Sometimes it is necessary to exit the screen and show a message to the user. For example, that we saved the changes made. But the screen to which we return, should not be aware of someone else's logic, and therefore we rendered the display of such messages in a separate command. It is very convenient!
All commands are marked with the Command marker marker. If for some reason you need a new team, just create it, no restrictions!
Navigator
The commands themselves do not implement the switching of screens, but only describe these transitions. Navigator is responsible for their implementation.
public interface Navigator { void applyCommand(Command command); } Depending on the task, the Navigator will be implemented differently, but it will always be where the container for the switchable screens is located.
- In Activity to switch Fragment'ov.
- In Fragment'e to switch nested (child) Fragment'ov.
- ... your option.
Since in the vast majority of Android applications, navigation relies on switching Fragments within the Activity, in order not to write the same type of code, the library already has a ready-made FragmentNavigator (and SupportFragmentNavigator for SupportFragments) that implements the commands presented.
Enough:
1) transfer the container ID and the FragmentManager to the constructor;
2) implement methods for exiting the application and displaying the system message;
3) implement the creation of Fragment'ov by screenKey.
For a more detailed example, I advise you to look into the Sample application.
The application does not need to have one Navigator. Example (also real, by the way): in Activity there is a BottomBar, which is available to the user ALWAYS. But each tab has its own navigation, which is preserved when switching tabs in BottomBar.
This is solved by a single navigator within the Activity, which switches tabs, and local navigators within each Fragment-a tab.
Thus, each individual presenter is not tied to where he is: inside the chain of one of the tabs or in a separate Activity. It is enough to provide him with the correct Router. One Router is associated with only one Navigator at any one time. About this a little further.
Router
As mentioned above, combining teams , you can implement any transition. This is exactly the task that Router does.
For example, if there is a task for some event in the presenter:
1) throw off the whole chain to the root screen;
2) replace the root screen with a new one;
3) and still show the system message;
then a method is added to the Router, which sends a sequence of three commands to be executed in the CommandBuffer:
public void navigateToNewRootWithMessage(String screenKey, Object data, String message) { executeCommand(new BackTo(null)); executeCommand(new Replace(screenKey, data)); executeCommand(new SystemMessage(screenKey, data)); } If the presenter himself called these methods, then after the first BackTo () command, he would have been destroyed (not quite, but conveys the essence) and did not complete the work correctly.
The library has a ready-made Router, used by default, with the most necessary transitions, but as with the navigator, no one forbids creating its own implementation.
navigateTo () - switch to the new screen.
newScreenChain () - resets the chain to the root screen and opens one new one.
newRootScreen () - reset the chain and replace the root screen.
replaceScreen () - replaces the current screen.
backTo () - return to any screen in the chain.
exit () - exit from the screen.
exitWithMessage () - exit from the screen + message display.
showSystemMessage () - display of the system message.
CommandBuffer
CommandBuffer is a class that is responsible for delivering Navigator navigation commands. It is logical that the link to the navigator instance is stored in the CommandBuffer. It gets there through the NavigatorHolder interface:
public interface NavigatorHolder { void setNavigator(Navigator navigator); void removeNavigator(); } In addition, if commands are received in the CommandBuffer, and at the moment it does not contain a Navigator, they will be saved in the queue and will be executed immediately when installing the new Navigator. Thanks to the CommandBuffer, we managed to solve all the problems of the life cycle.
Specific example for the Activity:
@Override protected void onResume() { super.onResume(); SampleApplication.INSTANCE.getNavigatorHolder().setNavigator(navigator); } @Override protected void onPause() { SampleApplication.INSTANCE.getNavigatorHolder().removeNavigator(); super.onPause(); } Why onResume and onPause? For secure transaction Fragment'ov and display the system message in the form of an alert.
From theory to practice. How to use cicerone?
Suppose we want to implement navigation on Fragments in MainActivity:
Add dependency to build.gradle
repositories { maven { url 'https://dl.bintray.com/terrakok/terramaven/' } } dependencies { //Cicerone compile 'ru.terrakok.cicerone:cicerone:1.0' } In the SampleApplication class, we initialize the ready router
public class SampleApplication extends Application { public static SampleApplication INSTANCE; private Cicerone<Router> cicerone; @Override public void onCreate() { super.onCreate(); INSTANCE = this; cicerone = Cicerone.create(); } public NavigatorHolder getNavigatorHolder() { return cicerone.getNavigatorHolder(); } public Router getRouter() { return cicerone.getRouter(); } } In the MainActivity create a navigator:
private Navigator navigator = new SupportFragmentNavigator(getSupportFragmentManager(), R.id.main_container) { @Override protected Fragment createFragment(String screenKey, Object data) { switch(screenKey) { case LIST_SCREEN: return ListFragment.getNewInstance(data); case DETAILS_SCREEN: return DetailsFragment.getNewInstance(data); default: throw new RuntimeException(“Unknown screen key!”); } } @Override protected void showSystemMessage(String message) { Toast.makeText(MainActivity.this, message, Toast.LENGTH_SHORT).show(); } @Override protected void exit() { finish(); } }; @Override protected void onResume() { super.onResume(); SampleApplication.INSTANCE.getNavigatorHolder().setNavigator(navigator); } @Override protected void onPause() { super.onPause(); SampleApplication.INSTANCE.getNavigatorHolder().removeNavigator(); } Now, from anywhere in the application (ideally from the presenter), you can call the router's methods:
SampleApplication.INSTANCE.getRouter().backTo(...); Special cases and their solution
Single Activity?
Not! But I don’t view Activity as screens, only as containers. See: Router is created in the Application class, so when switching from one Activity to another, the active navigator will simply change, so it is quite possible to divide the application into independent Activities, within which there will already be screen switches. Of course, it should be understood that the chains of screens in this case will be tied to a separate Activity, and the BackTo () command will work only in the context of one Activity.
Nested navigation
I gave an example above, but I repeat again:
There is an activity with tabs. The task is to ensure that within each tab there is an independent chain of screens that persists when changing tabs.
This is solved by two types of navigation: global and local.
GlobalRouter is an application router connected to the Activity navigator.
A presenter handling clicks on tabs invites commands from GlobalRouter.
LocalRouter - routers inside each Fragment container. Navigator for LocalRouter'a implements the Fragment-container itself.
Presenters related to local chains within tabs are obtained for LocalRouter navigation.
Where is the connection? In Fragment'ah containers there is access to the global navigator! At the moment when the local chain inside the tab has ended and the Back () command is called, the Fragment sends it to the global navigator.
Tip: To customize dependencies between components, use Dagger 2, and CustomScopes to manage their lifecycle.
And what about the system back button?
This question is not specifically addressed in the library. Pressing the Back button should be perceived as user interaction and transmitted simply as an event to the presenter.
But is there Flow or Conductor?
We looked at other solutions, but abandoned them, since one of the main tasks was to use the most standard approach and not to create another framework with our FragmentManager and BackStack.
First, it will allow new developers to quickly connect to the project without having to learn third-party frameworks.
Secondly, you will not have to fully rely on complex third-party solutions, which is fraught with difficult support.
Total
Cicerone Library:
- not tied to fragments;
- not a framework;
- provides short calls;
- easy to expand;
- adapted for tests;
- does not depend on the life cycle!
Github
Cicerone is a lightweight library app.
')
Source: https://habr.com/ru/post/314838/
All Articles