Google Maps and WordPress 2.x Integration
This article is a free script on the Google Maps for WordPress plugin at http://avi.alkalay.net/2006/11/google-maps-plugin-for-wordpress.html . What I considered necessary I added from myself, what I did not use - I missed, so this case is not a translation in the literal sense of the word.
Sometimes it becomes very useful and pleasant to integrate Google Maps into the “contacts” section of the site you are doing. I tried several different plugins for WordPress and just classes / libraries (like Solmetra Maps ), but finally I stopped at the Google Maps for Wordpress plugin. Very informative name for the plugin, by the way ...
So, take the plugin itself. We happily put it as usual, that is, in ~ / wp-content / plugins and go to the admin panel:

')
In order for the map to be displayed you need to get the Google Map API Key, which is completely free of charge written to this address : enter the address of your site, hit the button, and get the code. The only thing that I frankly didn’t like was that it was necessary to have a gmail account, my email accounts, though Google but, are parked to the domains, and this authorization method does not roll. To hell with him, we go further.
Further, everything, actually rests against the following: we go to Google Maps , and we select that point where there is our office.

We get with the help of “Link to this page” a pointer to the geographical point that we want to see in the form of a link. Now, our task is to insert this business into the “Contacts” page. Create a new page in WordPress, it will be responsible for the "Contacts" section.
In the WordPress editing window, we add there the graphic object and text that will be displayed in the pop-up balloon when you click on the green button on the map.
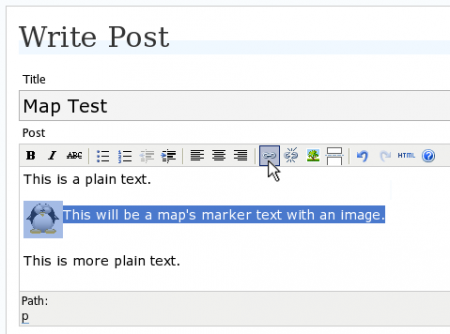
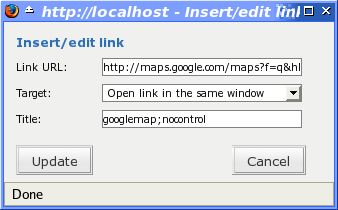
Select all this stuff, and make it a link, while pointing to the Title tag googlemap (required) and, if necessary, additional tags separated by a semicolon:
- nocontrol or nocontrols : removes scaling sliders;
- nomarker or nomarkers : removes the green pip;
- w: size and h: size - allows you to put down the desired card size at the output You can use both values in pixels and percentages, which is convenient in some cases.
Voila! When loading this page, instead of this link, a map of the area will appear with a link to where it should be.
In principle, the simplest part is described. Try, read the original, if something is not clear or you need more serious integration - ask.
Sometimes it becomes very useful and pleasant to integrate Google Maps into the “contacts” section of the site you are doing. I tried several different plugins for WordPress and just classes / libraries (like Solmetra Maps ), but finally I stopped at the Google Maps for Wordpress plugin. Very informative name for the plugin, by the way ...
So, take the plugin itself. We happily put it as usual, that is, in ~ / wp-content / plugins and go to the admin panel:
')
In order for the map to be displayed you need to get the Google Map API Key, which is completely free of charge written to this address : enter the address of your site, hit the button, and get the code. The only thing that I frankly didn’t like was that it was necessary to have a gmail account, my email accounts, though Google but, are parked to the domains, and this authorization method does not roll. To hell with him, we go further.
Further, everything, actually rests against the following: we go to Google Maps , and we select that point where there is our office.
We get with the help of “Link to this page” a pointer to the geographical point that we want to see in the form of a link. Now, our task is to insert this business into the “Contacts” page. Create a new page in WordPress, it will be responsible for the "Contacts" section.
In the WordPress editing window, we add there the graphic object and text that will be displayed in the pop-up balloon when you click on the green button on the map.
Select all this stuff, and make it a link, while pointing to the Title tag googlemap (required) and, if necessary, additional tags separated by a semicolon:
- nocontrol or nocontrols : removes scaling sliders;
- nomarker or nomarkers : removes the green pip;
- w: size and h: size - allows you to put down the desired card size at the output You can use both values in pixels and percentages, which is convenient in some cases.
Voila! When loading this page, instead of this link, a map of the area will appear with a link to where it should be.
In principle, the simplest part is described. Try, read the original, if something is not clear or you need more serious integration - ask.
Source: https://habr.com/ru/post/31461/
All Articles