Connecting Intel Internet of Things Gateways to AWS and sharing data with the cloud using Node-RED or Python
We'll talk about how to connect the Intel Gateway for the Internet of Things to Amazon Web Services (AWS) and start building applications designed to work with this platform using Node-RED and Python. As a result, we will come to a solution in which the gateway will transmit data to the cloud using the MQTT protocol.

In order to try out in practice what is being discussed, you will need an Intel gateway for the Internet of things with IDP 3.1 or higher, connected to the Internet, and a computer from which you can organize terminal access to the gateway.
If your gateway needs to be configured, refer to this material .
')
Let's start with preparing the gateway and AWS for collaboration.
Install the IoT Cloud repository on the gateway.
Here we look at the steps needed to equip the gateway with Amazon Web Services support.
Configure account settings in Amazon Web Services. This will need to connect to the cloud.
It is recommended to connect to the gateway via SSH or use the command line using the IoT Gateway Developer Hub interface to make it convenient to copy commands. If you work with the command line by connecting to the gateway directly using the monitor and keyboard, you in the next section will have to manually enter the access key and secret key.
At this stage, after setting up the gateway, you can exchange data with AWS. Now consider two options for interaction between the gateway and the cloud: using Node-RED and Python. If you are only interested in one of the aforementioned application development platforms, you can read only a section devoted to it.
In order to start working in the Node-RED environment, you need to make sure that you are using the latest version of the OS. AWS requires Node-RED 0.14.x.
You can monitor the interaction between AWS and the gateway using the AWS console.
In order to open the Node-RED window, in the IoT Gateway Developer Hub , go to the Administration section. Here, under the Node-RED icon, click on the Launch button.

Running Node-RED
Sending data to AWS using Node-RED is fine-tuned. Let us now organize the same process using Python.
After the gateway is configured to interact with AWS, you can prepare it to work with the cloud using Python scripts. There are many examples of such scripts, they can be used for training purposes and for testing the system.
The cloud part plays an important role in a variety of IoT systems. Now that you have mastered this guide, you can connect Intel IoT gateways to Amazon Web Services and create applications that can work with cloud services in a Node-RED environment or in Python.
In order to try out in practice what is being discussed, you will need an Intel gateway for the Internet of things with IDP 3.1 or higher, connected to the Internet, and a computer from which you can organize terminal access to the gateway.
If your gateway needs to be configured, refer to this material .
')
Gateway and AWS Preparation
Let's start with preparing the gateway and AWS for collaboration.
▍Installing the IoT Cloud Repository on the Gateway
Install the IoT Cloud repository on the gateway.
- Log into the gateway console using either a monitor and a keyboard directly connected to it, or else, and it’s better to do so via SSH from a remote computer.
- Add the GPG key for the cloud repository by typing the following command:
rpm --import http://iotdk.intel.com/misc/iot_pub.key - On your computer, open a browser, and by entering the gateway IP address in the address bar, connect to the Intel IoT Gateway Developer Hub. In order to find out the IP address of the gateway, you can use the
ifconfigcommand. - Log in to IoT Gateway Developer Hub using your account details. The default username and password is root .

Login to IoT Gateway Developer Hub - Add the IoT Cloud repository to the system.

Adding IoT Cloud Repository - Go to the Packages section and click on the Add Repo + button.

Repository settings - Fill in the fields of the window that appears as follows:
Name : IoT_Cloud
URL : iotdk.intel.com/repos/iot-cloud/wrlinux7/rcpl13
Then click on the Add Repository button. - Finally, click the Update Repositories button to update the package list.
AWWWS Support Tuning on Gateway
Here we look at the steps needed to equip the gateway with Amazon Web Services support.
- Click the Add Packages + button. This will bring up a list of packages that can be installed.

Starting the package installation process - Search for the cloud-aws keyword by typing it into the field at the top of the add new package window. Then, when the required package is found, click on the Install button, which is located to the right of the packagegroup-cloud-aws entry .

Package installation
▍User Setup in AWS
Configure account settings in Amazon Web Services. This will need to connect to the cloud.
- In your browser, go to the AWS console address and log in to your Amazon Web Sevices account.
- Configure the AWSIoTFullAccess policy.

Setting Permissions for an AWS Account - Click the account name in the upper right part of the window and select the Security Credentials command from the drop-down menu.

Security Access Warning Caption
If you see the pop-up message shown in the image above, click the Continue to Security Credentials button. - On the left side of the window, click the Users link to display a list of users in your AWS account. If there are no users in the list, click the Create New Users button, enter the name of the new user, and click the Create button. After that, the record of the created user will appear in the list.

Add a new user to your AWS account - Click a username to display a page with information about it. Select the Permissions tab and click the Attach Policy button.

Begin assignment of user security policy - Find the AWSIoTFullAccess policy in the list. Check the box next to the policy name and click on the Attach Policy button to assign it to the user.

Assign user security policy - Create a passkey for the device.
- Return to the user details screen and click the Create Access Key button on the Security Credentials tab.

Creating an access key for a device
After that, a window will appear that contains a key pair that is unique for each user. The key, which is displayed in the Secret Access Key field, is shown only once, after closing the window it can no longer be seen. This means that you will need to generate a new key to re-access the system, if the old one, after it was created, you have not saved anywhere.
Creating an access key
Attention! Do not close this window until following the steps in the next section.
Set Gateway Configuration
It is recommended to connect to the gateway via SSH or use the command line using the IoT Gateway Developer Hub interface to make it convenient to copy commands. If you work with the command line by connecting to the gateway directly using the monitor and keyboard, you in the next section will have to manually enter the access key and secret key.
- Add user credentials to the gateway. To do this, enter the following command:
aws configure
In response, the system prompts you to enter the following:- AWS Access Key ID : Just generated Access Key ID, access key.
- AWS Secret Access Key : Secret Access Key, the secret key that corresponds to the generated access key.
- Default region : here you can find a list of regions (for example, eu-west-1)
- The default output format : the default settings are appropriate, so press Enter .
- Create the “thing” associated with your AWS instance. To do this, enter the following commands on the gateway:
aws iot create-thing --thing-name gateway-test-01
If the addition of “things” was successful, information similar to the ones shown in the figure below will be displayed in the console.
Successful creation of "things" - Set permissions. To do this, enter the following commands in the console in order to create a new permission policy for your AWS instance.
aws iot create-policy --policy-name gateway-policy --policy-document '{ "Version": "2012-10-17", "Statement": [{ "Effect": "Allow", "Action":["iot:*"], "Resource": ["*"] }] }'
You can learn about the successful addition of a policy by a message in the console.
Successful Adding Policy - Create keys and a certificate for the “thing”. To do this, enter the following commands, which will create the keys and certificates necessary for organizing interaction with AWS.
wget -O rootCA.pem https://www.symantec.com/content/en/us/enterprise/verisign/roots/VeriSign-Class%203-Public-Primary-Certification-Authority-G5.pem aws iot create-keys-and-certificate --set-as-active --certificate-pem-outfile cert.pem --private-key-outfile privkey.pem
If everything goes as it should, messages will appear in the console that resemble those shown below. They will be followed by a large fragment of JSON data. In order to continue working, we need only the parameter certificateArn , which is located at the very beginning.
Successful addition of keys and certificates - Now you need to bind policy and certificate. To do this, use the following command:
aws iot attach-principal-policy --policy-name ${POLICY_NAME} –principal ${CERTIFICATE_ARN}
Check that the name of the policy is correct (for example, gateway-policy ) and the value of certificateArn obtained in the previous step. It all looks like this:aws iot attach-principal-policy --policy-name gateway-policy --principal arn:aws:iot:eu-west-1:681450608718:cert/122c86b84c6e0b919353882c03ca37385855897e16804438a20d44b3f9934cb3 - Check out the device in the AWS IoT console. To do this, go to the console home screen by clicking the AWS icon in the upper left of the page. Then check that in the upper right corner you select the region that was used when setting up the gateway (for example, Ireland). Now click on the AWS IoT service icon in the list.

AWS Home Screen, transition to AWS IoT
Now, the newly created “thing” should be visible in the AWS IoT control panel, as well as the policy and certificate that we configured above.
AWS control panel
At this stage, after setting up the gateway, you can exchange data with AWS. Now consider two options for interaction between the gateway and the cloud: using Node-RED and Python. If you are only interested in one of the aforementioned application development platforms, you can read only a section devoted to it.
Interaction with AWS IoT. Node-red
In order to start working in the Node-RED environment, you need to make sure that you are using the latest version of the OS. AWS requires Node-RED 0.14.x.
AWWS Setup
You can monitor the interaction between AWS and the gateway using the AWS console.
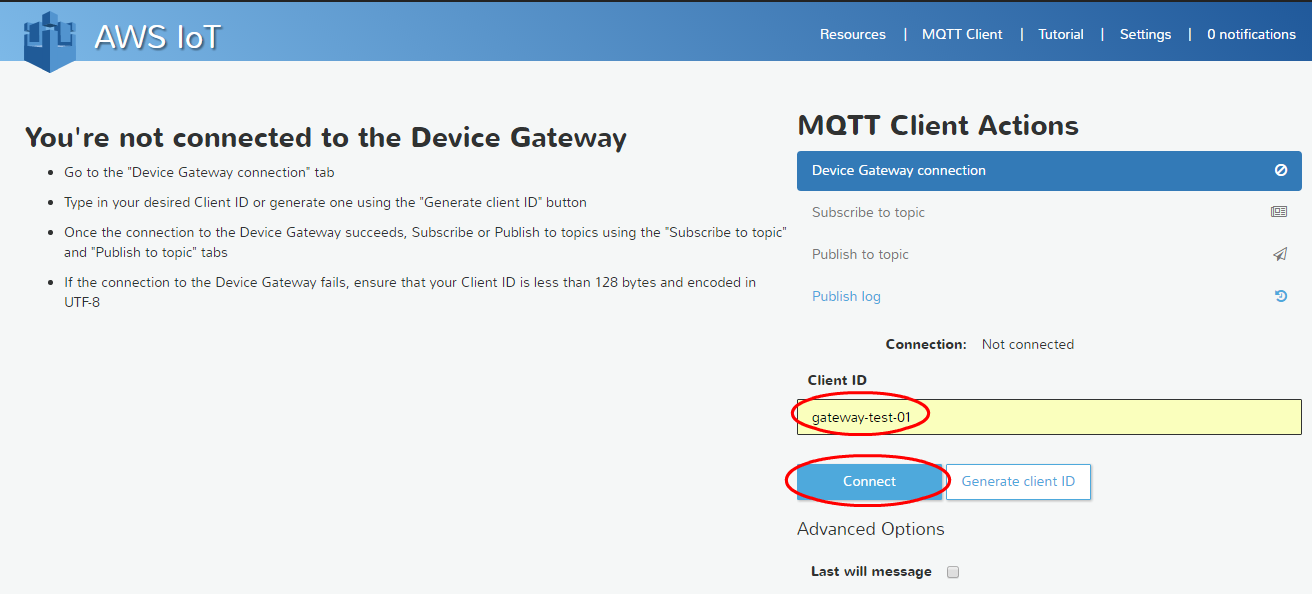
- In the AWS IoT console, click the MQTT Client link, which is located in the upper right part of the window.

MQTT Client Reference - In the MQTT Client window, enter the name of the “thing” that was previously assigned (for example, gateway-test-01 ) and click the Connect button.

Connect to "things"
If AWS can communicate with the gateway, the connection status message changes to Connected and turns green.
AWS Gateway Connection Status - Click the Subscribe to topic link in the MQTT Client Actions group.

Begin the MQTT Subscription Process - In the Subscription topic field, enter
sdk/test/noderedand click the Subscribe button.
Subscribe to a topic
Now the messages posted by the gateway in the sdk / test / nodered topic will appear in the message window.
View window messages received from the gateway
▍Download interface Node-RED
In order to open the Node-RED window, in the IoT Gateway Developer Hub , go to the Administration section. Here, under the Node-RED icon, click on the Launch button.
Running Node-RED
▍Setting an application flowchart
- Drag the mqtt and inject nodes onto the current sheet from the node panel, which is located on the left. If the desired node is not visible, scroll the panel.

Inject and mqtt nodes - Position the nodes in the window and connect them as shown in the figure below. Here there is an inject node, renamed the timestamp , which will, at a specified interval, send information about the current time to the mqtt node. The mqtt node is responsible for sending the received data to the MQTT broker. In this case, it will be AWS IoT . Once the nodes are placed in the flowchart and connected, they must be configured.

Layout and communication of nodes in Node-RED - To configure an inject node (which eventually became a timestamp node), you need to double click on it, which will bring up a dialog box. It must be aligned with the figure below, and click on the Done button. Thanks to these settings, the node will send data every 5 seconds.

Inject node setup - To configure the mqtt node, double-click on it, and then, in the settings window, click the edit button next to the Server field.

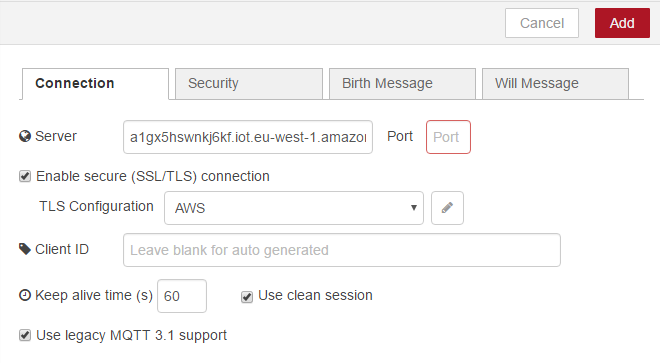
Start configuring the mqtt node - Fill in the MQTT connection settings fields as shown in the figure below. You will need to enter your own server URL. Now you will learn about where to get it.

Configure the mqtt node, enter server information - Enter the following command to get the server address for the AWS messaging.
aws iot describe-endpoint
In response to it, the address information will be displayed in the console. Namely, the endpointAddress parameter will contain the address of the server that we need to configure the MQTT connection.
Server address in the console
Copy the URL in quotes and paste it into the Server field. Note that the Port field must be empty.
Now you need to configure the connection security settings. Before you do this, you need to set the Enable secure flag (SSL / TLS) connection , then click on the Edit icon at the end of the TLS Configuration section. - In the window shown below, you need to configure the parameters. Namely, in them you need to specify the path to the previously generated key files and certificates.

Setting paths to keys and certificates- In the Certificate field, enter the path to the
cert.pemfile that was generated earlier. - In the Private Key field - the path to
privkey.pem. This file has also been generated. - In the CA Certificate field, the path to the
rootCA.pemfile that should have been loaded.
All certificates and keys must be stored in the same directory. By default, if you change nothing by connecting to the gateway, this is / root .
Here is what the filled fields from our example look like.
Filled fields of paths to files of keys and certificates - In the Certificate field, enter the path to the
- After you complete the configuration, click the Add button to save the TLS configuration. The setup screen should look something like the one below.
Complete setup - Now almost everything is ready. It remains only to enter the name of the topic to which you want to send messages. The topic entered should correspond to the one we subscribed to earlier, setting up the MQTT client in the AWS control panel, so you need to enter
sdk/test/noderedin the Topic field and click the Done button.
Configuring MQTT Themes
The Node-RED application is now configured and ready for deployment.
▍Downloading and checking the application
- Click on the Deploy button in the upper right corner of the Node-RED window. If a window appears asking you to confirm the deployment, click the Confirm deploy button.

Deploying the Node-RED application
If the MQTT node has been successfully configured, below it you can see the green LED labeled connected .
Mqtt node status - To finally make sure everything is working correctly, return to the MQTT client message window in the AWS control panel. There should be new posts.

New messages in the AWS MQTT client window
Sending data to AWS using Node-RED is fine-tuned. Let us now organize the same process using Python.
Interaction with AWS IoT. Python
After the gateway is configured to interact with AWS, you can prepare it to work with the cloud using Python scripts. There are many examples of such scripts, they can be used for training purposes and for testing the system.
AWWS Setup
- In the AWS IoT console, click the MQTT Client link, which is located at the top right of the program window.

MQTT Client Reference - In the MQTT Client window, enter the name of the “thing” that was previously assigned to the gateway (for example, gateway-test-01 ) and click the Connect button.
Connect to "things"
If AWS can communicate with the gateway, the connection status message changes to Connected and turns green.
AWS Gateway Connection Status - In the MQTT Client Actions section, click Subscribe to topic.

Begin Subscribing To MQTT - In the Subscription topic field, enter
sdk/test/Pythonand click the Subscribe button.
Set up a subscription to the MQTT theme
Messages received from the gateway can be viewed in the message window.
Message box
▍Sending a message from the gateway
- In order to find out the server address needed to send MQTT messages from the gateway, run the following command:
aws iot describe-endpoint
In response, you will receive the value of the endpointAddress parameter, which contains what we need. Copy the address bar, placed in quotes.
Server address - Navigate to the folder that contains AWS examples. For example, in our case, this required the following command:
cd /usr/share/awsiotsdk/samples/python/ - Run one of the code examples using the following command:
python basicPubSub.py -e [ENDPOINT] -r [ROOTCA_PATH] -c [CERT_PATH] –k [PRIVATE_KEY_PATH]
Here's how to set the script call options:- ENDPOINT : The address of the server that you found out above.
- ROOTCA_PATH : Path to the previously loaded rootCA.pem file.
- CERT_PATH : Path to the previously generated cert.pem file.
- PRIVATE_KEY_PATH : Path to the previously generated privkey.pem file.
Certificate and key files must be located in the same directory. By default, this is / root or $ HOME , if you have not changed anything by connecting to the gateway.
In our case, the above command looked like this:python basicPubSub.py -e a1gx5hswnkj6kf.iot.eu-west-1.amazonaws.com -r $HOME/rootCA.pem -c $HOME/cert.pem -k $HOME/privkey.pem
If the sample application is working, data will be displayed in the console, such as those shown in the figure below. This indicates that MQTT messages are sent to the sdk / test / Python subject.
Messages from the Python script - In order to check whether AWS really receives these messages, you need to return to the messages window on the AWS website. There should appear new messages.

New messages sent from the gateway
As a result, on the gateway connected to AWS IoT, you can run Python scripts that interact with the cloud.
findings
The cloud part plays an important role in a variety of IoT systems. Now that you have mastered this guide, you can connect Intel IoT gateways to Amazon Web Services and create applications that can work with cloud services in a Node-RED environment or in Python.
Source: https://habr.com/ru/post/314282/
All Articles