We generate beautiful pictures for social networks

The code to generate this particular image.
$generator = new imgGenerator(); $textGenerator=new imgTextGenerator(); $textGeneratorTop=new imgTextGenerator(); $label=$textGeneratorTop ->seTextShadow("#000000", 75, 1, 2, 2) ->setText("Test Site","#ffffff",imgGenerator::position_center_top,"1/12",0 ) ->setBackground("#000000",'3%') ->setFont($_SERVER["DOCUMENT_ROOT"]."/upload/fonts/fonts2_7/hinted-PTF55F.ttf"); $text=$textGenerator ->seTextShadow("#000000", 75, 1, 2, 2) ->setText(" ","#ffffff",imgGenerator::position_center_center,"1/7",array(0,'5%',0,'5%')) ->setFont($_SERVER["DOCUMENT_ROOT"]."/upload/fonts/fonts2_7/hinted-PTF55F.ttf"); $generator ->addText($text) ->addText($label) ->fromImg($_SERVER["DOCUMENT_ROOT"] . "/upload/dynamic/2016-08/15/carrot-big.jpg") ->resizeFor("autodetect") ->addOverlay(0.5,"#000000") ->show(); Looking for beautiful pictures for soc. networks that recently generate many news (and not only) sites - I wanted to write my own generator.
Examples of pictures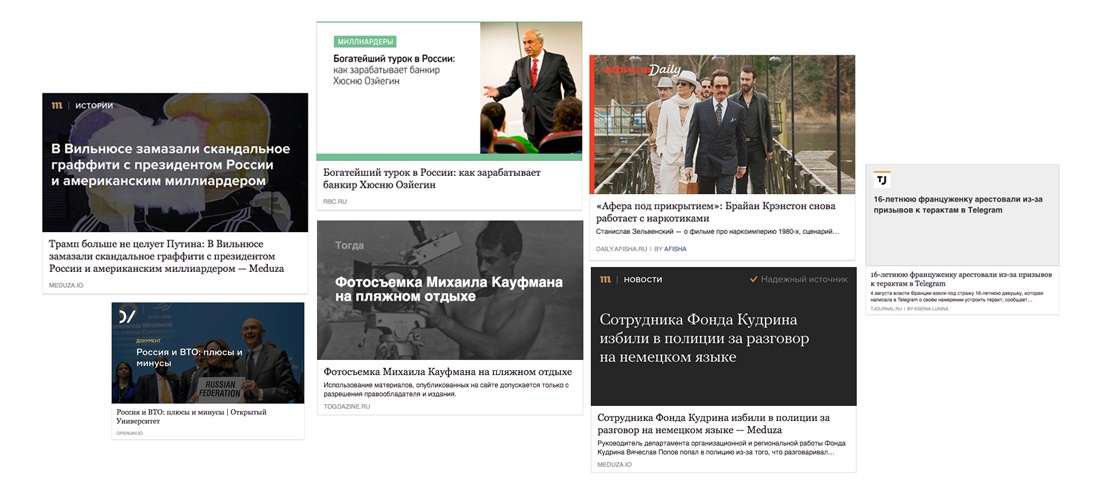
The script works in PHP, using the Imagick module. I did not dare to write this on GD2.
')
The algorithm of the work was supposed to:
- We take as a basis a picture or color
- We reduce to the necessary size
- We put a translucent background on top
- Set the logo
- Add an inscription
- Cache the result
In addition to all this, you need the ability to set indents, positioning, automatic font size.
Below I will write pieces of code from the finished script, the script can be fully viewed on Github .
Create a base
The base can be either from color or from a picture. It's simple. Create an Imagick object:
For pictures:
$this->im = new \Imagick($this->opts["img"]); For color:
$this->im = new \Imagick(); $this->im->newImage(100,100,$this->opts["color"]); Decrease
Next, we reduce and cut the picture to the desired size, since Imgick does not know how to do this, we write a small method for this:
$oldGeometry=$im->getImageGeometry(); $max=max($this->opts["resize_and_crop"]["width"],$this->opts["resize_and_crop"]["height"]); if($max==$this->opts["resize_and_crop"]["width"]) { $otn=$oldGeometry["height"]/$oldGeometry["width"]; $width=$max; $height=$max*$otn; if($height-$this->opts["resize_and_crop"]["height"] < 0) { $height=$this->opts["resize_and_crop"]["height"]; $width=$height/$otn; $x=($width-$this->opts["resize_and_crop"]["width"])/2; } else { $x = 0; } if($position==imgGenerator::position_center_center) { $y=($height-$this->opts["resize_and_crop"]["height"])/2; } } else { $otn=$oldGeometry["width"]/$oldGeometry["height"]; $height=$max; $width=$max*$otn; if($width-$this->opts["resize_and_crop"]["width"] < 0) { $width=$this->opts["resize_and_crop"]["width"]; $height=$width/$otn; $y=($width-$this->opts["resize_and_crop"]["height"])/2; } else { $y = 0; } if($position==imgGenerator::position_center_center) { $x=($width-$this->opts["resize_and_crop"]["width"])/2; } } $im->resizeImage($width,$height,\Imagick::FILTER_LANCZOS,1,false); $im->cropimage($this->opts["resize_and_crop"]["width"],$this->opts["resize_and_crop"]["height"],$x,$y); But the problem of reduction was not to reduce to the required size, but to determine which social. network was a request for a picture, and then set the desired reduction options.
The parameters themselves were as follows:
| 1200x630 | |
| 978x511 | |
| Google+ | 2120x1192 (winner!) |
| In contact with | 537x240 |
| Classmates | 780x585 (reduced to 780x385) |
So does Vkontakte. It is written that when accessing a site he uses vkShare as a User Agent. In practice, it turned out that he does it sometimes. I do not know what this is all about, but when I tried to share a new link in VK, I went to the page several times with completely different browsers. Sometimes there was vkShare.
In the end, after a series of experiments, I decided to make it so that if the User Agent was not determined, then we consider it to be VK.
The result was the following list of social robots:
- facebookexternalhit
- vkShare
- Twitterbot
- Odklbot
During testing, the office sounded quite a funny question from me, “Is there anyone in classmates?”. No one confessed. It turned out that I registered there myself once.
While writing the article, the script acquired the withoutCrop method, its meaning is that it allows you to reduce and position the picture without cutting it. This allows you to improve the situation if the original picture is almost always horizontal (for example, if it is a film cover, books, games, etc.).
We impose a translucent substrate
$geometry=$this->im->getImageGeometry(); $color=new \ImagickPixel($this->opts["overlay"]["color"]); $overlay->newImage($geometry["width"],$geometry["height"],$color); $overlay->setImageOpacity($this->opts["overlay"]["opacity"]); Logo installation
After some experiments, I came to the conclusion that if the logo will occupy no more than 25% of the width and height of the image, then it will look quite good.
The script allows you to set the logo in any place in the picture, including in the center.
The default settings are suitable for almost all cases, but the script allows you to change the size of the logo, indents and positioning.
Inscription
I suspected that the inscription would be one of the biggest problems. So it happened.
So, create an instance of ImagickDraw and set various parameters for it: font, font size, color, style, anti-aliasing:
$draw=new \ImagickDraw(); $draw->setFont($this->opts["big_text_font"]); $draw->setFontSize($fs); $draw->setFillColor(new \ImagickPixel($this->opts["big_text"]["color"])); $draw->setStrokeAntialias(true); $draw->setTextAntialias(true); After that, before setting the alignment, we divide our line into several lines, if it does not fit. To do this, we use queryFontMetrics, which, about a miracle (about this - below), in this case works as it should.
function splitToLines($draw,$text,$maxWidth) { $ex=explode(" ",$text); $checkLine=""; $textImage=new \Imagick(); foreach ($ex as $val) { if($checkLine) { $checkLine.=" "; } $checkLine.=$val; $metrics=$textImage->queryFontMetrics($draw, $checkLine); if($metrics["textWidth"]>$maxWidth) { $checkLine=preg_replace('/\s(?=\S*$)/',"\n",$checkLine); } } return $checkLine; } Set the alignment:
$draw->setTextAlignment(\Imagick::ALIGN_LEFT); Use the annotation method to draw the label:
$draw->annotation(0, 0, $this->opts["big_text"]["text"]); After that, our ImagickDraw object would be ready and it remains only to create an Imagick object, write our text on it using the drawImage method:
$textImage=new \Imagick(); $textImage->newImage($textwidth,$textheight,"none"); $textImage->drawImage($draw); $ textwidth $ textheight we take from queryFontMetrics, as well as at breakdown of the big line. But it was not there. It all works more or less correctly, when aligning to the left, but when aligning a few lines to the center or right, something strange started to happen. The text was constantly cropped on one side, on the other, and it was not clear how to position the text so that it fit into the image.
In the comments to the method, on php.net someone wrote a formula like:
$baseline = $metrics['boundingBox']['y2']; $textwidth = $metrics['textWidth'] + 2 * $metrics['boundingBox']['x1']; $textheight = $metrics['textHeight'] + $metrics['descender']; But this formula didn't work either.
Honestly, no matter how hard I fought, trying to find meaning in the array from queryFontMetrics in different text positioning variants, with different numbers of lines, I never succeeded.
As a result, this method was born: we calculate the dimensions at the prompt from php.net, but we increase slightly the width and height.
$textIm=new \Imagick(); $metrics=$textIm->queryFontMetrics($draw, $this->opts["big_text"]["text"]); $baseline = $metrics['boundingBox']['y2']; $textwidth = $metrics['textWidth'] + 2 * $metrics['boundingBox']['x1']; $textheight = $metrics['textHeight'] + $metrics['descender']; $draw->annotation ($textwidth*1.3, $textheight*1.3, $this->opts["big_text"]["text"]); Next, create a picture 3 times more and draw our inscription on it:
$textImage=new \Imagick(); $textImage->newImage($textwidth*3,$textheight*3,"none"); $textImage->drawImage($draw); Then we cut the edges with:
$textImage->trimImage(0); And after that we do not forget to use setImagePage, this is necessary so that the coordinates of the beginning, height and width return new values:
$textImage->setImagePage(0, 0, 0, 0); Shadow under text
Imagick can not put a shadow on the text, but can make a shadow from the picture. Ok, we make a copy with the text, turn it into a shadow, impose one on the other:
$shadow_layer = clone $textImage; $shadow_layer->setImageBackgroundColor(new \ImagickPixel($this->opts["big_text_shadow"]["color"])); $shadow_layer->shadowImage($this->opts["big_text_shadow"]["opacity"], $this->opts["big_text_shadow"]["sigma"], $this->opts["big_text_shadow"]["x"], $this->opts["big_text_shadow"]["y"]); $shadow_layer->compositeImage($textImage, \Imagick::COMPOSITE_OVER, 0, 0); $textImage=clone $shadow_layer; By the way, $ textImage-> trimImage (0); Of course, you need to do after installing the shadow.
Now everything works as it should.
Methods for working with text were singled out in a separate object and after that it became possible to put several inscriptions on the image at once, very convenient, for example, for an online store, where there is a product name and price.
Examples of the script (size for VK):


There are several ideas for the development of the script, for example, to make it possible to put a test against each other, to turn the setLogo method into addImage and to make it possible to overlay several pictures.
By the way, if you read to the end. A little about me: my name is Dmitry and I work as a programmer in a small studio. My tasks include the development of CMS, which already has a lot of interesting things, which I would like to share.
Source: https://habr.com/ru/post/314018/
All Articles