How to make a sound processor in Zhiguli
Usually people go to the car audio store and buy components. I first soldered a digital audio processor, and put some components on it.
The biggest problem of car audio is the installation of speakers in the most inappropriate places: a speaker that plays right in the foot, a subwoofer massages the back, the influence of the shape of the cabin. As long as the sound reaches the ears, it will not be the same. That is why I started with a DSP processor.
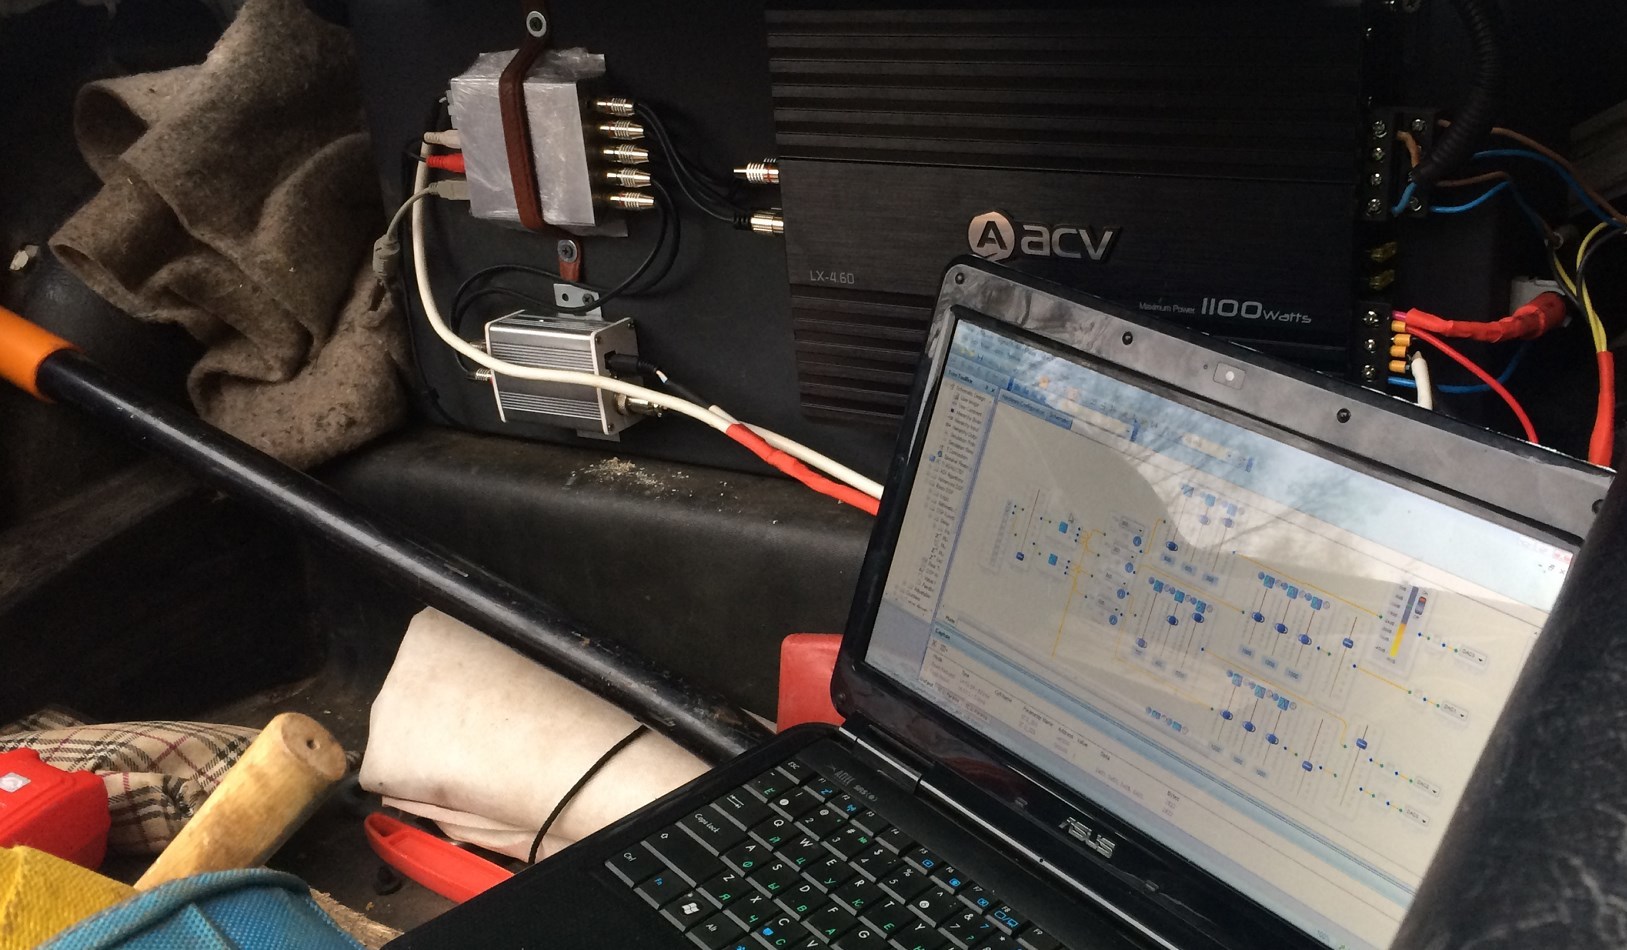
Table of contents:
1. Start
2. What's inside
3. Installation
4. Customization
4.1 Configuring Delays
4.2 Setting the frequency response
5. Listening
6. Results, advantages, disadvantages
7. Bonus
0. Terms
- Mid, Midbass - Speaker for low and mid frequencies (approximately 80-3kHz)
- Speaker - Speaker for Treble (3kHz-20kHz)
- Sub, Subwoofer - Speaker for the lowest frequencies (20-80Hz)
- Phase inverter - a pipe in the column case (subwoofer), tuned to a specific frequency to increase the sound pressure
- AFC-Amplitude-Frequency Characteristic - Graph of sound pressure versus frequency. Perfect frequency response - a straight horizontal line. Affects the perception of tonal balance of sound.
- Parametric, parametric equalizer - Filter with a given frequency, quality factor, level and type of filter (in this article, the peak and lowshelf). Unlike a simple graphic equalizer, it is more flexible and is used to correct the influence of components, installation, or room (cabin). Usually used in studio and concert equipment. Without measuring with a microphone, tuning is almost impossible.
1. Start
Inspired by the development of the company miniDSP and wanted to create a similar for the machine. The heart of the processor chip from Analog Devices ADAU1701
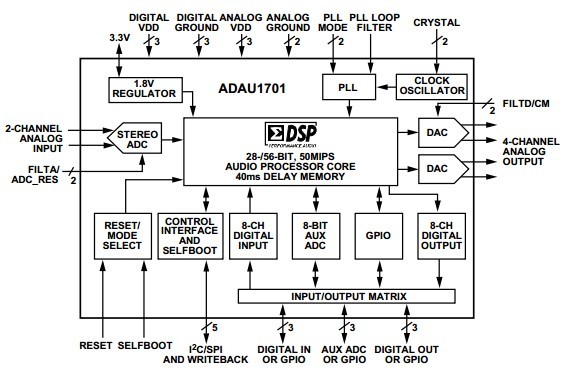
This is a ready-made DSP audio processor with a built-in 2 channel ADC and 4 channel D / A converter. Almost everyone uses it in 2x4 mode. But I have the most usual system for cars: 2 midbass, 2 tweeters, a subwoofer. You need at least 5 channels.
After reading the description, it turned out that the chip supports the connection of an external DAC over the I2S bus.
I soldered everything on the breadboard and checked:

The chip really gives all the signals for the operation of the DAC and supports additional channels.
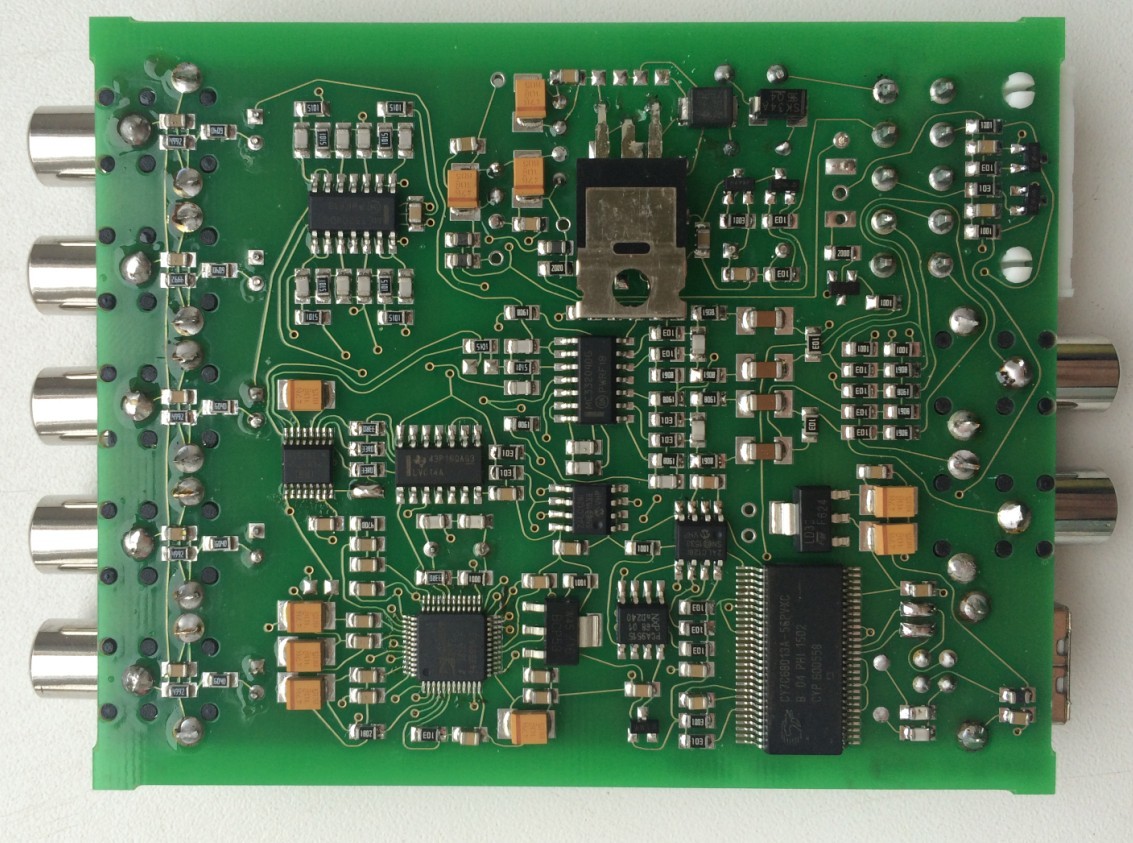
A board was designed and brazed:

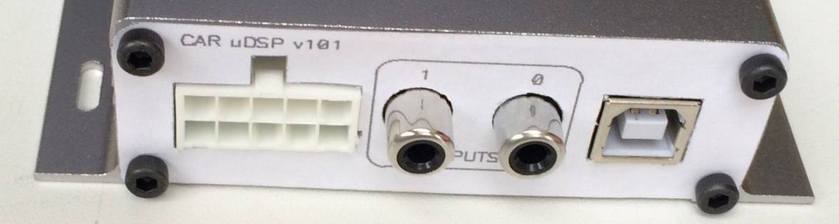
The case is selected and the front and rear panels are made:

on the other hand:
2. What's inside

- Galvanic isolation of power from the Remote input (so that it turns off from the radio and does not consume the battery)
- ADAU chip itself
- EEPROM for storing ADAU settings.
- Chip Cypress cy68013a for USB firmware. The board is defined as the Analog Devices USBi programmer. Connected to ADAU via I2C bus. You can flash ADAU on the fly and EEPROM to save the settings.
- PCM1754 DAC 2 channels
- Input and output opamp with datasheet filters
- 2 entrances of a tulip and 2 high-level entrances (either tulips or high-level ones are used. Together it is impossible)
- 5 outs tulip
- 2 external control inputs. For each, you can pick up a button or a variable resistor (twister).
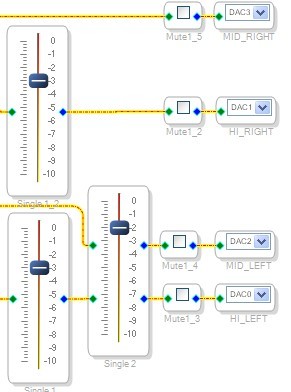
Main unit layout:

RC_IN1 and RC_IN2 are the inputs for connecting the twist / button. Protected by resistors and diodes. Capacitors for protection against chatter of contacts. Transistor for internal core voltage driver 1.8V. Inverter with Schmitt trigger to output the clock frequency (masterclock) to the DAC. Repeater on the op amp for the midpoint of the analog parts of the device.
The rest of the datasheet for the operation of the internal parts of the chip.

Inputs receive a signal from the tulips or from the outputs to the speakers (suddenly move to a car with a standard radio tape recorder). Levels are taken standard + small stock, in order not to get clipping, but also not to regulate in the gland. If that gain can be done in the processor itself.
Output filter 2 orders of datasheet:
DAC with exactly the same filter:

3. Installation

Radio: Alpine CDE-110
Mids: 16cm 35gdn-62 in the purchased podiums at the bottom of the door. So-so speakers
Tweeters: 2,5cm Asalab NEO-25 in homemade podiums on the upper door trim, deployed on the driver. Good speakers with alumoceramic dome.
Subwoofer: cabinet with phase inverter on 8 "dynamics from ASAlab
All the speakers were available, so the system went such
Usilki: 1 ready ACV 4 kanalich (black on the right) and 1 homemade for tweeters (bottom, silver):

The chipboard itself is the top left silver in the film.
Interconnect cables: homemade made to size
door speakers:

4. Customization
Setup is done through the SigmaStudio utility:

It allows you to somehow shuffle processing units, inputs, outputs. All settings are applied on the fly. But after a reboot, the chip is loaded from the EEPROM, so the settings themselves are not saved. It is necessary to force an EEPROM in the same utility.
Firstly, all levels were set up:
- On the processor at the maximum signal recorder.
- On amplifiers so as to match the speaker power.
- On the amplifier of the tweeters, the level was set so as not to change it much in the processor (On the tweeters, any noise will be perfectly audible, therefore it is better not to twist the gain).
On this setting a screwdriver is finished. Further everything only from a laptop in sigma studio.
4.1 Configuring Delays
A tape measure measured the distance to the speakers. Then recalculated as follows:
=( )-( ) Thus, the distance that you need to “move” the speaker is obtained.
Delays were asked in samples. Since The sampling rate was 48,000, the formula is
Delay = 48000 * distance in meters / 340 meters per second
The maximum delay is obtained for the left tweeter. Minimum for right mid and sub woofer. It so happened that the subwoofer and the right mid were on the same distance.

Max value reserves the right amount of memory to adjust on the fly without compiling.
Subsequently, when listening to all channels, a delay of 100 samples was added to “push” the subwoofer. It is tuned to the ear. It is very difficult to catch that the subwoofer “moved up” as it should. But if you remove the delay, you can hear that the subwoofer plays as if separately behind.
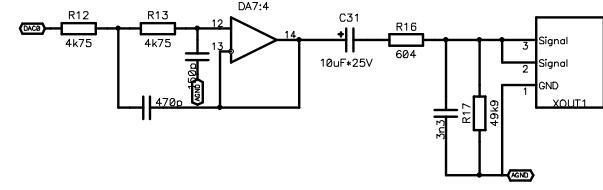
4.2 Setting the frequency response
Next will be a lot of frequency response graphs. Immediately clarify why some are beautiful, and some curves. Those AFCs that are shot close to the dynamics at a distance of 5 centimeters are very beautiful. But when setting up you need to use the frequency response at the listening point. They are folded with reflected sound from the interior surfaces. In some places, narrow and strong dips from standing waves are formed. This is normal. If you measure the same thing in a room with any cool system, then there will be the same crooks. When adjusting the frequency response the most important thing is to equalize the tonal balance so that there is a horizontal line with no slopes, strong humps and peaks. Narrow dips are not so important. They cannot be fixed by pumping more energy. You can only make a deaf room. In the car, it's just impossible.
In addition, an uncalibrated microphone and an uncalibrated sound input are used. It gives good results up to 8-10 kilohertz. Further his testimony should not be believed.
Here is the frequency response of the microphone datasheet:

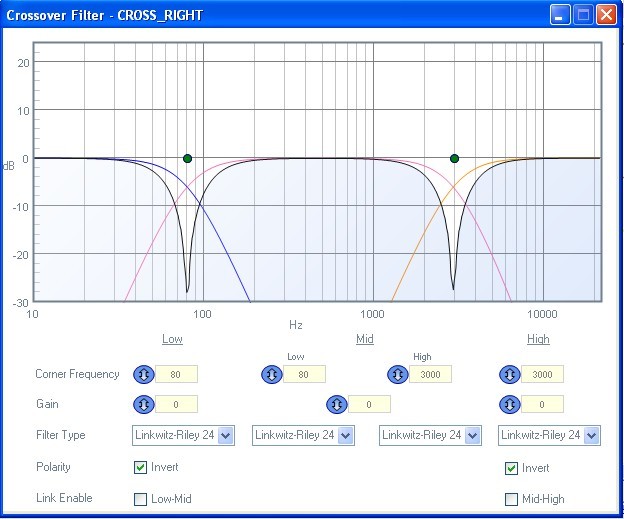
First, set up a crossover. The frequencies selected are standard: 80 hertz and 3 kHz. If it is still possible to play with the lower frequency, then the cut-off frequency of the tweeter should immediately be chosen correctly.
On these tweeters, the resonance frequency is 1.4kHz. According to the passport, they play from 3 kHz. Below is dangerous. Above the undesirable scene will descend to the midam. In addition, the left mid does not play well 3kHz. is at a high angle to the driver and closes the foot. The angular frequency response begins to fall from 2-2.5 kHz.
AFC at the listening point:

For example, a beautiful frequency response near:
Crossover was taken 4 orders Linkwitz-Riley (24dB / octave).
Frequency response mida with 3 kHz filter:

After adjusting the tweeters' levels relative to the ministries, a failure appeared at the frequency response at the junction of the bands:
Therefore, the signal of the beeper was inverted. The frequency response is equalized. The graph is not so noticeable. Aurally, the sound is not very noticeable when the phase is confused.
The program window promises failures, but the real frequency response is straight. This happens because the speakers are located at different points and the sound of them is quite different from the one on the ideal graphics in the program:
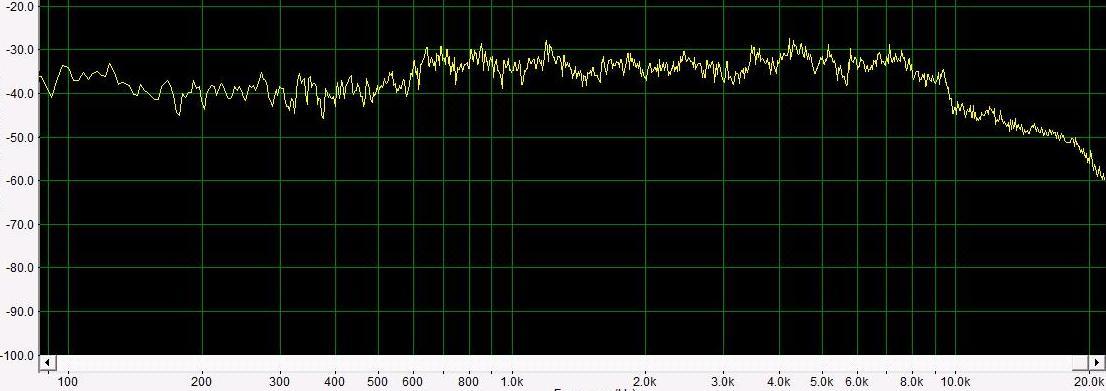
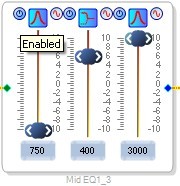
The most problematic in setting up were the ministries. Left mid did not play normally 3 kHz due to the fact that it is not deployed and plays in the leg. I had to pull parametrikom. A peak at 700Hz appeared at both points in the listening position. And if you measure close to the dynamics, there is almost no peak. Most likely this is a feature of the cabin. Fixed parametric.
Both mines have a decline of 400 hertz, most likely due to leaking doors. Fixed by Low Shelf filter.
For each speaker its own filter parameters are selected.
Frequency response mida before correction:
Parameters:
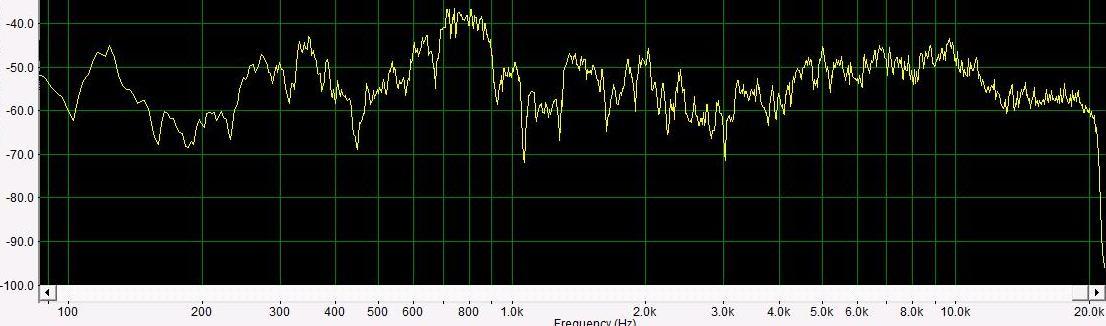
AFC mida after correction:
The remaining unevenness does not make sense to rule. They change if the microphone is shifted a few centimeters.
When measuring the subwoofer, a significant rise in the 50 Hz area was revealed, independent of the microphone position:

Most likely this is the effect of the cabin and the place of installation. when modeling it was not. It has been corrected by a parametric. In addition, a filter of infra-low frequencies (subsonic) at 35 hertz was added so as not to kill the 8 ”speaker. The subwoofer phase is also inverted to match the MID.
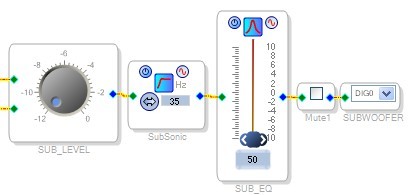
Adjusted AFC:
The frequency response of the tweeters was not tuned. It turned out to be even due to the fact that smooth podiums were made and the tweeters were turned right into the ear.
All speakers were adjusted to each other in level. The level of the left channel is slightly lowered, so that it seems that you are sitting between the speakers. The most good effect gives with delays.
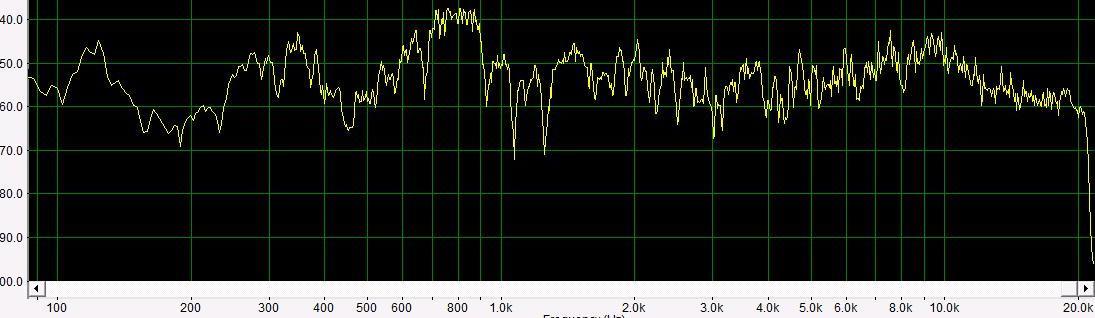
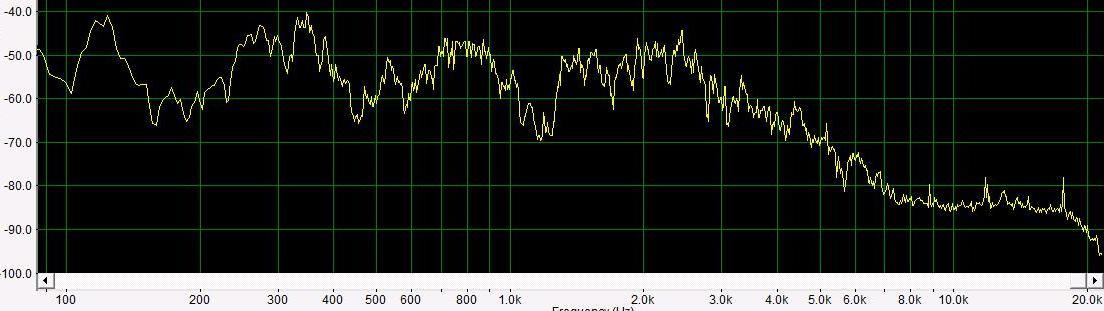
After all the speakers are tuned separately, we turn on all the channels and make small changes to the final frequency response.
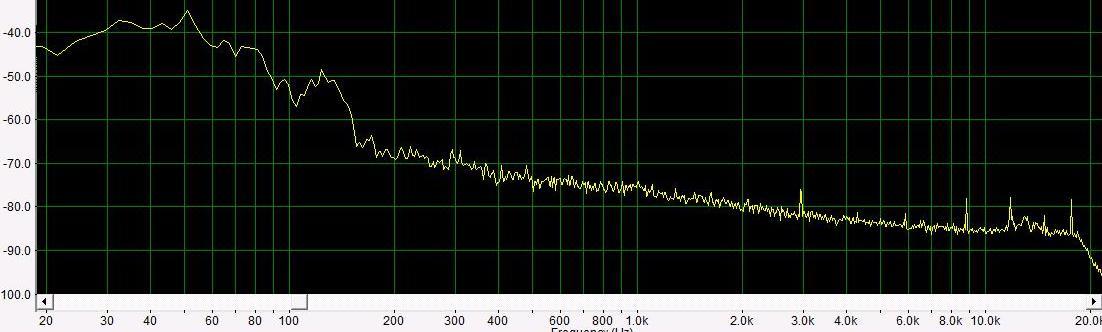
Final frequency response:

Getting up on the subbase in the car is a must. Otherwise, while driving, road noise clogs the bass. Many quality car systems have a similar climb.
The failure in the region of 3 kHz-not quite able to adjust the installation feature midbass. Not everything can be fixed by the processor.
Above 8-10 kHz-feature microphone and sound input. Gives similar results on other columns.
The final result is flashed into the EEPROM. In order for the firmware to work, you need to reboot: turn off USB, turn off and turn on the radio.
5. Listening
You can start listening. Conducted from a smartphone with an external USB DAC and records in flac.
Initially, this system was used with a filter from a single capacitor on a squeaker and a filter in an amplifier to a subwoofer. Everything was spinning with a screwdriver by ear. In general like everyone else.
After setting the sound has changed. Even not like this: CHANGED AND FILE! 1 !!!
The scene rose, that is, the sound ceased to go out of my feet and it is not clear where. And moved forward. All tools as live. Tweeters are playing in such detail and in tandem with midbass as they have never played.
It seems that they threw out all these dull-sounding speakers and set new ones. It's amazing that simple, cheap speakers can SO play. The subwoofer has stopped bubbling. Does not sink all the bass. It sounds monolithic with the front. Sometimes you think: where is the sub? Why doesn't it sound? And if you turn it off, then immediately heard.
After listening there was another refinement. At the frequency response of the subwoofer, it is noticeable that despite a good filter, it plays far enough beyond its range. It affected the music in that its sound seemed to be dragging down the beats and low notes that are already played out by the front speakers. As a result, another 1 filter above 100 hertz was added. And this lack has disappeared.
6. Results, advantages, disadvantages
Conclusion: no speakers color the sound. The speakers simply need to be of sufficient quality and normally installed. But most importantly: ADJUSTMENT. With ready-made crossovers without customization, you will never get the perfect result. You can suffer and change the system constantly or set up once and enjoy the sound.
Disadvantages:
- Most of the songs from the flash drive will have to be removed and find a replacement in normal quality.
- At high volume, the Means sound worse. These are the flaws of the speakers themselves and the installation.
- The main drawback of the delay system is that the sound has a good “scene” only in the driver’s seat.
Yesterday I rode on the passenger: the sound is the same, but already some kind of rustic, no depth. In a processor-free system, this drawback also exists, but there is not such a big difference. What the driver, the passenger "scene" is worse than the driver's seat system with a processor.
The most important advantage: It is very pleasant to tune the sound from the laptop and microphone. All changes do not require twisting a screwdriver, solder parts, change components.
You can easily fix any little things that in the conventional system will require significant rework.
From plans for the future: to improve the installation of foreign ministries. Now the doors and technological openings are simply taped with STP vibra. A purchased podiums bolted to a thin door trim.
To spend more fine tuning of the frequency response and delays.
7. BONUS
Who carefully read the “DAC PCM1754 2 channels”. This means that the processor turned out 6 channel! To get the sixth channel is enough to solder another tulip to the output of the DAC.
This article is written for the purpose of self-employment, because at the moment I am in search of any proposals for cooperation.
Are you interested in the topic of car audio?
')
Source: https://habr.com/ru/post/313946/
All Articles