Building a full-fledged IPTV / OTT service: Stalker Middleware
In this article I will explain how to install open source IPTV / OTT Middleware from Infomir, why it is needed and what features it provides to users and administrators.
The article will be useful for small operators and even users. You can "raise" at home Stalker and use it to watch * free IPTV and Internet channels on the console. To organize the EPG and record TV channels.
* Stalker Middleware does not contain any links to services or TV channels,
does not open access to any content, but only provides a convenient
interface for service administrators and end users.
')
Wikipedia has a good and concise definition:
I fully agree with this definition. It is impossible to build an IPTV / OTT service without Middleware. There are many developers in the market, each Middleware has its own characteristics: a list of supported devices, a list of supported CAS systems, a user interface, a list of supported video servers, different APIs for billing, cost and support.
Having chosen one solution, the operator binds to Middleware and cannot quickly and cheaply change the solution, because it will require changing the software on the set-top boxes (or replacing them if the list of supported devices does not match). You also need to re-integrate with the billing system content closure. This time and money, and the greater the subscriber base, the more difficult.
We have a good article about Middleware on our site.
First of all, Stalker is interesting because it is free. True free, without trial periods and functional limitations. Source code can be downloaded on GitHub .
These are very important advantages of Stalker over solutions from other manufacturers. I work for many years in the field of IPTV and I do not know other free solutions. I asked my colleagues and even the developers of Infomir, they don't know either. Write in the comments if you know other free solutions.
Not every operator is willing to invest in the purchase of Middleware, because it is not immediately clear why it is needed at all. Here satellite receivers accept TV channels, CAS-system protects content, consoles show video, counts money billing. What does Middleware do? List of channels and weather shows?
Of course not, but this is enough to get interested in the free solution and install Stalker on the test server to get to know it better.
Infomir has a little documentation and a VirtualBox image.
Running the VirtualBox image is not difficult, but I will describe briefly how it is done:
Let's install Stalker in the Docker container. It is fast and convenient. If you do not know what Docker is and have never worked with it, read the article habrahabr.ru/post/310460 . She will give a complete picture of the work of containers. But now this knowledge is not needed.
The developers strongly recommend using Ubuntu Server LTS, while 16.04 is not supported yet, and 12.04 is used by very few. Docker will allow you to run Stalker on your favorite distribution.
To continue, we need Docker himself and Docker-compose. Installation example for most distributions:
Let's create a working folder in which Stalker will live with us and download the docker-compose file:
Start Stalker:
Run the utility that will download the latest version of Stalker and fill us with the database:
We are waiting for the script to be executed. It takes about 4 minutes from me (what is happening there during this time?). Done, the Stalker admin panel is available at:
We go by the standard login / password: admin / 1 .
Once again, all together to show how simple everything is, literally 3 commands:
Video “Installing Stalker Middleware in 2 minutes”:
You can install in the old fashioned way, just install the necessary packages and edit several files manually. This method is the longest and most laborious, but it is great if you are going to start the server in Production.
If you already have a server with nginx + apache2 + php5, then you are lucky, maybe Stalker will start without installing additional packages. But, as far as I know, nginx + apache2 is rarely used together, nginx + php-fpm is much more convenient.
Instructions from the developer: wiki.infomir.eu/doku.php/stalker : install_and_configure
After installation, the first thing I want to do is open the portal on the set-top box to make sure that the installation was successful and evaluate the user interface. But it is too early, it will be completely boring there, let's add some content for now.
By default, the admin interface is in English. You can switch to Russian at the bottom of the page:

Expand the menu “IPTV Channels”, open the “Channels” page. The list will already contain the pre-set TV channel “Test channel”, delete it and let's add your channel (the “Add a channel” button).
We fill in the main fields: “Channel number”, “Channel name”, load the logo, tick the “Base channel”.
Click on the button "Add link", a pop-up window appears with the form to add the URL of the channel and additional options. As we see from the tooltip, in this line you need to enter "solution + URL". Solution is a hint for the console player, which library to use for playback. In most cases, it suffices to specify “auto” (for example, “auto udp: //239.255.1.1: 5500”). For HLS, the Infomir-recommended solution is ffmpeg.
Since I have a Flussonic video server, I immediately include support for temporary links. They are needed to protect content from unauthorized viewing.

The result should be:

For now, skip setting the program guide (EPG) and TV archive (DVR). We save.
Menu "Video Club" → "List of films."
The process of adding movies is not much different, but there is a nice bonus: autocomplete. It is enough to write the name of the film / series in the original language and Stalker will be able to get the metadata from the TMDB database or Film Search.
Manually filling out the cast list, logo, director, year of release, genre and other information, without which the catalog of films on the console will look inadequate, it is very difficult when you need to add a lot of movies. Thank you, Infomir.
It is possible to add series, with the correct sorting of series. You do not need to start each episode as a separate film and write the number of the season and series in the title.
For each movie or series, you can add several links to view in different quality, it can be convenient if you already have the source in different qualities and you are not using multi-bitrate HLS.
Without a program guide, it’s impossible to build a service; people are no longer interested in just clicking channels. EPG is needed not only for the user to see what the current program is called and what will happen tonight, but also for organizing a video archive ! Allowing users to watch shows that have already passed (so-called Catch UP ).
Stalker can import EPG from XMLTV format.
XMLTV is a popular XML-based program guide description format supported by all EPG providers. It contains a detailed description: name, start time, end time, genre, description, picture, cast, age rating and other information.
To continue tuning, we need to get an EPG supplier. They are paid, there are free. They differ in the number of TV channels, the amount of information (for example, not everybody has pictures for each program and the list of actors). I will not advertise any services, find a program in XMLTV format on Google and continue.
Open the menu "IPTV channels" → "EPG". Button "Add EPG".
We need to insert a link to the web server where the xml file is located. From my own experience, I’ll add that vendors often upload a password-protected ftp-server and archive in addition, so in Stalker we insert a link to localhost , and in crontab we add a script that will download and unpack XMLTV into the right folder.
After adding the link, click "update". If you did everything right, you get:

Now go to the channel settings. Menu "IPTV channels" → "Channels", click to edit our channel. We are interested in the “EPG” section, indicate the ID of our channel and, if necessary, adjust the time for our time zone.
For each channel will have to manually specify the ID. I don't know how to automate this yet.
Infoworld has long been developing a new modern interface, but it is turned off by default. I did not notice any obvious bugs in it, it works very well, it is his screenshot at the beginning of the article.
To activate it, go to the menu "Settings" → "Appearance". On this page we can get acquainted with all the available topics.

Click "Apply" under the topic "Stalker 5x - graphite".
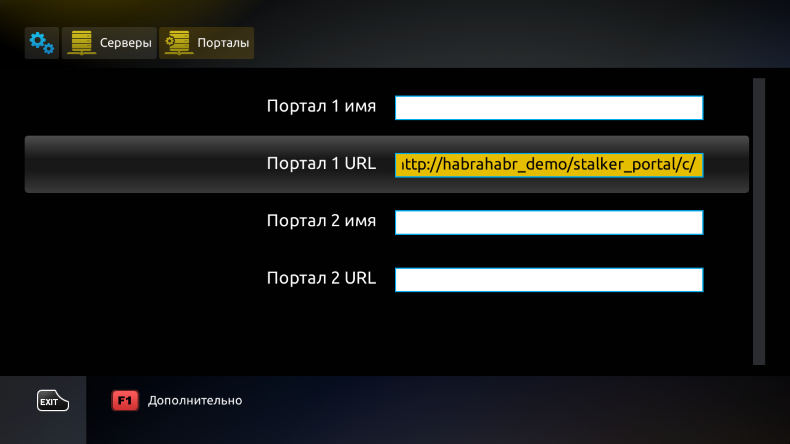
I hope you have the MAG console on hand. Using the remote control or USB-keyboard, go to the settings of the console → "Servers" → "Portals" and specify the URL of the server where you installed Stalker.
URL for clients:
We save, reboot the console and get into our Middleware. No logins and passwords are required, by default no authorization is required.
In the next article we will configure the authorization prefixes and protect our content from unauthorized views. There are many freeloaders and competitors / pirates in the world who want to steal your content. This is not a joke, we often have to help people protect their content from viewing for free and pasting on other people's sites.
The article will be useful for small operators and even users. You can "raise" at home Stalker and use it to watch * free IPTV and Internet channels on the console. To organize the EPG and record TV channels.
* Stalker Middleware does not contain any links to services or TV channels,
does not open access to any content, but only provides a convenient
interface for service administrators and end users.
')
▍What is Middleware?
Wikipedia has a good and concise definition:
Middleware - middleware for managing IPTV complex. This is the main component of the IPTV solution, as it ultimately determines the set of services available to the subscriber, the user interface, navigation logic and control algorithm. Middleware is assigned the role of coordinator in the process of interaction of almost all components of the complex.
I fully agree with this definition. It is impossible to build an IPTV / OTT service without Middleware. There are many developers in the market, each Middleware has its own characteristics: a list of supported devices, a list of supported CAS systems, a user interface, a list of supported video servers, different APIs for billing, cost and support.
Having chosen one solution, the operator binds to Middleware and cannot quickly and cheaply change the solution, because it will require changing the software on the set-top boxes (or replacing them if the list of supported devices does not match). You also need to re-integrate with the billing system content closure. This time and money, and the greater the subscriber base, the more difficult.
We have a good article about Middleware on our site.
▍Why Stalker?
First of all, Stalker is interesting because it is free. True free, without trial periods and functional limitations. Source code can be downloaded on GitHub .
These are very important advantages of Stalker over solutions from other manufacturers. I work for many years in the field of IPTV and I do not know other free solutions. I asked my colleagues and even the developers of Infomir, they don't know either. Write in the comments if you know other free solutions.
Not every operator is willing to invest in the purchase of Middleware, because it is not immediately clear why it is needed at all. Here satellite receivers accept TV channels, CAS-system protects content, consoles show video, counts money billing. What does Middleware do? List of channels and weather shows?
Of course not, but this is enough to get interested in the free solution and install Stalker on the test server to get to know it better.
▍Installation
Infomir has a little documentation and a VirtualBox image.
 | To install Stalker will have to install more than 200 packages in your OS. I recommend to allocate a separate virtual machine or install it in a docker container, otherwise conflicts with other web services may occur. |
Virtualbox image
Running the VirtualBox image is not difficult, but I will describe briefly how it is done:
- Install VirtualBox. Website: www.virtualbox.org
- Download and unzip the image. The current link on the page: http://wiki.infomir.eu/doku.php/stalker:start
- Run VirtualBox, the “Machine” menu, click “Add” (Ctrl + A) and select the file VmVirtualBox_Ubuntu14.04.4.x64_MW.Stalker.Demo
- We start the virtual machine, log in (test / test), look at the IP address of the machine and open the administrative interface in the browser.
- In the “Storage” admin interface, change the storage IP address to the virtual machine interface IP
▍Docker container
Let's install Stalker in the Docker container. It is fast and convenient. If you do not know what Docker is and have never worked with it, read the article habrahabr.ru/post/310460 . She will give a complete picture of the work of containers. But now this knowledge is not needed.
The developers strongly recommend using Ubuntu Server LTS, while 16.04 is not supported yet, and 12.04 is used by very few. Docker will allow you to run Stalker on your favorite distribution.
To continue, we need Docker himself and Docker-compose. Installation example for most distributions:
curl -sSL https://get.docker.com/ | sh curl -L https://github.com/docker/compose/releases/download/1.8.0/docker-compose-`uname -s`-`uname -m` > /usr/local/bin/docker-compose && chmod +x /usr/local/bin/docker-compose Let's create a working folder in which Stalker will live with us and download the docker-compose file:
mkdir /opt/stalker && wget -O /opt/stalker/docker-compose.yml https://gist.githubusercontent.com/klyushkov/3cc71f3fe3ea27a44c4a6985a1504d4a/raw/c38c746369e4b5238db23ef83ccf5592dc53a63a/stalker-docker-compose.yml Start Stalker:
cd /opt/stalker && docker-compose up -d Run the utility that will download the latest version of Stalker and fill us with the database:
docker exec -it stalker_portal_1 /opt/deploy.sh We are waiting for the script to be executed. It takes about 4 minutes from me (what is happening there during this time?). Done, the Stalker admin panel is available at:
http: // ip / stalker_portal /
We go by the standard login / password: admin / 1 .
Once again, all together to show how simple everything is, literally 3 commands:
mkdir /opt/stalker && wget -O /opt/stalker/docker-compose.yml https://gist.githubusercontent.com/klyushkov/3cc71f3fe3ea27a44c4a6985a1504d4a/raw/c38c746369e4b5238db23ef83ccf5592dc53a63a/stalker-docker-compose.yml cd /opt/stalker && docker-compose up -d docker exec -it stalker_portal_1 /opt/deploy.sh Video “Installing Stalker Middleware in 2 minutes”:
▍Installation without virtualization and containers
You can install in the old fashioned way, just install the necessary packages and edit several files manually. This method is the longest and most laborious, but it is great if you are going to start the server in Production.
If you already have a server with nginx + apache2 + php5, then you are lucky, maybe Stalker will start without installing additional packages. But, as far as I know, nginx + apache2 is rarely used together, nginx + php-fpm is much more convenient.
Instructions from the developer: wiki.infomir.eu/doku.php/stalker : install_and_configure
▍Setting
After installation, the first thing I want to do is open the portal on the set-top box to make sure that the installation was successful and evaluate the user interface. But it is too early, it will be completely boring there, let's add some content for now.
By default, the admin interface is in English. You can switch to Russian at the bottom of the page:
▍Add TV Channel
Expand the menu “IPTV Channels”, open the “Channels” page. The list will already contain the pre-set TV channel “Test channel”, delete it and let's add your channel (the “Add a channel” button).
We fill in the main fields: “Channel number”, “Channel name”, load the logo, tick the “Base channel”.
Click on the button "Add link", a pop-up window appears with the form to add the URL of the channel and additional options. As we see from the tooltip, in this line you need to enter "solution + URL". Solution is a hint for the console player, which library to use for playback. In most cases, it suffices to specify “auto” (for example, “auto udp: //239.255.1.1: 5500”). For HLS, the Infomir-recommended solution is ffmpeg.
Since I have a Flussonic video server, I immediately include support for temporary links. They are needed to protect content from unauthorized viewing.
The result should be:
For now, skip setting the program guide (EPG) and TV archive (DVR). We save.
▍Add a movie
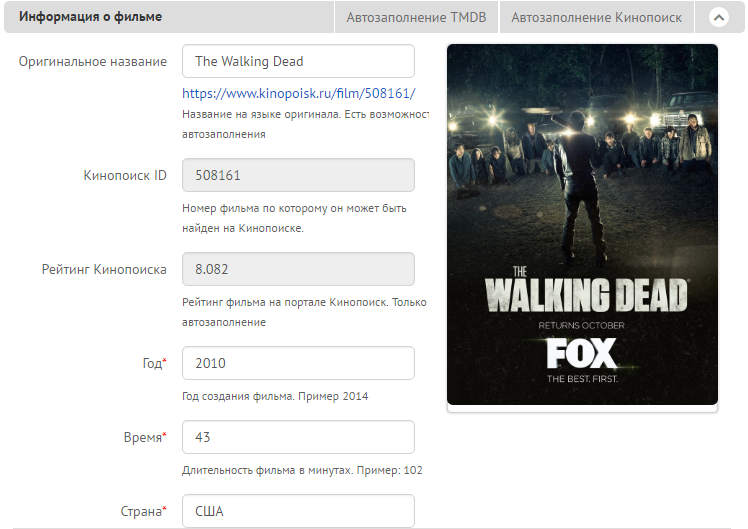
Menu "Video Club" → "List of films."
The process of adding movies is not much different, but there is a nice bonus: autocomplete. It is enough to write the name of the film / series in the original language and Stalker will be able to get the metadata from the TMDB database or Film Search.
Manually filling out the cast list, logo, director, year of release, genre and other information, without which the catalog of films on the console will look inadequate, it is very difficult when you need to add a lot of movies. Thank you, Infomir.
It is possible to add series, with the correct sorting of series. You do not need to start each episode as a separate film and write the number of the season and series in the title.
For each movie or series, you can add several links to view in different quality, it can be convenient if you already have the source in different qualities and you are not using multi-bitrate HLS.
▍ Program Transmission (EPG)
Without a program guide, it’s impossible to build a service; people are no longer interested in just clicking channels. EPG is needed not only for the user to see what the current program is called and what will happen tonight, but also for organizing a video archive ! Allowing users to watch shows that have already passed (so-called Catch UP ).
Stalker can import EPG from XMLTV format.
XMLTV is a popular XML-based program guide description format supported by all EPG providers. It contains a detailed description: name, start time, end time, genre, description, picture, cast, age rating and other information.
To continue tuning, we need to get an EPG supplier. They are paid, there are free. They differ in the number of TV channels, the amount of information (for example, not everybody has pictures for each program and the list of actors). I will not advertise any services, find a program in XMLTV format on Google and continue.
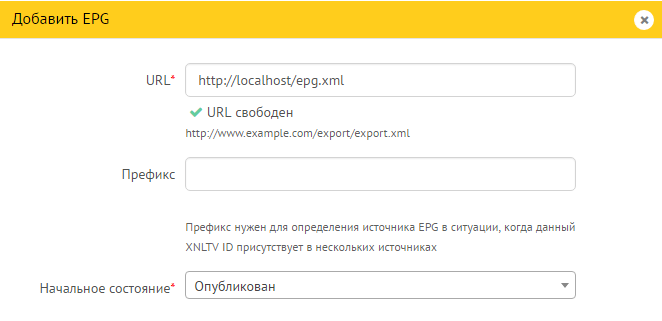
Open the menu "IPTV channels" → "EPG". Button "Add EPG".
We need to insert a link to the web server where the xml file is located. From my own experience, I’ll add that vendors often upload a password-protected ftp-server and archive in addition, so in Stalker we insert a link to localhost , and in crontab we add a script that will download and unpack XMLTV into the right folder.
After adding the link, click "update". If you did everything right, you get:
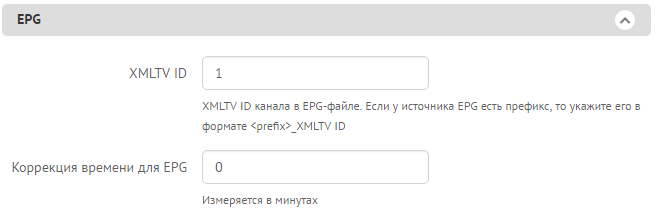
Now go to the channel settings. Menu "IPTV channels" → "Channels", click to edit our channel. We are interested in the “EPG” section, indicate the ID of our channel and, if necessary, adjust the time for our time zone.
How to know the XMLTV ID channel
Open the text editor XMLTV file and look. In this example: "Channel One" - 1, "Russia 1" - 2, "TVC" - 3.
<channel id="1"> <display-name lang="ru"> </display-name> <icon src="http://img.example.com/channel/1.gif" /> </channel> <channel id="2"> <display-name lang="ru"> 1</display-name> <icon src="http://img.example.com/channel/2.gif" /> </channel> <channel id="3"> <display-name lang="ru"></display-name> <icon src="http://img.example.com/channel/3.gif" /> </channel> <channel id="4"> <display-name lang="ru"></display-name> <icon src="http://img.example.com/channel/4.gif" /> </channel> <channel id="5"> <display-name lang="ru"> </display-name> <icon src="http://img.example.com/channel/5.gif" /> </channel> <channel id="101"> <display-name lang="ru"></display-name> <icon src="http://img.example.com/channel/101.gif" /> </channel> For each channel will have to manually specify the ID. I don't know how to automate this yet.
▍Appearance
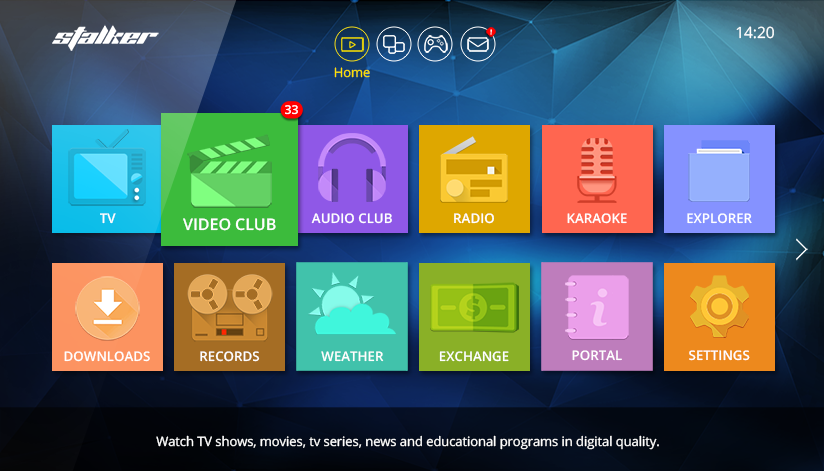
Infoworld has long been developing a new modern interface, but it is turned off by default. I did not notice any obvious bugs in it, it works very well, it is his screenshot at the beginning of the article.
To activate it, go to the menu "Settings" → "Appearance". On this page we can get acquainted with all the available topics.
Click "Apply" under the topic "Stalker 5x - graphite".
▍ Start the portal on the console
I hope you have the MAG console on hand. Using the remote control or USB-keyboard, go to the settings of the console → "Servers" → "Portals" and specify the URL of the server where you installed Stalker.
URL for clients:
http://ip/stalker_portal/c/We save, reboot the console and get into our Middleware. No logins and passwords are required, by default no authorization is required.
▍What's next?
In the next article we will configure the authorization prefixes and protect our content from unauthorized views. There are many freeloaders and competitors / pirates in the world who want to steal your content. This is not a joke, we often have to help people protect their content from viewing for free and pasting on other people's sites.
Source: https://habr.com/ru/post/313832/
All Articles