Content experiments in Google Analytics for the entire site at the same time
Most of us have a time when we need to run an experiment in Google Analytics in order to understand what works in the best way for our site. Perhaps, when it comes to content experiments, we often hear about the landing pages and the optimization of their elements (buttons, calls to action, and so on).
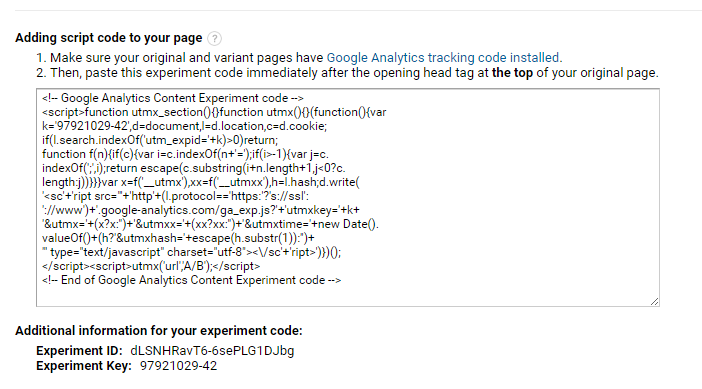
How do we do it? We simply take a piece of JavaScript code that Google Analytics kindly generates for us, and add our site’s tag to <head> </ head>. This code simply redirects a part of users to an alternative (tested) page, adding a certain parameter to the URL of this page. This parameter allows Google Analytics to understand which of the users saw the original page and which alternative saw the original. We all know that. It is very simple.
And our disgusting parameter:
')

Have you ever thought about how to conduct such experiments if we need to test an element that is present on other pages of the site?
Let's imagine that you need to test the main menu of the site (its color, the number of elements in it, and so on). We could create an alternative page with a new version of the menu and send a part of users there. But what will the users who were sent to the alternative page see, and then they decide to go somewhere else? They will still see the original menu. Juggling the menu this way is not a very good tone and can only confuse.
Here is a user trying to visit our site during an experiment:

... and immediately redirected to an alternative version with a new menu:
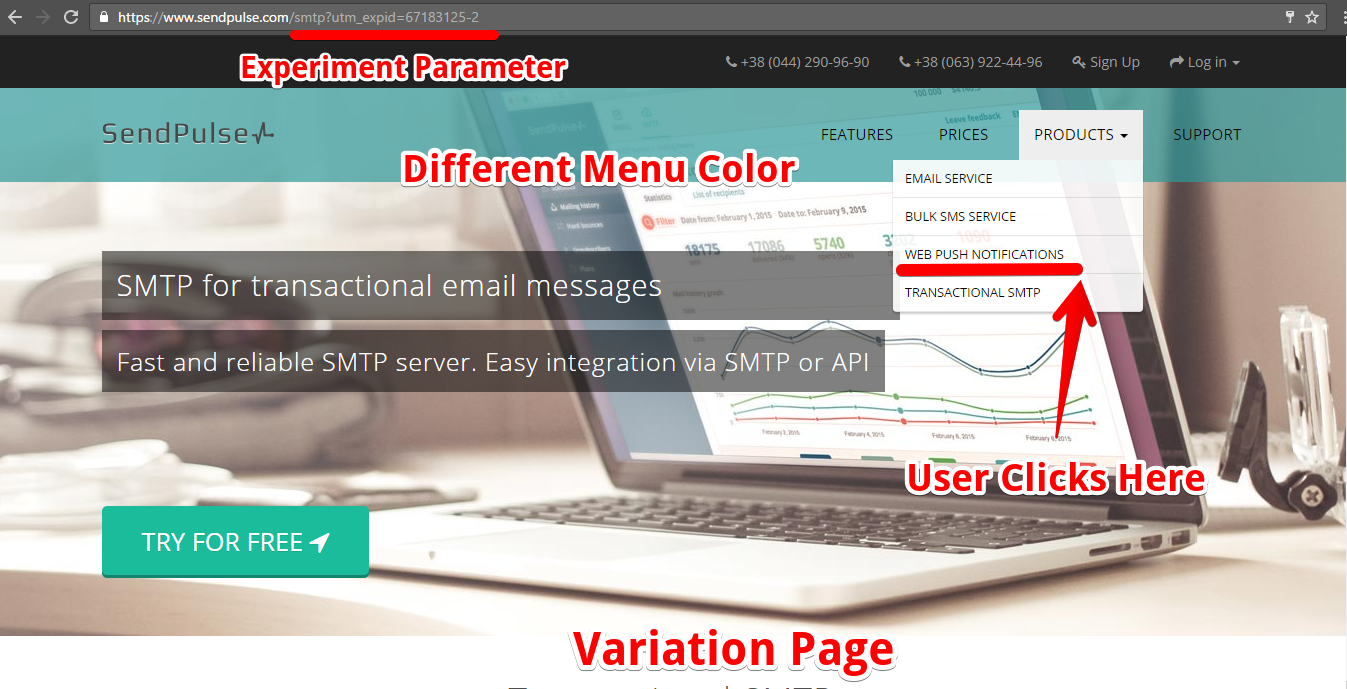
Then, the user decides to go to another section of the site, where he still sees the original menu:

Fortunately, we have a way to avoid such incidents.
If you are a seasoned Google Analytics expert with some technical skills, you may already be aware, through official documentation, of so-called experiments without redirects . They allow us to test different elements on a page without having to redirect users to another page. This "trick" can be performed with at least basic knowledge of Javascript and HTML. This is the most elegant way to conduct such experiments.
I recommend at least a superficial run through the material on this topic before we continue, but if you are not in the mood, I will try to briefly describe everything below.
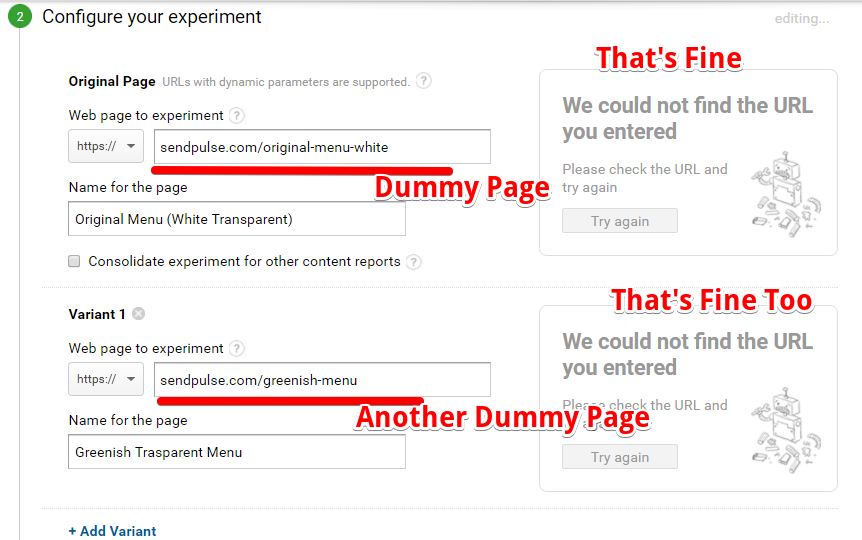
So, you set up an experiment through the Google Analytics interface, but instead of real pages on your site, you specify “dummies” (since we will not have pages where the user will be redirected). We definitely need to specify these dummies - GA will collect and assign data to these variations, as usual.
Then, from the experiment settings, you copy the Experiment Key and use it to load the experiment library:
Immediately under this load, you insert a small code that allows you to assign users to a specific experiment group:
When a user is assigned to a specific group, this information is stored in the experiment cookie and then it always shows one version of the element (regardless of the page). Information about which group the user has been assigned to is sent to Google Analytics in a standard way, during a call to the server along with the pageview (page view).
All you need to do in order to conduct an experiment on the entire site is to add an experiment code without redirecting to all pages of the site. Logical, isn't it?
Usually, this is done by inserting the code into the site’s header template. This code is absolutely indifferent on which page it is located - all it needs is to assign the user to a specific group and send data about this group to Google Analytics. When a user first visits the site and sees one of the versions of the element under test, this information is stored in the cookie, and during all subsequent “contacts” with the element under test on any of the pages of the site, he will always see the version that he saw before.
Let's go back to the machine, and I'll show you the practical application of this approach.
We need to test the different colors of the registration button on our website (green, red, yellow). The button is displayed at the very top of the site on all its pages. Consequently, we should take care that the user sees the same button color everywhere and always. The experiment criterion is clicking on the registration button.

So, create an experiment in Google Analytics.

As you can see, we indicated the addresses of non-existent pages, because GA obliges us to do this. But do not worry - although these settings will not pass the verification, the experiment will work fine and fulfill its role.
Do not forget to copy Experiment ID - we need it.

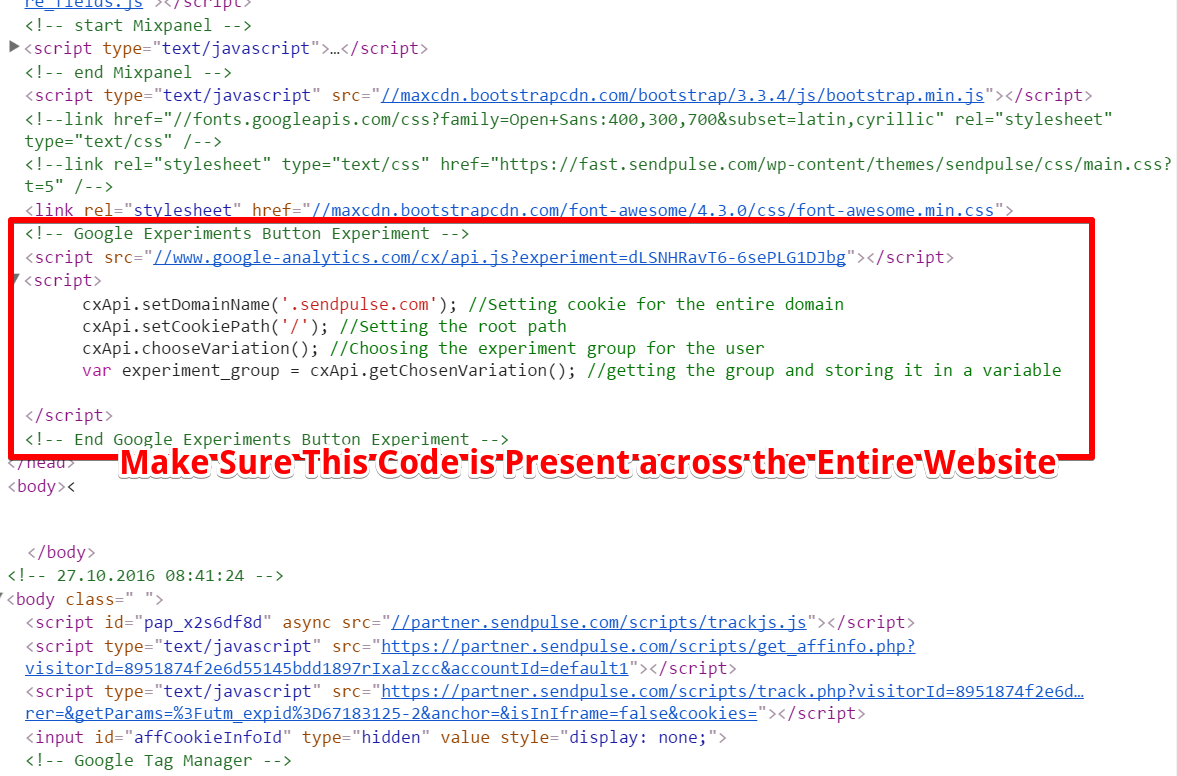
Let's load the experiment library using our Experiment ID, and then call several functions of this library that will assign the user to the experiment group:
Now, add some logic code that will change the color of the button depending on the group to which the user has been assigned.

This code only changes the CSS class of the button, depending on the experiment group to which the user is assigned. Naturally, you need to create two additional classes for the button.
The most important thing you need to remember is that all the code should be added to the header template of your site so that they are present on all pages (within the <head> </ head> tags, as is the case with the standard experiment code).
Now the user who participates in the experiment will always see a button of the same color.
Click "Start" in the experiment settings. Remember, feel free to ignore the validation error messages (but make sure that you did everything correctly).
That's all. Have fun experimenting!
How do we do it? We simply take a piece of JavaScript code that Google Analytics kindly generates for us, and add our site’s tag to <head> </ head>. This code simply redirects a part of users to an alternative (tested) page, adding a certain parameter to the URL of this page. This parameter allows Google Analytics to understand which of the users saw the original page and which alternative saw the original. We all know that. It is very simple.
And our disgusting parameter:
')
Have you ever thought about how to conduct such experiments if we need to test an element that is present on other pages of the site?
Let's imagine that you need to test the main menu of the site (its color, the number of elements in it, and so on). We could create an alternative page with a new version of the menu and send a part of users there. But what will the users who were sent to the alternative page see, and then they decide to go somewhere else? They will still see the original menu. Juggling the menu this way is not a very good tone and can only confuse.
Here is a user trying to visit our site during an experiment:
... and immediately redirected to an alternative version with a new menu:
Then, the user decides to go to another section of the site, where he still sees the original menu:
Fortunately, we have a way to avoid such incidents.
A few words about content experiments without redirects
If you are a seasoned Google Analytics expert with some technical skills, you may already be aware, through official documentation, of so-called experiments without redirects . They allow us to test different elements on a page without having to redirect users to another page. This "trick" can be performed with at least basic knowledge of Javascript and HTML. This is the most elegant way to conduct such experiments.
I recommend at least a superficial run through the material on this topic before we continue, but if you are not in the mood, I will try to briefly describe everything below.
So, you set up an experiment through the Google Analytics interface, but instead of real pages on your site, you specify “dummies” (since we will not have pages where the user will be redirected). We definitely need to specify these dummies - GA will collect and assign data to these variations, as usual.
Then, from the experiment settings, you copy the Experiment Key and use it to load the experiment library:
<script src="//www.google-analytics.com/cx/api.js?experiment=YOUR_EXPERIMENT_ID"></script> Immediately under this load, you insert a small code that allows you to assign users to a specific experiment group:
<script> cxApi.setDomainName('.sendpulse.com'); cxApi.setCookiePath('/'); cxApi.chooseVariation(); var experiment_group = cxApi.getChosenVariation(); </script> When a user is assigned to a specific group, this information is stored in the experiment cookie and then it always shows one version of the element (regardless of the page). Information about which group the user has been assigned to is sent to Google Analytics in a standard way, during a call to the server along with the pageview (page view).
What are the advantages of experiments without redirects
- You avoid vile redirects and nasty parameters in your URLs
- Such experiments have a better effect on page loading speed.
- This method allows you to experiment not on the same page, but on the entire site at the same time.
What are the advantages of the experiment on the entire site at the same time?
- The ability to test items that are displayed on all pages of the site, while maintaining their consistency for one user
- The ability to collect data for the conclusions of the experiment is much faster, since we will experiment based on the traffic of the entire site , rather than individual pages
Detailed step-by-step explanation of experiments on the entire site at the same time
All you need to do in order to conduct an experiment on the entire site is to add an experiment code without redirecting to all pages of the site. Logical, isn't it?
Usually, this is done by inserting the code into the site’s header template. This code is absolutely indifferent on which page it is located - all it needs is to assign the user to a specific group and send data about this group to Google Analytics. When a user first visits the site and sees one of the versions of the element under test, this information is stored in the cookie, and during all subsequent “contacts” with the element under test on any of the pages of the site, he will always see the version that he saw before.
Let's go back to the machine, and I'll show you the practical application of this approach.
Configuring the experiment
We need to test the different colors of the registration button on our website (green, red, yellow). The button is displayed at the very top of the site on all its pages. Consequently, we should take care that the user sees the same button color everywhere and always. The experiment criterion is clicking on the registration button.
Settings in the interface
So, create an experiment in Google Analytics.
As you can see, we indicated the addresses of non-existent pages, because GA obliges us to do this. But do not worry - although these settings will not pass the verification, the experiment will work fine and fulfill its role.
Do not forget to copy Experiment ID - we need it.
Editing the source code of the site
Let's load the experiment library using our Experiment ID, and then call several functions of this library that will assign the user to the experiment group:
Now, add some logic code that will change the color of the button depending on the group to which the user has been assigned.
This code only changes the CSS class of the button, depending on the experiment group to which the user is assigned. Naturally, you need to create two additional classes for the button.
The most important thing you need to remember is that all the code should be added to the header template of your site so that they are present on all pages (within the <head> </ head> tags, as is the case with the standard experiment code).
Now the user who participates in the experiment will always see a button of the same color.
Click "Start" in the experiment settings. Remember, feel free to ignore the validation error messages (but make sure that you did everything correctly).
That's all. Have fun experimenting!
Source: https://habr.com/ru/post/313792/
All Articles