Android In-app Billing: from a mobile application to server validation and testing

Hello! Recently, I faced the task of integrating billing into our service, and although the task initially seemed quite simple, as a result, this resulted in a month-long research, a lot of nerves and discoveries. The result was an understanding that, despite the huge amount of documentation, not everything can be found by a simple query on Google (and in some places the documentation offers frank nonsense, which I will discuss further below).
As a result, Google Play billing was successfully integrated into our service, and validation of purchases and subscriptions on the server side works. To whom it became interesting - welcome under the cat: there will be a complete description of everything, starting from the registration of purchases in the Google Play management console, and ending with the work with subscriptions on your backend.
To begin, briefly about the patient. I will analyze Google Play In-App Billing V3 by bit, as well as the cloud-based Android Publisher API , which will help us both with the validation of purchases and when working with subscriptions. Also, do not ignore the Google Play Management Console - we also need it.
')
Why do you need it at all?
If you have a client-server application, then without validation on the server, you will not be provided with protection against piracy. And although you can simply validate the digital signature of the purchase on the server, the request for the Android Publisher API method has some additional features. First, you can get information about the purchase or subscription at any time without being tied to the user's device, and, secondly, you can get more detailed information about the subscriptions and manage them (cancel, postpone, etc.). For example, if you want to display the date of the next payment as in Google Play Music:

Then you can get it only by querying the Android Publisher API.
Full flow with billing integration is as follows:
1. Register the application in the Google Play console and create a shopping list.
2. Android in-app billing integration in a mobile application.
3. Validation of purchases and subscriptions on the server.
Part 1: Register an application in the Google Play console and create a shopping list
Go to the Google Play Management Console (if you do not have an account, register it for $ 25) and create your first application. Let's start with the moment when your application is already registered.
1. Have your application not been previously downloaded - sign your application with your release-certificate and load it into a closed alpha or beta test.
All Applications / Your Application / APK / Alpha (Beta) Testing
2. Create a testing list and activate it for the type of testing you choose (Alpha or Beta).
3. Add Google accounts to this list that will test billing. For example, your personal email, with which you logged into Google Play on your device.
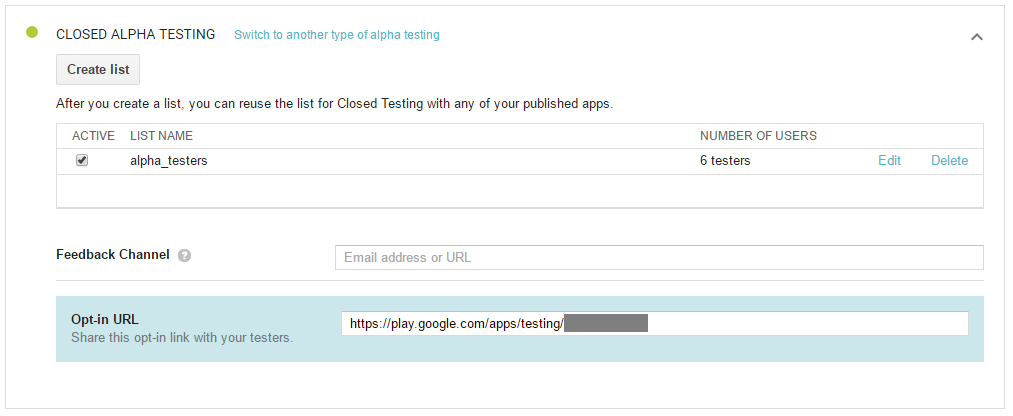
Below is the link Opt-in URL: this link should go to all users who will test the billing (and most, too), and agree to testing. Without this, you will not be able to make purchases in alpha / beta versions.
4. Go to the Settings / Account Details tab, find the LICENSE TESTING section and in the Gmail accounts with testing access field add the same emails as in the last step. Now with these accounts you can test purchases - they will not be charged for.
You still have to add the payment method - the purchase dialog itself will require this, however, when you do not see the buy button in the application, it will be indicated that this is a test purchase.
5. Add test purchases to your app. To do this, go to All Applications / Your Application / In-app Products and click Add new product . You can add one purchase (Managed product) and one subscription (Subscription). As a product id, you can use something in the style of com.example.myapp_testing_inapp1 and com.example.myapp_testing_subs1 for buying and subscribing, respectively. At least you need to add a name and description, set a price for the product, select the countries where it is available (you can select all ), for the subscription also select the period, and activate the product. After that, it will be available after some time.
IMPORTANT: you must publish the application (at least in alpha / beta), otherwise the purchases will not work.
Briefly about the types of purchases
1. Managed product (inapp) - one-time purchase. After the purchase, the user becomes the owner of the purchase forever, but such a purchase can also be “consumed” (for example, for charging some bonuses). After use, the purchase disappears and you can make it again.
2. Subscription (subs) - subscription. After activation, the user withdraws a certain amount once a certain period. While the user pays, the subscription is active.
When our purchases are activated - we will be able to get information about them directly in the mobile application (name, description, price in local currency) and also make a purchase.
Part 2: Android in-app billing integration in a mobile application
Official documentation
First, let's perform some manipulations in order to work with the billing service in our application.
Copy the file IInAppBillingService.aidl into our project:
Free translation of official documentation
IInAppBillingService.aidl is an Android Interface Definition Language (AIDL) file that defines the interface for interacting with the In-app Billing Version 3 service. You will use this interface to make billing requests using IPC calls.
To get an AIDL file:
Open Android SDK Manager .
In the SDK Manager, find and expand the Extras section.
Select Google Play Billing Library .
Click Install packages to complete the installation.
Navigate to your project's src / main folder and create a folder named aidl .
Inside this folder, create the com.android.vending.billing package.
Copy the IInAppBillingService.aidl file from the % anroid-sdk% / extras / google / play_billing / folder into the newly created src / main / aidl / com.android.vending.billing package
Add permission to the manifest:
<uses-permission android:name="com.android.vending.BILLING" /> And in the place where we are going to make purchases, we connect to the service:
IInAppBillingService inAppBillingService; ServiceConnection serviceConnection = new ServiceConnection() { @Override public void onServiceConnected(ComponentName name, IBinder service) { inAppBillingService = IInAppBillingService.Stub.asInterface(service); } @Override public void onServiceDisconnected(ComponentName name) { inAppBillingService = null; } }; @Override public void onCreate(Bundle savedInstanceState) { super.onCreate(savedInstanceState); Intent serviceIntent = new Intent("com.android.vending.billing.InAppBillingService.BIND"); serviceIntent.setPackage("com.android.vending"); bindService(serviceIntent, serviceConnection, Context.BIND_AUTO_CREATE); ... } @Override public void onDestroy() { super.onDestroy(); if (serviceConnection != null) { unbindService(serviceConnection); } } Now you can start working with shopping. We will receive a list of our purchases from the service with a description and prices:
class InAppProduct { public String productId; public String storeName; public String storeDescription; public String price; public boolean isSubscription; public int priceAmountMicros; public String currencyIsoCode; public String getSku() { return productId; } String getType() { return isSubscription ? "subs" : "inapp"; } } List<InAppProduct> getInAppPurchases(String type, String... productIds) throws Exception { ArrayList<String> skuList = new ArrayList<>(Arrays.asList(productIds)); Bundle query = new Bundle(); query.putStringArrayList("ITEM_ID_LIST", skuList); Bundle skuDetails = inAppBillingService.getSkuDetails( 3, context.getPackageName(), type, query); ArrayList<String> responseList = skuDetails.getStringArrayList("DETAILS_LIST"); List<InAppProduct> result = new ArrayList<>(); for (String responseItem : responseList) { JSONObject jsonObject = new JSONObject(responseItem); InAppProduct product = new InAppProduct(); // "com.example.myapp_testing_inapp1" product.productId = jsonObject.getString("productId"); // product.storeName = jsonObject.getString("title"); // product.storeDescription = jsonObject.getString("description"); // "0.99USD" product.price = jsonObject.getString("price"); // "true/false" product.isSubscription = jsonObject.getString("type").equals("subs"); // "990000" = x 1000000 product.priceAmountMicros = Integer.parseInt(jsonObject.getString("price_amount_micros")); // USD product.currencyIsoCode = jsonObject.getString("price_currency_code"); result.add(product); } return result; } With this method we can download data about available purchases.
// List<InAppProduct> purchases = getInAppPurchases("inapp", "com.example.myapp_testing_inapp1"); // List<InAppProduct> subscriptions = getInAppPurchases("subs", "com.example.myapp_testing_subs1"); Now we can get a shopping list and information about them directly from the application. The price will be indicated in the currency in which the user will pay. These methods should be called in the background thread, as the service in the process can download data from Google servers. How to use this data is at your discretion. You can display prices and product names from the resulting list, or you can specify the names and prices in the application resources.
It's time to buy something now!
private static final int REQUEST_CODE_BUY = 1234; public static final int BILLING_RESPONSE_RESULT_OK = 0; public static final int BILLING_RESPONSE_RESULT_USER_CANCELED = 1; public static final int BILLING_RESPONSE_RESULT_SERVICE_UNAVAILABLE = 2; public static final int BILLING_RESPONSE_RESULT_BILLING_UNAVAILABLE = 3; public static final int BILLING_RESPONSE_RESULT_ITEM_UNAVAILABLE = 4; public static final int BILLING_RESPONSE_RESULT_DEVELOPER_ERROR = 5; public static final int BILLING_RESPONSE_RESULT_ERROR = 6; public static final int BILLING_RESPONSE_RESULT_ITEM_ALREADY_OWNED = 7; public static final int BILLING_RESPONSE_RESULT_ITEM_NOT_OWNED = 8; public static final int PURCHASE_STATUS_PURCHASED = 0; public static final int PURCHASE_STATUS_CANCELLED = 1; public static final int PURCHASE_STATUS_REFUNDED = 2; public void purchaseProduct(InAppProduct product) throws Exception { String sku = product.getSku(); String type = product.getType(); // // String developerPayload = "12345"; Bundle buyIntentBundle = inAppBillingService.getBuyIntent( 3, context.getPackageName(), sku, type, developerPayload); PendingIntent pendingIntent = buyIntentBundle.getParcelable("BUY_INTENT"); startIntentSenderForResult(pendingIntent.getIntentSender(), REQUEST_CODE_BUY, new Intent(), Integer.valueOf(0), Integer.valueOf(0), Integer.valueOf(0), null); } @Override public void onActivityResult(int requestCode, int resultCode, Intent data) { super.onActivityResult(requestCode, resultCode, data); if (requestCode == REQUEST_CODE_BUY) { int responseCode = data.getIntExtra("RESPONSE_CODE", -1); if (responseCode == BILLING_RESPONSE_RESULT_OK) { String purchaseData = data.getStringExtra("INAPP_PURCHASE_DATA"); String dataSignature = data.getStringExtra("INAPP_DATA_SIGNATURE"); // readPurchase(purchaseData); } else { // } } } private void readPurchase(String purchaseData) { try { JSONObject jsonObject = new JSONObject(purchaseData); // , null String orderId = jsonObject.optString("orderId"); // "com.example.myapp" String packageName = jsonObject.getString("packageName"); // "com.example.myapp_testing_inapp1" String productId = jsonObject.getString("productId"); // unix-timestamp long purchaseTime = jsonObject.getLong("purchaseTime"); // PURCHASE_STATUS_PURCHASED // PURCHASE_STATUS_CANCELLED // PURCHASE_STATUS_REFUNDED int purchaseState = jsonObject.getInt("purchaseState"); // "12345" String developerPayload = jsonObject.optString("developerPayload"); // , // String purchaseToken = jsonObject.getString("purchaseToken"); // ... } catch (Exception e) { ... } } Separately, I want to say about dataSignature. An example of its verification is here , but if your purchase is validated on the server, then this is an extra step.
It may also be useful to get information on purchases already made:
private void readMyPurchases() throws Exception { readMyPurchases("inapp"); // readMyPurchases("subs"); // } private void readMyPurchases(String type) throws Exception { String continuationToken = null; do { Bundle result = inAppBillingService.getPurchases( 3, context.getPackageName(), type, continuationToken); if (result.getInt("RESPONSE_CODE", -1) != 0) { throw new Exception("Invalid response code"); } List<String> responseList = result.getStringArrayList("INAPP_PURCHASE_DATA_LIST"); for (String purchaseData : responseList) { readPurchase(purchaseData); } continuationToken = result.getString("INAPP_CONTINUATION_TOKEN"); } while (continuationToken != null); } This also needs to be done from the background thread. This will return the list of purchases that we made earlier. You can also get a list of active subscriptions.
The next step is to use the purchase. It means that you charge the user something for the purchase, and the purchase itself disappears, giving such an opportunity to make a purchase again.
private void consumePurchase(String purchaseToken) throws Exception { int result = inAppBillingService.consumePurchase(GooglePlayBillingConstants.API_VERSION, context.getPackageName(), purchaseToken); if (result == GooglePlayBillingConstants.BILLING_RESPONSE_RESULT_OK) { // ... } else { // ... } } After that, you will not be able to read the purchase data - it will not be available through getPurchases () .
Here, our ability to use billing directly on the device ends.
Part 3: Validation of purchases and subscriptions on the server
This is the most interesting part, which I fought the longest. All examples will be on java, for which Google provides a ready-made library for working with its services.
Libraries and for other languages can be searched here . The Google Publisher API documentation is here , in the context of the current task, we are interested in Purchases.products and Purchases.subscriptions .
In fact, the main problem I encountered is the description of the authorization method . Even by the description it looks like the fifth leg of a horse, but the problem is not that it does not work, but that it is fundamentally wrong for our task. Request to experts not to throw stones at me: OAuth is designed to work with client resources, but in our case, the backend service requests billing data from our own application.
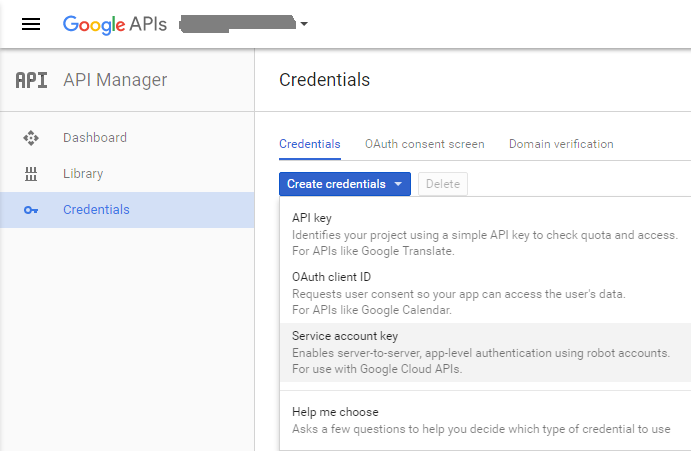
And this is where IAM (Identy Access Management) comes to the rescue. We need to create a project in the Google Cloud Console and go to the Credentials tab, select Create credentials → Service account key .
Fill in the data as shown in the picture:
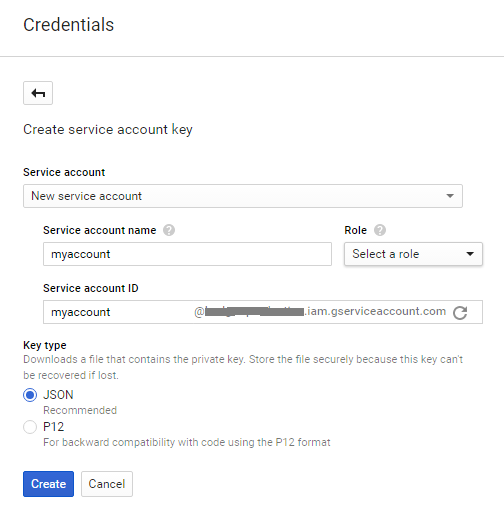
Service account: New service account
Service account name: a name to choose from
Role: do not choose, it is not needed now
Key type: JSON
Click Create . A window will pop up with a warning Service account has no role . Agrees, choose CREATE WITHOUT ROLE . You will automatically download the JSON file with the data to authorize your account. Save this file - in the future you will need it in order to log in to Google services.
Sample file
{ "type": "service_account", "project_id": "project-name", "private_key_id": "1234567890abcdef1234567890abcdef", "private_key": "-----BEGIN PRIVATE KEY-----\XXXXX.....XXXXX\n-----END PRIVATE KEY-----\n", "client_email": "myaccount@project-name.iam.gserviceaccount.com", "client_id": "12345678901234567890", "auth_uri": "https://accounts.google.com/o/oauth2/auth", "token_uri": "https://accounts.google.com/o/oauth2/token", "auth_provider_x509_cert_url": "https://www.googleapis.com/oauth2/v1/certs", "client_x509_cert_url": "https://www.googleapis.com/robot/v1/metadata/x509/myaccount%40project-name.iam.gserviceaccount.com" } Now we return to the Credentials tab of our project and see below the list of Service account keys . On the right is the Manage service accounts button - click on it and see:

myaccount@project-name.iam.gserviceaccount.com - this is the id of our account. Copy it and go to the Google Play Developer Console → Settings → User Accounts & Rights and select Invite New user .
Fill in the data.
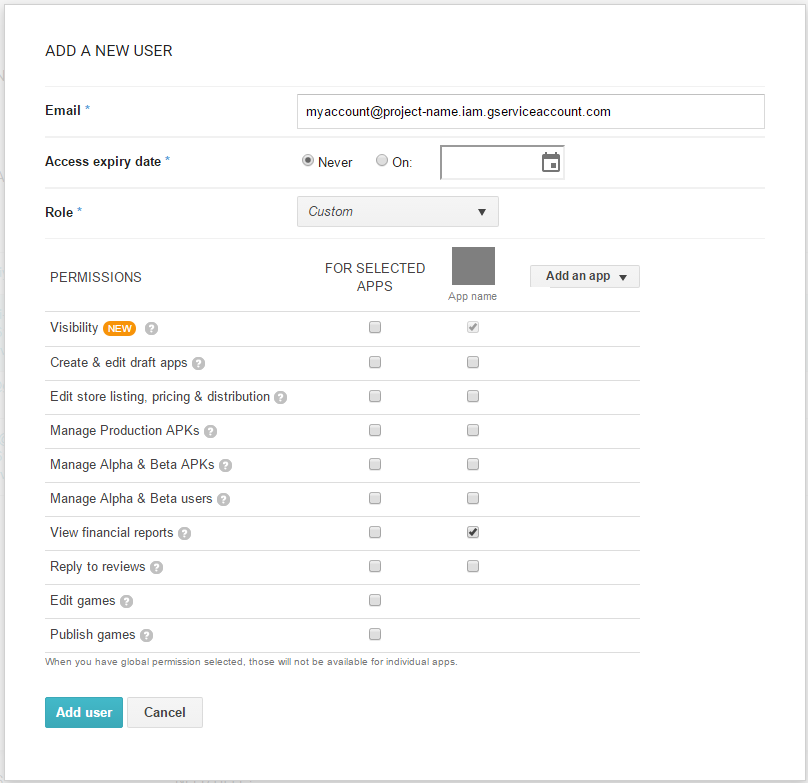
Insert the account id in the Email field, add our application and tick the View financial reports .
Click Send Invitation. Now we can use our JSON file for authorization and Google API and access to the data of purchases and subscriptions of our application.
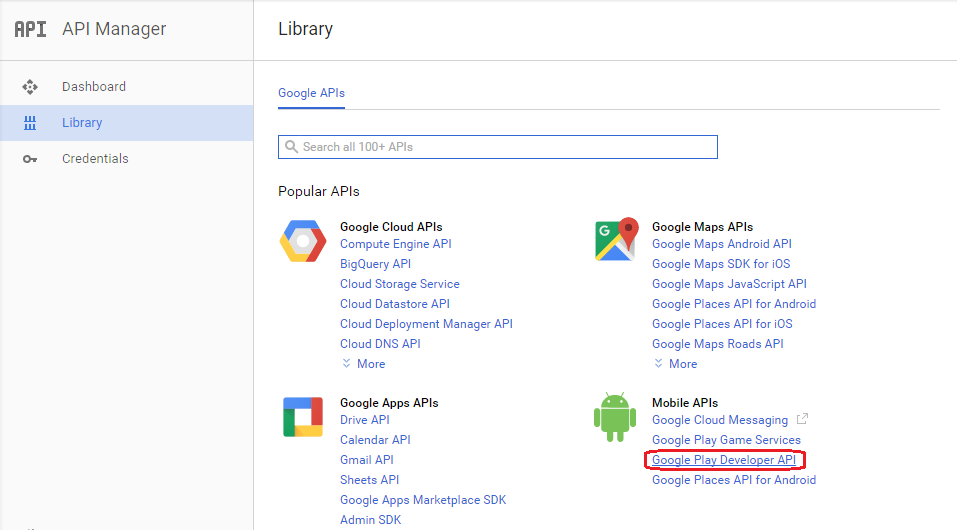
The next step is to activate the Google Play Developer API for our project. Go to the Google Developer Console → Library and look for the Google Play Developer API . Open it and click Enable .
The last step is to go to the Google Play Developer Console → Settings → API Access .
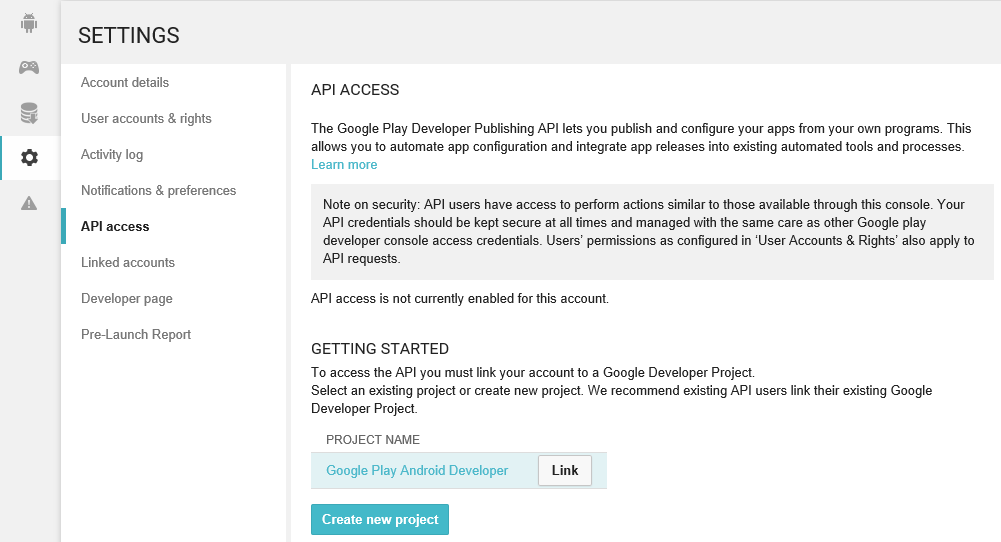
In the list we find our project (in the picture above it is Google Play Android Developer, but there should be the name of your project) and click Link .
We now turn to the development of the server part
We will leave it at your discretion as to how you will store the JSON-file with the private data of the IAM-account. Import the Google Play Developer API into your project ( mavencentral ) and implement the check.
Purchase data must be sent from our application to the server. The implementation of the check on the server itself looks like this:
import com.google.api.client.googleapis.auth.oauth2.GoogleCredential; import com.google.api.client.googleapis.javanet.GoogleNetHttpTransport; import com.google.api.client.http.HttpTransport; import com.google.api.client.json.jackson2.JacksonFactory; import com.google.api.services.androidpublisher.AndroidPublisher; import com.google.api.services.androidpublisher.AndroidPublisherScopes; import com.google.api.services.androidpublisher.model.ProductPurchase; import com.google.api.services.androidpublisher.model.SubscriptionPurchase; import java... public class GooglePlayService { private final Map<String, AndroidPublisher> androidPublishers = new HashMap<>(); private String readCredentialsJson(String packageName) { // JSON- ... } private AndroidPublisher getPublisher(String packageName) throws Exception { if (!androidPublishers.containsKey(packageName)) { String credentialsJson = readCredentialsJson(packageName); InputStream inputStream = new ByteArrayInputStream( credentialsJson.getBytes(StandardCharsets.UTF_8)); HttpTransport transport = GoogleNetHttpTransport.newTrustedTransport(); GoogleCredential credential = GoogleCredential.fromStream(inputStream) .createScoped(Collections.singleton( AndroidPublisherScopes.ANDROIDPUBLISHER)); AndroidPublisher.Builder builder = new AndroidPublisher.Builder( transport, JacksonFactory.getDefaultInstance(), credential); AndroidPublisher androidPublisher = builder.build(); androidPublishers.put(packageName, androidPublisher); } return androidPublishers.get(packageName); } public ProductPurchase getPurchase(String packageName, String productId, String token) throws Exception { AndroidPublisher publisher = getPublisher(packageName); AndroidPublisher.Purchases.Products.Get get = publisher .purchases().products().get(packageName, productId, token); return get.execute(); } public SubscriptionPurchase getSubscription(String packageName, String productId, String token) throws Exception { AndroidPublisher publisher = getPublisher(packageName); AndroidPublisher.Purchases.Subscriptions.Get get = publisher .purchases().subscriptions().get(packageName, productId, token); return get.execute(); } } Thus, we get the opportunity to obtain data about our purchase directly from Google, because there is no need to verify the signature. Moreover, for subscriptions, you can get a lot more information than directly through IInAppBilligService in a mobile application.
As query parameters we need:
- packageName - application package name (com.example.myapp)
- productId - product identifier (com.example.myapp_testing_inapp1)
- token is a unique purchase token that you received in the mobile application:
String purchaseToken = jsonObject.getString("purchaseToken");
Details on ProductPurchase and SubscriptionPurchase are described in the documentation, we will not dwell on them.
Instead of conclusion
First, the seemingly simple task of integrating billing into our service turned into a journey through documentation, googling and impotence (OAuth, you are fine ), since there is not a word about using IAM for access to documentation. Seriously, they propose to drive a concocted URL in your browser with some hands, add origin to the redirect in the project management console, all to get a one-time token that you need to pass to the server with your hands, then use the entire OAuth flow for access to billing data. This is not to say that if you do not have time to use the refresh-token, then you will have to get a new token - by hand. Agree - it sounds like complete nonsense for a backend service that should work without human intervention.
I hope that this article will help someone save some time and nerves.
Source: https://habr.com/ru/post/313416/
All Articles