learnopengl. Lesson 1.5 - Shaders
 We already mentioned shaders in the previous lesson. Shaders are small programs running on a graphics accelerator (hereinafter, we will use the more common name - GPU). These programs are executed for each specific section of the graphics pipeline. If to describe shaders in the simplest way, then shaders are nothing more than programs that transform inputs into outputs. Shaders are usually isolated from each other, and do not have communication mechanisms between themselves except for the above-mentioned inputs and outputs.
In the previous lesson we briefly touched on the topic of “surface shaders” and how to use them. In this lesson we will look at shaders in more detail and in particular the OpenGL shading language (OpenGL Shading Language).
Menu
- Getting started
GLSL
Shaders (as mentioned above, shaders are programs) are programmed in C like GLSL. It is adapted for use in graphics and provides functions for working with vectors and matrices.
The shader description begins with an indication of its version, followed by lists of input and output variables, global variables (the keyword uniform), and main functions. The main function is the starting point of the shader. Inside this function, you can manipulate the input data, the result of the shader is placed in the output variables. Do not pay attention to the keyword uniform, we will return to it later.
Below is a generalized shader structure:
#version version_number in type in_variable_name; in type in_variable_name; out type out_variable_name; uniform type uniform_name; void main() { // - , , , .. ... // out_variable_name = weird_stuff_we_processed; } The input variables of the vertex shader are called vertex attributes. There is a maximum number of vertices that can be passed to the shader; this limitation is imposed by the limited hardware capabilities. OpenGL guarantees the ability to transfer at least 16 4-component vertices, in other words, at least 64 values can be passed to the shader. However, it should be borne in mind that there are computing devices significantly raise this bar. Anyway, you can find out the maximum number of input variable vertices that are passed to the shader by referring to the GL_MAX_VERTEX_ATTRIBS attribute.
GLint nrAttributes; glGetIntegerv(GL_MAX_VERTEX_ATTRIBS, &nrAttributes); std::cout << "Maximum nr of vertex attributes supported: " << nrAttributes << std::endl; As a result of the execution of this code, as a result we will see the figure> = 16.
Types
GLSL, like any other programming language, provides a specific list of variable types, these include the following primitive types: int, float, double, uint, bool. GLSL also provides two container types: vector and matrix.
Vector
Vector in GLSL is a container containing from 1 to 4 values of any primitive type. A container vector declaration can have the following form (n is the number of elements of the vector):
vecn (for example, vec4) is a standard vector containing n values of type float
bvecn (for example, bvec4) is a vector containing n values of type boolean
ivecn (for example, ivec4) is a vector containing n integer values
uvecn (for example, uvecn) is a vector containing n unsigned integer values
dvecn (for example, dvecn) is a vector containing n double values.
In most cases, the standard vector vecn will be used.
To access the elements of the vector container, we will use the following syntax: vec.x, vec.y, vec.z, vec.w (in this case, we addressed all elements in order, from first to last). You can also iterate over RGBA if the vector describes a color, or stpq if the vector describes the coordinates of the texture.
PS It is allowed to refer to one vector through XYZW, RGBA, STPQ. No need to take this note as a guide to action, please.
PPS In general, nobody forbids to iterate over a vector with the help of an index and an access operator on an index []. https://en.wikibooks.org/wiki/GLSL_Programming/Vector_and_Matrix_Operations#Components
From a vector, when accessing data through a point, you can get not only one value, but also a whole vector using the following syntax, which is called swizzling
vec2 someVec; vec4 differentVec = someVec.xyxx; vec3 anotherVec = differentVec.zyw; vec4 otherVec = someVec.xxxx + anotherVec.yxzy; To create a new vector, you can use up to 4 literals of the same type or vector, only one rule - in total, we need to get the number of elements we need, for example: to create a vector of 4 elements, we can use two vectors of 2 elements long, or one vector long into 3 elements and one literal. Also, to create a vector of n elements, it is allowed to specify one value, in this case all elements of the vector will take this value. It is also allowed to use variables of primitive types.
vec2 vect = vec2(0.5f, 0.7f); vec4 result = vec4(vect, 0.0f, 0.0f); vec4 otherResult = vec4(result.xyz, 1.0f); You may notice that the vector is a very flexible data type and can be used as input and output variables.
In and out variables
We know that shaders are small programs, but in most cases they are part of something bigger, for this reason, GLSL has in and out variables that allow you to create a shader “interface” that allows you to get data for processing and transmit the results to the caller. Thus, each shader can define for itself input and output variables using the keywords in and out.
A vertex shader would be extremely inefficient if it did not accept any input data. By itself, this shader is different from other shaders in that it takes input values directly from the vertex data. In order to tell OpenGL how the arguments are organized, we use position metadata so that we can set attributes on the CPU. We have already seen this technique before: 'layout (location = 0). The vertex shader, in turn, requires additional specifications in order for us to associate the arguments with vertex data.
You can omit layout (location = 0), and use the glGetAttributeLocation call to get the location of the vertex attributes.
Another exception is that the fragment shader (Fragment shader) must have vec4 output, in other words, the fragment shader must provide as a result a color in RGBA format. If this is not done, the object will be drawn in black or white.
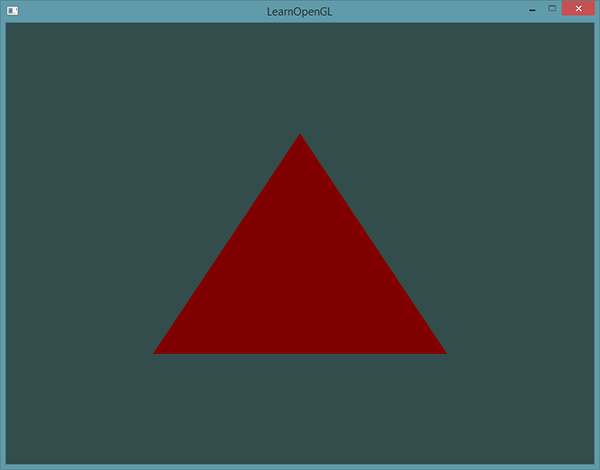
Thus, if we are faced with the task of transferring information from one shader to another, then it is necessary to define in the transmitting shader out a variable of this type as with the in variable in the receiving shader. Thus, if the types and names of variables are the same on both sides, OpenGL will connect these variables together, which will enable us to exchange information between shaders (this is done at the linking stage). To demonstrate this in practice, we will modify the shaders from the previous lesson so that the vertex shader provides the color for the fragment shader.
Vertex shader
#version 330 core layout (location = 0) in vec3 position; // 0 out vec4 vertexColor; // void main() { gl_Position = vec4(position, 1.0); // vec3 vec4 vertexColor = vec4(0.5f, 0.0f, 0.0f, 1.0f); // - . } Fragment shader
#version 330 core in vec4 vertexColor; // ( ) out vec4 color; void main() { color = vertexColor; } In these examples, we declared an output vector of 4 elements with the name vertexColor in the vertex shader and an identical vector with the name vertexColor, but only as an input in the fragment shader. As a result, the output vertexColor from the vertex shader and the input vertexColor from the fragment shader were connected. Since we set the vertexColor value in the vertex shader corresponding to the opaque burgundy (dark red color), applying the shader to the object makes it burgundy. The following image shows the result:
That's all. We made it so that the value from the vertex shader was obtained by the fragment shader. Next, we will look at how to transfer information to the shader from our application.
Uniforms
Uniforms (we will call them forms) is another way to transfer information from our application running on the CPU to the shader running on the GPU. Forms are slightly different from vertex attributes. For a start: forms are global. The global variable for GLSL means the following: The global variable will be unique for each shader program, and every shader has access to it at any stage in this program. Second: the value of the form is maintained until it is reset or updated.
To declare a form in GLSL, the unifrom variable specifier is used. After the form is declared, it can be used in the shader. Let's see how to set the color of our triangle using a form:
#version 330 core out vec4 color; uniform vec4 ourColor; // OpenGL. void main() { color = ourColor; } We declared the outColor form variable of the vector of 4 elements in the fragment shader and use it to set the output value of the fragment shader. Since Since the form is a global variable, its declaration can be made in any shader, which means that we do not need to transfer something from the vertex shader to the fragment shader. Thus, we do not declare the form in the vertex shader, since we don't use it there.
If you declare a form and do not use it in a shader program, the compiler will quietly delete it, which can cause some errors, so keep this information in your head.
At the moment the form does not contain useful data, because we didn't put them there, so let's do it. First we need to know the index, in other words, the location of the form attribute we need in our shader. Having obtained the value of the attribute index, we can fit the necessary data there. To clearly demonstrate the performance of this function, we will change the color from time:
GLfloat timeValue = glfwGetTime(); GLfloat greenValue = (sin(timeValue) / 2) + 0.5; GLint vertexColorLocation = glGetUniformLocation(shaderProgram, "ourColor"); glUseProgram(shaderProgram); glUniform4f(vertexColorLocation, 0.0f, greenValue, 0.0f, 1.0f); First we get the runtime in seconds by calling glfwGetTime (). Then we change the value from 0.0 to 1.0 using the sin function and write the result to the greenValue variable.
After we request the index of the form ourColor using glGetUniformLocation. This function takes two arguments: the shader program variable and the name of the form defined within this program. If glGetUniformLocation returned -1, it means that no such form with this name was found. Our final step is to set the value of ourColor form by using the glUniform4f function. Notice that the search for a form index does not require a prior call to glUseProgram, but to update the value of the form, you must first call glUseProgram.
Since OpenGL is implemented using the C language, in which there is no function overload, it is impossible to call functions with different arguments, but OpenGL defines functions for each data type, which are determined by the postfix of the function. Below are some postfixes:
f: the function takes a float argument;
i: the function takes an int argument;
ui: the function takes an unsigned int argument;
3f: the function takes three float arguments;
fv: function takes as argument a vector from float.
Thus, instead of using overloaded functions, we must use a function whose implementation is intended for a specific set of arguments, as indicated by the postfix function. In the example above, we used the function glUniform ... () specialized to handle 4 arguments of type float, so the full name of the function was glUniform4f () (4f - four arguments of type float).
Now that we know how to set values to forms, we can use them in the rendering process. If we want to change color over time, then we need to update the shape value every iteration of the rendering cycle (in other words, the color will change on each frame), otherwise our triangle will be the same color if we set the color only once. In the example below, the new color of the triangle is calculated and updated at each iteration of the rendering cycle:
while(!glfwWindowShouldClose(window)) { // glfwPollEvents(); // // glClearColor(0.2f, 0.3f, 0.3f, 1.0f); glClear(GL_COLOR_BUFFER_BIT); // glUseProgram(shaderProgram); // GLfloat timeValue = glfwGetTime(); GLfloat greenValue = (sin(timeValue) / 2) + 0.5; GLint vertexColorLocation = glGetUniformLocation(shaderProgram, "ourColor"); glUniform4f(vertexColorLocation, 0.0f, greenValue, 0.0f, 1.0f); // glBindVertexArray(VAO); glDrawArrays(GL_TRIANGLES, 0, 3); glBindVertexArray(0); } The code is very similar to that used earlier, but now we execute it inside the loop, changing the value of the form at each iteration. If everything is correct, then you will see the color change of the triangle from green to black and back (if it is not clear, find the image of the sine wave).
The full source code of the program that creates such miracles can be found here .
As you have already noticed, forms are a very convenient way to exchange data between the shader and your program. But what if we want to set the color for each vertex? To do this, we must declare as many forms as there are vertices. The most successful solution would be to use vertex attributes, which we will now demonstrate.
More attributes to god of attributes !!!
In the previous tutorial, we saw how to fill in a VBO, set pointers to vertex attributes, and how to store it all in a VAO. Now we need to add color information to the vertex data. To do this, we will create a vector of three float elements. We will assign the red, green, and blue colors to each of the vertices of the triangle, respectively:
GLfloat vertices[] = { // // 0.5f, -0.5f, 0.0f, 1.0f, 0.0f, 0.0f, // -0.5f, -0.5f, 0.0f, 0.0f, 1.0f, 0.0f, // 0.0f, 0.5f, 0.0f, 0.0f, 0.0f, 1.0f // }; Now we have a lot of information to transfer it to the vertex shader, we need to edit the shader so that it gets both vertices and colors. Note that we set the color locations to 1:
#version 330 core layout (location = 0) in vec3 position; // 0 layout (location = 1) in vec3 color; // 1 out vec3 ourColor; // void main() { gl_Position = vec4(position, 1.0); ourColor = color; // , } Now we do not need the form ourColor, but the output parameter of ourColor will be useful to us for passing the value to the fragment shader:
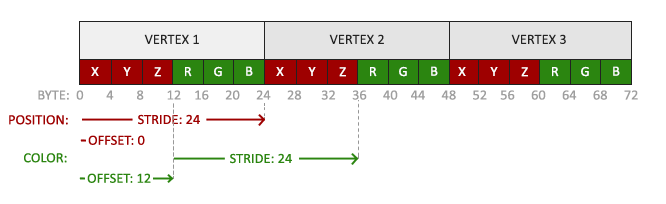
#version 330 core in vec3 ourColor; out vec4 color; void main() { color = vec4(ourColor, 1.0f); } Since we added a new vertex parameter and updated the VBO memory; we need to configure the vertex attribute pointers. The updated data in the VBO memory is as follows:
Knowing the current scheme, we can update the vertex format using the glVertexAttribPointer function:
// glVertexAttribPointer(0, 3, GL_FLOAT, GL_FALSE, 6 * sizeof(GLfloat), (GLvoid*)0); glEnableVertexAttribArray(0); // glVertexAttribPointer(1, 3, GL_FLOAT, GL_FALSE, 6 * sizeof(GLfloat), (GLvoid*)(3* sizeof(GLfloat))); glEnableVertexAttribArray(1); The first few attributes of the glVertexAttribPointer function are fairly simple. In this example, we use the vertex attribute with position 1. The color consists of three values of the fleet type and we do not need normalization.
Since we now use two shader attributes, then we should recalculate the step. To access the next shader attribute (the next x vertex vector) we need to move 6 float elements to the right, 3 for the vertex vector and 3 for the color vector. Those. we move 6 times to the right, i.e. 24 bytes to the right.
Now we understand the shifts. The first is the vector with the coordinates of the vertex. A vector with an RGB color value comes after a vector with coordinates, i.e. after 3 * sizeof (GLfloat) = 12 bytes.
Running the program you can see the following result:

The full source code that does this miracle can be found here :
It may seem that the result does not correspond to the work done, because we set only three colors, and not the palette that we see as a result. This result gives a fragmentary interpolation of a fragment shader. When we draw a triangle, at the rasterization stage, we get many more areas, and not just the vertices, which we use as the shader arguments. The rasterizer determines the positions of these areas based on their position on the landfill. Based on this position, all arguments of the fragment shader are interpolated. Suppose we have a simple line, at one end it is green, at the other it is blue. If the fragment shader processes an area that is approximately in the middle, then the color of this area will be chosen so that green will be equal to 50% of the color used in the line, and, accordingly, blue will be equal to 50% percent of blue. This is exactly what happens on our triangle. We have three colors, and three vertices, for each of which one of the colors is set. If you look closely, you can see that red, when you go to blue, first turns purple, which is quite expected. Fragment interpolation is applied to all attributes of a fragment shader.
OOP to the masses! Making your shader class
The code that describes the shader, compiles it, and allows you to configure the shader can be very cumbersome. So let's make our life a bit easier by writing a class that reads our shader from disk, compiling it, linking it, checking for errors, and of course, having a simple and pleasant interface. Thus, OOP will help us encapsulate all this chaos inside the methods of our class.
We start the development of our class by declaring its interface and assign all necessary directives to the newly created heading. The result is something like this:
#ifndef SHADER_H #define SHADER_H #include <string> #include <fstream> #include <sstream> #include <iostream> #include <GL/glew.h>; // glew , OpenGL class Shader { public: // GLuint Program; // Shader(const GLchar* vertexPath, const GLchar* fragmentPath); // void Use(); }; #endif Let's do well and use ifndef and define directives to avoid recursively executing include directives. This advice does not apply to OpenGL, but to programming in C ++ as a whole.
And so, our class will store in itself the identifier. The shader constructor will take as arguments the pointers to arrays of characters (in other words, the text, and in the context of the class, it would be more appropriate to say - the path to the file with the source code of our shader) containing the path to the files containing the vertex and fragment shaders, represented by plain text. We will also add the utilitarian Use function, which clearly demonstrates the advantages of using shader classes.
Read shader file For reading, we will use standard C ++ streams, putting the result in the lines:
Shader(const GLchar* vertexPath, const GLchar* fragmentPath) { // 1. filePath std::string vertexCode; std::string fragmentCode; std::ifstream vShaderFile; std::ifstream fShaderFile; // , ifstream vShaderFile.exceptions(std::ifstream::badbit); fShaderFile.exceptions(std::ifstream::badbit); try { // vShaderFile.open(vertexPath); fShaderFile.open(fragmentPath); std::stringstream vShaderStream, fShaderStream; // vShaderStream << vShaderFile.rdbuf(); fShaderStream << fShaderFile.rdbuf(); // vShaderFile.close(); fShaderFile.close(); // GLchar vertexCode = vShaderStream.str(); fragmentCode = fShaderStream.str(); } catch(std::ifstream::failure e) { std::cout << "ERROR::SHADER::FILE_NOT_SUCCESFULLY_READ" << std::endl; } const GLchar* vShaderCode = vertexCode.c_str(); const GLchar* fShaderCode = fragmentCode.c_str(); [...] ( , , . , … ):
// 2. GLuint vertex, fragment; GLint success; GLchar infoLog[512]; // vertex = glCreateShader(GL_VERTEX_SHADER); glShaderSource(vertex, 1, &vShaderCode, NULL); glCompileShader(vertex); // - glGetShaderiv(vertex, GL_COMPILE_STATUS, &success); if(!success) { glGetShaderInfoLog(vertex, 512, NULL, infoLog); std::cout << "ERROR::SHADER::VERTEX::COMPILATION_FAILED\n" << infoLog << std::endl; }; // [...] // this->Program = glCreateProgram(); glAttachShader(this->Program, vertex); glAttachShader(this->Program, fragment); glLinkProgram(this->Program); // - glGetProgramiv(this->Program, GL_LINK_STATUS, &success); if(!success) { glGetProgramInfoLog(this->Program, 512, NULL, infoLog); std::cout << "ERROR::SHADER::PROGRAM::LINKING_FAILED\n" << infoLog << std::endl; } // , . glDeleteShader(vertex); glDeleteShader(fragment); Use:
void Use() { glUseProgram(this->Program); } :
Shader ourShader("path/to/shaders/shader.vs", "path/to/shaders/shader.frag"); ... while(...) { ourShader.Use(); glUniform1f(glGetUniformLocation(ourShader.Program, "someUniform"), 1.0f); DrawStuff(); } shader.vs, shader.frag. , , , , .
:
')
Source: https://habr.com/ru/post/313380/
All Articles