Kivy - even easier, more native
We continue a series of articles on the development of mobile applications with the Kivy framework. Today we will talk about the wonderful KivyMD library - a library for building a native interface in the style of Android Material Design, written with and for the Kivy framework. Frankly, I personally am infinitely glad that I no longer need to sculpt and contemplate curves, dark and scary custom widgets in Kivy applications. Using the KivyMD library in your projects plus a bit of imagination, it’s unlikely anyone will be able to visually distinguish whether your program is written in Java or using the Kivy and Python framework.
Download, unpack KivyMD, go to the root directory of the unpacked archive and perform the installation:
python setup.py install Next, install the dependencies for KivyMD:
pip install kivy-garden garden install recycleview After installing the library, you can run a test sample from the archive you downloaded and unpacked:
python kitchen_sink.py After launching, you will see an application that demonstrates native widgets and controllers that are available to you for use in your projects:
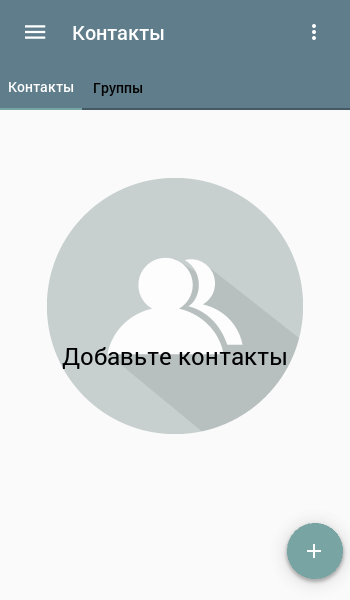
In the article we will not dwell on any specific library widgets (their creation and parameters are beautifully described in the same kitchen_sink.py), but create a simple demo application “Contacts” using KivyMD. Our application will be able to create contacts and groups, as well as add created contacts to them. Well, along the way we will cover in more detail some aspects of creating an application interface in Kivy
For a simple creation of a default project on Kivy, I recommend CreatorKivyProject , a detailed description of the work with which is described in this article . So, following the instructions in the article on the link, the project DemoKivyContacts created. Open the file on the DemoKivyContacts / libs / uix / kv / startscreen.kv path , mercilessly delete all its contents and “draw” the start screen of your application!
This is how the markup of this interface in Kivy-Language looks like:
#:kivy 1.9.1 #:import CreateContact libs.uix.createcontact.CreateContact #:import CallContact libs.uix.callcontact.CallContact #:import EmptyScreen libs.uix.emptyscreen.EmptyScreen #:import Toolbar kivymd.toolbar.Toolbar #:import MDTabbedPanel kivymd.tabs.MDTabbedPanel #:import MDTab kivymd.tabs.MDTab ############################################################################### # # # ############################################################################### <StartScreen>: id: root.manager Screen: name: 'root_screen' BoxLayout: #canvas: # Rectangle: # pos: self.pos # size: self.size # source: 'data/images/background.jpg' orientation: 'vertical' #################################################################### # # ACTION BAR # #################################################################### Toolbar: #canvas.before: # Rectangle: # pos: self.pos # size: self.size # source: 'data/images/background_toolbar.jpg' id: action_bar #background_color: app.data.alpha background_color: app.theme_cls.primary_color title: app.data.string_lang_contacts left_action_items: [['menu', lambda x: app.nav_drawer.toggle()]] right_action_items: [['more-vert', lambda x: None]] #################################################################### # # TABBED PANEL # #################################################################### MDTabbedPanel: id: tabs tab_display_mode: 'text' #tab_color: app.data.alpha tab_text_color: app.data.tab_text_color tab_indicator_color: app.data.tab_indicator_color MDTab: name: 'contacts' text: app.data.string_lang_contacts on_tab_press: app.on_tab_press(self.name) ScreenManager: id: screen_manager_tab_contacts Screen: name: 'empty_contacts_list' EmptyScreen: image: 'data/images/contacts.png' text: app.data.string_lang_add_contacts callback: app.show_form_create_contact disabled: False Screen: name: 'create_contact' CreateContact: MDTab: name: 'groups' text: app.data.string_lang_groups on_tab_press: app.on_tab_press(self.name) ScreenManager: id: screen_manager_tab_groups Screen: name: 'empty_groups_list' EmptyScreen: image: 'data/images/contacts.png' text: app.data.string_lang_not_groups callback: lambda: app.create_group() disabled: False Screen: name: 'call_contact' CallContact: As you can see, our screen uses:
Toolbar: id: action_bar background_color: app.theme_cls.primary_color title: app.data.string_lang_contacts left_action_items: [['menu', lambda x: app.nav_drawer.toggle()]] right_action_items: [['more-vert', lambda x: None]] 
MDTabbedPanel: id: tabs tab_display_mode: 'text' tab_text_color: app.data.tab_text_color tab_indicator_color: app.data.tab_indicator_color MDTab: name: 'contacts' text: app.data.string_lang_contacts on_tab_press: app.on_tab_press(self.name) ScreenManager: id: screen_manager_tab_contacts Screen: name: 'empty_contacts_list' EmptyScreen: image: 'data/images/contacts.png' text: app.data.string_lang_add_contacts callback: app.show_form_create_contact disabled: False Screen: name: 'create_contact' CreateContact: MDTab: name: 'groups' text: app.data.string_lang_groups on_tab_press: app.on_tab_press(self.name) ScreenManager: id: screen_manager_tab_groups Screen: name: 'empty_groups_list' EmptyScreen: image: 'data/images/contacts.png' text: app.data.string_lang_not_groups callback: lambda: app.create_group 
We imported these KivyMD library widgets at the very beginning of the startscreen.kv markup file:
#:import Toolbar kivymd.toolbar.Toolbar #:import MDTabbedPanel kivymd.tabs.MDTabbedPanel #:import MDTab kivymd.tabs.MDTab These instructions in Kivy-Language are similar to imports in python scripts:
from kivymd.toolbar import Toolbar from kivymd.tabs import MDTabbedPanel from kivymd.tabs import MDTab By the way, you can include other markup files in the kv-file if the interface, for example, is too complex:
#:include your_kv_file.kv We have two tabs on MDTabbedPanel - “Contacts” and “Groups”. The first one (“Contacts”) will contain a ScreenManager widget (screen manager) in which we will place two, in Java, Activity:
MDTab: name: 'contacts' text: app.data.string_lang_contacts on_tab_press: app.on_tab_press(self.name) ScreenManager: id: screen_manager_tab_contacts Screen: name: 'empty_contacts_list' EmptyScreen: image: 'data/images/contacts.png' text: app.data.string_lang_add_contacts callback: app.show_form_create_contact disabled: False Screen: name: 'create_contact' CreateContact: As you can see, ScreenManager must include one or more Screen widgets (screens) that will contain our content (Activity). In our case, these are EmptyScreen (blank screen) and CreateContact (form for creating a new contact):

Switch between Activity data by their name:
Screen: name: 'empty_contacts_list' … Screen: name: 'create_contact' … ... using the ScreenManager object ...
ScreenManager: id: screen_manager_tab_contacts ... in the program code by its identifier from the markup we created:

... and switching the Activity by passing the current name of the new screen to the current attribute:
self.manager_tab_contacts.current = 'create_contact' Now let's “draw” our Activity - EmptyScreen (blank screen) and CreateContact (form for creating a new contact). Create interface markup files in the project directory DemoKivyContacts / libs / uix / kv emptyscreen.kv and createcontact.kv and the same name python scripts in the directory DemoKivyContacts / libs / uix to manage and transfer the parameters to the created EmptyScreen and CreateContact widgets:
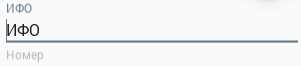
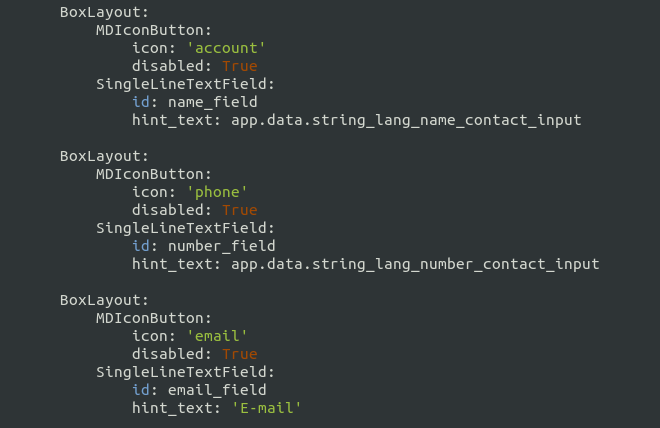
#:kivy 1.9.1 #:import MDLabel kivymd.label.MDLabel #:import MDFloatingActionButton kivymd.button.MDFloatingActionButton <EmptyScreen>: id: empty_screen Image: source: root.image pos_hint: {'center_x': .5, 'center_y': .6} opacity: .5 MDLabel: id: label font_style: 'Headline' theme_text_color: 'Primary' color: app.data.text_color text: root.text halign: 'center' MDFloatingActionButton: id: float_act_btn icon: 'plus' size_hint: None, None size: dp(56), dp(56) opposite_colors: True elevation_normal: 8 pos_hint: {'center_x': .9, 'center_y': .1} background_color: app.data.floating_button_color background_color_down: app.data.floating_button_down_color disabled: root.disabled on_release: root.callback() #:kivy 1.9.1 #:import SingleLineTextField kivymd.textfields.SingleLineTextField #:import MDIconButton kivymd.button.MDIconButton #:import MDFlatButton kivymd.button.MDFlatButton #:import MDFloatingActionButton kivymd.button.MDFloatingActionButton <CreateContact>: orientation: 'vertical' FloatLayout: size_hint: 1, .3 Image: id: avatar pos_hint: {'center_y': .5} source: 'data/images/avatar_empty.png' MDFloatingActionButton: icon: 'plus' size_hint: None, None size: dp(56), dp(56) opposite_colors: True elevation_normal: 8 pos_hint: {'center_x': .9, 'center_y': .20} background_color: app.data.floating_button_color background_color_down: app.data.floating_button_down_color on_release: app.choice_avatar_contact() BoxLayout: orientation: 'vertical' padding: 5, 5 size_hint: 1, .3 BoxLayout: MDIconButton: icon: 'account' disabled: True SingleLineTextField: id: name_field hint_text: '' BoxLayout: MDIconButton: icon: 'phone' disabled: True SingleLineTextField: id: number_field hint_text: '' BoxLayout: MDIconButton: icon: 'email' disabled: True SingleLineTextField: id: email_field hint_text: 'E-mail' Widget: size_hint: 1, .3 AnchorLayout: anchor_x: 'right' anchor_y: 'bottom' size_hint: 1, None height: dp(40) MDFlatButton: id: button_ok text: 'OK' on_release: app.save_info_contact() emptyscreen.py
from kivy.uix.floatlayout import FloatLayout from kivy.properties import StringProperty, ObjectProperty, BooleanProperty class EmptyScreen(FloatLayout): image = StringProperty() text = StringProperty() callback = ObjectProperty() disabled = BooleanProperty() createcontact.py
from kivy.uix.boxlayout import BoxLayout class CreateContact(BoxLayout): pass In EmptyScreen, we used another widget from the KivyMD library - MDFloatingActionButton, which is worth describing. That same annoying fly that many users want to slam:

MDFloatingActionButton: id: float_act_btn icon: 'plus' size_hint: None, None size: dp(56), dp(56) opposite_colors: True # / elevation_normal: 8 # pos_hint: {'center_x': .9, 'center_y': .1} # , background_color: app.data.floating_button_color background_color_down: app.data.floating_button_down_color disabled: root.disabled on_release: root.callback() CreateContact uses KivyMD library widgets:
MDIconButton:

MDIconButton is a button with a vector icon. The full set of official icons from Google, see the link . All of them are used and available in KivyMD.
SingleLineTextField:
MDFlatButton:

It will call the function of saving user input data:
MDFlatButton: … on_release: app.save_info_contact() We will receive the information entered by the user from the SingleLineTextField fields according to the method already described above - by their id from the text attribute:
DemoKivyContacts / libs / uix / kv / createcontact.kv
DemoKivyContacts / libs / programclass / showformcreatecontact.py
def show_form_create_contact(self, *args): ''' .''' self.manager_tab_contacts.current = 'create_contact' # <class 'libs.uix.createcontact.CreateContact'> self._form_create_contact = \ self.manager_tab_contacts.current_screen.children[0] ... def save_info_contact(self): ''' .''' name_contact = self._form_create_contact.ids.name_field.text number_contact = self._form_create_contact.ids.number_field.text mail_contact = self._form_create_contact.ids.email_field.text ... After saving the data, the program creates a list of contacts if it has not been created, or adds a new one to the already existing list and displays it on the screen:

def show_contacts(self, info_contacts): ''' :type info_contacts: dict; :param info_contacts: { 'Name contact': ['Number contact\nMail contact', 'path/to/avatar'] }; ''' if not self._contacts_items: # . self._contacts_list = ContactsList() self._contacts_items = Lists( dict_items=info_contacts, flag='three_list_custom_icon', right_icons=self.data.right_icons, events_callback=self._event_contact_item ) button_add_contact = Builder.template( 'ButtonAdd', disabled=False, events_callback=self.show_form_create_contact ) self._contacts_list.add_widget(self._contacts_items) self._contacts_list.add_widget(button_add_contact) self.add_screens( 'contact_list', self.manager_tab_contacts, self._contacts_list ) else: # # . self._add_contact_item(info_contacts) self.manager_tab_contacts.current = 'contact_list' Pay attention to the add_screens function — programmatically adding a new Activity and setting it as the current screen:
DemoKivyContacts / program.py
def add_screens(self, name_screen, screen_manager, new_screen): screen = Screen(name=name_screen) # c screen.add_widget(new_screen) # Activity screen_manager.add_widget(screen) # screen_manager.current = name_screen # Activity, I wrote a small (yet clumsy) binding for creating MDList lists - DemoKivyContacts / libs / uix / lists.py
You can easily create a list item with an icon on the left and the vector icons on the right by creating an instance of the Lists class with the necessary parameters.
def show_contacts(self, info_contacts): ''' :type info_contacts: dict; :param info_contacts: { 'Name contact': ['Number contact\nMail contact', 'path/to/avatar'] }; ''' … self._contacts_items = Lists( dict_items=info_contacts, flag='three_list_custom_icon', right_icons=self.data.right_icons, events_callback=self._event_contact_item ) 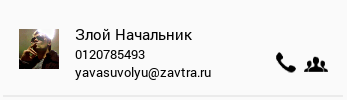
Next, the list self._contacts_items throw on any desired widget.
When creating the list item, we passed the _event_contact_item function to the events_callback parameter to handle the connection events:
def _event_contact_item(self, *args): ''' .''' def end_call(): self.screen.current = 'root_screen' instanse_button = args[0] if type(instanse_button) == RightButton: name_contact, name_event = instanse_button.id.split(', ') if name_event == 'call': self.screen.current = 'call_contact' data_contact = self.info_contacts[name_contact] call_screen = self.screen.current_screen.children[0] call_screen.name_contact = name_contact call_screen.number_contact = data_contact[0].split('\n')[0] call_screen.avatar = data_contact[1] call_screen.callback = end_call elif name_event == 'groups': self._show_names_groups(name_contact) else: name_contact, name_event = args The event identifiers 'call' and 'group' are the names of the icons that we specified in the right_icons parameter:
DemoKivyContacts / libs / programdata.py
… right_icons = ['data/images/call.png', 'data/images/groups.png'] Clicking on the call icon will open an outgoing call simulation screen:
def _event_contact_item(self, *args): def end_call(): self.screen.current = 'root_screen' … if name_event == 'call': self.screen.current = 'call_contact' call_screen = self.screen.current_screen.children[0] … call_screen.callback = end_call 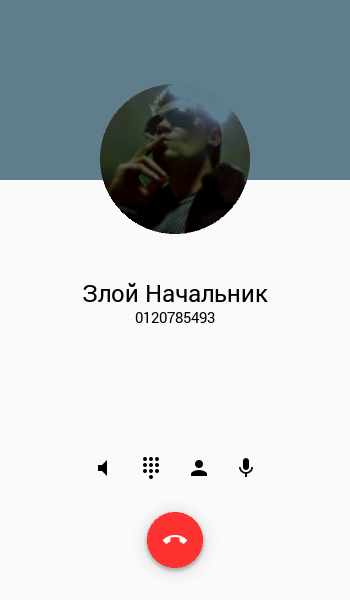
All widgets in it have already been described, so I’ll just give the layout of this Activity:
#:kivy 1.9.1 #:import MDIconButton kivymd.button.MDIconButton #:import MDFloatingActionButton kivymd.button.MDFloatingActionButton #:import MDLabel kivymd.label.MDLabel <CallContact>: id: call_contact Widget: id: title_line canvas: Color: rgba: app.theme_cls.primary_color Rectangle: size: self.size pos: self.pos size_hint_y: None height: root.height * 30 // 100 # 30% pos: 0, call_contact.height - self.size[1] Widget: canvas: Ellipse: pos: self.pos size: 150, 150 source: root.avatar if root.avatar else 'data/logo/kivy-icon-128.png' pos: (call_contact.width // 2) - 75, call_contact.height * 61 // 100 BoxLayout: orientation: 'vertical' size_hint: 1, None height: 50 pos: self.pos[0], call_contact.height * 45 // 100 MDLabel: id: name_contact font_style: 'Headline' theme_text_color: 'Primary' color: app.data.text_color text: root.name_contact if root.name_contact else 'Abonent' halign: 'center' MDLabel: id: number_contact font_style: 'Subhead' theme_text_color: 'Primary' color: app.data.text_color text: root.number_contact if root.number_contact else '12345' halign: 'center' BoxLayout: size_hint: None, None height: 60 width: volume.width + dialpad.width + account.width + mic.width pos: (call_contact.width // 2) - (self.width // 2), call_contact.height * 18 // 100 MDIconButton: id: volume icon: 'volume-mute' MDIconButton: id: dialpad icon: 'dialpad' MDIconButton: id: account icon: 'account' MDIconButton: id: mic icon: 'mic' MDFloatingActionButton: id: phone_end icon: 'phone-end' size_hint: None, None size: dp(56), dp(56) opposite_colors: True # / elevation_normal: 8 # pos_hint: {'center_x': .5, 'center_y': .1} background_color: app.data.floating_button_color_end_call background_color_down: app.data.floating_button_down_color_end_call on_release: root.callback() CallContact widget inherits from FloatLayout:
from kivy.uix.floatlayout import FloatLayout from kivy.properties import StringProperty, ObjectProperty class CallContact(FloatLayout): callback = ObjectProperty(lambda: None) avatar = StringProperty(None) name_contact = StringProperty(None) number_contact = StringProperty(None) This means that all widgets and controllers in it will overlap each other, which is why in the markup I used a percentage indication of their positions relative to the height of the main screen:
pos: self.pos[0], call_contact.height * 45 // 100 Now that you know how ScreenManager works, let's take another look at the management class of the starting Activity:
from kivy.uix.screenmanager import ScreenManager from kivy.properties import ObjectProperty class StartScreen(ScreenManager): events_callback = ObjectProperty(lambda: None) ''' .''' and skeleton markup:
<StartScreen>: Screen: name: 'root_screen' … # — MDTabbedPanel Screen: name: 'call_contact' CallContact: That is, when you press the call button in the contact list item, we open the Activity for simulating an outgoing call and close it when you press the hang up button:
def _event_contact_item(self, *args): def end_call(): self.screen.current = 'root_screen' … if name_event == 'call': self.screen.current = 'call_contact' call_screen = self.screen.current_screen.children[0] … call_screen.callback = end_call We will not consider the process of creating a group, since it is similar to the process of creating a new contact. Let's look at the NavigationDrawer widget:
To use the NavigationDrawer panel, we need to create its markup and control class inherited from NavigationDrawer:
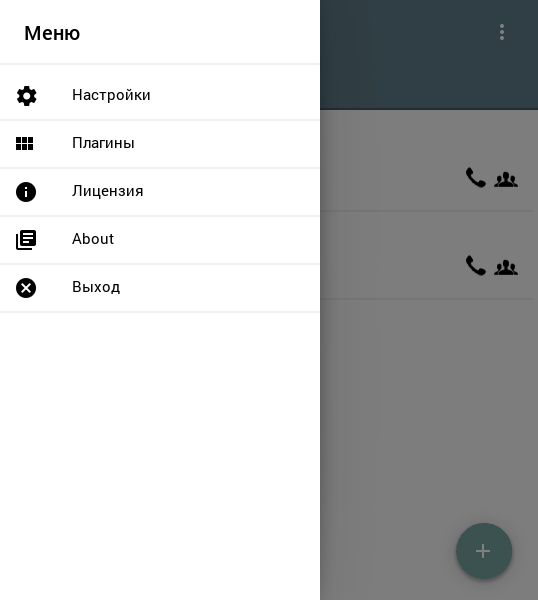
#:kivy 1.9.1 <NavDrawer>: NavigationDrawerIconButton: icon: 'settings' text: app.data.string_lang_settings on_release: app.events_program(self.text) NavigationDrawerIconButton: icon: 'view-module' text: app.data.string_lang_plugin on_release: app.events_program(self.text) NavigationDrawerIconButton: icon: 'info' text: app.data.string_lang_license on_release: app.events_program(self.text) NavigationDrawerIconButton: icon: 'collection-text' text: 'About' on_release: app.events_program(self.text) NavigationDrawerIconButton: icon: 'close-circle' text: app.data.string_lang_exit_key on_release: app.events_program(app.data.string_lang_exit_key) DemoKivyContacts / program.py
from kivy.app import App from kivy.properties import ObjectProperty from kivymd.navigationdrawer import NavigationDrawer class NavDrawer(NavigationDrawer): events_callback = ObjectProperty() class Program(App): nav_drawer = ObjectProperty() def __init__(self, **kvargs): super(Program, self).__init__(**kvargs) def build(self): self.nav_drawer = NavDrawer(title=data.string_lang_menu) That's all for now. You can get acquainted with the full scenario of the project on github.
PS
No doubt the KivyMD library is a great addition to the Kivy framework! I hope you will master it and apply it in your projects.
I have a suggestion to change the format of articles on the development of mobile applications using Kivy: take a ready-made native Android application written in Java and create a similar, but written in Python using the Kivy framework, covering the whole development process from scratch: how Widgets and controllers are created in Kivy, how to use dynamic classes, what FloatLayout is, etc.
')
Source: https://habr.com/ru/post/313160/
All Articles