Use Veeam Cloud Connect. Store client backups and replicas

Backups need to have. Preferably in several places.
I think that every administrator of Veeam Backup & Replication noticed the button “Add Service Provider” in the management console. On Habré there are several good articles that demonstrate how to use this button for its intended purpose and how to start folding Veeam backups not only in your own home, but also in the cloud provided by the service provider.
In this article I would like to try to look on the other side and show what the service provider needs to do to start taking backup copies of clients.
Veeam provides, in my opinion, a very convenient way to store backups and off-site replicas, on the side of a service provider that provides its own disk and computational capabilities for this purpose. The greatest convenience for the client is that all connections to the service provider are made from the BR console, which is familiar to the administrator, and with a flick of a mouse, it receives the target repository for backups, which is somewhere far away.
The administrator uses his usual Backup Job and Backup Copy Job tasks, knowing that if he loses the main backup, it will always be possible to recover from copies that are on the service provider side.
')
As I wrote above, there are articles on this site that describe how a client can get a remote repository. I will try to describe how to create this repository and provide it to the client. In this article, I omit replication and the ability to restore virtual machines on the service provider's equipment.
I’ll start with the scheme that explains how Cloud Connect works:

The left side is our customers. Veeam BR users who send their backups to the service provider side.
The right side is a service provider. Its infrastructure consists of the following components:
- Veeam Backup Server - a server that manages the cloud, clients, disk and computing resources;
- Veeam Backup Repository is a familiar and familiar server with storage connected to it. In this case, the client backups are located here;
- Veeam Cloud Gateway - Client entry point. It is through this gateway that the backups from the client are loaded into the repository of the service provider. There may be several such gateways;
- Optional WAN optimizer from two sides.
The interaction between the client and the service provider is made over an encrypted channel through a single port.
Now, when you can see how it looks from the outside, let's look at the service provider side. In my test environment, I use three servers for cloud storage and one client:
- Veeam Backup Server;
- Veeam Backup Repository;
- Veeam Cloud Gateway;
For cleanliness testing, all components of Cloud Connect are in a separate network from customers. The Cloud Gateway server has a second interface that looks to the network accessible to clients (ideally, this is a WAN, but not in my case).
It is worth noting that the Cloud Gateway server does not need to have a second interface that is accessible from the outside. He gets along very well in the DMZ behind the NAT (So it should always be, imho), only one port is required to forward outside.
List of ports that Veeam can use.
Now delve into the setting of this whole thing:
The first step is to install the classic Veeam Backup & Replication server with one exception. This server must use another license, the Cloud Connect Provider license. Read more about licenses for service providers.
After installing the BR server and adding a service provider license, you can immediately notice the difference. Everything else we get a new bookmark «CLOUD CONNECT»:

Previously, I connected two virtual machines to the Veeam server, one of which I connected to the repository, and the second one will be used for the Cloud Gateway. As a result, the structure of the Veeam is as follows:

Repositories:

Now let's set up our cloud storage. The first step is to add a certificate that will be used for the communication channel with the client. You can generate your certificate, use the already imported one, or use the certificate file. This is done with the “Manage Certificates” item from the “CLOUD CONNECT” tab. I will use the first item and create a self-signed certificate:


Further Veeam will offer to get acquainted with the certificate. At this his creation \ import is complete.
The next step is to add Cloud Gateway, through which customers will access resources to host their backups. You must use the menu item "Add Cloud Gateway":
First of all, you need to choose a server to which Cloud Gateway will act as and to which necessary packages will be installed, as well as specify the port through which the server will accept connections from clients (NAT must be configured to this port if it is used):

The next step is to specify the type of connection of our Gateway to the network. Is direct connection being used, or are we behind NAT? .. In my case, I use direct connection via Ethernet 2:

If the Gateway is behind NAT, you must specify the NAT address of the device.
Next, Veeam checks the settings and reports that the Cloud Gateway service will be installed on the target machine specified at the beginning. After waiting for the installation to finish, we see that we have a new access gateway:
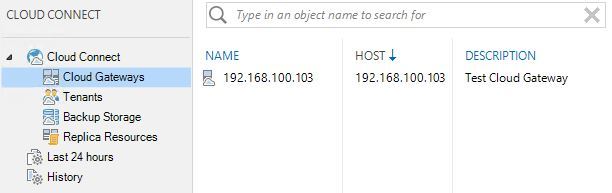
This opportunity would not make sense if we had no customers. The next step is to create a client account and allocate a pool of resources to it. The account is transferred to the client and with it it connects to the service provider.
Adding customers occurs at the point "Tenants" → "Add Tenant":
When you add a new client, its account and, accordingly, the password for access is indicated. The following are the resources that are provided to the user. They can be both disk and computational. Since I use only backup in this example, I only specify disk resources (Backup Storage). You can also specify the duration of the contract, after which the user will not be able to connect:
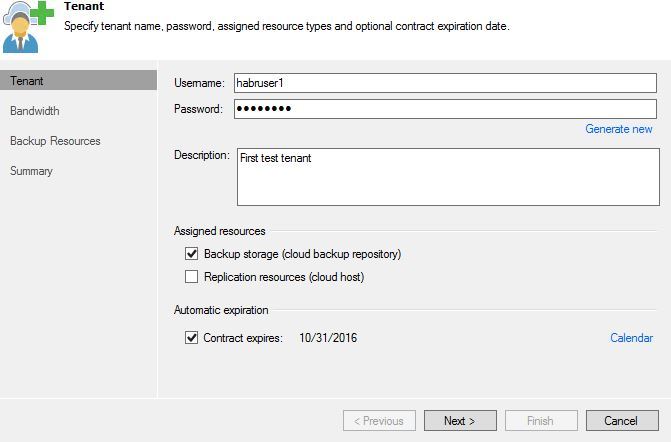
Next, we can limit the maximum client throughput:

At the last stage, we add repositories that will be visible to the user, as well as indicate the quota available to the user in these repositories. In the example, I will add a repository to the user at 20GB:
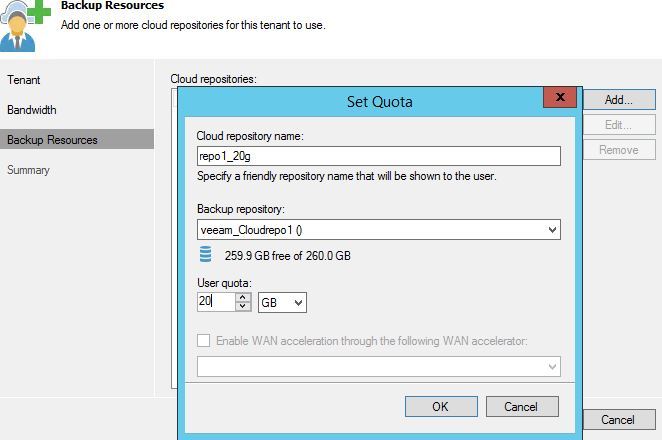

Here you can also connect a WAN-accelerator, if the client needs it. If the client needs to add two repositories, they can only be located in different repositories connected to our Veeam BR server.
Having checked the total settings, click "OK". Now on the tab “Tenants” we see our client:

And on the Backup Storage tab, you can observe how clients use the disk space provided to them:

That's all, the Veeam service provider side setup is complete. Check if the client can use our resources.
On the second BR server, I select “Add Service Provider” and enter the Ethernet 2 address of my Cloud Gateway, which was configured above (In the case of NAT, you must specify the address of the device that performs port forwarding). Better yet, get a DNS entry for this address:

Further, in case of successful connection, it is necessary to verify the certificate provided, as well as specify the connection data that we provide to the client:

If everything is ok, the client will see a list of resources provided to him. As you can see, we see the previously allocated 20GB:
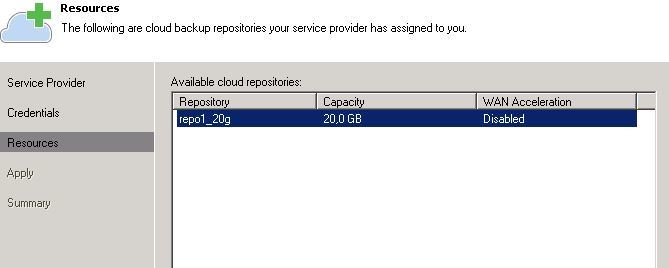
Now the client will see the address of our Cloud Gateway in the “Service Providers” list, and the repository with the name “repo1_20g” will be visible in the list of repositories.
This repository can be used for both regular backup tasks and tasks such as Backup Copy. I will create and run a regular task, check what the service provider will see in this case.
As soon as a client launches a task, the goal of which is the repository of the service provider is specified, through the management console, the provider can see the status of the task launched by the client, as well as the amount of data transferred at the moment:

At the same time, the provider does not see the virtual machines that are backed up, and other valuable information for the client. To make sure that no one touches backups, in the properties of the backup task it is possible to enable encryption. This is done in the paragraph "Advanced → Storage":


Two tasks. One is password protected, the other is not.
From the user’s side there is one limitation. The maximum number of threads that can be run on one repository is 1. That is, even if the proxy includes 10 threads, virtual machines will be backed up in turn, rather than 10 at once. More about the limitations here. To be able to run multiple threads, you need several repositories provided by the provider, as well as several backup tasks.
Otherwise, the backup / restore process when using the cloud is similar to the recovery process from a regular repository, except for the ability to use Instant Recovery.
That seems to be all that I planned to write about backing up to Veeam cloud. I would like to add once again that, as for me, this is a convenient option to comply with rule 3-2-1. After reading this article, perhaps someone wants to become a provider, and someone will begin to trust providers to store their backups.
Source: https://habr.com/ru/post/312956/
All Articles