ASP.NET Core: Creating your first web API using ASP.NET Core MVC and Visual Studio
HTTP protocol can be used not only for web pages. It is also a powerful platform for creating APIs that provide services and data. The HTTP protocol is simple, flexible and widely distributed. Virtually any existing platform has an HTTP library, so HTTP services are available to a large number of clients, including browsers, mobile devices, and traditional office applications.
A new article in the ASP.NET Core series will describe the creation of a simple web API to work with a to-do list.

1. ASP.NET Core on Nano Server .
2. Creating the web service front end for the application .
3. Create the first web API using ASP.NET Core MVC and Visual Studio .
4. Deploy a web app in Azure App Service using Visual Studio .
5. Your first application on a Mac using Visual Studio Code .
')
ASP.NET Core MVC has built-in support for creating web APIs. Combining the two platforms makes it easy to create applications that include both a user interface (HTML) and an API, since in this case they will have common code and a pipeline.
Note: if you are porting an existing web API application to an ASP.NET Core, read on how to switch from an ASP.NET web API .
In this article we will create the following API:
The diagram below shows the application architecture:

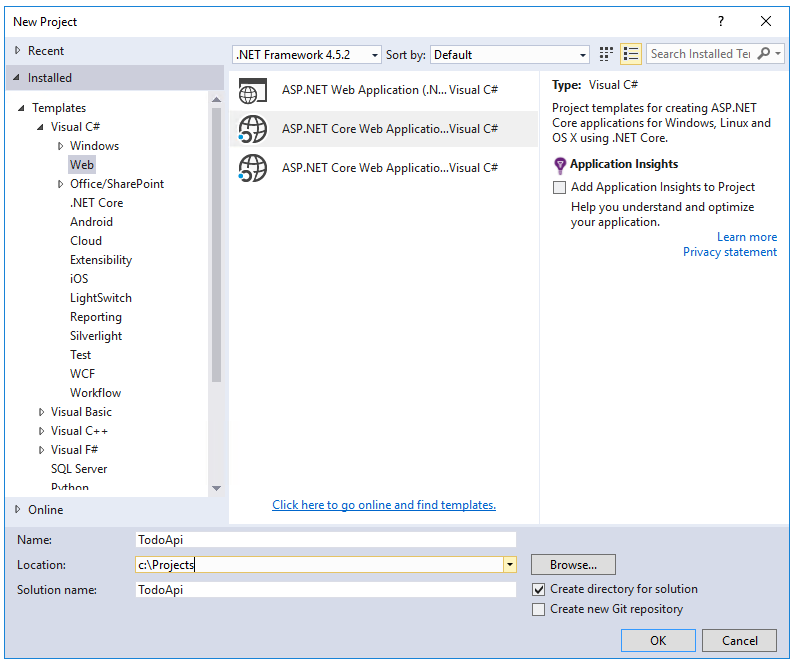
Launch Visual Studio. From the File menu, select New> Project . Select the ASP.NET Core Web Application (.NET Core) project template. Name the project
In the New ASP.NET Core Web Application (.NET Core) - TodoApi window, select the Web API template. Click OK .

A model is an object that represents data in our application. In this case, the only model is the to-do item.
Add a directory named "Models". In Solution Explorer, right-click the project. Select Add> New Folder . Enter the Models directory name.

Note: Model classes can be located anywhere in the project, but they are usually placed in the Models catalog.
Add a
Replace the generated code with the following:
A repository is an object that encapsulates a data layer and contains logic for extracting data and its directions to the model. Although this application does not use a database, it makes sense to show how repositories can be embedded in controllers. Create a repository code in the Models directory.
Begin by defining a repository interface called
This interface defines basic CRUD operations.
Then add the
Build the application to make sure that the compiler does not generate errors.
When defining a repository interface, we can separate the repository class from the MVC controller that uses it. Instead of implementing the
This approach simplifies unit testing of controllers. Unit tests embed a “dummy” or “simulation” version of the
To integrate the repository into the controller, it is necessary to register it using DI containers. Open the Startup.cs file. Add the following using directive:
In the
In Solution Explorer, right-click on the Controllers directory. Select Add> New Item . In the Add New Item window, select the Web API Controller Class template. Enter the class name
Replace the generated code with the following:
This determines the class of the empty controller. The following sections describe how to add methods to implement an API.
To get to-do items, add the following methods to the
These methods implement two GET methods:
In this case, the HTTP response for the
Next, we’ll tell you how you can view HTTP responses using Postman .
The
In the
The
In turn, the
Press CTRL + F5 in Visual Studio to launch the application. The browser starts and the web page
Add the
This is the HTTO POST method specified in the [HttpPost] attribute. The [FromBody] attribute sends the MVC command to get the value of the to-do item element from the body of the HTTP request.
The CreatedAtRoute method returns response 201, which is the standard response for the HTTP POST method that creates a new resource on the server.

Select the Headers tab and copy the Location header:

To access a resource that has just been created, you can use the URL from the Location header. Re-invoke the

Same as
Answer 204 (No content) .

A new article in the ASP.NET Core series will describe the creation of a simple web API to work with a to-do list.
The first cycle of articles on ASP.NET Core
1. ASP.NET Core on Nano Server .
2. Creating the web service front end for the application .
3. Create the first web API using ASP.NET Core MVC and Visual Studio .
4. Deploy a web app in Azure App Service using Visual Studio .
5. Your first application on a Mac using Visual Studio Code .
')
Introduction
ASP.NET Core MVC has built-in support for creating web APIs. Combining the two platforms makes it easy to create applications that include both a user interface (HTML) and an API, since in this case they will have common code and a pipeline.
Note: if you are porting an existing web API application to an ASP.NET Core, read on how to switch from an ASP.NET web API .
Description
In this article we will create the following API:
| API | Description | Request body | Body response |
| GET / api / todo | Retrieve all to-do items | Not | To-do list array |
| GET / api / todo / {id} | Get item by id | Not | To-do item |
| POST / api / todo | Add new item | To-do item | To-do item |
| PUT / api / todo / {id} | Update existing item | To-do item | Not |
| PATCH / api / todo / {id} | Update existing item | To-do item | Not |
| DELETE / api / todo / {id} | Delete item | Not | Not |
The diagram below shows the application architecture:
- A client is software that uses a web API (browser, mobile app, etc.). In our article, the client is not created. Postman will be used to test the application.
- A model is an object that represents data in our application. In this case, the only model is the to-do item. Models are represented by simple C # (POCO) classes.
- A controller is an object that processes an HTTP request and creates an HTTP response. In this application, one controller.
- For simplicity in this material for the application will not use the database. Instead, list items are simply stored in memory. However, the data access level will be enabled to show the separation of the web API and the data level. Option using the database is described in the article .
Project creation
Launch Visual Studio. From the File menu, select New> Project . Select the ASP.NET Core Web Application (.NET Core) project template. Name the project
TodoApi , uncheck Host in the cloud and click OK .In the New ASP.NET Core Web Application (.NET Core) - TodoApi window, select the Web API template. Click OK .
Adding a model class
A model is an object that represents data in our application. In this case, the only model is the to-do item.
Add a directory named "Models". In Solution Explorer, right-click the project. Select Add> New Folder . Enter the Models directory name.
Note: Model classes can be located anywhere in the project, but they are usually placed in the Models catalog.
Add a
TodoItem class. Right-click on the Models directory and select Add> Class . TodoItem class name TodoItem and click Add .Replace the generated code with the following:
namespace TodoApi.Models { public class TodoItem { public string Key { get; set; } public string Name { get; set; } public bool IsComplete { get; set; } } } Add repository class
A repository is an object that encapsulates a data layer and contains logic for extracting data and its directions to the model. Although this application does not use a database, it makes sense to show how repositories can be embedded in controllers. Create a repository code in the Models directory.
Begin by defining a repository interface called
ITodoRepository . Use the class template (Add New Item> Class) . using System.Collections.Generic; namespace TodoApi.Models { public interface ITodoRepository { void Add(TodoItem item); IEnumerable<TodoItem> GetAll(); TodoItem Find(string key); TodoItem Remove(string key); void Update(TodoItem item); } } This interface defines basic CRUD operations.
Then add the
TodoRepository class that implements the ITodoRepository : using System; using System.Collections.Generic; using System.Collections.Concurrent; namespace TodoApi.Models { public class TodoRepository : ITodoRepository { private static ConcurrentDictionary<string, TodoItem> _todos = new ConcurrentDictionary<string, TodoItem>(); public TodoRepository() { Add(new TodoItem { Name = "Item1" }); } public IEnumerable<TodoItem> GetAll() { return _todos.Values; } public void Add(TodoItem item) { item.Key = Guid.NewGuid().ToString(); _todos[item.Key] = item; } public TodoItem Find(string key) { TodoItem item; _todos.TryGetValue(key, out item); return item; } public TodoItem Remove(string key) { TodoItem item; _todos.TryRemove(key, out item); return item; } public void Update(TodoItem item) { _todos[item.Key] = item; } } } Build the application to make sure that the compiler does not generate errors.
Registration repository
When defining a repository interface, we can separate the repository class from the MVC controller that uses it. Instead of implementing the
TodoRepository inside the controller, we will TodoRepository using the built-in dependency injection support in ASP.NET Core.This approach simplifies unit testing of controllers. Unit tests embed a “dummy” or “simulation” version of the
ITodoRepository . In this case, the test is aimed at the logic of the controller, and not at the level of data access.To integrate the repository into the controller, it is necessary to register it using DI containers. Open the Startup.cs file. Add the following using directive:
using TodoApi.Models; In the
ConfigureServices method, add the highlighted code: public void ConfigureServices(IServiceCollection services) { // Add framework services. services.AddMvc(); services.AddSingleton<ITodoRepository, TodoRepository>(); } Add controller
In Solution Explorer, right-click on the Controllers directory. Select Add> New Item . In the Add New Item window, select the Web API Controller Class template. Enter the class name
TodoController .Replace the generated code with the following:
using System.Collections.Generic; using Microsoft.AspNetCore.Mvc; using TodoApi.Models; namespace TodoApi.Controllers { [Route("api/[controller]")] public class TodoController : Controller { public TodoController(ITodoRepository todoItems) { TodoItems = todoItems; } public ITodoRepository TodoItems { get; set; } } } This determines the class of the empty controller. The following sections describe how to add methods to implement an API.
Getting To Do List Items
To get to-do items, add the following methods to the
TodoController class: public IEnumerable<TodoItem> GetAll() { return TodoItems.GetAll(); } [HttpGet("{id}", Name = "GetTodo")] public IActionResult GetById(string id) { var item = TodoItems.Find(id); if (item == null) { return NotFound(); } return new ObjectResult(item); } These methods implement two GET methods:
GET /api/todoGET /api/todo/{id}
In this case, the HTTP response for the
GetAll method will be as follows: HTTP/1.1 200 OK Content-Type: application/json; charset=utf-8 Server: Microsoft-IIS/10.0 Date: Thu, 18 Jun 2015 20:51:10 GMT Content-Length: 82 [{"Key":"4f67d7c5-a2a9-4aae-b030-16003dd829ae","Name":"Item1","IsComplete":false}] Next, we’ll tell you how you can view HTTP responses using Postman .
Routing and URL paths
The
HttpGet attribute ( HttpGetAttribute ) defines the HTTP GET method. The URL path for each method is constructed as follows:- Take the pattern string from the controller's route attribute:
[Route("api/[controller]")] - Replace [Controller] with the name of the controller that you get by taking the name of the controller class and removing the “Controller” suffix. In our example, the controller class name is Todo Controller, and the root name is todo. Routing in ASP.NET Core is case-insensitive.
- If the
[HttpGet]attribute has a template string, add it to the path. In this example, the template string is not used.
In the
GetById method: [HttpGet("{id}", Name = "GetTodo")] public IActionResult GetById(string id) "{id}" is a value that is replaced by the todo element identifier. When GetById is called, the value “{id}” in the URL is assigned to the id parameter of the method.Name = "GetTodo" creates a named route that allows it to be referenced in an HTTP response. This will be shown later in the example.Return values
The
GetAll method returns an IEnumerable . MVC automatically serializes the object to JSON and writes JSON to the response body. The response code for this method is 200, in the event that there are no unhandled exceptions (unhandled exceptions are translated to errors 5xx.)In turn, the
GetById method returns a value of a more general type IActionResult , which is represented by a large number of return types. GetById has two different types of return values:- If there is no match for the requested identifier, the method returns a 404 error. This happens when
NotFound. - In other cases, the method returns code 200 and the response body in JSON format. This happens when the
ObjectResult.
Application launch
Press CTRL + F5 in Visual Studio to launch the application. The browser starts and the web page
http://localhost:port/api/values opens, where port is an arbitrarily selected port number. If you are using Chrome, Edge or Firefox, the data will be displayed. When using IE, you will be prompted to open or save the values.json file.Implementing other CRUD operations
Add the
Create , Update and Delete methods. This process is similar to what was discussed earlier, so the code will be shown here and the main differences highlighted. Create a project after adding or modifying the code.Create
[HttpPost] public IActionResult Create([FromBody] TodoItem item) { if (item == null) { return BadRequest(); } TodoItems.Add(item); return CreatedAtRoute("GetTodo", new { id = item.Key }, item); } This is the HTTO POST method specified in the [HttpPost] attribute. The [FromBody] attribute sends the MVC command to get the value of the to-do item element from the body of the HTTP request.
The CreatedAtRoute method returns response 201, which is the standard response for the HTTP POST method that creates a new resource on the server.
CreateAtRoute also adds a Location header to the response. The Location header indicates the URL of the created to-do item. Description: 10.2.2 201 Created .Using Postman to send a Create request
- Set
POSTas the HTTP method. - Select the Body switch.
- Select the raw switch.
- Select JSON type.
- In the key-value pairs editor, specify the Todo element as follows:
{"Name":"<your to-do item>"}. - Click Send .
Select the Headers tab and copy the Location header:
To access a resource that has just been created, you can use the URL from the Location header. Re-invoke the
GetById method that created the named route "GetTodo" : [HttpGet("{id}", Name = "GetTodo")] public IActionResult GetById(string id) Update
[HttpPut("{id}")] public IActionResult Update(string id, [FromBody] TodoItem item) { if (item == null || item.Key != id) { return BadRequest(); } var todo = TodoItems.Find(id); if (todo == null) { return NotFound(); } TodoItems.Update(item); return new NoContentResult(); } Update is similar to Create , but uses HTTP PUT. Answer 204 (No content) . According to the HTTP specification, a PUT request requires the client to send the updated object completely, not just the delta. To support partial updates, use HTTP PATCH.Update using Patch
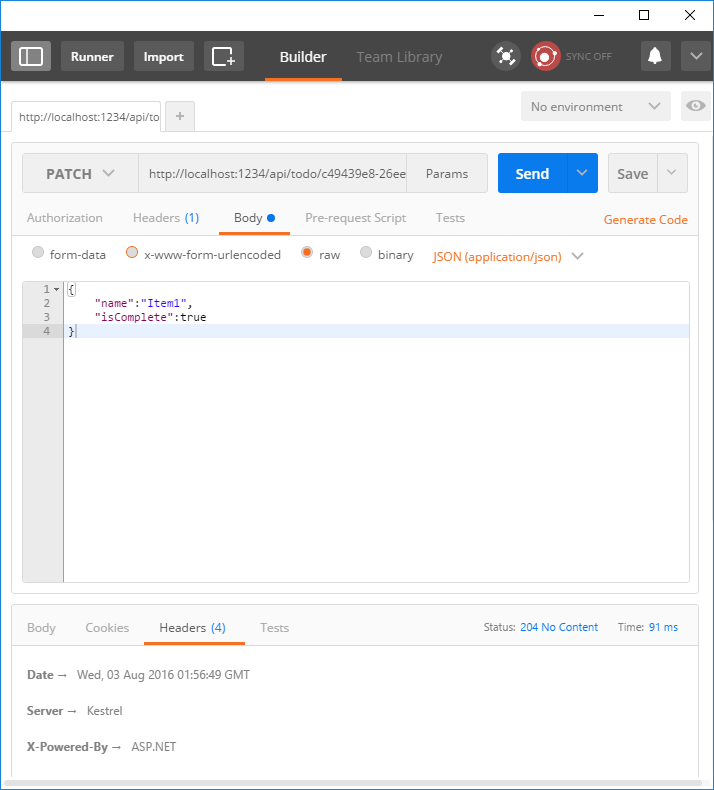
Same as
Update , but using HTTP PATCH. Answer 204 (No content) . [HttpPatch("{id}")] public IActionResult Update([FromBody] TodoItem item, string id) { if (item == null) { return BadRequest(); } var todo = TodoItems.Find(id); if (todo == null) { return NotFound(); } item.Key = todo.Key; TodoItems.Update(item); return new NoContentResult(); } Delete
[HttpDelete("{id}")] public IActionResult Delete(string id) { var todo = TodoItems.Find(id); if (todo == null) { return NotFound(); } TodoItems.Remove(id); return new NoContentResult(); } Answer 204 (No content) .
Source: https://habr.com/ru/post/312878/
All Articles