As an Android developer, time management got carried away, and what came of it
Hi, Habr. I want to confess to you. I'm lazy. This dark secret, carefully hidden from others. Therefore, mind anyone.
So that no one around can guess about this, we have to constantly work. But often during work, I get distracted by all sorts of extraneous things. News read, see mail, message history. As a result, distracting activities take too much time and image suffers. Sometimes, I'm close to exposing.
But one day I found a method of managing my working time, called “Pomodoro”. And he wrote the application "Timer of the Labor Man." Because I am an Android Developer!

So, below under the cut, I will tell you about creative throwing, puzzles, and other charms that accompany the creative process.
Briefly about the system "Pomodoro". All our working time is divided into certain segments of work and rest, called “Tomato” (the name derives from the form of the kitchen timer, which was used by the inventor of the method Francesco Cirillo). The ratio of 25 minutes to work and 5 to rest is generally accepted.
The basic idea is that the working time (25 minutes) you work / learn for real, without being distracted by anything (that’s all, absolutely nothing). Then you do what you want for 5 minutes (within the framework of the Criminal Code and public morality).
Before starting work, you make a list of how many “tomatoes” you want to spend on each task. For example: preparing for the exam - 3 pieces, learning new material - 4, etc.
From my own experience, I can say that this technique is very effective (of course, I would not advise it if I did not test it myself).
The inventor of the technique used a kitchen timer in the form of a tomato, from which the name actually came. But using it in the office and scaring colleagues with strange ticks and unexpected bells is not comme il faut. Therefore, before I used the stopwatch on the phone, and a notebook. But this, too, was not convenient.
In the Android Market, a lot of timers working on tomato technology. I also wanted something of my own, warm, and lamp, without additional functions (according to the expression of my former head - “Whistles, fakes and candy wrappers”), without advertising and other dubious delights. Plus, I myself wanted to customize my own time intervals.
')
Yes, and so there, I wanted to write my own application, as in adults.
The first version looked simple and primitive. Timer, button, setup menu. Initial state:
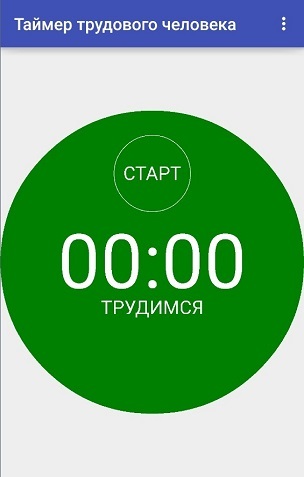
In progress:

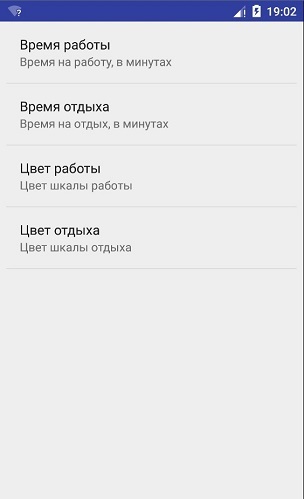
In the setup menu, you can select the colors of the scale, and the duration of the work / rest phases.
The timer was drawn on the Canvas.
But getting rid of the timer, I did not leave the leaflets with the schedule. Therefore, I decided to make a complete restructuring.
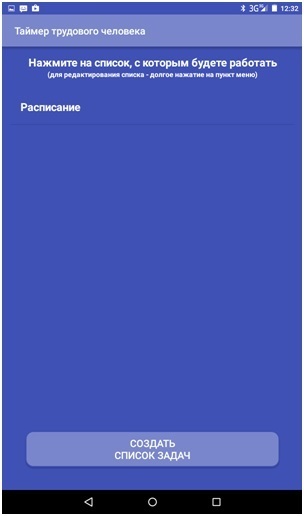
So, in the original time management system “Pomodoro”, the basic idea is that you plan in advance how much time you have, it will take on a particular task. Therefore, I decided to add a task list. But people already liked the opportunity to work in the "non-stop" mode. Therefore, the old functionality had to survive. This is how the main menu now looks like:

For those who want to work with a regular timer, without problems with the schedule - I left the classic version, available on the button “Work without a task list” (on the initial screen). Immediately choose the time of work / rest and work, as in the first version.

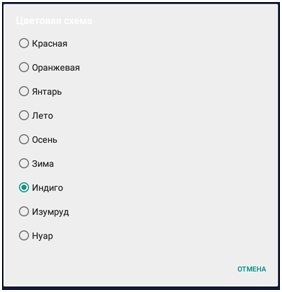
Also under the knife went the ability to choose colors for the time scale. Instead, several harmonious color schemes were created, and the ability to choose one of them. With the schemes, I had a wild dance with tambourines, successfully solved (see below for details).
So, if you want to create a new task schedule for the day, then by clicking on the “Create / Load Task List” button, you can plan your work day.
The “Add Duty Cycle” button adds a task divided into several stages. And each stage includes time for work, and a short break.
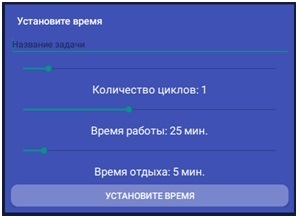
Every four “tomatoes”, it is recommended to have a big break for half an hour-hour. Therefore, the “Add break” button was added.

Having created your task list, you can correct it and save it.

So you can create yourself a few schedules, just a week.
A long press on a list item allows you to either edit the task list or start working with it. The working screen looks like this:
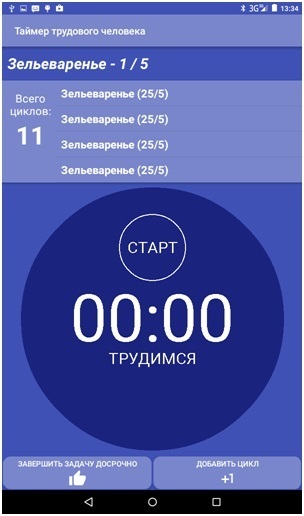
Starting to work with the list, at the top you see the name of the current stage, its number and the number of stages for this task. Below is a list of all cycles (in parentheses are the time of work and rest). The main place is occupied by the main timer, as from the first version of the program. If you have coped with the task ahead of time, you can click on the button “Complete the task ahead of schedule” , and thereby remove it from the list. In case you didn’t meet the schedule, the “Add cycle” button will add another cycle to the task.
One of the most puzzling moments for me was to create uniform color schemes for the application. All wanted to do in the style of Material. But when testing on different devices, the shoals got. What looked decent on the Android 5.x version, on the 4.x version, looked awful.
In the end, I came to this decision. Created sets of Material-colors:
And the file with styles:
And for each scheme I had to create my own form for the button. For example, for the indigo scheme:
In the settings fragment, the name of the scheme was set, and when starting any activity (in onCreate), the following code was executed:
The application was originally written for myself. And therefore, to make any investment in the advertising campaign, did not see the point. Just in case, translated the application into English. And after sitting in the vector editor, for 15 minutes, the icon and the main picture (the one at the top of the post) were piled. Placed the application on w3bsit3-dns.com. There in total about 150 downloads.
Also, I write stories from my life on Picaba. People like, there are subscribers. Therefore, I posted two posts (on the first and second versions, respectively, sequentially as the versions are released). But unfortunately, a couple of trolls, they decided to "make a joke," and set the moderator up with a complaint that "they say advertising the application, and is prohibited by the rules." The moderator did not understand the topic about the first version deleted, and slapped a ban for two weeks. But, the letter of support solved this problem, and the admins unblocked the article. True, the troll did not calm down, and demanded “Ban him for illiterate Russian language and punctuation! ", But picked up the minuses safely merged. The second post, about the new version of the troll have not tried. In general, the audience accepted the application favorably, pointed out several errors (corrected).
That's actually my entire application writing story. Naturally, the application is available for free and without advertising. The author does not receive any material benefit, except moral satisfaction (and only a little, to satisfy the megalomania), and the desire to share a useful tool with the community.
So let me leave. I hope someone will be useful. If someone has comments or hints, I’ll listen to them with great pleasure.
So that no one around can guess about this, we have to constantly work. But often during work, I get distracted by all sorts of extraneous things. News read, see mail, message history. As a result, distracting activities take too much time and image suffers. Sometimes, I'm close to exposing.
But one day I found a method of managing my working time, called “Pomodoro”. And he wrote the application "Timer of the Labor Man." Because I am an Android Developer!
So, below under the cut, I will tell you about creative throwing, puzzles, and other charms that accompany the creative process.
Part One (Thoughtful)
Briefly about the system "Pomodoro". All our working time is divided into certain segments of work and rest, called “Tomato” (the name derives from the form of the kitchen timer, which was used by the inventor of the method Francesco Cirillo). The ratio of 25 minutes to work and 5 to rest is generally accepted.
The basic idea is that the working time (25 minutes) you work / learn for real, without being distracted by anything (that’s all, absolutely nothing). Then you do what you want for 5 minutes (within the framework of the Criminal Code and public morality).
Before starting work, you make a list of how many “tomatoes” you want to spend on each task. For example: preparing for the exam - 3 pieces, learning new material - 4, etc.
From my own experience, I can say that this technique is very effective (of course, I would not advise it if I did not test it myself).
The inventor of the technique used a kitchen timer in the form of a tomato, from which the name actually came. But using it in the office and scaring colleagues with strange ticks and unexpected bells is not comme il faut. Therefore, before I used the stopwatch on the phone, and a notebook. But this, too, was not convenient.
In the Android Market, a lot of timers working on tomato technology. I also wanted something of my own, warm, and lamp, without additional functions (according to the expression of my former head - “Whistles, fakes and candy wrappers”), without advertising and other dubious delights. Plus, I myself wanted to customize my own time intervals.
')
Yes, and so there, I wanted to write my own application, as in adults.
Part Two (Experimental)
The first version looked simple and primitive. Timer, button, setup menu. Initial state:
In progress:
In the setup menu, you can select the colors of the scale, and the duration of the work / rest phases.
The timer was drawn on the Canvas.
But getting rid of the timer, I did not leave the leaflets with the schedule. Therefore, I decided to make a complete restructuring.
Part Three (perestroika)
So, in the original time management system “Pomodoro”, the basic idea is that you plan in advance how much time you have, it will take on a particular task. Therefore, I decided to add a task list. But people already liked the opportunity to work in the "non-stop" mode. Therefore, the old functionality had to survive. This is how the main menu now looks like:
For those who want to work with a regular timer, without problems with the schedule - I left the classic version, available on the button “Work without a task list” (on the initial screen). Immediately choose the time of work / rest and work, as in the first version.
Also under the knife went the ability to choose colors for the time scale. Instead, several harmonious color schemes were created, and the ability to choose one of them. With the schemes, I had a wild dance with tambourines, successfully solved (see below for details).
So, if you want to create a new task schedule for the day, then by clicking on the “Create / Load Task List” button, you can plan your work day.
The “Add Duty Cycle” button adds a task divided into several stages. And each stage includes time for work, and a short break.
Every four “tomatoes”, it is recommended to have a big break for half an hour-hour. Therefore, the “Add break” button was added.
Having created your task list, you can correct it and save it.
So you can create yourself a few schedules, just a week.
A long press on a list item allows you to either edit the task list or start working with it. The working screen looks like this:
Starting to work with the list, at the top you see the name of the current stage, its number and the number of stages for this task. Below is a list of all cycles (in parentheses are the time of work and rest). The main place is occupied by the main timer, as from the first version of the program. If you have coped with the task ahead of time, you can click on the button “Complete the task ahead of schedule” , and thereby remove it from the list. In case you didn’t meet the schedule, the “Add cycle” button will add another cycle to the task.
Part Four (okolotehnicheskaya)
One of the most puzzling moments for me was to create uniform color schemes for the application. All wanted to do in the style of Material. But when testing on different devices, the shoals got. What looked decent on the Android 5.x version, on the 4.x version, looked awful.
In the end, I came to this decision. Created sets of Material-colors:
Colors.xml file
<?xml version="1.0" encoding="utf-8"?> <resources> <color name="colorPrimary">#64B5F6</color> <color name="colorPrimaryDark">#2196F3</color> <color name="colorAccent">#0D47A1</color> <color name="colorPrimaryTeal">#4DB6AC</color> <color name="colorPrimaryDarkTeal">#009688</color> <color name="colorAccentTeal">#004D40</color> <color name="colorPrimaryGreen">#8BC34A</color> <color name="colorPrimaryDarkGreen">#689F38</color> <color name="colorAccentGreen">#33691E</color> <color name="colorPrimaryRed">#e57373</color> <color name="colorPrimaryDarkRed">#f44336</color> <color name="colorAccentRed">#b71c1c</color> <color name="colorPrimaryOrange">#FF5722</color> <color name="colorPrimaryDarkOrange">#E64A19</color> <color name="colorAccentOrange">#BF360C</color> <color name="colorPrimaryAmber">#FFD54F</color> <color name="colorPrimaryDarkAmber">#FFC107</color> <color name="colorAccentAmber">#FF6F00</color> <color name="colorPrimaryAutumn">#FF5722</color> <color name="colorPrimaryDarkAutumn">#4CAF50</color> <color name="colorAccentAutumn">#E64A19</color> <color name="colorPrimaryIndigo">#7986CB</color> <color name="colorPrimaryDarkIndigo">#3F51B5</color> <color name="colorAccentIndigo">#1A237E</color> <color name="colorPrimaryBlack">#9E9E9E</color> <color name="colorPrimaryDarkBlack">#616161</color> <color name="colorAccentBlack">#212121</color> <color name="colorText">#ffffff</color> <color name="colorTextHint">#c8ffffff</color> </resources> And the file with styles:
Styles.xml file
<resources> <style name="MyDialogStyle" parent="Theme.AppCompat.Dialog.Alert"> <item name="android:windowFrame">@null</item> <item name="android:textColor">@color/colorText</item> <item name="android:windowBackground">@android:color/transparent</item> <item name="android:windowIsFloating">true</item> <item name="android:textSize">30sp</item> <item name="android:windowContentOverlay">@null</item> <item name="android:windowTitleStyle">@null</item> <item name="android:windowAnimationStyle">@android:style/Animation.Dialog</item> <item name="android:windowSoftInputMode">stateUnspecified|adjustPan</item> <item name="android:background">@android:color/transparent</item> </style> <style name="BlueButtonStyle" parent="Base.Widget.AppCompat.Button"> <item name="android:background">@drawable/button_shape</item> </style> <style name="GreenButtonStyle" parent="Base.Widget.AppCompat.Button"> <item name="android:background">@drawable/button_shape_green</item> </style> <style name="TealButtonStyle" parent="Base.Widget.AppCompat.Button"> <item name="android:background">@drawable/button_shape_teal</item> </style> <style name="AmberButtonStyle" parent="Base.Widget.AppCompat.Button"> <item name="android:background">@drawable/button_shape_amber</item> </style> <style name="BlackButtonStyle" parent="Base.Widget.AppCompat.Button"> <item name="android:background">@drawable/button_shape_black</item> </style> <style name="IndigoButtonStyle" parent="Base.Widget.AppCompat.Button"> <item name="android:background">@drawable/button_shape_indigo</item> </style> <style name="LightBlueButtonStyle" parent="Base.Widget.AppCompat.Button"> <item name="android:background">@drawable/button_shape_autumn</item> </style> <style name="OrangeButtonStyle" parent="Base.Widget.AppCompat.Button"> <item name="android:background">@drawable/button_shape_orange</item> </style> <style name="RedButtonStyle" parent="Base.Widget.AppCompat.Button"> <item name="android:background">@drawable/button_shape_red</item> </style> <!-- Base application theme. --> <style name="AppTheme" parent="Theme.AppCompat.Light.DarkActionBar"> <!-- Customize your theme here. --> <item name="colorPrimary">@color/colorPrimary</item> <item name="colorPrimaryDark">@color/colorPrimaryDark</item> <item name="colorAccent">@color/colorAccent</item> <item name="android:windowBackground">@color/colorPrimaryDark</item> <item name="android:itemBackground">@color/colorPrimaryDark</item> <item name="android:itemTextAppearance">@android:style/TextAppearance.Large</item> <item name="android:textColor">@color/colorText</item> <item name="android:textColorHint">@color/colorTextHint</item> <item name="buttonStyle">@style/BlueButtonStyle</item> <item name="dialogTheme">@style/MyDialogStyle</item> <item name="alertDialogTheme">@style/MyDialogStyle</item> </style> <style name="AppTheme.Launcher"> <item name="android:windowBackground">@color/colorPrimaryDarkBlack</item> </style> <style name="TealTheme" parent="AppTheme"> <item name="colorPrimary">@color/colorPrimaryTeal</item> <item name="colorPrimaryDark">@color/colorPrimaryDarkTeal</item> <item name="colorAccent">@color/colorAccentTeal</item> <item name="android:windowBackground">@color/colorPrimaryDarkTeal</item> <item name="android:itemBackground">@color/colorPrimaryDarkTeal</item> <item name="android:itemTextAppearance">@android:style/TextAppearance.Large</item> <item name="android:textColor">@color/colorText</item> <item name="android:textColorHint">@color/colorTextHint</item> <item name="buttonStyle">@style/TealButtonStyle</item> <item name="dialogTheme">@style/MyDialogStyle</item> <item name="alertDialogTheme">@style/MyDialogStyle</item> </style> <style name="GreenTheme" parent="AppTheme"> <item name="colorPrimary">@color/colorPrimaryGreen</item> <item name="colorPrimaryDark">@color/colorPrimaryDarkGreen</item> <item name="colorAccent">@color/colorAccentGreen</item> <item name="android:windowBackground">@color/colorPrimaryDarkGreen</item> <item name="android:itemBackground">@color/colorPrimaryDarkGreen</item> <item name="android:itemTextAppearance">@android:style/TextAppearance.Large</item> <item name="android:textColor">@color/colorText</item> <item name="android:textColorHint">@color/colorTextHint</item> <item name="buttonStyle">@style/GreenButtonStyle</item> <item name="dialogTheme">@style/MyDialogStyle</item> <item name="alertDialogTheme">@style/MyDialogStyle</item> </style> <style name="AmberTheme" parent="AppTheme"> <item name="colorPrimary">@color/colorPrimaryAmber</item> <item name="colorPrimaryDark">@color/colorPrimaryDarkAmber</item> <item name="colorAccent">@color/colorAccentAmber</item> <item name="android:windowBackground">@color/colorPrimaryDarkAmber</item> <item name="android:itemBackground">@color/colorPrimaryDarkAmber</item> <item name="android:itemTextAppearance">@android:style/TextAppearance.Large</item> <item name="android:textColor">@color/colorText</item> <item name="android:textColorHint">@color/colorTextHint</item> <item name="buttonStyle">@style/AmberButtonStyle</item> <item name="dialogTheme">@style/MyDialogStyle</item> <item name="alertDialogTheme">@style/MyDialogStyle</item> </style> <style name="BlackTheme" parent="AppTheme"> <item name="colorPrimary">@color/colorPrimaryBlack</item> <item name="colorPrimaryDark">@color/colorPrimaryDarkBlack</item> <item name="colorAccent">@color/colorAccentBlack</item> <item name="android:windowBackground">@color/colorPrimaryDarkBlack</item> <item name="android:itemBackground">@color/colorPrimaryDarkBlack</item> <item name="android:itemTextAppearance">@android:style/TextAppearance.Large</item> <item name="android:textColor">@color/colorText</item> <item name="android:textColorHint">@color/colorTextHint</item> <item name="buttonStyle">@style/BlackButtonStyle</item> <item name="dialogTheme">@style/MyDialogStyle</item> <item name="alertDialogTheme">@style/MyDialogStyle</item> </style> <style name="IndigoTheme" parent="AppTheme"> <item name="colorPrimary">@color/colorPrimaryIndigo</item> <item name="colorPrimaryDark">@color/colorPrimaryDarkIndigo</item> <item name="colorAccent">@color/colorAccentIndigo</item> <item name="android:windowBackground">@color/colorPrimaryDarkIndigo</item> <item name="android:itemBackground">@color/colorPrimaryDarkIndigo</item> <item name="android:itemTextAppearance">@android:style/TextAppearance.Large</item> <item name="android:textColor">@color/colorText</item> <item name="android:textColorHint">@color/colorTextHint</item> <item name="buttonStyle">@style/IndigoButtonStyle</item> <item name="dialogTheme">@style/MyDialogStyle</item> <item name="alertDialogTheme">@style/MyDialogStyle</item> </style> <style name="AutumnTheme" parent="AppTheme"> <item name="colorPrimary">@color/colorPrimaryAutumn</item> <item name="colorPrimaryDark">@color/colorPrimaryDarkAutumn</item> <item name="colorAccent">@color/colorAccentAutumn</item> <item name="android:windowBackground">@color/colorPrimaryDarkAutumn</item> <item name="android:itemBackground">@color/colorPrimaryDarkAutumn</item> <item name="android:itemTextAppearance">@android:style/TextAppearance.Large</item> <item name="android:textColor">@color/colorText</item> <item name="android:textColorHint">@color/colorTextHint</item> <item name="buttonStyle">@style/LightBlueButtonStyle</item> <item name="dialogTheme">@style/MyDialogStyle</item> <item name="alertDialogTheme">@style/MyDialogStyle</item> </style> <style name="OrangeTheme" parent="AppTheme"> <item name="colorPrimary">@color/colorPrimaryOrange</item> <item name="colorPrimaryDark">@color/colorPrimaryDarkOrange</item> <item name="colorAccent">@color/colorAccentOrange</item> <item name="android:windowBackground">@color/colorPrimaryDarkOrange</item> <item name="android:itemBackground">@color/colorPrimaryDarkOrange</item> <item name="android:itemTextAppearance">@android:style/TextAppearance.Large</item> <item name="android:textColor">@color/colorText</item> <item name="android:textColorHint">@color/colorTextHint</item> <item name="buttonStyle">@style/OrangeButtonStyle</item> <item name="dialogTheme">@style/MyDialogStyle</item> <item name="alertDialogTheme">@style/MyDialogStyle</item> </style> <style name="RedTheme" parent="AppTheme"> <item name="colorPrimary">@color/colorPrimaryRed</item> <item name="colorPrimaryDark">@color/colorPrimaryDarkRed</item> <item name="colorAccent">@color/colorAccentRed</item> <item name="android:windowBackground">@color/colorPrimaryDarkRed</item> <item name="android:itemBackground">@color/colorPrimaryDarkRed</item> <item name="android:itemTextAppearance">@android:style/TextAppearance.Large</item> <item name="android:textColor">@color/colorText</item> <item name="android:textColorHint">@color/colorTextHint</item> <item name="buttonStyle">@style/RedButtonStyle</item> <item name="dialogTheme">@style/MyDialogStyle</item> <item name="alertDialogTheme">@style/MyDialogStyle</item> </style> </resources> And for each scheme I had to create my own form for the button. For example, for the indigo scheme:
File button_shape_indigo.xml
<?xml version="1.0" encoding="utf-8"?> <shape xmlns:android="http://schemas.android.com/apk/res/android" android:shape="rectangle"> <corners android:radius="15dp"/> <solid android:color="@color/colorPrimaryIndigo"/> <stroke android:width="2dp" android:color="@color/colorPrimaryDarkIndigo"/> <padding android:left="40dp" android:right="40dp" android:bottom="10dp" android:top="10dp"/> </shape> In the settings fragment, the name of the scheme was set, and when starting any activity (in onCreate), the following code was executed:
Theme selection function
public static void setNewTheme(Context mContext){ SharedPreferences sp; sp = PreferenceManager.getDefaultSharedPreferences(mContext); String colorScheme = sp.getString("colorScheme", "blue"); if(colorScheme.equals("blue")) mContext.setTheme(R.style.AppTheme); else if (colorScheme.equals("green")) mContext.setTheme(R.style.GreenTheme); else if (colorScheme.equals("teal")) mContext.setTheme(R.style.TealTheme); else if (colorScheme.equals("amber")) mContext.setTheme(R.style.AmberTheme); else if (colorScheme.equals("black")) mContext.setTheme(R.style.BlackTheme); else if (colorScheme.equals("indigo")) mContext.setTheme(R.style.IndigoTheme); else if (colorScheme.equals("autumn")) mContext.setTheme(R.style.AutumnTheme); else if (colorScheme.equals("orange")) mContext.setTheme(R.style.OrangeTheme); else if (colorScheme.equals("red")) mContext.setTheme(R.style.RedTheme); } Part five (okoloreklamny and a bit scandalous)
The application was originally written for myself. And therefore, to make any investment in the advertising campaign, did not see the point. Just in case, translated the application into English. And after sitting in the vector editor, for 15 minutes, the icon and the main picture (the one at the top of the post) were piled. Placed the application on w3bsit3-dns.com. There in total about 150 downloads.
Also, I write stories from my life on Picaba. People like, there are subscribers. Therefore, I posted two posts (on the first and second versions, respectively, sequentially as the versions are released). But unfortunately, a couple of trolls, they decided to "make a joke," and set the moderator up with a complaint that "they say advertising the application, and is prohibited by the rules." The moderator did not understand the topic about the first version deleted, and slapped a ban for two weeks. But, the letter of support solved this problem, and the admins unblocked the article. True, the troll did not calm down, and demanded “Ban him for illiterate Russian language and punctuation! ", But picked up the minuses safely merged. The second post, about the new version of the troll have not tried. In general, the audience accepted the application favorably, pointed out several errors (corrected).
That's actually my entire application writing story. Naturally, the application is available for free and without advertising. The author does not receive any material benefit, except moral satisfaction (and only a little, to satisfy the megalomania), and the desire to share a useful tool with the community.
So let me leave. I hope someone will be useful. If someone has comments or hints, I’ll listen to them with great pleasure.
Source: https://habr.com/ru/post/312672/
All Articles