Two-factor authentication in Redmine
For a long time for the second authentication step, we used one-time passwords sent via SMS. This functionality appeared in Redmine in 2013, when we developed the redmine_sms_auth plugin. We wrote about this in a long-standing article .
But time does not stand still. We are actively introducing Telegram into the company's business processes ( one , two , three ).
In this regard, we decided to do authentication via Telegram in Redmine. At the same time rewrite the old SMS plugin and add support for Google Authenticator.
Next, we will talk about how to install, configure and use this plugin.
Installation
Go to the folder with the pluginscd plugins
Clone the repositorygit clone https://github.com/centosadmin/redmine_2fa.git
Go to the root of Redminecd ..
Set the necessary gemsbundle install
Migratingrake redmine:plugins:migrate
We supplement config/configuration.yml
# specific configuration options for production environment # that overrides the default ones production: redmine_2fa: sms_command: 'echo %{phone} %{password}' In sms_command enter the system command to which messages will be sent.
This approach is used for compatibility with most SMS gateway APIs. Most likely in your case there will be something like
/usr/bin/curl "https://sms.ru/api/send?phone=%{phone}&message=code: %{password}"
Restart Redmine.
Customization
Prerequisites
Since Telegram's web hooks are sent only to HTTPS addresses, your Redmine must be configured to use this protocol.
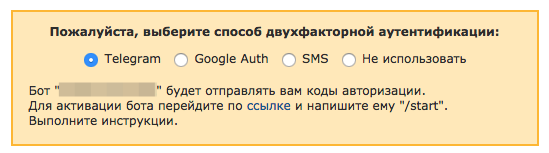
Mandatory use
Disabled by default, so after installing the plugin you could select “not use” and log in to Redmine.
But it is better to turn on, so that random passersby, who learned the password of one of the users, could not enter the system.

Telegram setup
For authentication via Telegram, you need to have a separate bot. We create a bot using @BotFather . Instructions for creating a bot .
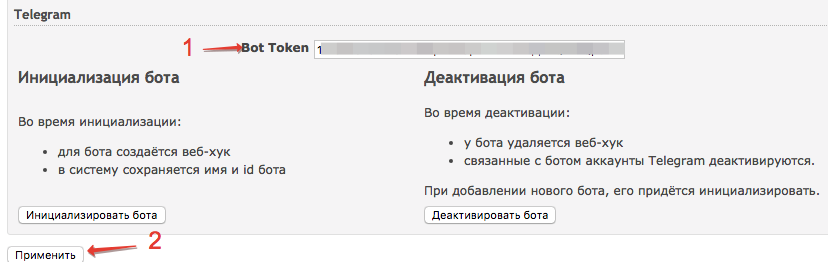
The key obtained from it is entered into the settings and click Apply .
Bot initialization
After the token is saved, you need to initialize the bot.
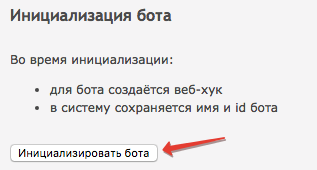
When initializing, the bot name will be loaded into the system to show a link to it at the initialization step.
A web hook will also be installed - the address to which requests from the API will arrive in case someone writes a bot.
In the previous plugins, we used boto processes, since there is a lot of incoming traffic.
They immediately decided to exclude an extra element from the system.
Important! When changing a token, you need to initialize the bot again.
Deactivating the bot
This function is useful if
- you decide to use this bot somewhere else
- for some reason you need to switch to another bot.
During the deactivation process, the token is reset and all users using the plugin are deactivated.
The next time they sign in, they will need to add themselves to the contacts of the new bot.
Important! Do not forget to activate the bot when you enter and save a new token.
And how is this from the user?
First entry
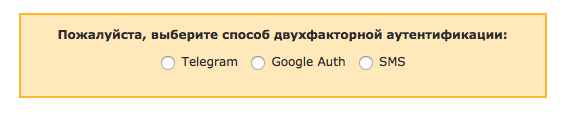
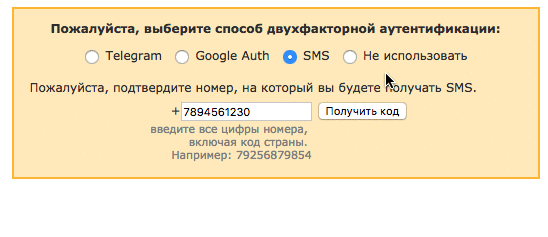
When you first log in, the user can choose one of the authentication methods or refuse to use the second factor.

He can refuse only if you have allowed it in the plugin settings.
Telegram
After the / start command, the bot saves your Telegram account in Redmine and offers to link it with your Redmine account.

Enter the proposed command

And we get a letter in the mail

When you click on the link we will see the message

and login form.
You need to enter your login and password again.
After that, we will see a one-time password entry form
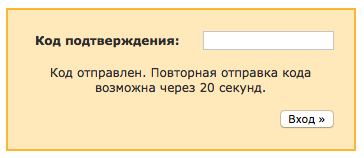
and get the coveted code from the bot

Telegram setup is the most difficult. But for the sake of ease of use to spend a minute is not a pity.
Google auth
Authentication via Google is the easiest to configure. Scan the QR code in the application and click “Next”.

SMS
To receive codes via SMS, you must first confirm the phone number to which you will receive SMS with one-time passwords.
Migration from the old plugin
If you used our old plugin , it is better to switch from it to a new one . Detailed instructions on the transition are available here .
Reset 2FA settings
It may happen that the user wants to change the authentication method. On his page there is a special link for this.

After resetting the settings at the next login, the user will be prompted to select an authentication method.
What's next?
Now you know how to add two-factor authentication to Redmine. It's time to put this knowledge into practice.
Questions about the plugin are ready to answer in the comments to this publication.
Requests for expanding the functionality and bug reports are accepted here, as well as in the repository tickets .
')
Source: https://habr.com/ru/post/312656/
All Articles