Methods for remote access to the Linux GUI
RUVDS technical support regularly contacts the GUI and remote access to it on virtual servers with Linux, despite the fact that there are a lot of materials on the Internet covering this problem. Therefore, for our users, we decided to collect everything on this topic in one article.

Just in case, it is probably worth mentioning that SSH is the main way to provide access to Linux virtuals on RUVDS . Most of the actions described in this article will be carried out in this way.
To connect, you need to find an SSH client for your operating system.
')
Windows:
Linux:
MAC OS:
Browser Plugins:
So let's move on to installing the GUI. First you need to put the graphics subsystem:
For Debian / Ubuntu:
For CentOS:
Next comes the installation of the Desktop Environment (DE). They exist a great many. We recommend putting more lightweight environments on the server, and even better, do not install at all. The first two DEs are quite compact, functional, and “familiar.”
1. Xfce
For Debian / Ubuntu:
Full installation:
Standard:
You can add:
For CentOS:
2. LXDE
For Debian / Ubuntu:
Complete:
Minimum:
For CentOS:
Adding Russian layouts:
The key combination can be changed at its discretion, for example:
To run this command every time you start LXDE, you need to add the following line to your file using vi: @setxkbmap -option grp: switch, grp: ctrl_shift_toggle, grp_led: scroll us, ru. Or like this ...
The following two DEs are extremely light. If you really need a GUI on the server, you probably should use them.
3. FluxBox
For Debian / Ubuntu:
For CentOS:
4. Openbox
For Debian / Ubuntu:
For CentOS:
This is followed by the most popular graphical shells on desktops.
5. gnome
For Ubuntu / Debian:
Minimum installation:
Full installation:
For CentOS:
6. KDE
For Debian:
Complete:
Standard:
Minimum installation:
For CentOS:
7. Cinnamon
For Debian / Ubuntu:
For CentOS:
8. MATE
For Debian / Ubuntu:
Complete:
Standard:
Minimum:
For CentOS:
If you want to access the GUI through "Emergency Mode", you must do the following:
Moreover, it is necessary to ensure the launch of the graphical shell at system startup. To do this, you can install any screen manager (Display Manager, DM), for example:
Or in the case of CentOS:
If you do not need access from your personal account, you should do the following:
Note: Ubuntu offers its users several meta packages for more convenient installation of the desired DE:
Unitu:
Lxde:
XFCE:
KDE:
Further, there are many ways to gain remote access to the GUI.
On a virtual server, depending on the OS, you need to perform the following steps.
Debian:
CentOS:
XDMCP:
Next, if you are using Windows, connect through the built-in RDP client, Remote Desktop Connection.
Standard port 3389. For Linux, there are lots of clients that can be installed from repositories: freerdp and remmina, gnome-rdp, vinagre, etc.
For Mac OS :
You can also forward RDP-shny traffic through an SSH tunnel. To do this, you need to fix the xrdp configuration file:
Add the following line to the [globals] section: address = 127.0.0.1
Check that everything is correct, you can:
Then if you use cygwin or mingw, linux or mac os:
If PuTTY:
Run PuTTY. In the tree menu on the left Connection → SSH → Tunnels. Next, add a new Forwarded Port (Source port: 3389, Destination: localhost: 3389). Click Add.

Next, follow the Session section. Enter the IP of your server in the Host Name (or IP address) field. Click the Open button, enter the password to connect via SSH.

Next for Windows:
Customer:
For Windows:
For Linux:
For MAC OS:
OS X provides the built-in Screen Sharing application for this. You can also use safari
Server: Install a VNC server on your virtual machine:
Or
If your system is running a firewall, you must open the corresponding ports. CentOS Example
Next, do:
If you have problems with displaying icons and fonts when using xfce4 on Ubuntu / Debian:
If you want the VNC server to start automatically, create a file:
With the following content:
Do this:
Now you can connect, for example, via UltraVNC . To do this, start the UltraVNC Viewer, write [IP] :: 5901 (default: 5901, 5902, etc. for the first display, second, etc., respectively) in the VNC Server field and click the connect button.
You can also send vnc-shny traffic through ssh-tunnel. To do this, edit:
Then if you use cygwin or mingw, linux or mac os:
If PuTTY:
Run PuTTY. In the tree menu on the left Connection → SSH → Tunnels. Next, add a new Forwarded Port (Source port: 5901, Destination: localhost: 5901). Click Add.
Next, follow the Session section. Enter the IP of your server in the Host Name (or IP address) field. Click the Open button, enter the password to connect via SSH.
Then open the UltraVNC Viewer and in the VNC Server field enter: localhost :: 5901 and then connect.

You can also try other VNC servers:
x11vnc is actually a VNC server (like vnc4server or tightvnc), but allows access to an existing X session. Those. If you have configured the GUI in such a way that it starts at system startup, then you can use the following option:
After connecting via VNC (to port 5900), you should see the same as in “Emergency mode”.
To start x11vnc when you start OS, you need to do the following:
Add:
Further:
Now a little more interesting. One great company, NoMachine, developed the excellent NX replacement protocol for VNC. Clients to connect using this protocol are free, and NoMachine official server software costs a lot of money. At one time, the same company supported the FreeNX project of work on which subsided over time; The current version is 0.7.2 from 2008-08-22. But, fortunately, there were people who created the fork and called it x2go. Unfortunately, x2go is not compatible with NX from NoMachine, nor with freeNX. So we take the client here .
Installing a server on Debian ( source ):
For example, put this DE:
Next, follow the instructions from the official site:
The output of the following command should show that x2go is ready for operation:
And now an important point, to connect without this fix will not work! Find the string “mesg n” in the .profile file and replace it with “tty -s && mesg n”.
The following command will display the path to the startfluxbox executable file, which will be needed when setting up the client:
Installing the server on Ubuntu:
And now an important point, to connect without this fix will not work! It is necessary to find the line “mesg n || true "and replace it with" tty -s && mesg n ".
Server installation on CentOS:
The client for Linux is installed from the above repositories by the following command:
For Windows - download, install, run. For the same link above, there is a client for OS X.
We start the client:

In the session settings, we specify: in the Host field - the IP of your server, in the Login field - root, leave the port as it is, the session type is the GUI that was set.

As you can see, there is the possibility of authentication by key. In general, a lot of things. See for yourself. And the sound can be output through PulseAudio.
After clicking Ok, you will see here such charming things that you need to click to receive a request to enter a password and connect to the selected session:

Note: Please note that your favorite FluxBox is not on the list, so you have to write the path to it.
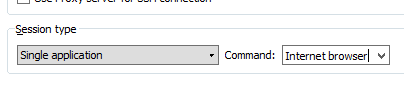
An important feature of x2go is the ability to run any graphics application without installing DE at all. To do this, in the session settings, in the session type section, select the single application item and select the application to be executed or enter the path to the program to be launched.
In this case, installing the software on the server will look like this. In the case of Ubuntu:
And now an important point, to connect without this fix will not work! It is necessary to find the line “mesg n || true "and replace it with" tty -s && mesg n ".
And by setting up the session as shown below, you can launch the browser on a remote server, and a window showing it will open on your machine:
Or so; then the terminal window will simply open:

Below you can see a screenshot of the current session status window. Orange numbers are marked with buttons:
The last way to remotely access your desktop.
Installation on Ubuntu:
Installation on Debian:
Installation on CentOS:
You also need to accept the TeamViewer license agreement, this can be done using the “Emergency mode”, or add the following lines to the end of the /opt/teamviewer/config/global.conf file:
The following command will show the status of the TeamViewer daemon and the nine-digit TeamViewer ID required to connect:
After launching the client downloaded here, you need to enter TeamViewer ID in the Partner UD field and click on the "Connect to partner" button. Then TeamViewer will request a password: [PASSWD].

That seems to be all. We hope that this article will help users of linux-servers in setting up a comfortable and convenient environment for them.
Introduction
Just in case, it is probably worth mentioning that SSH is the main way to provide access to Linux virtuals on RUVDS . Most of the actions described in this article will be carried out in this way.
To connect, you need to find an SSH client for your operating system.
')
Windows:
Linux:
- OpenSSH; if you are using Linux, for example Ubuntu, most likely everything is already installed, before us, so you can safely write in the terminal: ssh root @ [IP].
- PuTTY is also available for Linux , including the official Debian and Ubuntu repositories.
MAC OS:
Browser Plugins:
- FireSSH for Firefox
- Secure Shell for Google Chrome
GUI installation
So let's move on to installing the GUI. First you need to put the graphics subsystem:
For Debian / Ubuntu:
$ apt-get update $ apt-get install --no-install-recommends xserver-xorg xserver-xorg-core xfonts-base xinit libgl1-mesa-dri x11-xserver-utils For CentOS:
$ yum groupinstall "X Window System" "Fonts" Next comes the installation of the Desktop Environment (DE). They exist a great many. We recommend putting more lightweight environments on the server, and even better, do not install at all. The first two DEs are quite compact, functional, and “familiar.”
1. Xfce
For Debian / Ubuntu:
$ apt-get update Full installation:
$ apt-get install task-xfce-desktop Standard:
$ apt-get install xfce4 xfce4-terminal You can add:
$ apt-get install xfce4-goodies For CentOS:
$ yum install epel-release $ yum groupinstall "Xfce" $ echo "PREFERRED=startxfce4" >> /etc/sysconfig/desktop 2. LXDE
For Debian / Ubuntu:
$ apt-get update Complete:
$ apt-get install lxde Minimum:
$ apt-get install lxde-core For CentOS:
Adding Russian layouts:
$ setxkbmap -option grp:switch,grp:ctrl_shirt_toggle us,ru The key combination can be changed at its discretion, for example:
$ setxkbmap -option grp:switch,grp:alt_shift_toggle us,ru To run this command every time you start LXDE, you need to add the following line to your file using vi: @setxkbmap -option grp: switch, grp: ctrl_shift_toggle, grp_led: scroll us, ru. Or like this ...
$ echo "@setxkbmap -option grp:switch,grp:alt_shift_toggle,grp_led:scroll us,ru" >> /etc/xdg/lxsession/LXDE/autostart The following two DEs are extremely light. If you really need a GUI on the server, you probably should use them.
3. FluxBox
For Debian / Ubuntu:
$ apt-get update $ apt-get install fluxbox xterm For CentOS:
$ yum install fluxbox xterm $ echo "PREFERRED=startfluxbox" >> /etc/sysconfig/desktop 4. Openbox
For Debian / Ubuntu:
$ apt-get update $ apt-get install openbox xterm For CentOS:
$ yum install epel-release $ yum install openbox xterm $ echo "PREFERRED=openbox-session" >> /etc/sysconfig/desktop This is followed by the most popular graphical shells on desktops.
5. gnome
For Ubuntu / Debian:
$ apt-get update Minimum installation:
$ apt-get install --no-install-recommends lightdm gnome-panel gnome-terminal Full installation:
$ apt-get install gnome gnome-shell Note: something went wrong with setting up a VNC server under Gnome ... Servers from the tightvncserver and vnc4server repositories did not agree to cooperate, so I had to assemble a couple of deb-packages by hand. If you fail to set up a server, then we can recommend downloading the archive we collected with tigervnc-server and putting it. For this:$ curl -LOk https://ruvds.com/downloads/tightvnc-packages.tar
Or$ wget https://ruvds.com/downloads/tightvnc-packages.tar $ tar -xvf tightvnc-packages.tar $ cd ./tightvnc-packages $ dpkg -i *.deb || (apt -f install -y ; dpkg -i *.deb)
For CentOS:
$ yum groupinstall "GNOME" $ echo "PREFERRED=gnome-session" >> /etc/sysconfig/desktop 6. KDE
For Debian:
$ apt-get update Complete:
$ apt-get install kde-full Standard:
$ apt-get install kde-standart Minimum installation:
$ apt-get install kde-plasma-desktop For CentOS:
$ yum groupinstall "KDE" $ echo "PREFERRED=startkde" >> /etc/sysconfig/desktop 7. Cinnamon
For Debian / Ubuntu:
$ apt-get update $ apt-get install --no-install-recommends cinnamon-core lightdm For CentOS:
$ yum install cinnamon 8. MATE
For Debian / Ubuntu:
$ apt-get update Complete:
$ apt-get install mate-desktop-environment-extras Standard:
$ apt-get install mate-desktop-environment Minimum:
$ apt-get install mate-desktop-environment-core For CentOS:
$ yum groupinstall "MATE Desktop" If you want to access the GUI through "Emergency Mode", you must do the following:
$ systemctl set-default graphical.target Moreover, it is necessary to ensure the launch of the graphical shell at system startup. To do this, you can install any screen manager (Display Manager, DM), for example:
$ apt-get install lightdm Or in the case of CentOS:
$ yum install lightdm If you do not need access from your personal account, you should do the following:
$ systemctl set-default multi-user.target Note: Ubuntu offers its users several meta packages for more convenient installation of the desired DE:
Unitu:
$ apt-get install ubuntu-desktop Lxde:
$ apt-get install lubuntu-desktop XFCE:
$ apt-get install xubuntu-desktop KDE:
$ apt-get install kubuntu-desktop Further, there are many ways to gain remote access to the GUI.
Remote access
RDP
On a virtual server, depending on the OS, you need to perform the following steps.
Debian:
$ apt-get install xrdp $ systemctl enable xrdp $ systemctl start xrdp CentOS:
$ yum install epel-release $ yum install xrdp tigervnc-server tigervnc-server-module $ chcon -t bin_t /usr/sbin/xrdp $ chcon -t bin_t /usr/sbin/xrdp-sesman $ firewall-cmd --zone=public --add-port=3389/tcp --permanent $ firewall-cmd --zone=public --add-port=3389/udp --permanent $ firewall-cmd --reload $ systemctl enable xrdp $ systemctl start xrdp XDMCP:
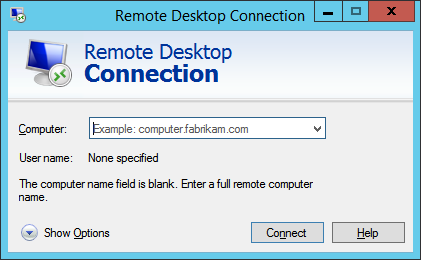
$ vi /etc/gdm/custom.conf [security] AllowRemoteRoot=true DisallowTCP=false [xdmcp] Enable=true MaxSessions=30 Next, if you are using Windows, connect through the built-in RDP client, Remote Desktop Connection.
Standard port 3389. For Linux, there are lots of clients that can be installed from repositories: freerdp and remmina, gnome-rdp, vinagre, etc.
For Mac OS :
You can also forward RDP-shny traffic through an SSH tunnel. To do this, you need to fix the xrdp configuration file:
$ vi /etc/xrdp/xrdp.ini Add the following line to the [globals] section: address = 127.0.0.1
$ systemctl restart xrdp Check that everything is correct, you can:
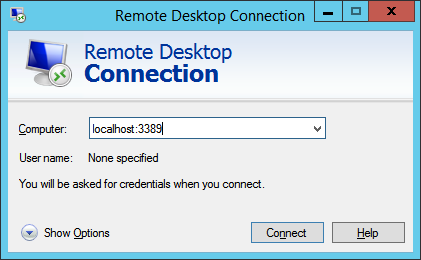
$ nmap -p 3389 [IP] Starting Nmap 6.47 ( http://nmap.org ) at 2016-10-04 13:07 MSK Nmap scan report for unspecified.mtw.ru ([IP]) Host is up (0.0087s latency). PORT STATE SERVICE 3389/tcp closed ms-wbt-server Then if you use cygwin or mingw, linux or mac os:
ssh root@[IP] -L 3389:localhost:3389 If PuTTY:
Run PuTTY. In the tree menu on the left Connection → SSH → Tunnels. Next, add a new Forwarded Port (Source port: 3389, Destination: localhost: 3389). Click Add.
Next, follow the Session section. Enter the IP of your server in the Host Name (or IP address) field. Click the Open button, enter the password to connect via SSH.
Next for Windows:
VNC
Customer:
For Windows:
For Linux:
- You can use the above client: remmina
- If in the browser you want: novnc - HTML5 VNC client
- And a bunch of all sorts of different: directvnc, gnome-rdp, krdc, xtightvncviewer, vinagre, xvnc4viewer
For MAC OS:
OS X provides the built-in Screen Sharing application for this. You can also use safari
vnc://yourserverip:5901 Server: Install a VNC server on your virtual machine:
$ apt-get install tightvncserver Or
$ apt-get install vnc4server $ yum install tigervnc-server If your system is running a firewall, you must open the corresponding ports. CentOS Example
$ firewall-cmd --zone=public --add-port=5901/tcp --permanent $ firewall-cmd --zone=public --add-port=5901/udp --permanent $ firewall-cmd --reload Next, do:
$ vncpasswd Password: Verify: If you have problems with displaying icons and fonts when using xfce4 on Ubuntu / Debian:
$ echo "export XKL_XMODMAP_DISABLE=1" >> ~/.vnc/xstartup If you want the VNC server to start automatically, create a file:
$ vi /lib/systemd/system/vncsrv.service With the following content:
[Service] Environment=RESOLUTION=800x600 Environment=COLOR=16 Environment=DISPLAY=1 [Unit] Description=VNC Server [Service] Type=forking ExecStart=/usr/bin/vncserver -depth ${DEPTH} -geometry ${RESOLUTION} :${DISPLAY} ExecStop=/usr/bin/vncserver -kill :${DISPLAY} ExecReload=/usr/bin/vncserver -kill :${DISPLAY} && /usr/bin/vncserver -depth ${DEPTH} -geometry ${RESOLUTION} :${DISPLAY} User=root [Install] WantedBy=multi-user.target Do this:
systemctl daemon-reload systemctl enable vncsrv.service systemctl start vncsrv.service Now you can connect, for example, via UltraVNC . To do this, start the UltraVNC Viewer, write [IP] :: 5901 (default: 5901, 5902, etc. for the first display, second, etc., respectively) in the VNC Server field and click the connect button.
You can also send vnc-shny traffic through ssh-tunnel. To do this, edit:
$ vi /lib/systemd/system/vncsrv.service [Service] Environment=RESOLUTION=800x600 Environment=COLOR=16 Environment=DISPLAY=1 [Unit] Description=VNC Server [Service] Type=forking ExecStart=/usr/bin/vncserver -depth ${DEPTH} -geometry ${RESOLUTION} :${DISPLAY} -localhost ExecStop=/usr/bin/vncserver -kill :${DISPLAY} ExecReload=/usr/bin/vncserver -kill :${DISPLAY} && /usr/bin/vncserver -depth ${DEPTH} -geometry ${RESOLUTION} :${DISPLAY} -localhost User=root [Install] WantedBy=multi-user.target Then if you use cygwin or mingw, linux or mac os:
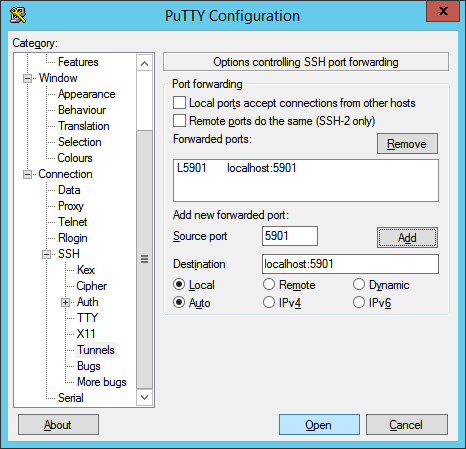
ssh root@[IP] -L 5901:localhost:5901 If PuTTY:
Run PuTTY. In the tree menu on the left Connection → SSH → Tunnels. Next, add a new Forwarded Port (Source port: 5901, Destination: localhost: 5901). Click Add.
Next, follow the Session section. Enter the IP of your server in the Host Name (or IP address) field. Click the Open button, enter the password to connect via SSH.
Then open the UltraVNC Viewer and in the VNC Server field enter: localhost :: 5901 and then connect.
You can also try other VNC servers:
x11vnc is actually a VNC server (like vnc4server or tightvnc), but allows access to an existing X session. Those. If you have configured the GUI in such a way that it starts at system startup, then you can use the following option:
$ apt-get install x11vnc $ x11vnc -storepasswd $ x11vnc -usepw $ x11vnc -xkb -noxrecord -noxfixes -noxdamage -display :0 -auth /var/run/lightdm/root/:0 -usepw & $ disown -h %1 After connecting via VNC (to port 5900), you should see the same as in “Emergency mode”.
To start x11vnc when you start OS, you need to do the following:
$ vi /lib/systemd/system/xvncsrv.service Add:
[Unit] Description=X11VNC [Service] Type=forking ExecStart=/usr/bin/x11vnc -xkb -noxrecord -noxfixes -noxdamage -display :2 -usepw User=root [Install] WantedBy=graphical.target Further:
systemctl daemon-reload systemctl enable xvncsrv.service systemctl start xvncsrv.service NX
Now a little more interesting. One great company, NoMachine, developed the excellent NX replacement protocol for VNC. Clients to connect using this protocol are free, and NoMachine official server software costs a lot of money. At one time, the same company supported the FreeNX project of work on which subsided over time; The current version is 0.7.2 from 2008-08-22. But, fortunately, there were people who created the fork and called it x2go. Unfortunately, x2go is not compatible with NX from NoMachine, nor with freeNX. So we take the client here .
Installing a server on Debian ( source ):
For example, put this DE:
$ apt-get install fluxbox Next, follow the instructions from the official site:
$ apt-key adv --recv-keys --keyserver keys.gnupg.net E1F958385BFE2B6E $ echo "deb http://packages.x2go.org/debian jessie main" > /etc/apt/sources.list.d/x2go.list $ echo "deb-src http://packages.x2go.org/debian jessie main" >> /etc/apt/sources.list.d/x2go.list $ apt-get update $ apt-get install x2go-keyring && apt-get update $ apt-get install x2goserver x2goserver-xsession The output of the following command should show that x2go is ready for operation:
$ systemctl status x2goserver ● x2goserver.service - LSB: Start and stop the X2Go daemon Loaded: loaded (/etc/init.d/x2goserver) Active: active (running) since Tue 2016-10-11 22:05:51 MSK; 30min ago ... And now an important point, to connect without this fix will not work! Find the string “mesg n” in the .profile file and replace it with “tty -s && mesg n”.
$ vi .profile The following command will display the path to the startfluxbox executable file, which will be needed when setting up the client:
$ whereis startfluxbox Installing the server on Ubuntu:
$ apt-get install xfce4 xfce4-terminal $ add-apt-repository ppa:x2go/stable $ apt-get update $ apt-get install x2goserver x2goserver-xsession And now an important point, to connect without this fix will not work! It is necessary to find the line “mesg n || true "and replace it with" tty -s && mesg n ".
$ vi .profile Server installation on CentOS:
$ yum install epel-release $ yum install x2goserver x2goserver-xsession The client for Linux is installed from the above repositories by the following command:
$ apt-get install x2goclient For Windows - download, install, run. For the same link above, there is a client for OS X.
We start the client:
In the session settings, we specify: in the Host field - the IP of your server, in the Login field - root, leave the port as it is, the session type is the GUI that was set.
As you can see, there is the possibility of authentication by key. In general, a lot of things. See for yourself. And the sound can be output through PulseAudio.
After clicking Ok, you will see here such charming things that you need to click to receive a request to enter a password and connect to the selected session:
Note: Please note that your favorite FluxBox is not on the list, so you have to write the path to it.
An important feature of x2go is the ability to run any graphics application without installing DE at all. To do this, in the session settings, in the session type section, select the single application item and select the application to be executed or enter the path to the program to be launched.
In this case, installing the software on the server will look like this. In the case of Ubuntu:
$ add-apt-repository ppa:x2go/stable $ apt-get update $ apt-get install x2goserver x2goserver-xsession And now an important point, to connect without this fix will not work! It is necessary to find the line “mesg n || true "and replace it with" tty -s && mesg n ".
$ vi .profile $ apt-get install firefox xterm And by setting up the session as shown below, you can launch the browser on a remote server, and a window showing it will open on your machine:
Or so; then the terminal window will simply open:
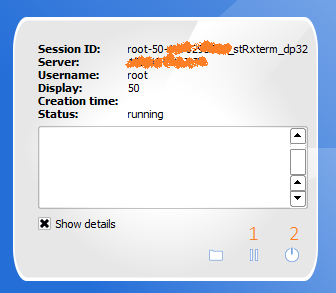
Below you can see a screenshot of the current session status window. Orange numbers are marked with buttons:
- “Suspend session” - after clicking on this button, the connection will be terminated, but the session will remain and wait for reconnection. All applications running on the server will continue;
- “Terminate session” - after clicking the connection to the server will be terminated, and the applications running on the server will be terminated.
Teamviewer
The last way to remotely access your desktop.
Installation on Ubuntu:
$ apt-get update $ apt-get install lubuntu-desktop $ reboot $ dpkg --add-architecture i386 $ apt-get update $ wget http://download.teamviewer.com/download/teamviewer_i386.deb $ dpkg -i teamviewer_i386.deb $ apt-get -f install $ teamviewer --passwd [PASSWD] Installation on Debian:
$ apt-get update $ apt-get install lxde lightdm $ reboot $ dpkg --add-architecture i386 $ apt-get update $ wget http://download.teamviewer.com/download/teamviewer_i386.deb $ dpkg -i teamviewer_i386.deb $ apt-get -f install $ teamviewer --passwd [PASSWD] Installation on CentOS:
$ yum groupinstall "X Window system" $ yum install epel-release $ yum install fluxbox xterm lightdm $ systemctl set-default graphical.target $ reboot $ curl -o TeamViewer_Linux_PubKey.asc -Lk http://www.teamviewer.com/link/?url=354858 $ rpm --import TeamViewer_Linux_PubKey.asc $ curl -LOk http://download.teamviewer.com/download/teamviewer.i686.rpm $ yum install teamviewer.i686.rpm $ teamviewer --passwd [PASSWD] You also need to accept the TeamViewer license agreement, this can be done using the “Emergency mode”, or add the following lines to the end of the /opt/teamviewer/config/global.conf file:
$ echo "[int32] EulaAccepted = 1" >> /opt/teamviewer/config/global.conf $ echo "[int32] EulaAcceptedRevision = 6" >> /opt/teamviewer/config/global.conf $ teamviewer --daemon restart The following command will show the status of the TeamViewer daemon and the nine-digit TeamViewer ID required to connect:
$ teamviewer --info After launching the client downloaded here, you need to enter TeamViewer ID in the Partner UD field and click on the "Connect to partner" button. Then TeamViewer will request a password: [PASSWD].
Instead of conclusion
That seems to be all. We hope that this article will help users of linux-servers in setting up a comfortable and convenient environment for them.
Source: https://habr.com/ru/post/312556/
All Articles