Admin note: OpenVPN + pfSense + Dreamkas = Retail Automation

The article will look at an example of the settings of the cash registers of the Dreamkas vendor and the pfSense router for working with the 1C server via OpenVPN quickly and encrypted (using TLS / SSL), via any public channels.
Task: there are many cash registers in many stores, there is a 1C server in the office. Need to set up interaction. I will not go into the setting of 1C, the emphasis is on OpenVPN in the pfSense router and building the network. A detailed description of the cass in my article is missing.
Item 1. We update the software to the current versions.
The pfSense version can be viewed on the main page, there you can update it in just 3 clicks + 1 restart.
The cashier version can be updated automatically through the “settings” menu on the cashier itself. There are a bunch of upgrade options, they are listed on the manufacturer's website.
')
Basically, you need to update the software to minimize problems with OpenVPN. I had “nuances” for working with openVPN on different versions of pfSense. Protect yourself from unnecessary problems. Similarly, the OpenVPN package appeared at the box office relatively recently.
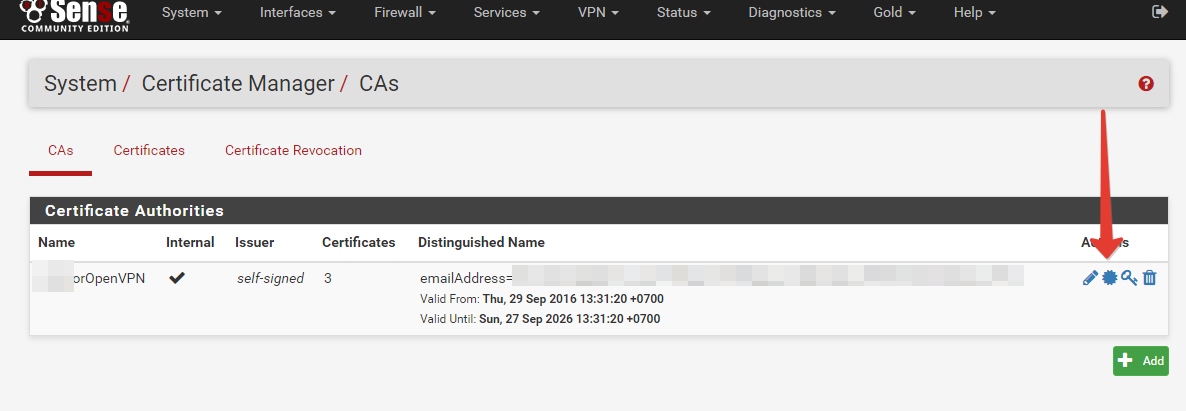
Point 2. We write out the CA certificate
Go to System-> Cert.Manager-> Ca, click the Add button and fill in the fields.

Pay attention to the field:
- choose Create an internal if you do not have a ready certificate
- Lifetime (days) - CA certificate lifetime
- Common Name - this is how it will be displayed further in the configuration.
Enter the data deliberately, change will not work.
Item 3. We write out the server certificate
Go to System → Certificate Manager → Certificates, click Add and fill in the fields.
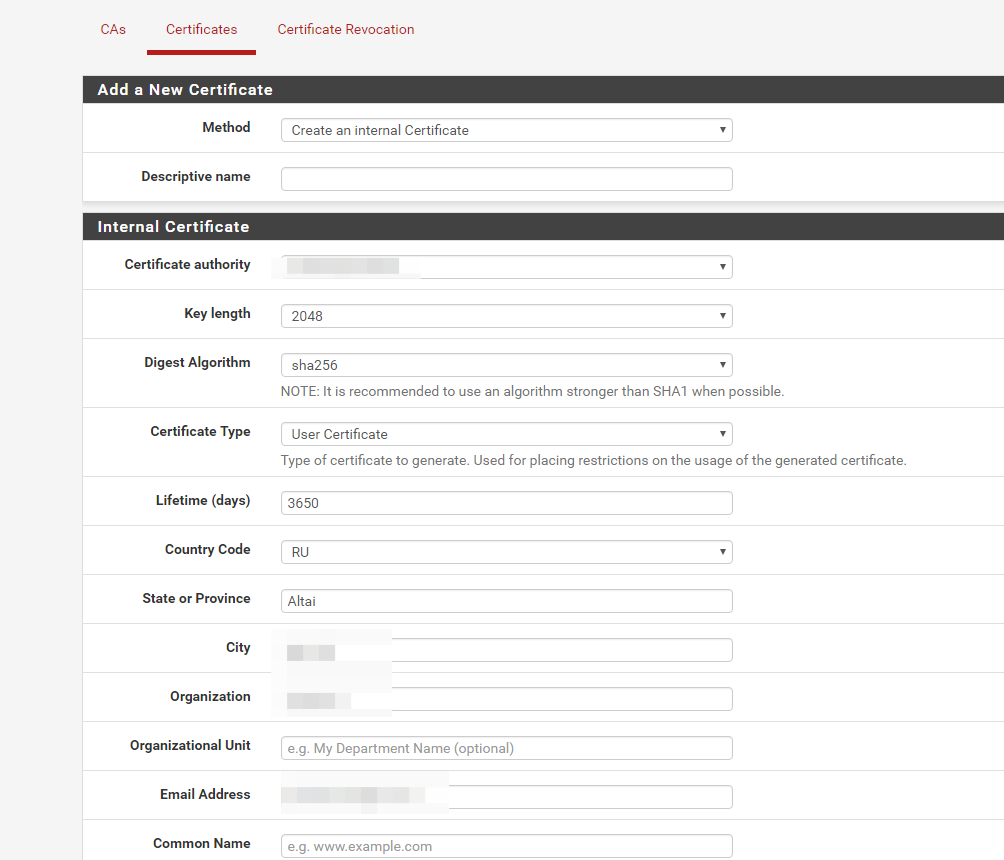
I draw attention to the following points:
- Create an internal if we do not have a ready certificate
- Certificate authority - choose our CA certificate, created in claim 1
- Certificate Type choose Server
- Lifetime (days) - the lifetime of the server certificate
- Common Name - this is how it will be displayed further in the configuration.
Item 4. We write out a client certificate
IMPORTANT! For each client - their own individual certificate! Go to System → Certificate Manager → Certificates, click Add and fill in the fields. Everything is similar to clause 3, except for the Certificate Type , where we select Client
I draw attention to the following points:
- Certificate authority - choose our CA certificate, created in claim 1
- Certificate Type choose Client
- Lifetime (days) - the lifetime of the server certificate
- Common Name - this is how it will be displayed further in the configuration.
- you can use the Alternative Names field, but if you do not know what it is, then you do not need it (leave blank). In general, according to this field, you can specify additional settings and bindings for openVPN clients.
-
I will share my experience - I give a conscious name in the Common Name , of the type mag.address.kassanomer - this will allow us to visually distinguish certificates from each other.
Item 5. Configure OpenVPN
It's simple. Everything in pfSense is configured by the mouse through a user-friendly interface. Thanks to the developers and all members of the community.
We go VPN → OpenVPN → Servers, we add the server.
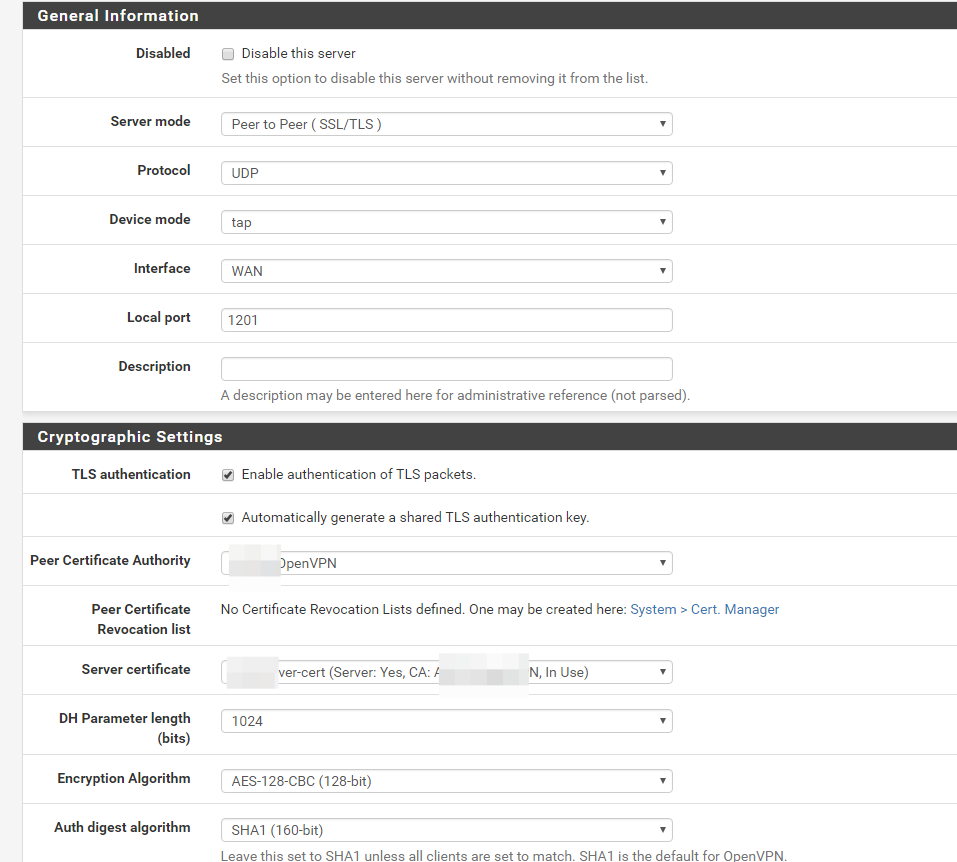
I will make some comments:
- I work with a tap tunnel, it's more convenient for me, it simulates the L2 level. Any multicastes, broadcasts, etc., work with him;
- The UDP protocol is faster than TCP, and the channel width is the same under the same conditions. This is the ancient problem of OpenVPN;
- select in the Server mode section the RemoteAccess mode;
- choose in the Peer Certificate Authority section from the list our CA certificate;
- choose our server certificate in the Server certificate section;
- select the desired length in the section DH Parameter length (bits) ;
- we select in the section Certificate Depth mode One (Client + Server), this is a scheme without certifying intermediaries;
- in the section IPv4 Tunnel Network we register our tunnel grid, for example, 192.168.202.0/24 ;
- in the section IPv4 Local network (s) we assign resources, the routing to which must be received by cash registers. I have this for example 192.168.100.2/32, 192.168.1.0/24 ;
- The rest can not touch, or fill in its sole discretion. Do not forget to open the port on which your OpenVPN server hangs on the firewall.
IMPORTANT!
Cash desks will cling to the server, and receive addresses from the IPv4 Tunnel Network range, addresses will be issued in the order of the connection order. But the server 1C should always know that "such a cash desk" is located on "this is such an address." Therefore, set up further.
Go to VPN → OpenVPN → Client Specific Overrides, Add button. You need to create settings for specific clients. Tie each client your IP address

Further the algorithm is as follows:
- choose our server in the Server List
- Common name is prescribed the name of our client certificate from p.4
- in the Advanced section, write the command for assigning IP addresses
ifconfig-push 192.168.202.12 255.255.255.0
Item 6. Unloading pfSense certificates
You need to upload the following files:
1) CA certificate
2) client certificate + key
3) if we have SSL / TLS, then save the key
4) dh parameters
Items 1) and 2) are exported via the web interface:
The file for 3) is exported from the settings of the OpenVPN server. If you have already created it - go, a key will be registered there. We copy, paste into a file, save for example in a file client.tls-auth .
DH parameters are saved via the commands:
/usr/bin/openssl dhparam 1024 > /etc/dh1024.pem /usr/bin/openssl dhparam 2048 > /etc/dh2048.pem /usr/bin/openssl dhparam 4096 > /etc/dh4096.pem Via the Diagnostics -> Edit File menu, we open the file we need, for example, dh1024.pem , the DH settings are set in the OpenVPN server settings.
Item 7. For general development
When I set up TLS / SSL, I had little idea what the client should have written in the config, I had very modest knowledge of OpenVPN. I tried the solution in the forehead - I set up another pfSense connection in the “client” mode, loaded the client certificates, checked how it works. The router is configured via the web interface, the connection is not difficult.
Thanks to the pfsense control console, I knew that the OpenVPN configs are in the / var / etc / openvpn folder. Using Edit File, you can see how turning on and off checkboxes and parameters in the web interface is written to a file. At the same time you can peep the keys.
If you do the same - do not forget to remove the OpenVPN client and certificates from the test server.
Item 8. Cash adjustment
At the checkout, by default, the smb-folder with the name \\ ipaddress \ exchange is open, there is write access. We unload into it all 4 files from p.6.
Connect via SSH to the checkout, standard default root / 324012 account , transfer our files to / opt / networks. Yes, on board is a cropped Linux.
To connect to the server, a client.ovpn file is needed , it can be viewed in step 7 and edited to fit your needs. Put the same - / opt / networks. I did something like this:
client dev tap proto udp remote server_ip server_port keepalive 10 60 ping-timer-rem persist-tun persist-key cipher AES-128-CBC auth SHA1 resolv-retry infinite nobind persist-key persist-tun ca "//opt//networks//CAforOpenVPN.crt" cert "//opt//networks//mag.magaddress.kassa1.crt" key "//opt//networks//mag.magaddress.kassa1.key" dh "//opt//networks//dh1024.pem" tls-client tls-auth "//opt//networks//client.tls-auth" 1 ns-cert-type server verb 3 The file is saved. Everything will work when we reload the cashier, for example through reboot . Do not forget to write the rules on the openVPN interface in pfSense for our subnets!
How visually to see that cash registers work (connect)?
Option 1 - bring the OpenVPN widget to the pfSense homepage
Option 2 - through the menu Status-> OpenVPN
Option 3 - through the cashier. We connect via ssh, and then we have a standard set - ifconfig, ping etc ...
Point 9. How to work with 1C
Cashier in smb-folder stores its work materials. Server 1C reads them and writes. Keep this in mind this security hole when designing your store network.
As a result
The article describes an example of how having a free pfSense router and a lot of Linux-based cash registers available can make a good encrypted tunnel to a remote 1C server that is configured in a few clicks.
In the described configuration we get a very scalable connection scheme for cash registers with a personal certificate for each remote device.
Using OpenVPN directly at the box office makes information security risks in terms of data transfer irrelevant.
If you have a small outlet, then building a network may not be necessary. We buy any router with 3G support, we start an Internet ticket office, either by cable or via Wi-Fi, and we’ll knock on the server itself. On my scale, this is a significant savings in network infrastructure.
useful links
About pfSense
OpenVPN PKI: Site-to-Site discussion guide
Instructions from the manufacturer, without TLS / SSL and encryption
Thanks to all.
Source: https://habr.com/ru/post/312528/
All Articles