BizTalk Server Support: helpful tips. Part 2
We continue the series of articles in which we share with you our experience in supporting MS BizTalk Server 2010. In this article we will talk about a tool that will save you a lot of time! It will be about Pipelines, and more specifically, Pipeline components. Link to the first article is here . In it you will find some general information about what MS BizTalk Server is and why you may need it.

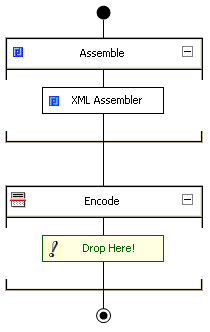
A pipeline is an element (more often referred to as an artifact) of the infrastructure of the BizTalk Server application, which contains .Net or COM components for processing an incoming message in a certain sequence.
')
 BizTalk Server provides a large set of components for the pipelines, so to speak out of the box. For small applications it is quite enough. But when it comes to large corporate solutions without components of its own design can not do.
For those who are familiar with this topic, I am sure it will not be news that msdn has articles on the topic "How to develop your own pipeline components . " It describes in detail the types of components, the process of creating a project in Visual Studio, the namespace to be connected, which interfaces to implement, etc. Here it is important to understand that having made one component, you will develop another one in the same way each time. Knowing this is important, but there is an option that will allow you to save time on preparing a project and focus your attention on writing code. And this is the BizTalk Server Pipeline Component Wizard ( project page on codeplex ). Add-on for VS 2010 (available for more recent versions), which in a few simple steps allows you to create a pipeline component project, ready to execute your code, you just have to add it there.
And so there is a task:
Our company receives orders from clients in the form of files of different formats. BizTalk Server has a standard set of components for working with files in XML and text files, but for files of other formats you will have to develop a pipeline component that will convert it to XML.
But more to the point:
1. From the project page on the codeplex, download the plcwsrc2.20 archive.
2. To install, unzip plcwsrc2.20 and you will receive a project for Visual Studio. Open and build the project and from the PipelineComponentWizard Setup project folder, run setup.exe.
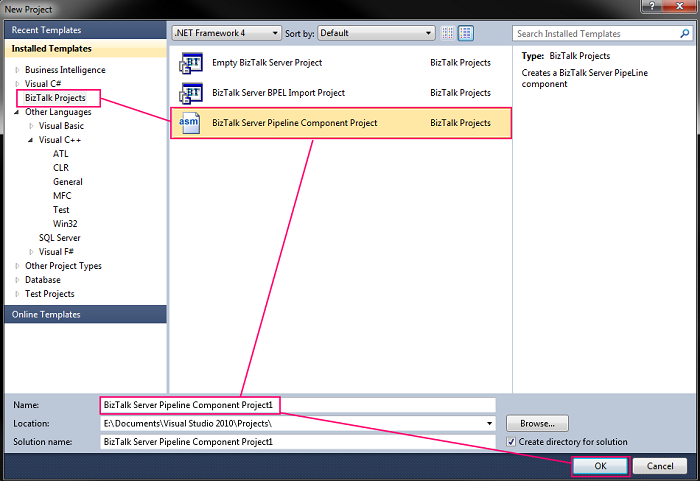
3. Start Visual Studio 2010 and create a new BizTalk Server Pipeline Component Project.
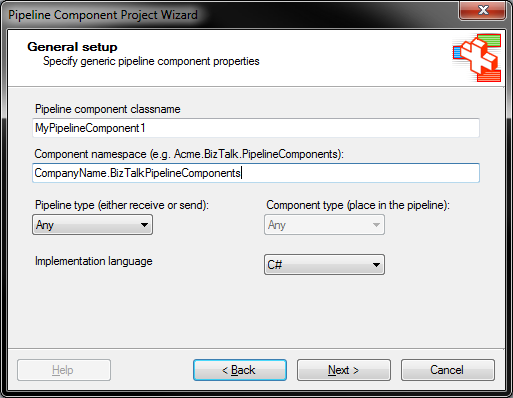
4. Next, the Wizard will open, which will prompt us to fill in some fields.
5. In the next window, we are asked to enter the component name, version, and description.
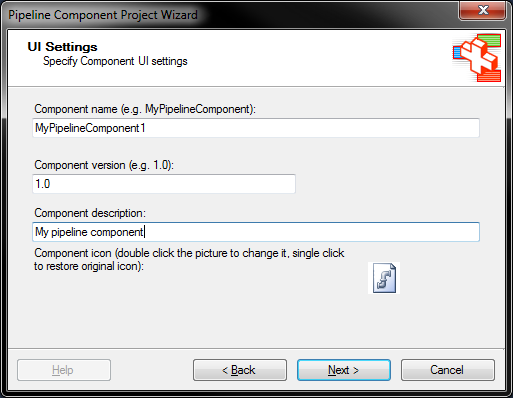
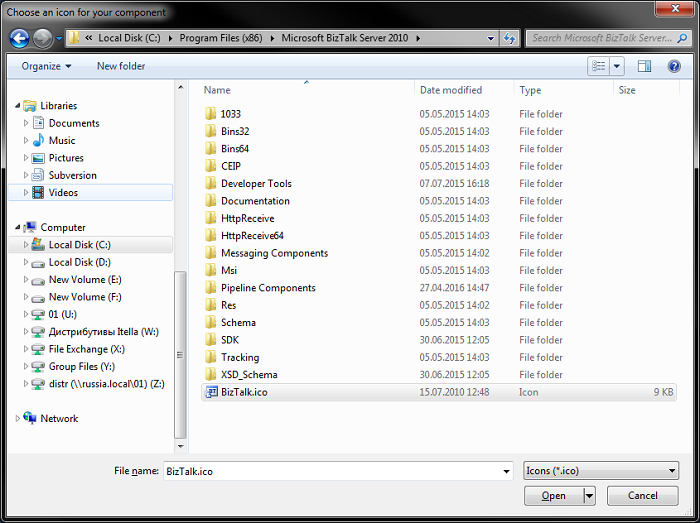
Also double click on You can change the icon of the components (size 16x16). The component's own icon will make it easier to search in the list of components. Choose one of the standard BizTalk icons
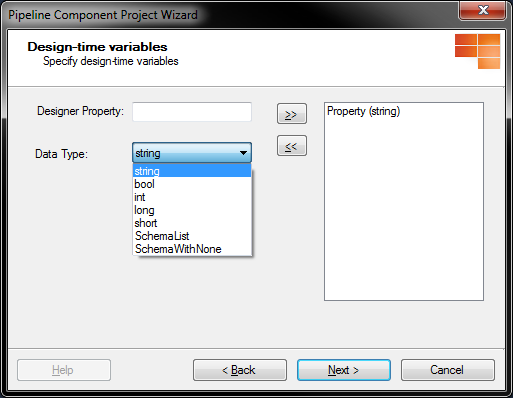
6. Further proposed to add the parameters of the components. Parameters are optional, but for the example, add one. Parameters are also available from Visual Studio to set default values.
7. Next, click Next, then Finish. The wizard will create a pipeline component project. There will be two files in the project: cs is the skeleton of our component and .resx contains properties with the name, description and version. In the generated class you will have several sections:
• public variables - component parameters;
• IBaseComponent members - defines the properties that provide information about the component;
• IPersistPropertyBag members - defines methods for preparing, loading and saving component properties;
• IConponentUI - defines the components icon and the method that verifies that all properties are set correctly;
• IComponent - defines the method that starts the component to process the incoming message.
An example of code that will be executed in the Execute () method of this component:

In our case, this is the main and only method in which the incoming message is processed. It is also important that the output you write to pInMsg.BodyPart.Data is a stream that is XML. To do this, you can use a regular XmlWriter. Moreover, there should also be a .xsd message scheme that exits the component.
8. Build the project and copy the resulting DLL to C: \ Program Files (x86) \ Microsoft BizTalk Server 2010 \ Pipeline Components , but this is an optional condition, you can select any other folder and close the project.
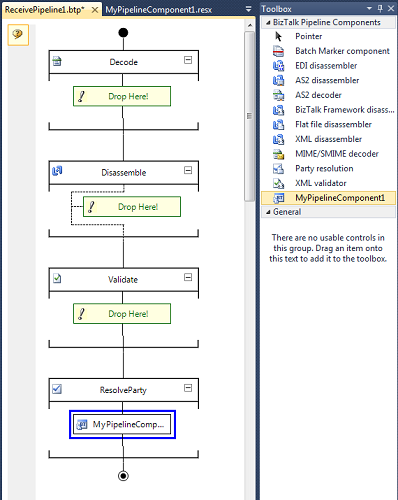
9. In Visual Studio, open the project with the pipeline to which you want to place your component, then in the context menu of Toolbox -> Choose items-> BizTalk Pipeline Components, select your component from the list and transfer it to the pipeline.
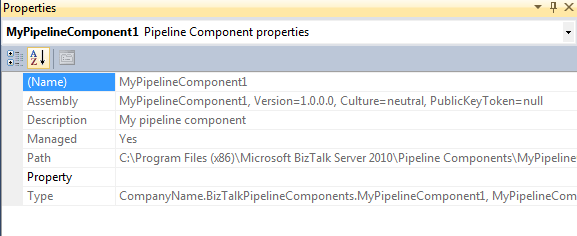
Also, we only have access to the created property. We can set its default value before deploying the assembly to BizTalk Server.
10. Assemble and back up the assembly with the pipeline on BizTalk Server.
Done! So, in a few simple steps in your application, you can use a pipeplan with a component of its own design.
A pipeline is an element (more often referred to as an artifact) of the infrastructure of the BizTalk Server application, which contains .Net or COM components for processing an incoming message in a certain sequence.
')
BizTalk Server provides a large set of components for the pipelines, so to speak out of the box. For small applications it is quite enough. But when it comes to large corporate solutions without components of its own design can not do.For those who are familiar with this topic, I am sure it will not be news that msdn has articles on the topic "How to develop your own pipeline components . " It describes in detail the types of components, the process of creating a project in Visual Studio, the namespace to be connected, which interfaces to implement, etc. Here it is important to understand that having made one component, you will develop another one in the same way each time. Knowing this is important, but there is an option that will allow you to save time on preparing a project and focus your attention on writing code. And this is the BizTalk Server Pipeline Component Wizard ( project page on codeplex ). Add-on for VS 2010 (available for more recent versions), which in a few simple steps allows you to create a pipeline component project, ready to execute your code, you just have to add it there.
And so there is a task:
Our company receives orders from clients in the form of files of different formats. BizTalk Server has a standard set of components for working with files in XML and text files, but for files of other formats you will have to develop a pipeline component that will convert it to XML.
But more to the point:
1. From the project page on the codeplex, download the plcwsrc2.20 archive.
2. To install, unzip plcwsrc2.20 and you will receive a project for Visual Studio. Open and build the project and from the PipelineComponentWizard Setup project folder, run setup.exe.
3. Start Visual Studio 2010 and create a new BizTalk Server Pipeline Component Project.
4. Next, the Wizard will open, which will prompt us to fill in some fields.
5. In the next window, we are asked to enter the component name, version, and description.
Also double click on
You can change the icon of the components (size 16x16). The component's own icon will make it easier to search in the list of components. Choose one of the standard BizTalk icons6. Further proposed to add the parameters of the components. Parameters are optional, but for the example, add one. Parameters are also available from Visual Studio to set default values.
7. Next, click Next, then Finish. The wizard will create a pipeline component project. There will be two files in the project: cs is the skeleton of our component and .resx contains properties with the name, description and version. In the generated class you will have several sections:
• public variables - component parameters;
• IBaseComponent members - defines the properties that provide information about the component;
• IPersistPropertyBag members - defines methods for preparing, loading and saving component properties;
• IConponentUI - defines the components icon and the method that verifies that all properties are set correctly;
• IComponent - defines the method that starts the component to process the incoming message.
An example of code that will be executed in the Execute () method of this component:
In our case, this is the main and only method in which the incoming message is processed. It is also important that the output you write to pInMsg.BodyPart.Data is a stream that is XML. To do this, you can use a regular XmlWriter. Moreover, there should also be a .xsd message scheme that exits the component.
8. Build the project and copy the resulting DLL to C: \ Program Files (x86) \ Microsoft BizTalk Server 2010 \ Pipeline Components , but this is an optional condition, you can select any other folder and close the project.
9. In Visual Studio, open the project with the pipeline to which you want to place your component, then in the context menu of Toolbox -> Choose items-> BizTalk Pipeline Components, select your component from the list and transfer it to the pipeline.
Also, we only have access to the created property. We can set its default value before deploying the assembly to BizTalk Server.
10. Assemble and back up the assembly with the pipeline on BizTalk Server.
Done! So, in a few simple steps in your application, you can use a pipeplan with a component of its own design.
Source: https://habr.com/ru/post/312512/
All Articles