Why super-mega-about machine learning in 15 minutes still does not become
Yesterday I published an article about machine learning and NVIDIA DIGITS. As promised, today's article - why everything is not so good + an example of selecting objects in a frame on DIGITS.
NVIDIA raised a wave of public relations about the DetectNet mesh developed and implemented in DIGITS. The grid is positioned as a solution for searching for identical / similar objects in the image.

At the beginning of the year, I mentioned several times about the Yolo fun net. In general, all the people with whom I spoke, treated her rather negatively, with the words that Faster-RCNN is much faster and simpler. But, NVIDIA engineers were inspired by it and assembled their Caffe grid, calling it DetectNet.
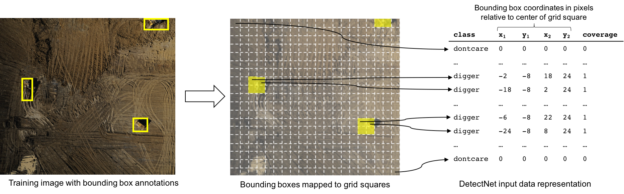
The grid principle is the same as in Yolo. The network output for an image (N * a * N * a) is an N * N * 5 array, in which for each region of the original image of a * a size, 5 parameters are entered: the presence of the object and its size:
')
Plus grids:
Minus one: there are solutions with better detection.
Unlike category recognition, which I wrote about yesterday, the detection of objects is done poorly. Not user friendly. Most of the article will be on how to start this miracle. Unfortunately, this approach kills the original idea of DIGITS, that you can do something without understanding the logic of the system and its mathematics.
But if you still run - it is convenient to use.
A couple of years ago we had a completely crazy idea with license plates. Which resulted in a whole series of articles on it. Including was a decent database of photos that we posted.
I decided to use part of the developments and re-detect the numbers through DIGITS. So we will use them.
The base is properly labeled, I had a very small, for other purposes . But it was enough to train.
Selecting in the main menu “New Dataset-> Images-> Object Detection” we get to the menu for creating datasets. Here you must specify:
There is a difficulty. How to make a text-caption to the image with its description? The example on GitHub from NVIDIA in the official DIGITS repository is silent about this, mentioning only that it is the same as in the kitti. I was somewhat surprised by this approach to users of a ready-made box of the framework. But ok. I went, downloaded the database and the docks to it, read it. File format:
File Description:
Naturally, most of the parameters are not needed here. In reality, you can leave only the “bbox” parameter, the rest will not be used anyway.
As it turned out, for DIGITS there was also a second tutorial , where the file format was still signed. But he was not in the repository DIGITS ¯ \ _ (ツ) _ / ¯
It confirmed that my guesses about what to use were correct:

The class. The base is made, we begin to train. For training you need to set the same settings as specified in the example :
Also, I did the following. For the “detectnet_network.prototxt” copied mesh, I replaced all image size values “1248, 352” with image sizes from my base. Without this, learning fell. Well, naturally, there is no such thing in one tutorial ... ¯ \ _ (ツ) _ / ¯
Loss chart falls, training has gone. But ... The accuracy graph is at zero. What?!
None of the two tutorials that I found answered this question. Went to dig into the description of the grid. Where to dig, it was clear right away. Once the loss falls, the training is on. Error in validation pipeline. And really. In the network configuration there is a block:
It looks suspicious. Opening the description of the clustering layer you can find a comment:
It becomes clear that these are thresholds. Zarandomil there 3 numbers without delving into the essence. Training went + began to grow validation. Hours for 5 reached some reasonable thresholds.

But here's a bummer. With successful training, 100% of the pictures were not distributed. I had to dig and understand what this layer means.
The layer implements the collection of the obtained hypotheses into a single solution. As the main tool, the OpenCV module “cv.groupRectangles” is used here. This is a function that associates groups of rectangles into one rectangle. As you remember, the network has such a structure that in the vicinity of the object there should be a lot of positives. They need to be collected in a single solution. The collection algorithm has a bunch of parameters.
Now it’s enough just to pick them up so that it all works. And now humor. Taki was also the third tutorial, where part of the whole thing is described.
But not all ¯ \ _ (ツ) _ / ¯
As a result, you can see what the grid has allocated:

It works well. At first glance, better than the Haar that we used. But it immediately became clear that a small training base (~ 1500 frames) - makes itself felt. The database did not take into account dirty numbers => they are not detected. The database did not take into account the strong perspective numbers => they are not detected. Not considered too large / too small. Well, you understand. In short, you need not be lazy and mark out thousands of 5 numbers normally.
When recognizing, you can see funny pictures with activation cards ( 1 , 2 , 3 ). It can be seen that at each next level the number is seen more and more clearly.
Pleasant moment - the result can be run with a code of ~ 20 lines. And it will be a ready-made number detector:
Here I posted a file for the grid and the weight of the trained network, if anyone needs it.
NVIDIA raised a wave of public relations about the DetectNet mesh developed and implemented in DIGITS. The grid is positioned as a solution for searching for identical / similar objects in the image.
What it is
At the beginning of the year, I mentioned several times about the Yolo fun net. In general, all the people with whom I spoke, treated her rather negatively, with the words that Faster-RCNN is much faster and simpler. But, NVIDIA engineers were inspired by it and assembled their Caffe grid, calling it DetectNet.
The grid principle is the same as in Yolo. The network output for an image (N * a * N * a) is an N * N * 5 array, in which for each region of the original image of a * a size, 5 parameters are entered: the presence of the object and its size:
')
Plus grids:
- Quickly counts. I did it for 10-20ms per frame. At a time when Faster-RCNN spent 100-150.
- Just learning and customizing. With Faster-RCNN it was necessary to potter for a long time.
Minus one: there are solutions with better detection.
Common words before I start the story
Unlike category recognition, which I wrote about yesterday, the detection of objects is done poorly. Not user friendly. Most of the article will be on how to start this miracle. Unfortunately, this approach kills the original idea of DIGITS, that you can do something without understanding the logic of the system and its mathematics.
But if you still run - it is convenient to use.
What we will recognize
A couple of years ago we had a completely crazy idea with license plates. Which resulted in a whole series of articles on it. Including was a decent database of photos that we posted.
I decided to use part of the developments and re-detect the numbers through DIGITS. So we will use them.
The base is properly labeled, I had a very small, for other purposes . But it was enough to train.
Go
Selecting in the main menu “New Dataset-> Images-> Object Detection” we get to the menu for creating datasets. Here you must specify:
- Training image folder - a folder with images
- Training label folder - folder with textual captions for images
- Validation image folder - a folder with images for verification
- Validation label folder - a folder with textual signatures to them
- Pad image - If the image is smaller than the one specified here, then it will be supplemented with a black background. If more - the creation of the base will fall ¯ \ _ (ツ) _ / ¯
- Resize image - to what size to resize the image
- Minimum box size - it’s best to set this value. This is the minimum object size during validation.
There is a difficulty. How to make a text-caption to the image with its description? The example on GitHub from NVIDIA in the official DIGITS repository is silent about this, mentioning only that it is the same as in the kitti. I was somewhat surprised by this approach to users of a ready-made box of the framework. But ok. I went, downloaded the database and the docks to it, read it. File format:
Car 0.00 0 1.95 96.59 181.90 405.06 371.40 1.52 1.61 3.59 -3.49 1.62 7.68 1.53 Car 0.00 0 1.24 730.55 186.66 1028.77 371.36 1.51 1.65 4.28 2.61 1.69 8.27 1.53 Car 0.00 0 1.77 401.35 177.13 508.22 249.68 1.48 1.64 3.95 -3.52 1.59 16.82 1.57 File Description:
#Values Name Description ---------------------------------------------------------------------------- 1 type Describes the type of object: 'Car', 'Van', 'Truck', 'Pedestrian', 'Person_sitting', 'Cyclist', 'Tram', 'Misc' or 'DontCare' 1 truncated Float from 0 (non-truncated) to 1 (truncated), where truncated refers to the object leaving image boundaries 1 occluded Integer (0,1,2,3) indicating occlusion state: 0 = fully visible, 1 = partly occluded 2 = largely occluded, 3 = unknown 1 alpha Observation angle of object, ranging [-pi..pi] 4 bbox 2D bounding box of object in the image (0-based index): contains left, top, right, bottom pixel coordinates 3 dimensions 3D object dimensions: height, width, length (in meters) 3 location 3D object location x,y,z in camera coordinates (in meters) 1 rotation_y Rotation ry around Y-axis in camera coordinates [-pi..pi] 1 score Only for results: Float, indicating confidence in detection, needed for p/r curves, higher is better. Naturally, most of the parameters are not needed here. In reality, you can leave only the “bbox” parameter, the rest will not be used anyway.
As it turned out, for DIGITS there was also a second tutorial , where the file format was still signed. But he was not in the repository DIGITS ¯ \ _ (ツ) _ / ¯
It confirmed that my guesses about what to use were correct:
Begin to teach
The class. The base is made, we begin to train. For training you need to set the same settings as specified in the example :
- Subtract Mean to None
- base learning rate at 0.0001
- ADAM solver
- Choose your base
- Select the “Custom Network” tab. Copy the text from the file "/caffe-caffe-0.15/examples/kitti/detectnet_network.prototxt" into it (this is in the caffe from nvidia, of course).
- It is also recommended to download a pre-trained GoogleNet model here . Specify it in “Pretrained model (s)”
Also, I did the following. For the “detectnet_network.prototxt” copied mesh, I replaced all image size values “1248, 352” with image sizes from my base. Without this, learning fell. Well, naturally, there is no such thing in one tutorial ... ¯ \ _ (ツ) _ / ¯
Loss chart falls, training has gone. But ... The accuracy graph is at zero. What?!
None of the two tutorials that I found answered this question. Went to dig into the description of the grid. Where to dig, it was clear right away. Once the loss falls, the training is on. Error in validation pipeline. And really. In the network configuration there is a block:
layer { name: "cluster" type: "Python" bottom: "coverage" bottom: "bboxes" top: "bbox-list" python_param { module: "caffe.layers.detectnet.clustering" layer: "ClusterDetections" param_str: "1024, 640, 16, 0.05, 1, 0.02, 5, 1" } } It looks suspicious. Opening the description of the clustering layer you can find a comment:
# parameters - img_size_x, img_size_y, stride, # gridbox_cvg_threshold,gridbox_rect_threshold,gridbox_rect_eps,min_height,num_classes It becomes clear that these are thresholds. Zarandomil there 3 numbers without delving into the essence. Training went + began to grow validation. Hours for 5 reached some reasonable thresholds.
But here's a bummer. With successful training, 100% of the pictures were not distributed. I had to dig and understand what this layer means.
The layer implements the collection of the obtained hypotheses into a single solution. As the main tool, the OpenCV module “cv.groupRectangles” is used here. This is a function that associates groups of rectangles into one rectangle. As you remember, the network has such a structure that in the vicinity of the object there should be a lot of positives. They need to be collected in a single solution. The collection algorithm has a bunch of parameters.
- gridbox_cvg_threshold (0.05) - object detection threshold. Essentially the credibility of the fact that we found a number. The smaller - the more detections.
- gridbox_rect_threshold (1) - how many detectors should work for a “have a number” decision
- gridbox_rect_eps (0.02) - how many times the size of rectangles can be different to combine them into one hypothesis
- min_height - the minimum height of the object
Now it’s enough just to pick them up so that it all works. And now humor. Taki was also the third tutorial, where part of the whole thing is described.
But not all ¯ \ _ (ツ) _ / ¯
What is the result
As a result, you can see what the grid has allocated:
It works well. At first glance, better than the Haar that we used. But it immediately became clear that a small training base (~ 1500 frames) - makes itself felt. The database did not take into account dirty numbers => they are not detected. The database did not take into account the strong perspective numbers => they are not detected. Not considered too large / too small. Well, you understand. In short, you need not be lazy and mark out thousands of 5 numbers normally.
When recognizing, you can see funny pictures with activation cards ( 1 , 2 , 3 ). It can be seen that at each next level the number is seen more and more clearly.
How to start
Pleasant moment - the result can be run with a code of ~ 20 lines. And it will be a ready-made number detector:
import numpy as np import sys caffe_root = '../' # sys.path.insert(0, caffe_root + 'python') import caffe caffe.set_mode_cpu() # . : #caffe.set_device(0) #caffe.set_mode_gpu() model_def = caffe_root + 'models/DetectNet/deploy.prototxt' # model_weights = caffe_root + 'models/DetectNet/DetectNet.caffemodel' # net = caffe.Net(model_def, # defines the structure of the model model_weights, # contains the trained weights caffe.TEST) # use test mode (eg, don't perform dropout) # mean=np.array([128.0,128.0,128.0]) transformer = caffe.io.Transformer({'data': net.blobs['data'].data.shape}) transformer.set_transpose('data', (2,0,1)) # move image channels to outermost dimension transformer.set_mean('data', mean) # subtract the dataset-mean value in each channel transformer.set_raw_scale('data', 255) # rescale from [0, 1] to [0, 255] transformer.set_channel_swap('data', (2,1,0)) # swap channels from RGB to BGR # net.blobs['data'].reshape(1, # batch size 3, # 3-channel (BGR) images 640, 1024) # image size is 227x227 image = caffe.io.load_image('/media/anton/Bazes/ReInspect/CARS/test/0.jpg')# transformed_image = transformer.preprocess('data', image)# output = net.forward() # output_prob = output['bbox-list'][0] # print output_prob[0] Here I posted a file for the grid and the weight of the trained network, if anyone needs it.
Source: https://habr.com/ru/post/312472/
All Articles