Dive into the blockchain technology: Fast and secure transactions
We present you a series of articles about the first Russian projects developed on the basis of blockchain technology. We asked the participating teams of the InspiRussia hackathon about the technological component of their decisions.
This material focuses on the hackathon winners - a project from the Modbank Bank development team, which solves existing problems in the banking sector and helps to make quick and secure transactions between legal entities.
1. A series of materials on Emer technology:
1.1. The secrets of EmerCoin .
1.2. Decentralized uncensored domain name system .
1.3. Worldwide public key infrastructure .
1.4. Decentralized password-free security system .
2. Fast and secure transactions .
3. Ecosystem of digital dentistry .
4. Combating counterfeit goods .
5. Mutual insurance of animals .
6. What is ICO and how to conduct it .
7. Loading ...
')
Since representatives of the project work in the banking sector, they are familiar with the problem of settlement between legal entities: this process can take up to three days, which is extremely long for small businesses and dynamic entrepreneurs. In addition, banks today have another problem: a part of non-cash payments between companies is the “transit” of black money. This is usually very difficult to determine, because there is no chain to go through the transaction and the connection between them. There is no history of movement of money in other banks. Banks come up with various analytical algorithms to identify such transactions. But they are often mistaken, because there is not enough data for a full analysis. In turn, the blockchain network implies a single distributed transaction repository. This means that each payment will remain forever in a single database of funds movement, therefore the entire cash flow is always available for analysis.
The problem of speed of payments is solved by the fact that transactions in the blockchain occur instantly. The only slowing factor can be the time that the receiving party will wait for confirmation of this transaction, as they come from other members of the network - PoW.
The security of transactions is ensured by the fact that the calculated checksum of the previous block is embedded in the blockchain, so that each block has a link to the previous one. We believe that thanks to this feature, the blockchain technology will significantly and even radically increase the transparency of transactions and make the verification procedures (in terms of combating money laundering and terrorist financing) simple and effective.
On the hackathon, a solution was tested that simplifies the analysis of cash flow between accounts: when a transaction went through each account, “money” was marked with a special unique label of this account. Therefore, every ruble that passes through the network can pull not only the tail of all tags, but also the sequence of all accounts through which it has passed. Together with the other advantages of the blockchain network (speed, security, single transaction base), this solution eliminates the non-transparent flow of money and allows you to unambiguously restore the route of their movement at any time within a financial consortium.
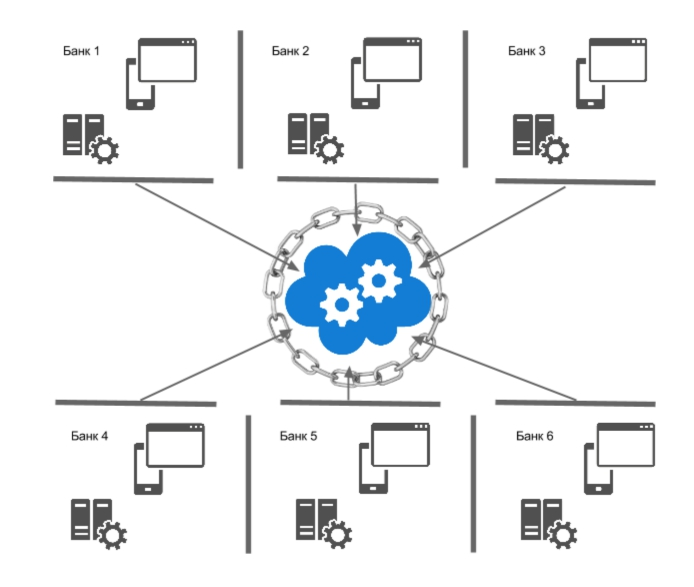
The key goal of the team was to show that their idea was working for the end user, so for clarity, they created: a client application for a mobile device, a web application for the bank and regulators. For the back-end, it was decided to deploy the Ethereum network (a platform for creating blockchain-based decentralized online services) based on the Azure Blockchain as a Service.
Mobile application for iOS for translation was created on Objective-C. Web monitoring applications - on Angular. For back-end integration, C # language and Visual Studio tools were used.
The architecture of the implemented system is quite simple. Below you can see it.
Microsoft Azure was chosen because there is a ready-made template for deploying all the necessary infrastructure for Ethereum - DevTest Labs for Blockchain as a Service. This template expands into Azure a virtual machine on Ubuntu, within which the Ethereum network is deployed from the standard repository, after which the parameters of its work are configured using artifacts.
Since to connect client applications with the Ethereum network, .NET WebApi was used, it is extremely convenient to use Nethereum - a ready-made solution for accessing the Ethereum network. The main advantage of Ethereum for the current solution is programmable smart contracts. To create them there is a handy tool Solidity extension for Visual Studio. An additional advantage is that the back-end application can also be easily deployed to a web service in Azure.
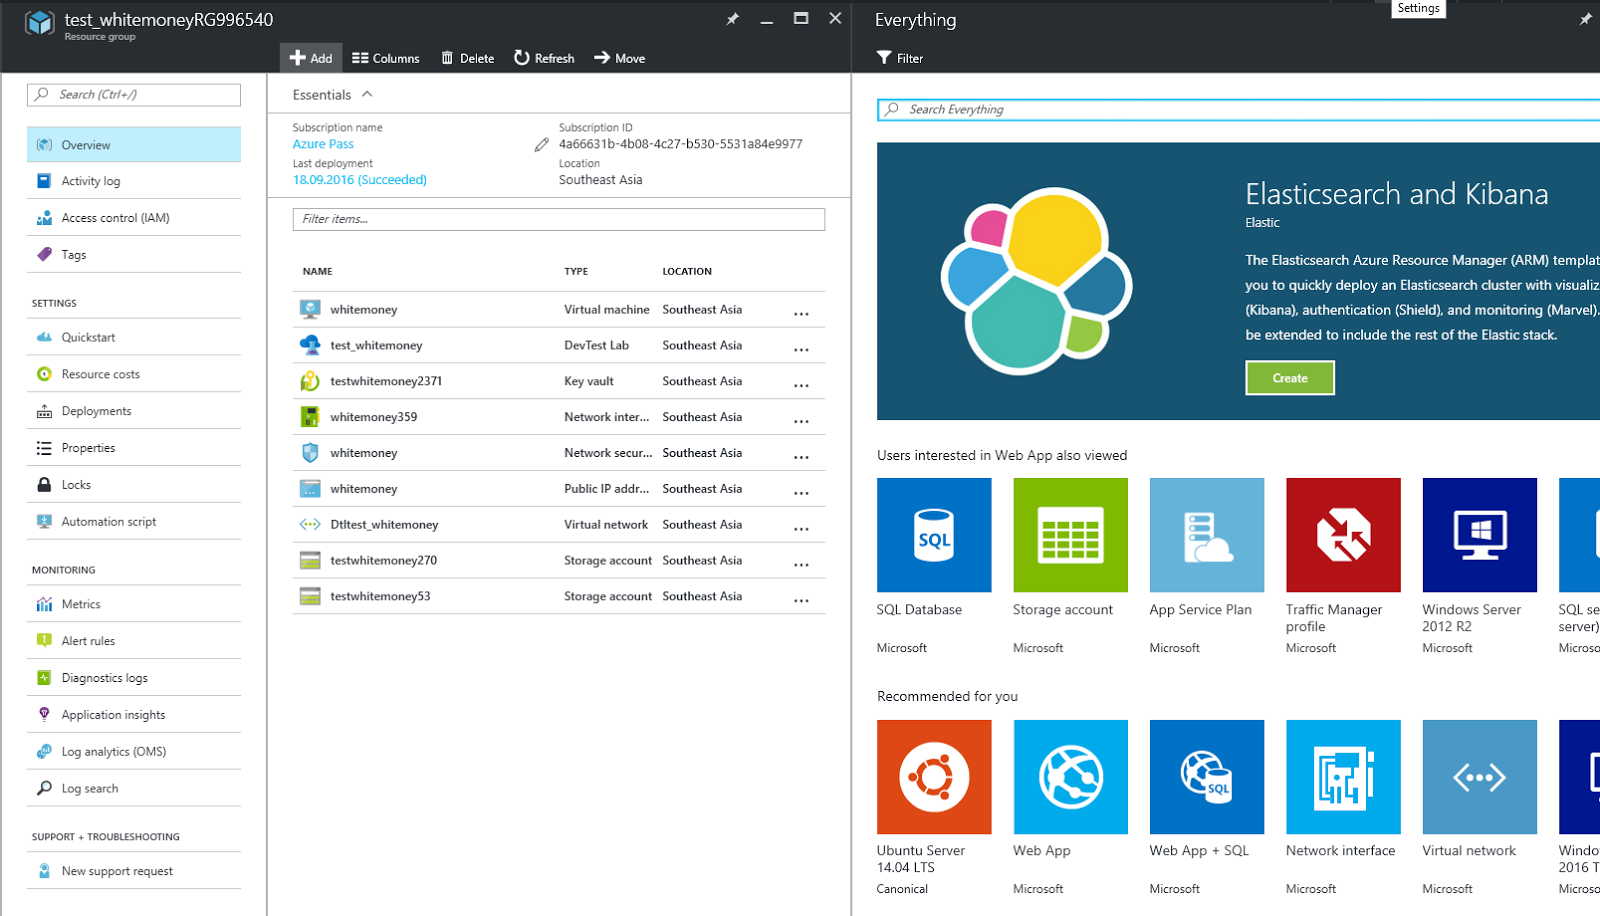
The most difficult and at the same time interesting task was to deploy the blockchain network. For this, the DevTest Labs template was used, allowing you to deploy Ethereum to Azure with a minimum of effort, since many things happen automatically in it.

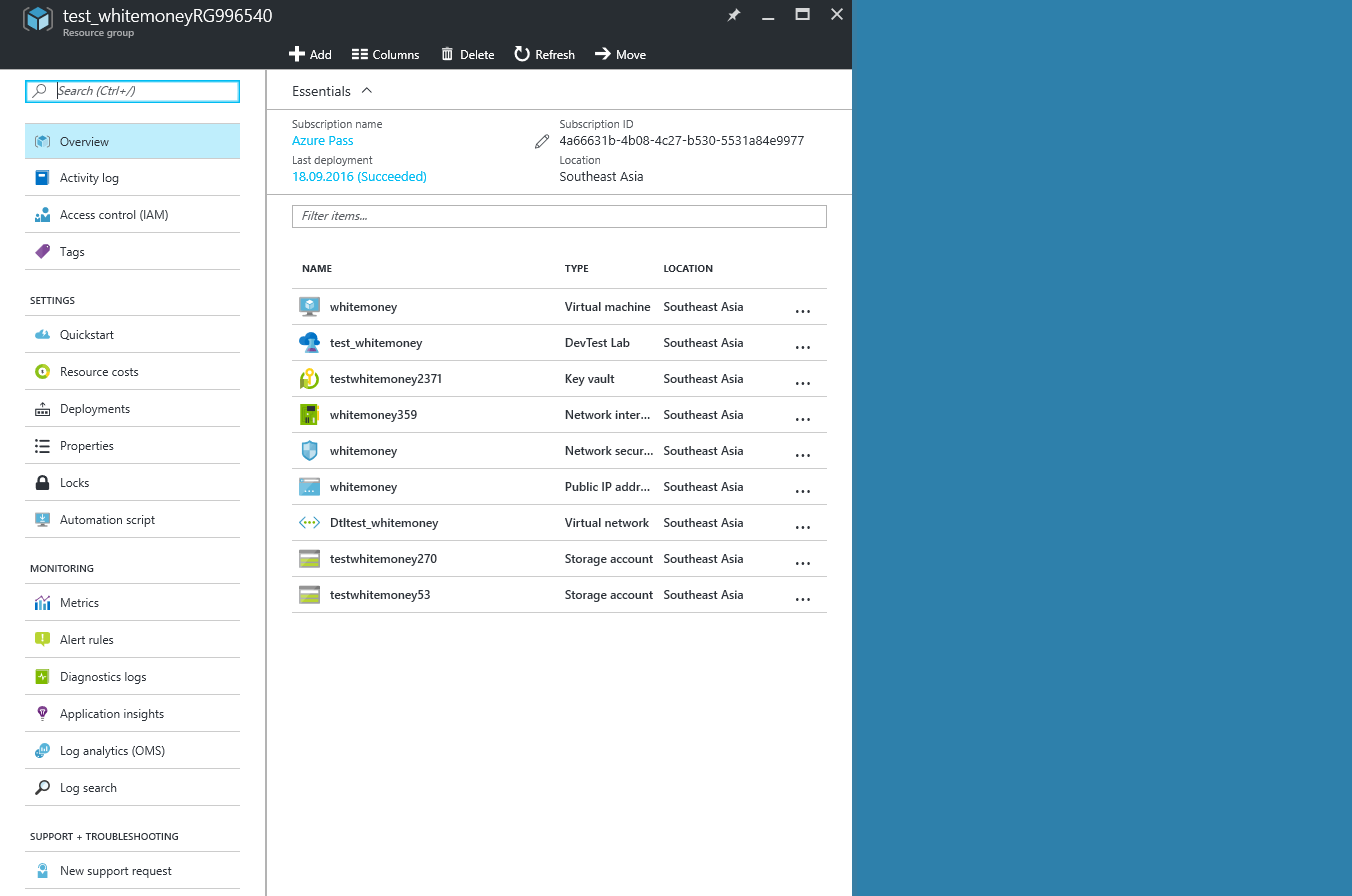
In fact, when it is used, a resource group is created that is fully ready for the deployment of the Ethereum network. But! It does not create a virtual machine. The solution is simple - clicking on Add simply select and add a new resource - a virtual machine on Ubuntu Server 14.04:
After about 5 minutes, you will see a ready environment for deploying the blockchain network:
Note: it is worth mentioning here that the deployment of the Ethereum network can be carried out in fully automatic mode by connecting artifacts before creating a virtual machine. This method is described in this article. But within the Azure test account provided for the hackathon, this feature was not available. Therefore, the network was deployed manually.
Next, using prepared scripts , hooking to the virtual machine via an SSH client, execute several commands (add the Ethereum repository, update the list of packages, install Ethereum):
Next you need to run it all. To do this, send the scripts to the virtual machine using the command:
Next, run the Ethereum network by running:
Here, the network uses the genesis file
After that we create the first account:
And start mining:
As a result, we see the launch of the mining process - new blocks are being created in the network. Now they are without transactions:
Note: Please note that if the mining does not happen on the network, the network does not consider the transactions created in it to be confirmed.
Now that the virtual machines are ready, you can dive into the “network” itself. In order not to stop mining, we connect to it in a parallel session. The command to connect is given in the

Note: in fact, this is a pretty impressive amount for Homestead "production". At the time of the hackathon, the cost of one ether was close to C $ 17.
In order to deploy a distributed blockchain network, at least one more virtual machine (node) will be needed. To raise the second node of our network, you need to perform all actions similar to the creation of the main node.
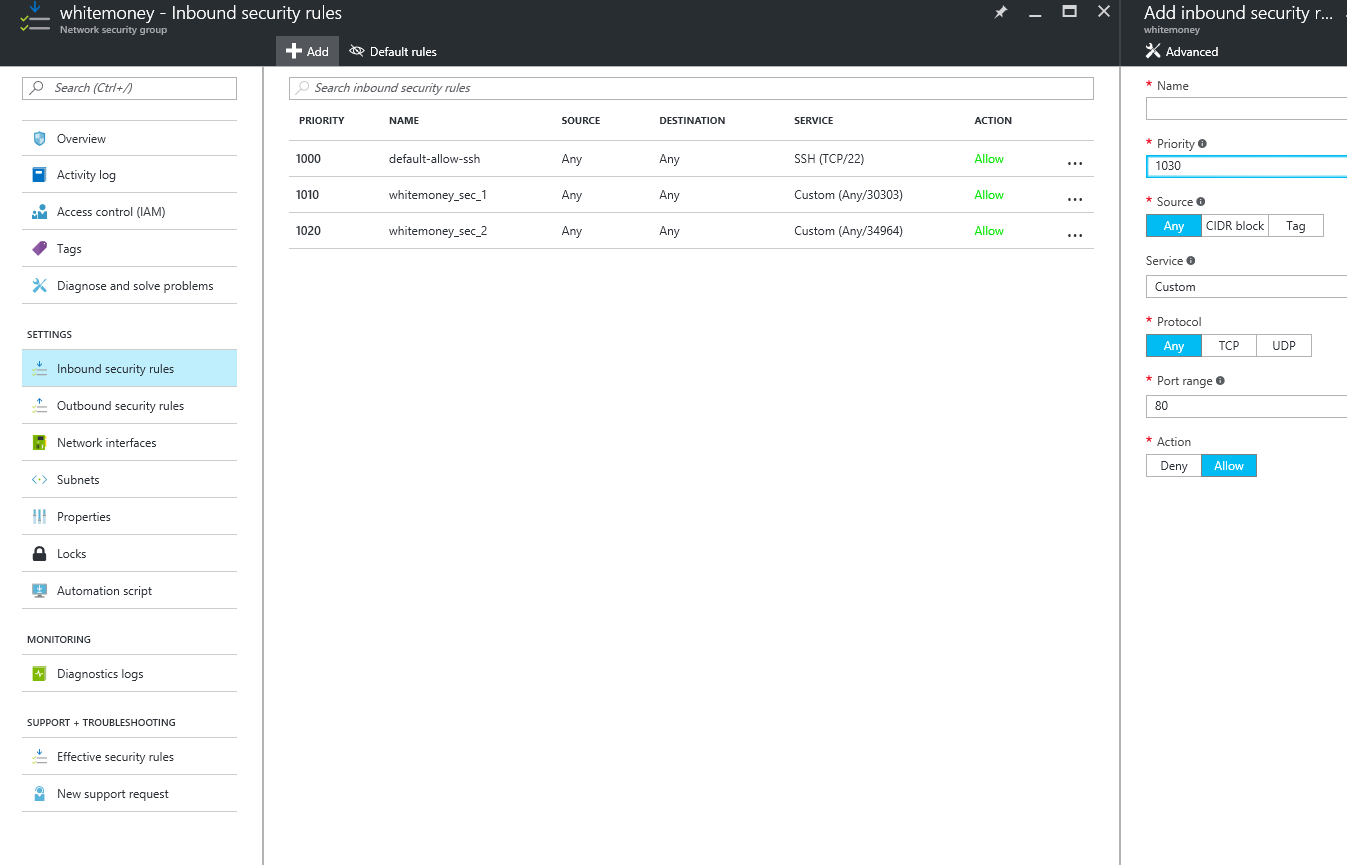
In addition, in Azure, in the Network security group section, you must open the outgoing and incoming ports on which the Ethereum network is running. In the section Inbound security rules we open ports 30303 and 34964:
Now let's link the nodes so that they see each other on the network. To do this, you need to submit one node to another by entering a command, within the context of connecting one of the nodes:
To find out the ID of the node being represented, you need to execute the following command as part of the connection to it:

So, now we have a distributed blockchain network and we can start transferring cryptocurrency between accounts.
To make it more interesting, create more accounts:

As a result, we get:

Now we can transfer ether between them, but there is one nuance - in order to transfer money from one account to another, you need to unlock the account from which we will make the transfer. The lock on the account is set automatically. This is done to ensure the security of your account.
Here, the first argument is the address of the account, the second is the password, and the last argument is the time at which the account will be unblocked (if you specify 0, the account will be unblocked for the lifetime of this connection to the Ethereum network). If the connection is interrupted, the account is immediately blocked.

Moving on to create a transaction:
In this case, we translate 1 air between accounts. In response to the call, if everything went well, the transaction address will be returned:

At this address you can request the data that the transaction contains:
Now let's see the balance on the destination account:

We see that the network is functioning successfully. Now we attach client applications to it. To do this, you can use the SSH client. Usage example:
This is the part of the code in which funds are transferred from one account to another, using the
In industrial applications, everything will be much more complicated, since it is necessary to introduce and develop intelligent analytical algorithms that allow you to establish the full path of funds movement from one account to another. And also, it will be necessary to take into account the interaction of this solution on the blockchain platform with already existing services within the bank.
In this article, we have demonstrated only transfers ether between accounts. Ways with the help of which marked transfers ether from one account to another - already the topics of future articles.
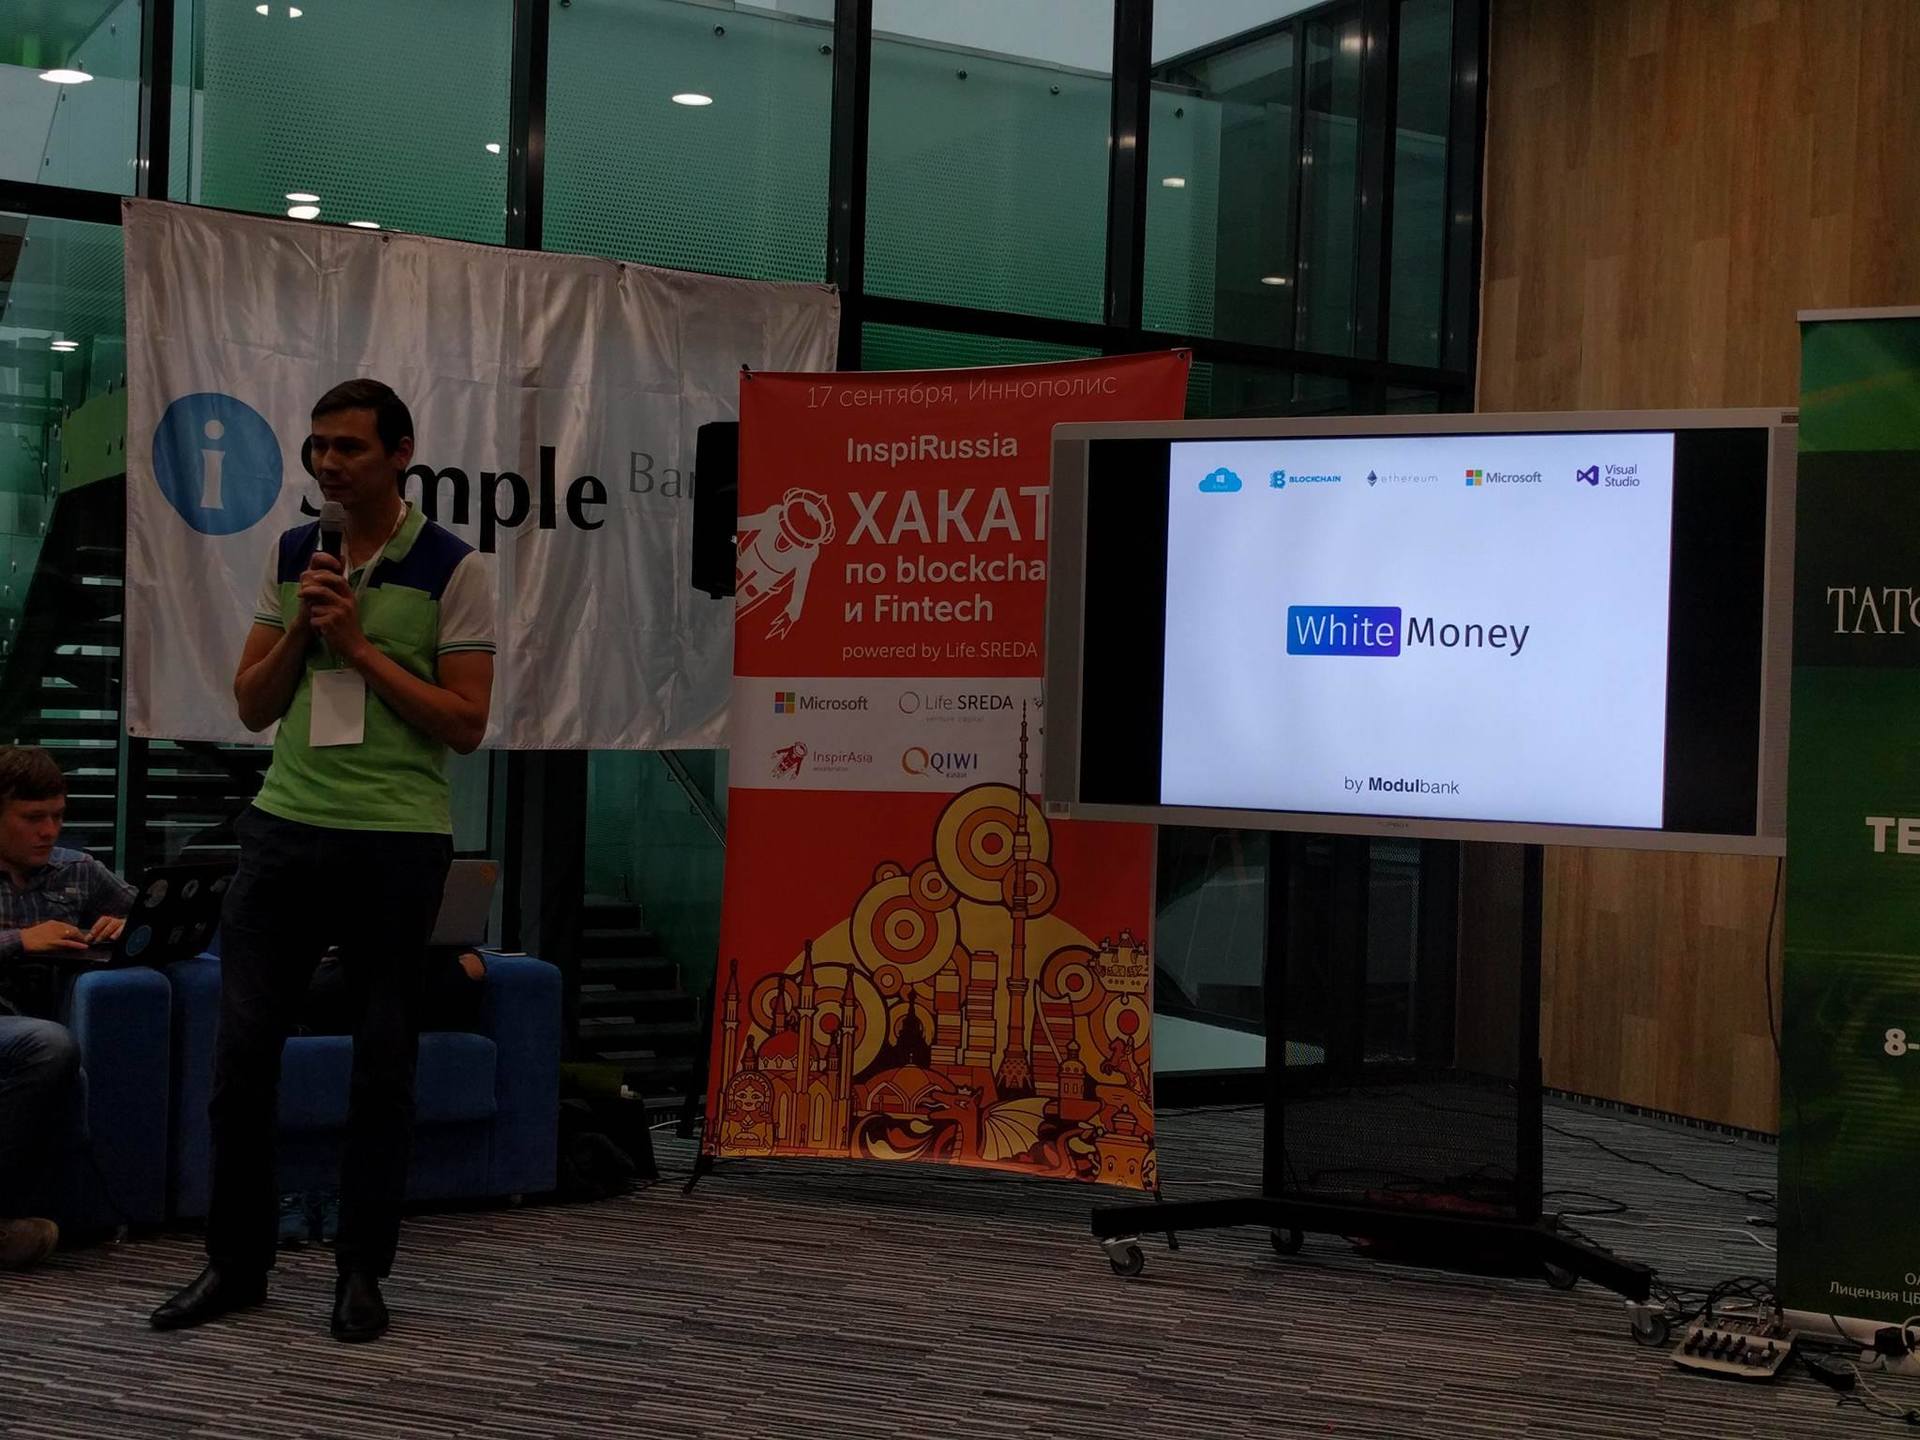
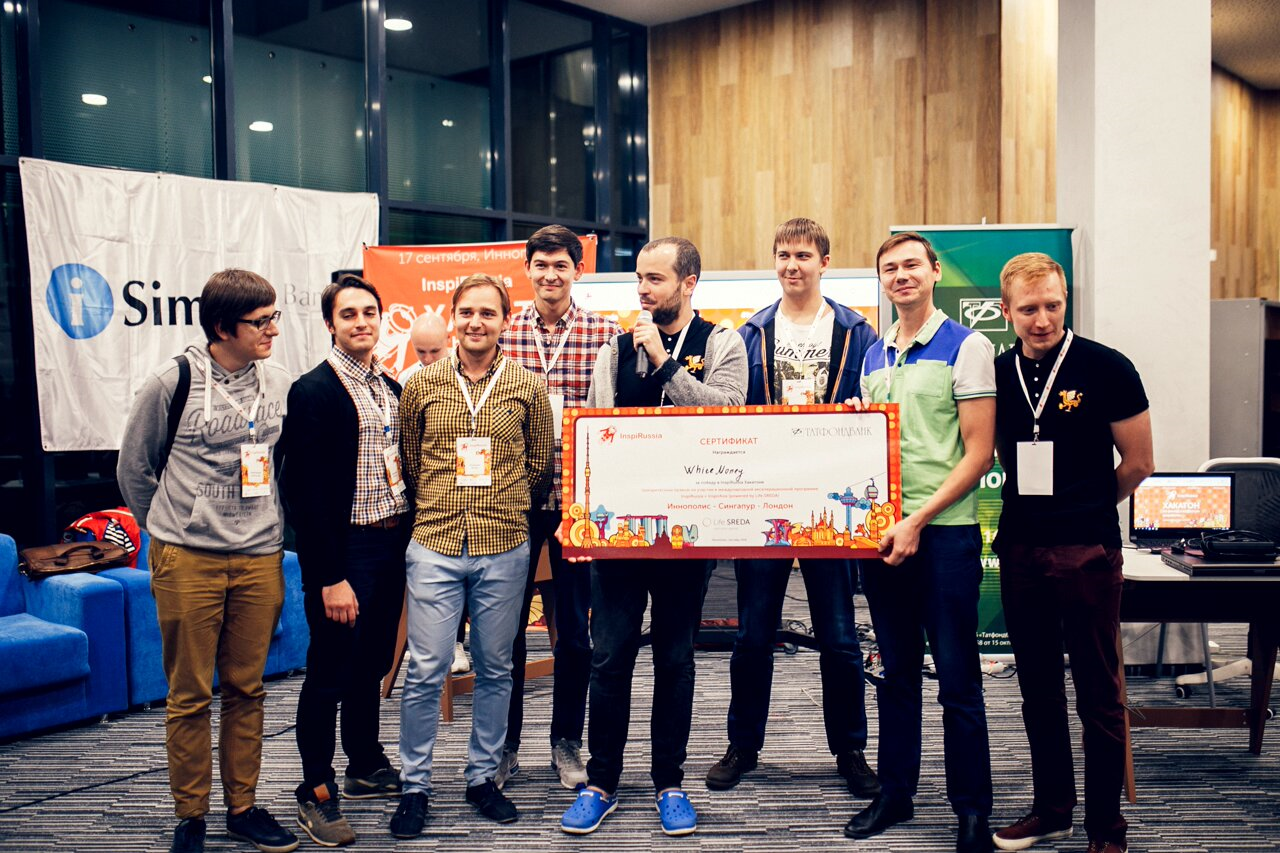
In the photo below, the authors of the material: Lyovin Denis, Anastasiev Svyatoslav, Andrei Varikov, - the Modbank Bank development team.
This material focuses on the hackathon winners - a project from the Modbank Bank development team, which solves existing problems in the banking sector and helps to make quick and secure transactions between legal entities.
The series of articles "Immersion in technology blockchain"
1. A series of materials on Emer technology:
1.1. The secrets of EmerCoin .
1.2. Decentralized uncensored domain name system .
1.3. Worldwide public key infrastructure .
1.4. Decentralized password-free security system .
2. Fast and secure transactions .
3. Ecosystem of digital dentistry .
4. Combating counterfeit goods .
5. Mutual insurance of animals .
6. What is ICO and how to conduct it .
7. Loading ...
')
Banking problems that can be solved using blockchain technology
Since representatives of the project work in the banking sector, they are familiar with the problem of settlement between legal entities: this process can take up to three days, which is extremely long for small businesses and dynamic entrepreneurs. In addition, banks today have another problem: a part of non-cash payments between companies is the “transit” of black money. This is usually very difficult to determine, because there is no chain to go through the transaction and the connection between them. There is no history of movement of money in other banks. Banks come up with various analytical algorithms to identify such transactions. But they are often mistaken, because there is not enough data for a full analysis. In turn, the blockchain network implies a single distributed transaction repository. This means that each payment will remain forever in a single database of funds movement, therefore the entire cash flow is always available for analysis.
Payment rate
The problem of speed of payments is solved by the fact that transactions in the blockchain occur instantly. The only slowing factor can be the time that the receiving party will wait for confirmation of this transaction, as they come from other members of the network - PoW.
Transaction security
The security of transactions is ensured by the fact that the calculated checksum of the previous block is embedded in the blockchain, so that each block has a link to the previous one. We believe that thanks to this feature, the blockchain technology will significantly and even radically increase the transparency of transactions and make the verification procedures (in terms of combating money laundering and terrorist financing) simple and effective.
On the hackathon, a solution was tested that simplifies the analysis of cash flow between accounts: when a transaction went through each account, “money” was marked with a special unique label of this account. Therefore, every ruble that passes through the network can pull not only the tail of all tags, but also the sequence of all accounts through which it has passed. Together with the other advantages of the blockchain network (speed, security, single transaction base), this solution eliminates the non-transparent flow of money and allows you to unambiguously restore the route of their movement at any time within a financial consortium.
Implementation of the idea
The key goal of the team was to show that their idea was working for the end user, so for clarity, they created: a client application for a mobile device, a web application for the bank and regulators. For the back-end, it was decided to deploy the Ethereum network (a platform for creating blockchain-based decentralized online services) based on the Azure Blockchain as a Service.
Mobile application for iOS for translation was created on Objective-C. Web monitoring applications - on Angular. For back-end integration, C # language and Visual Studio tools were used.
The architecture of the implemented system is quite simple. Below you can see it.
Why Microsoft Azure?
Microsoft Azure was chosen because there is a ready-made template for deploying all the necessary infrastructure for Ethereum - DevTest Labs for Blockchain as a Service. This template expands into Azure a virtual machine on Ubuntu, within which the Ethereum network is deployed from the standard repository, after which the parameters of its work are configured using artifacts.
Why Ethereum?
Since to connect client applications with the Ethereum network, .NET WebApi was used, it is extremely convenient to use Nethereum - a ready-made solution for accessing the Ethereum network. The main advantage of Ethereum for the current solution is programmable smart contracts. To create them there is a handy tool Solidity extension for Visual Studio. An additional advantage is that the back-end application can also be easily deployed to a web service in Azure.
Deploying the blockchain network
The most difficult and at the same time interesting task was to deploy the blockchain network. For this, the DevTest Labs template was used, allowing you to deploy Ethereum to Azure with a minimum of effort, since many things happen automatically in it.
In fact, when it is used, a resource group is created that is fully ready for the deployment of the Ethereum network. But! It does not create a virtual machine. The solution is simple - clicking on Add simply select and add a new resource - a virtual machine on Ubuntu Server 14.04:
After about 5 minutes, you will see a ready environment for deploying the blockchain network:
Note: it is worth mentioning here that the deployment of the Ethereum network can be carried out in fully automatic mode by connecting artifacts before creating a virtual machine. This method is described in this article. But within the Azure test account provided for the hackathon, this feature was not available. Therefore, the network was deployed manually.
Next, using prepared scripts , hooking to the virtual machine via an SSH client, execute several commands (add the Ethereum repository, update the list of packages, install Ethereum):
sudo add-apt-repository -y ppa:ethereum/ethereum sudo apt-get update sudo apt-get install ethereum Next you need to run it all. To do this, send the scripts to the virtual machine using the command:
pscp "C:\path to your scripts folder\*" <username>@<server_ip>:./ Next, run the Ethereum network by running:
sh seed-blockchain.sh Here, the network uses the genesis file
lab-seed.json , which contains the following: { "config": { "homesteadBlock": 10 }, "alloc": {}, "nonce": "0x0000000000000042", "difficulty": "0x0400", "mixhash": "0x00000000000000000000000000000000000000647572616c65787365646c6578", "coinbase": "0x0000000000000000000000000000000000000000", "timestamp": "0x00", "parentHash": "0x0000000000000000000000000000000000000000000000000000000000000000", "extraData": "0x11bbe8db4e347b4e8c937c1c8370e4b5ed33adb3db69cbdb7a38e1e50b1b82ee", "gasLimit": "0x4c4b40" } After that we create the first account:
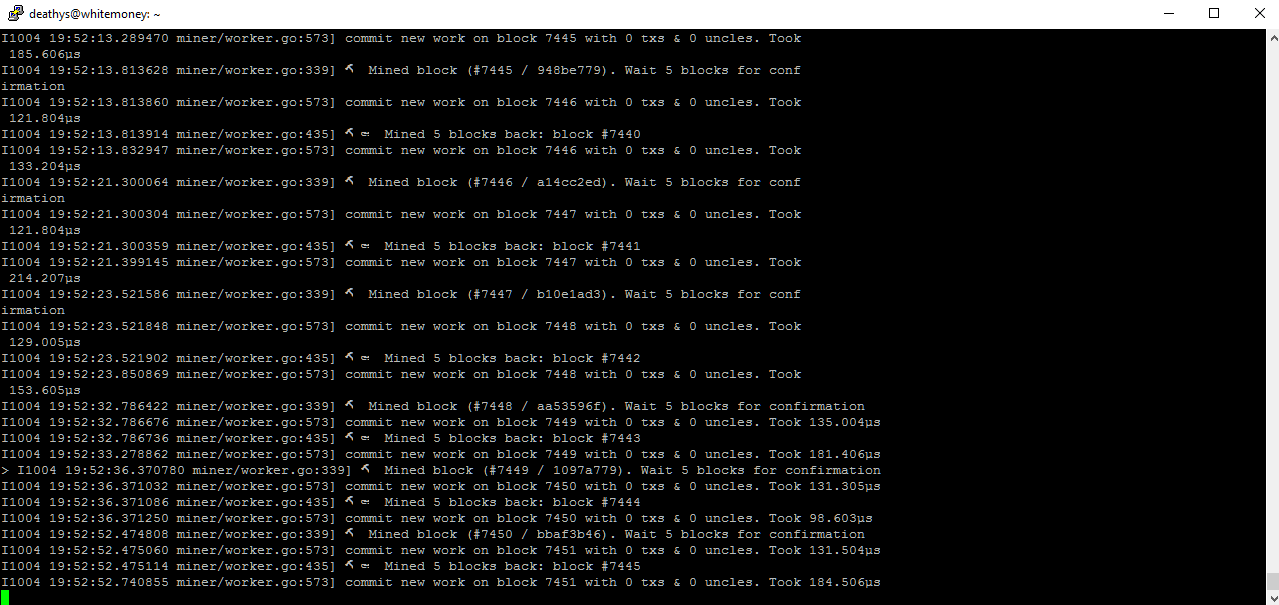
geth --datadir "chains/devtest" account new And start mining:
geth --mine --identity "Node1" --datadir "/home/deathys/chains/devtest/" --nodiscover --rpc --rpccorsdomain "*" --networkid 552 console As a result, we see the launch of the mining process - new blocks are being created in the network. Now they are without transactions:
Note: Please note that if the mining does not happen on the network, the network does not consider the transactions created in it to be confirmed.
Now that the virtual machines are ready, you can dive into the “network” itself. In order not to stop mining, we connect to it in a parallel session. The command to connect is given in the
attachOne.sh script. Since mining is in full swing, we get a reward for it on the air - the standard currency of the network. At the moment, we have the following number of esters for testing solutions:Note: in fact, this is a pretty impressive amount for Homestead "production". At the time of the hackathon, the cost of one ether was close to C $ 17.
Blockchain distributed network
In order to deploy a distributed blockchain network, at least one more virtual machine (node) will be needed. To raise the second node of our network, you need to perform all actions similar to the creation of the main node.
In addition, in Azure, in the Network security group section, you must open the outgoing and incoming ports on which the Ethereum network is running. In the section Inbound security rules we open ports 30303 and 34964:
Now let's link the nodes so that they see each other on the network. To do this, you need to submit one node to another by entering a command, within the context of connecting one of the nodes:
admin.addPeer("enode://<nodeid>@<ip address>:30303") To find out the ID of the node being represented, you need to execute the following command as part of the connection to it:
admin.nodeInfo.enode So, now we have a distributed blockchain network and we can start transferring cryptocurrency between accounts.
To make it more interesting, create more accounts:
personal.newAccount() As a result, we get:
Now we can transfer ether between them, but there is one nuance - in order to transfer money from one account to another, you need to unlock the account from which we will make the transfer. The lock on the account is set automatically. This is done to ensure the security of your account.
personal.unlockAccount('0xa2081622fcc99aec3c1efb575b548c90bdadf8cf','12345678', 0) Here, the first argument is the address of the account, the second is the password, and the last argument is the time at which the account will be unblocked (if you specify 0, the account will be unblocked for the lifetime of this connection to the Ethereum network). If the connection is interrupted, the account is immediately blocked.
Moving on to create a transaction:
eth.sendTransaction({from: “0xa2081622fcc99aec3c1efb575b548c90bdadf8cf", to: "0x847a20cdec0b3ba98aced771bd1df7e8a2e004f5", value: web3.toWei(1, "ether")}) In this case, we translate 1 air between accounts. In response to the call, if everything went well, the transaction address will be returned:
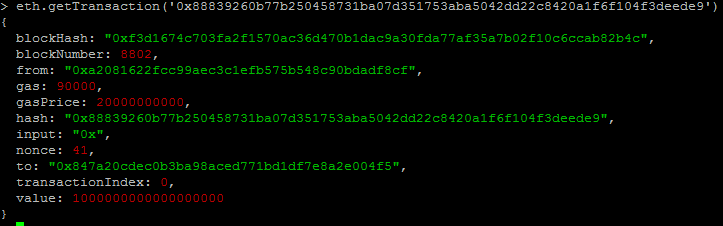
At this address you can request the data that the transaction contains:
eth.getTransaction('0x88839260b77b250458731ba07d351753aba5042dd22c8420a1f6f104f3deede9') Now let's see the balance on the destination account:
We see that the network is functioning successfully. Now we attach client applications to it. To do this, you can use the SSH client. Usage example:
using (var client = new SshClient(hostUrl, 22, userName, pass)) { client.Connect(); string commStr = @"curl http://localhost:8545 -X POST --data '{""method"": ""eth_sendTransaction"", ""params"": [{ ""from"": ""0xa2081622fcc99aec3c1efb575b548c90bdadf8cf"", ""to"": ""0x847a20cdec0b3ba98aced771bd1df7e8a2e004f5"", ""gas"": ""0x76c0"", ""gasPrice"": ""0x9184e72a000"", ""value"": ""0x9184e72a"", ""data"": ""bla bla"" }], ""id"":1}'"; var comm = client.RunCommand(commStr); client.Disconnect(); } This is the part of the code in which funds are transferred from one account to another, using the
curl command — essentially an RPC request to our network. In response, we get the result of executing the command in JSON format with the data of the created transaction.Conclusion
In industrial applications, everything will be much more complicated, since it is necessary to introduce and develop intelligent analytical algorithms that allow you to establish the full path of funds movement from one account to another. And also, it will be necessary to take into account the interaction of this solution on the blockchain platform with already existing services within the bank.
In this article, we have demonstrated only transfers ether between accounts. Ways with the help of which marked transfers ether from one account to another - already the topics of future articles.
In the photo below, the authors of the material: Lyovin Denis, Anastasiev Svyatoslav, Andrei Varikov, - the Modbank Bank development team.
Source: https://habr.com/ru/post/312308/
All Articles