@ActivityScope with Dagger 2
Hi, Habr! I want to share the experience of creating an ActivityScope. Those examples that I saw on the Internet, in my opinion, are not sufficiently complete, irrelevant, artificial and do not take into account some of the nuances of practical development.
The article assumes that the reader is already familiar with Dagger 2 and understands what a component is, a module, an injection, and an object graph and how it all works together. Here we, first of all, will concentrate on creating an ActivityScope and on how to link it to the fragments.
So, let's go ... What is the scope?
')
Scope is a Dagger 2 mechanism that allows you to save a certain set of objects that has its own life cycle. In other words, a scop is an object graph having its own lifetime, which depends on the developer.
By default, Dagger 2 out of the box provides us with support for the javax.inject.Singleton scop. As a rule, objects in this scopa exist exactly as long as the instance of our application exists.
In addition, we are not limited in the possibility of creating our own additional scopes. A good example of a custom scop can be the UserScope , whose objects exist as long as the user is authorized in the application. As soon as the user's session ends, or the user explicitly exits the application, the object graph is destroyed and re-created at the next authorization. In this scoop it is convenient to store objects associated with a specific user and not having meaning for other users. For example, some AccountManager that allows you to view lists of accounts of a particular user.
The figure shows an example of the Singleton and UserScope life cycle in an application.
Hopefully we figured out a bit with the scopes.
We now turn to our example - ActivityScope . In real Android applications, ActivityScope can be extremely useful. Still would! It is enough to imagine some complex screen consisting of a heap of classes: five different fragments, a lot of adapters, helpers and presenters. In this case, it would be ideal to “fumble” between them a model and / or business logic classes, which should be common.
 There are 3 options for solving this problem:
Let's take a step-by-step how to create and use an ActivityScope with Dagger 2.
So, to create a custom skopa you need:
The interface of our demo application will consist of two ActivityA and ActivityB screens and a common fragment used by both SharedFragment activities .

The application will have 2 scopes: Singleton and ActivityScope .
Conventionally, all our beans can be divided into 3 groups:
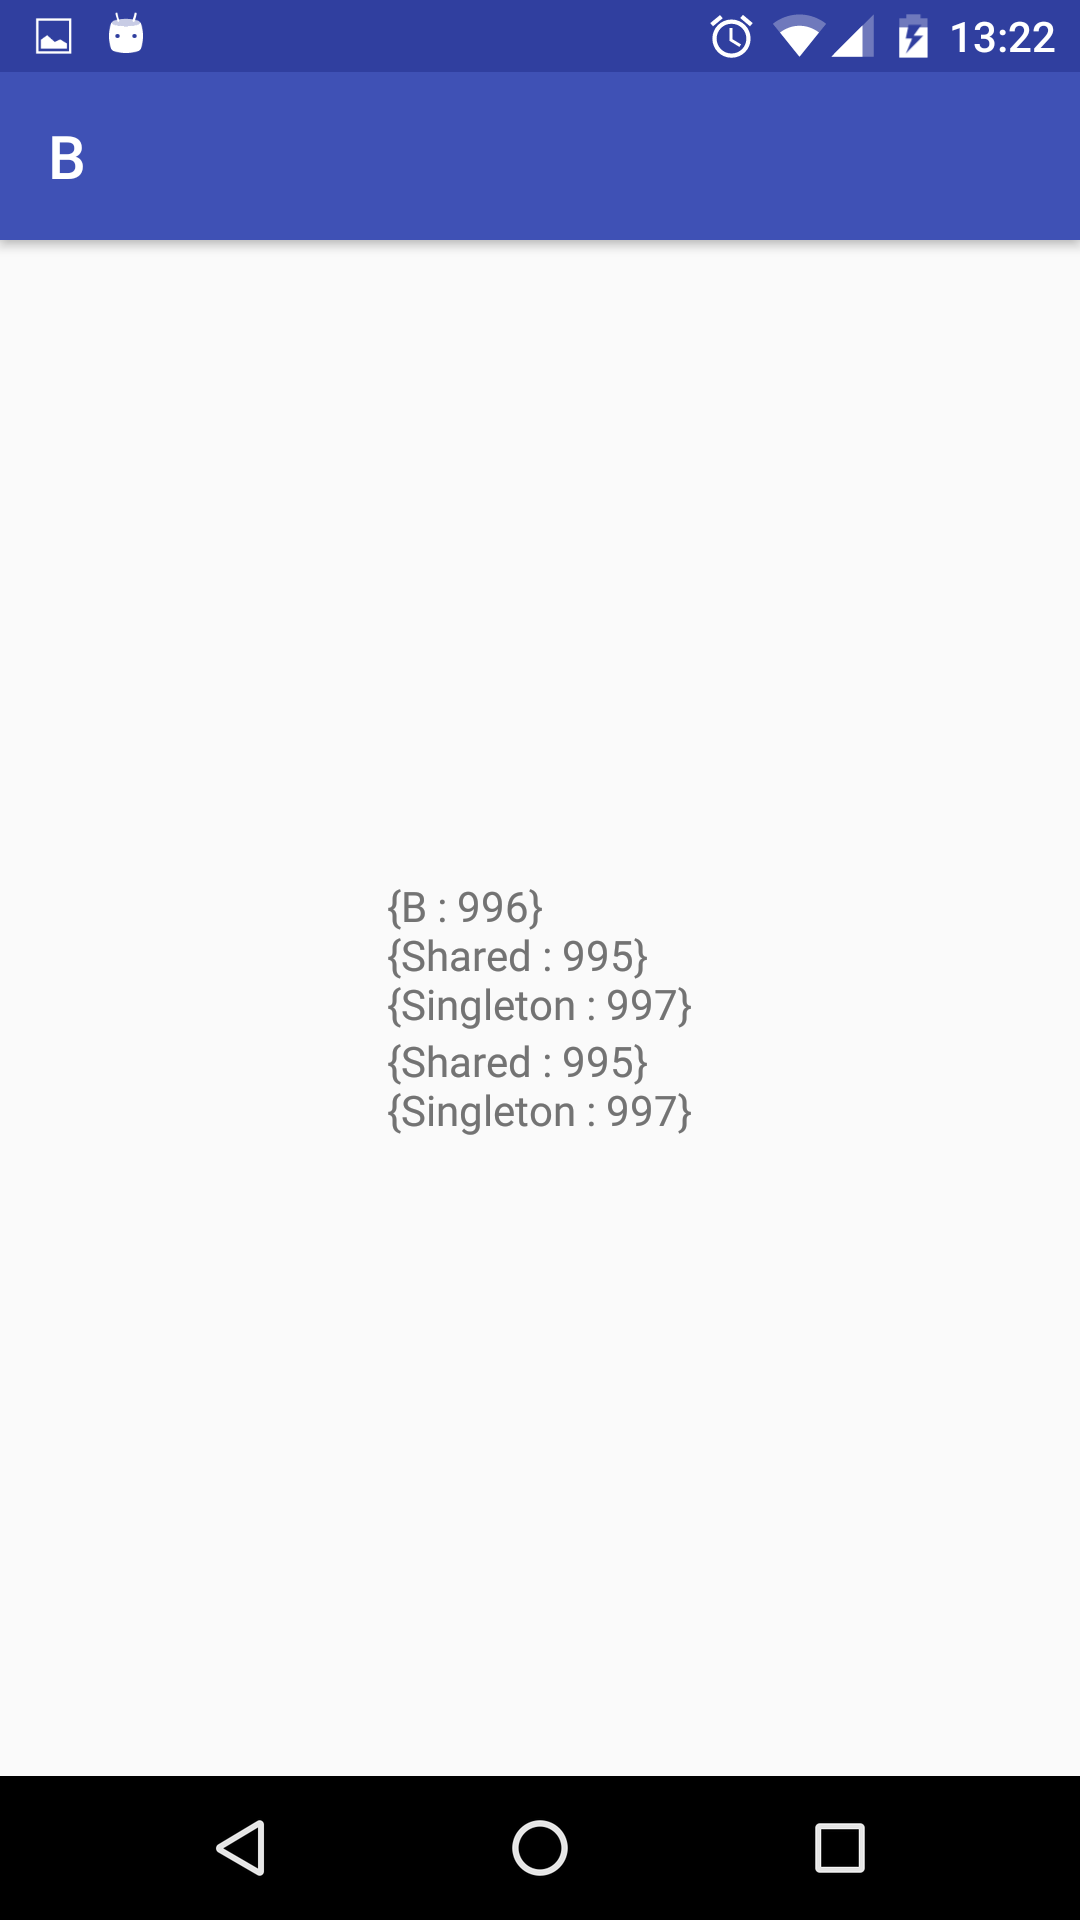
Each bin gets a unique id when created. This allows you to visually understand whether the skup works as intended, because each new instance of the bean will have an id that is different from the previous one.
Thus, in the application there will be 3 object graphs (3 components)

Let's turn to implementation. First we connect Dagger 2 to our project. To do this, connect the android-apt plugin in the root build.gradle ...
and Dagger 2 itself in app / build.gradle
Next, we announce the module that will provide singletons
and the singleton component:
We create an injector - the only singleton in our application, which we will manage, and not Dagger 2, and which will hold the Singleton scop dagger and be responsible for the injection.
We declare ActivityScope . In order to declare your scop, you need to create an annotation with the name of the scop and mark it with the annotation javax.inject.Scope .
Group the beans into modules: shared and for activities
We declare the corresponding components of activities. In order to implement a component that will include objects of another component, there are 2 ways: subcomponents and component dependencies . In the first case, the child components have access to all objects of the parent component automatically. In the second, in the parent component, you must explicitly specify the list of objects that we want to export to the children. Within one application, in my opinion, it is more convenient to use the first option.
In the created subcomponents, we declare injection points. In our example there are two such points: Activity and SharedFragment . They will have shared SharedBean shared beans .
Subcomponent instances are obtained from the parent component by adding objects from the subcomponent module to an existing graph. In our example, the parent component is SingletonComponent , we will add methods for creating subcomponents to it.
That's all. The entire infrastructure is ready, it remains to instantiate the declared components and inject dependencies. Let's start with a fragment.
The fragment is used immediately within two different activities, so it does not need to know specific details about the activity within which it is located. However, we need access to the activation component in order to gain access to the graph of objects of our scopes through it. To solve this “problem”, we use the Inversion of Control pattern, creating an intermediate interface, InjectorProvider , through which interaction with activities will be built.
It remains to instantiate the components of the ActivityScope level within each of the activities and project the activity and the fragment contained within it.
I will voice again the main points:
At first glance it may seem that to implement such a simple task it is necessary to write a lot of glue code. In the demo application, the number of classes that perform “work” (bins, fragments, and activities) is approximately comparable to the number of “linking” Dagger classes. But:
»A demo project is available on github
All Dagger and happy coding! :)
The article assumes that the reader is already familiar with Dagger 2 and understands what a component is, a module, an injection, and an object graph and how it all works together. Here we, first of all, will concentrate on creating an ActivityScope and on how to link it to the fragments.
So, let's go ... What is the scope?
')
Scope is a Dagger 2 mechanism that allows you to save a certain set of objects that has its own life cycle. In other words, a scop is an object graph having its own lifetime, which depends on the developer.
By default, Dagger 2 out of the box provides us with support for the javax.inject.Singleton scop. As a rule, objects in this scopa exist exactly as long as the instance of our application exists.
In addition, we are not limited in the possibility of creating our own additional scopes. A good example of a custom scop can be the UserScope , whose objects exist as long as the user is authorized in the application. As soon as the user's session ends, or the user explicitly exits the application, the object graph is destroyed and re-created at the next authorization. In this scoop it is convenient to store objects associated with a specific user and not having meaning for other users. For example, some AccountManager that allows you to view lists of accounts of a particular user.
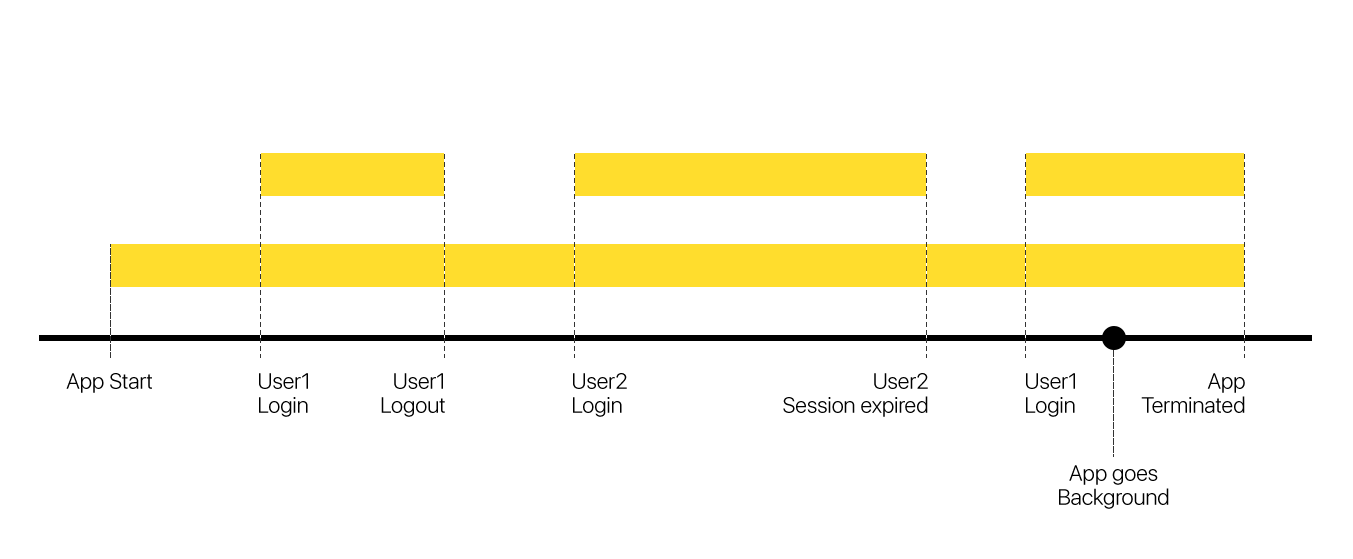
The figure shows an example of the Singleton and UserScope life cycle in an application.
- At startup, a singleton scop is created, the lifetime of which equals the lifetime of the application. In other words, objects belonging to Singleton will exist until the system destroys and unloads our application from memory.
- After starting the application, User1 is authorized in the application. At this point, a UserScope is created, containing objects that have meaning for this user.
- After some time, the user decides to "log out" and logs out of the application.
- Now User2 is authorized and this initiates the creation of UserScope objects for the second user.
- When a user session expires, it will destroy the object graph.
- User1 returns to the application, becomes authorized, thereby creates a graph of UserScope objects and sends the application to the background.
- After some time, the system in a situation of lack of resources decides to stop and unload from the memory of our application. This results in the destruction of both the UserScope and the SingletonScope .
Hopefully we figured out a bit with the scopes.
We now turn to our example - ActivityScope . In real Android applications, ActivityScope can be extremely useful. Still would! It is enough to imagine some complex screen consisting of a heap of classes: five different fragments, a lot of adapters, helpers and presenters. In this case, it would be ideal to “fumble” between them a model and / or business logic classes, which should be common.
There are 3 options for solving this problem:- Use homemade singletons, the Application class, or static variables to pass references to common objects. I definitely don’t like this approach, because it violates the principles of OOP and SOLID, makes the code confusing, hard to read and unsupported.
- Independently transfer objects from an Activity to the required classes via setters or constructors. The disadvantage of this approach is the cost of writing a routine code, when you could instead focus on writing new features.
- Use Dagger 2 to inject shared objects into necessary places of our application. In this case, we get all the advantages of the second approach, while not spending time on writing the template code. In fact, we shift the writing of binding code to the library.
Let's take a step-by-step how to create and use an ActivityScope with Dagger 2.
So, to create a custom skopa you need:
- Announce scop (create annotation)
- Declare at least one component and the corresponding module for scopa
- At the right time, instantiate the object graph and delete it after use.
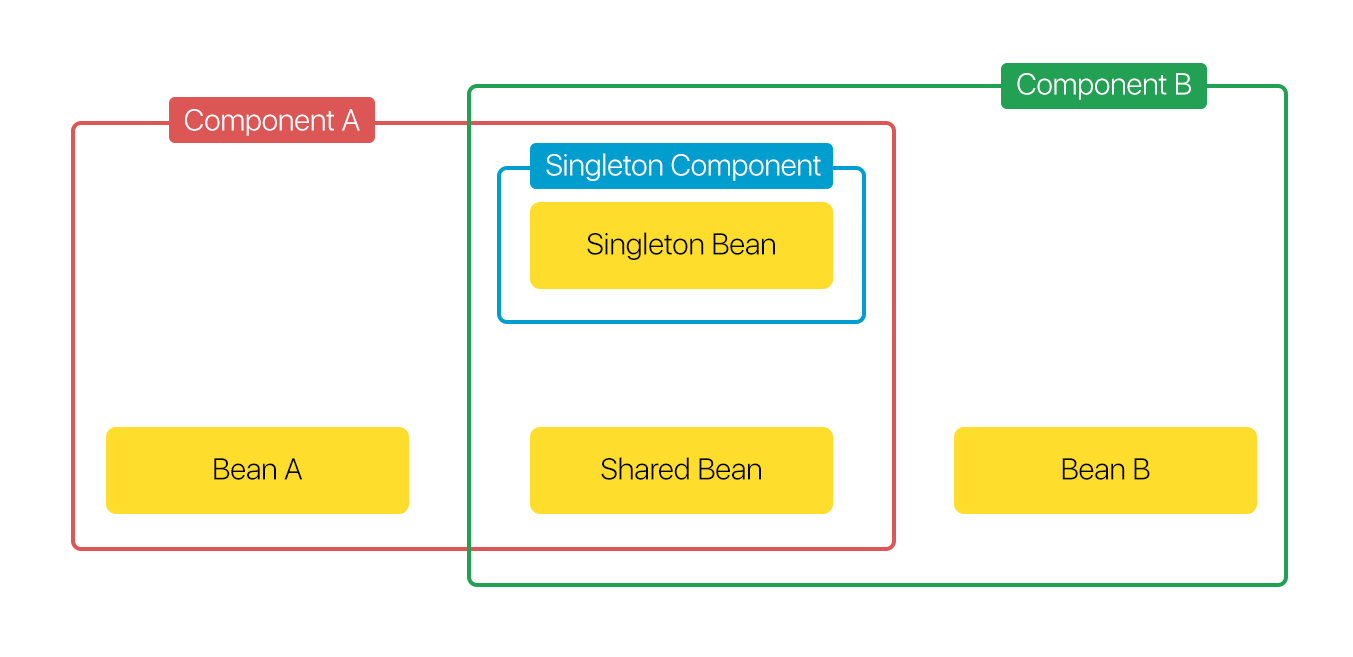
The interface of our demo application will consist of two ActivityA and ActivityB screens and a common fragment used by both SharedFragment activities .
The application will have 2 scopes: Singleton and ActivityScope .
Conventionally, all our beans can be divided into 3 groups:
- Singletons - SingletonBean
- Activation Scope Bins, which are needed only inside Activiti - BeanA and BeanB
- Activation Scope Bins, access to which is needed both from the Activation itself and from other activation sites of the Scope, for example, a fragment - SharedBean
Each bin gets a unique id when created. This allows you to visually understand whether the skup works as intended, because each new instance of the bean will have an id that is different from the previous one.
Thus, in the application there will be 3 object graphs (3 components)
- SingletonComponent - a graph of objects that exist while the application is running and not killed by the system.
- ComponentActivityA is a graph of objects necessary for the operation of ActivityA (including its fragments, adapters, presenters, and so on) and existing as long as an instance of ActivityA exists. When you destroy and re-create the activation, the graph will also be destroyed and re-created along with the new activation instance. This graph is a superset that includes all objects from the singleton scop.
- ComponentActivityB is a similar graph, but for ActivityB
Let's turn to implementation. First we connect Dagger 2 to our project. To do this, connect the android-apt plugin in the root build.gradle ...
buildscript { //... dependencies { //... classpath 'com.neenbedankt.gradle.plugins:android-apt:1.8' } } and Dagger 2 itself in app / build.gradle
dependencies { compile 'com.google.dagger:dagger:2.7' apt 'com.google.dagger:dagger-compiler:2.7' } Next, we announce the module that will provide singletons
@Module public class SingletonModule { @Singleton @Provides SingletonBean provideSingletonBean() { return new SingletonBean(); } } and the singleton component:
@Singleton @Component(modules = SingletonModule.class) public interface SingletonComponent { } We create an injector - the only singleton in our application, which we will manage, and not Dagger 2, and which will hold the Singleton scop dagger and be responsible for the injection.
public final class Injector { private static final Injector INSTANCE = new Injector(); private SingletonComponent singletonComponent; private Injector() { singletonComponent = DaggerSingletonComponent.builder() .singletonModule(new SingletonModule()) .build(); } public static SingletonComponent getSingletonComponent() { return INSTANCE.singletonComponent; } } We declare ActivityScope . In order to declare your scop, you need to create an annotation with the name of the scop and mark it with the annotation javax.inject.Scope .
@Scope public @interface ActivityScope { } Group the beans into modules: shared and for activities
@Module public class ModuleA { @ActivityScope @Provides BeanA provideBeanA() { return new BeanA(); } } @Module public class ModuleB { @ActivityScope @Provides BeanB provideBeanB() { return new BeanB(); } } @Module public class SharedModule { @ActivityScope @Provides SharedBean provideSharedBean() { return new SharedBean(); } } We declare the corresponding components of activities. In order to implement a component that will include objects of another component, there are 2 ways: subcomponents and component dependencies . In the first case, the child components have access to all objects of the parent component automatically. In the second, in the parent component, you must explicitly specify the list of objects that we want to export to the children. Within one application, in my opinion, it is more convenient to use the first option.
@ActivityScope @Subcomponent(modules = {ModuleA.class, SharedModule.class}) public interface ComponentActivityA { void inject(ActivityA activity); void inject(SharedFragment fragment); } @ActivityScope @Subcomponent(modules = {ModuleB.class, SharedModule.class}) public interface ComponentActivityB { void inject(ActivityB activity); void inject(SharedFragment fragment); } In the created subcomponents, we declare injection points. In our example there are two such points: Activity and SharedFragment . They will have shared SharedBean shared beans .
Subcomponent instances are obtained from the parent component by adding objects from the subcomponent module to an existing graph. In our example, the parent component is SingletonComponent , we will add methods for creating subcomponents to it.
@Singleton @Component(modules = SingletonModule.class) public interface SingletonComponent { ComponentActivityA newComponent(ModuleA a, SharedModule shared); ComponentActivityB newComponent(ModuleB b, SharedModule shared); } That's all. The entire infrastructure is ready, it remains to instantiate the declared components and inject dependencies. Let's start with a fragment.
The fragment is used immediately within two different activities, so it does not need to know specific details about the activity within which it is located. However, we need access to the activation component in order to gain access to the graph of objects of our scopes through it. To solve this “problem”, we use the Inversion of Control pattern, creating an intermediate interface, InjectorProvider , through which interaction with activities will be built.
public class SharedFragment extends Fragment { @Inject SharedBean shared; @Inject SingletonBean singleton; //… @Override public void onAttach(Context context) { super.onAttach(context); if (context instanceof InjectorProvider) { ((InjectorProvider) context).inject(this); } else { throw new IllegalStateException("You should provide InjectorProvider"); } } public interface InjectorProvider { void inject(SharedFragment fragment); } } It remains to instantiate the components of the ActivityScope level within each of the activities and project the activity and the fragment contained within it.
public class ActivityA extends AppCompatActivity implements SharedFragment.InjectorProvider { @Inject SharedBean shared; @Inject BeanA a; @Inject SingletonBean singleton; ComponentActivityA component = Injector.getSingletonComponent() .newComponent(new ModuleA(), new SharedModule()); //... @Override public void inject(SharedFragment fragment) { component.inject(this); component.inject(fragment); } } I will voice again the main points:
- We created 2 different scopes: Singleton and ActivityScope
- The ActivityScope is implemented through Subcomponent , not component dependencies, so that you do not have to explicitly expose all the bins from the singleton scop
- Activity stores a link to the object graph of its corresponding ActivityScop, and injects itself and all classes that want to inject bins from the ActivityScope, for example, SharedFragment
- With the destruction of activations, the object graph for this activity is also destroyed.
- The graph of singleton objects exists as long as the application instance exists
At first glance it may seem that to implement such a simple task it is necessary to write a lot of glue code. In the demo application, the number of classes that perform “work” (bins, fragments, and activities) is approximately comparable to the number of “linking” Dagger classes. But:
- In a real project, the number of “working” classes will be much larger.
- Binding code is enough to write once, and then just add the necessary components and modules.
- Using DI makes testing a lot easier. You have additional opportunities for injecting mocks and stubs instead of real bins during testing.
- The business logic code becomes more isolated and concise by moving the glue and instantiation code into Dagger classes. At the same time, in the business logic classes themselves, only business logic remains and nothing superfluous. Such classes are again easier to write, maintain and cover with unit tests.
»A demo project is available on github
All Dagger and happy coding! :)
Source: https://habr.com/ru/post/312196/
All Articles