2D magic in detail. Part two. Structure
Remember the famous meme about "korovovany"? Probably, everyone who develops games (or would like to do this) is thinking about a certain “dream project”, where it will be possible to “rob korovanov” and “fill in”. And also, so that the weather changed dynamically, and the traces of boots on the dirt remained, and the trees grew in real time. And also to ...
It is clear that in a real game project such a pursuit of Wishlocks - death is similar. But in the techno-demo - the very thing.
Previous articles
Part one. Shine.
Part two. Structure.
Part Three Global coverage.
Table of contents
- Introduction
- Sprites
- Polygons
- Pixel perfect and integer geometry
- Old project structure
- Region tree
- Managers
- Post effects
- Thoughts about the future
Introduction
Let me remind you that in the last part there was a survey: on what topic to write the next article. And the dynamic water seemed to the community the most interesting. But it’s a long story and you’ll have to start with the project structure and the algorithms that are used under the hood, and then talk about the lighting improvements and post-effects. The text will be big, so the water moves on to one of the nearest articles. By the way, this article contains fewer beautiful renders, but much more technical hints. Do not be bored.
Much has been done since the writing of the previous article. The entire project code was rewritten completely, algorithms were optimized, new light sources were added, background lighting was implemented, water with highlights, waves, boiling and freezing was implemented. As you can see - not a word about the characters or the gameplay component, it is still ahead. I will not get ahead of myself and tell you everything in order.
Sprites
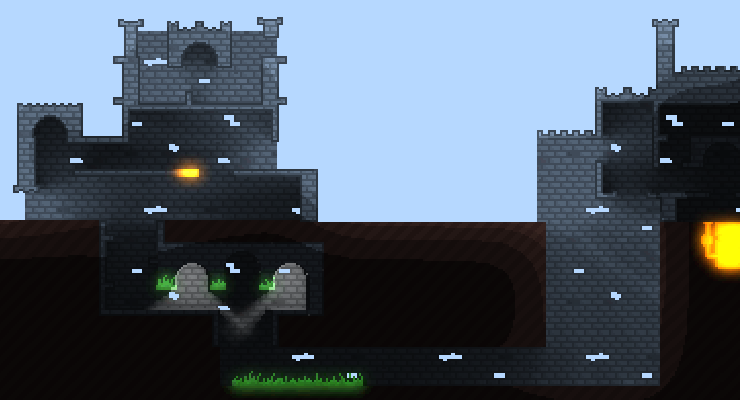
Our project is about magicians, which means that we cannot do without old stone castles. That's just to draw each from scratch - more expensive. Let's try to collect them from small pieces, for example, like this:

Neat pieces from which you can make everything.
In order for these pieces to have a common outline, we will write some kind of shader, and the static batching in Unity3d optimizes the number of draw calls. That's just to get a common contour, you have to use a two-pass shader with stencil buffer: the first part will draw the contours, and the second - the fill. And any elements that use materials with multipass shaders are not involved in batching . It is better to draw each sprite twice, but with different materials. The number of vertices will increase, but there will be only two draw calls.

Render a solid outline.

Add texture.
In such a simple way we can create such a castle:

Walls in the editor. The texture and color of the contour can be configured separately.
- We remove copy-paste. Of course, you should not copy the sprites with your hands. I have a Contour class that contains all the necessary settings for the sprite and 2 materials. When appearing on the scene, this class creates two heirs with a SpriteRenderer (for the contour and background).

We automate the transfer. Initially, I already had prefabs sprites that were used on the stage (several hundred elements). When I decided to wrap them in Contour , for some reason, the changes to the prefabs were not applied to the objects created. Fortunately, you can easily write a script that for each existing element will find the corresponding prefab (by name) and create an element from this prefab in the desired position. Key Methods - UnityEditor.AssetDatabase.LoadAssetAtPath and UnityEditor.PrefabUtility.ConnectGameObjectToPrefab
Proper drag'n'drop. Minus the division into sprites - now, by default, one of the heirs sprites is selected and used in drag'n'drop on the stage. The problem is solved by adding the attribute [SelectionBase] before the class Contour .
Display prefabs. In the project menu, prefabs with contours are no longer displayed as sprites, and, honestly, I have not found a way to generate the icon myself. Therefore, I added SpriteRenderer to the prefabs , the sprite to which my Contour asks. When adding to the scene, I remove the SpriteRenderer not needed in the gameplay from the object.
Uninstall from OnValidate . When adding an object to the scene, OnValidate is called and it is there that I delete the SpriteRenderer . However, neither Destroy nor DestroyImmediate works in this method (without witchcraft with its own class editor), so I use this crutch:
#if UNITY_EDITOR void OnValidate() { if (UnityEditor.PrefabUtility.GetPrefabParent(gameObject) == null && UnityEditor.PrefabUtility.GetPrefabObject(gameObject) != null) { var renderer = GetComponent<SpriteRenderer>(); renderer.sprite = sprite; return; } else { var renderer = GetComponent<SpriteRenderer>(); UnityEditor.EditorApplication.delayCall+=()=> { if (renderer == null) return; DestroyImmediate(renderer); }; } } #endif
using UnityEngine; using System.Collections; using NewEngine.Core.Components; namespace NewEngine.Core.Static { [SelectionBase] public class Contour : MonoBehaviour { public interface SpriteSettings { Color Color { get; set; } int SortingLayerId { get; set; } string SortingLayerName { get; set; } int SortingOrder { get; set; } Material Material { get; set; } } [System.Serializable] class SpriteSettingsImpl : SpriteSettings { [SerializeField] Material material; [SerializeField] SortingLayer sortingLayer; [SerializeField] int sortingOrder; [SerializeField] Color color = Color.white; SpriteRenderer spriteRenderer; public Color Color { set { color = value; } get { return color; } } public int SortingLayerId { set { // TODO ? foreach (var layer in SortingLayer.layers) { if (layer.id != value) continue; sortingLayer = layer; if (spriteRenderer != null) spriteRenderer.sortingLayerID = sortingLayer.id; return; } sortingLayer = new SortingLayer(); if (spriteRenderer != null) spriteRenderer.sortingLayerID = sortingLayer.id; } get { return sortingLayer.id; } } public string SortingLayerName { set { // TODO ? foreach (var layer in SortingLayer.layers) { if (layer.name != value) continue; sortingLayer = layer; if (spriteRenderer != null) spriteRenderer.sortingLayerID = sortingLayer.id; return; } sortingLayer = new SortingLayer(); if (spriteRenderer != null) spriteRenderer.sortingLayerID = sortingLayer.id; } get { return sortingLayer.name; } } public int SortingOrder { set { sortingOrder = value; if (spriteRenderer != null) spriteRenderer.sortingOrder = sortingOrder; } get { return sortingOrder; } } public Material Material { set { material = value; if (spriteRenderer != null) spriteRenderer.sharedMaterial = material; } get { return material; } } public SpriteRenderer SpriteRenderer { set { spriteRenderer = value; if (spriteRenderer == null) return; spriteRenderer.color = color; spriteRenderer.sortingOrder = sortingOrder; spriteRenderer.sortingLayerID = sortingLayer.id; spriteRenderer.material = material; } } } [SerializeField] SpriteSettingsImpl fillSettings; [SerializeField] SpriteSettingsImpl contourSettings; [SerializeField] Sprite sprite; [SerializeField] bool flipX; [SerializeField] bool flipY; SpriteRenderer fillSprite; SpriteRenderer contourSprite; void OnValidate() { #if UNITY_EDITOR if (IsPrefab) { var renderer = this.GetRequiredComponent<SpriteRenderer>(); renderer.sprite = sprite; return; } else { var renderer = this.GetRequiredComponent<SpriteRenderer>(); UnityEditor.EditorApplication.delayCall+=()=> { if (renderer == null) return; DestroyImmediate(renderer); }; } #endif var tmpFill = FillSprite; var tmpContour = ContourSprite; ApplySettings(fillSprite, fillSettings); ApplySettings(contourSprite, contourSettings); } public SpriteRenderer FillSprite { get { if (IsPrefab) return null; if (fillSprite == null) fillSprite = Create(fillSettings, "fill"); return fillSprite; } } public SpriteRenderer ContourSprite { get { if (IsPrefab) return null; if (contourSprite == null) contourSprite = Create(contourSettings, "contour"); return contourSprite; } } public SpriteSettings FillSettings { get { return fillSettings; } } public SpriteSettings ContourSettings { get { return contourSettings; } } public bool FlipX { get { return flipX; } set { flipX = value; FillSprite.flipX = flipX; ContourSprite.flipX = flipX; } } public bool FlipY { get { return flipY; } set { flipY = value; FillSprite.flipY = flipY; ContourSprite.flipY = flipY; } } public Sprite Sprite { get { return sprite; } set { sprite = value; FillSprite.sprite = sprite; ContourSprite.sprite = sprite; } } SpriteRenderer Create(SpriteSettingsImpl settings, string spriteName) { var child = transform.FindChild(spriteName); var obj = child == null ? null : child.gameObject; if (obj == null) { obj = new GameObject(); obj.name = spriteName; obj.transform.parent = transform; } var sprite = obj.GetRequiredComponent<SpriteRenderer>(); if (sprite == null) { sprite = obj.AddComponent<SpriteRenderer>(); sprite.receiveShadows = false; sprite.shadowCastingMode = UnityEngine.Rendering.ShadowCastingMode.Off; sprite.useLightProbes = false; } ApplySettings(sprite, settings); return sprite; } void ApplySettings(SpriteRenderer spriteRenderer, SpriteSettingsImpl settings) { spriteRenderer.flipX = flipX; spriteRenderer.flipY = flipY; spriteRenderer.sprite = sprite; settings.SpriteRenderer = spriteRenderer; spriteRenderer.transform.localPosition = Vector3.zero; spriteRenderer.transform.localScale = Vector3.one; spriteRenderer.transform.localRotation = Quaternion.identity; } bool IsPrefab { get { #if UNITY_EDITOR return UnityEditor.PrefabUtility.GetPrefabParent(gameObject) == null && UnityEditor.PrefabUtility.GetPrefabObject(gameObject) != null; #else return false; #endif } } } } #endif Shader "NewEngine/Game/Foreground/Contour" { Properties { _MainTex ("MainTex", 2D) = "white" {} [MaterialToggle] PixelSnap ("Pixel snap", Float) = 0 } SubShader { Tags { "Queue"="Transparent" "IgnoreProjector"="True" "RenderType"="Transparent" "PreviewType"="Plane" "CanUseSpriteAtlas"="True" } Cull Off Lighting Off ZWrite On ZTest Off Fog { Mode Off } Blend One OneMinusSrcAlpha Pass { // Stencil { WriteMask 7 Ref 6 Pass Replace } CGPROGRAM #pragma vertex vert #pragma fragment frag #include "UnityCG.cginc" struct appdata { float4 vertex : POSITION; float2 uv : TEXCOORD0; float4 color : COLOR; }; struct v2f { float2 uv : TEXCOORD0; float4 vertex : SV_POSITION; float4 color : COLOR; }; sampler2D _MainTex; v2f vert (appdata v) { v2f o; o.vertex = mul(UNITY_MATRIX_MVP, v.vertex); #ifdef PIXELSNAP_ON v.vertex = UnityPixelSnap (v.vertex); #endif o.uv = v.uv; o.color = v.color; return o; } fixed4 frag (v2f i) : SV_Target0 { fixed4 color = tex2D(_MainTex, i.uv) * i.color; if (color.a == 0) discard; return i.color * color.a; } ENDCG } } } Shader "NewEngine/Game/Foreground/Fill" { Properties { _MainTex ("MainTex", 2D) = "white" {} _BackgroundTex ("BackgroundTex", 2D) = "white" {} _MaskColor ("MaskColor", Color) = (0, 0, 0, 0) [MaterialToggle] PixelSnap ("Pixel snap", Float) = 0 } SubShader { Tags { "Queue"="Transparent" "IgnoreProjector"="True" "RenderType"="Transparent" "PreviewType"="Plane" "CanUseSpriteAtlas"="True" } Cull Off Lighting Off ZWrite On ZTest Off Fog { Mode Off } Blend One OneMinusSrcAlpha Pass { Stencil { WriteMask 7 Ref 2 Pass Replace } CGPROGRAM #pragma vertex vert #pragma fragment frag #include "UnityCG.cginc" struct appdata { float4 vertex : POSITION; float4 color : COLOR; float2 uv : TEXCOORD0; }; struct v2f { float4 uv : TEXCOORD0; float4 vertex : SV_POSITION; float4 color : COLOR; }; sampler2D _BackgroundTex; sampler2D _MainTex; float4 _BackgroundTex_ST; float4 _BackgroundTex_TexelSize; fixed4 _MaskColor; v2f vert (appdata v) { v2f o; o.vertex = mul(UNITY_MATRIX_MVP, v.vertex); o.uv.xy = v.uv; o.uv.zw = mul(_Object2World, v.vertex) * fixed4(1 / _BackgroundTex_TexelSize.zw * 32, 1, 1); o.color = v.color; return o; } fixed4 frag (v2f i) : SV_Target { fixed4 backgroundColor = tex2D(_BackgroundTex, i.uv.zw) * i.color; fixed4 mask = tex2D(_MainTex, i.uv.xy); if (mask.a == 0 || backgroundColor.a == 0 || length(mask - _MaskColor) > 0.00001 /* threshold */) discard; return backgroundColor * backgroundColor.a; } ENDCG } } } Polygons
However, sometimes you have to make a jumble of sprites: if we want to get a large and complex object, like the surface of the earth with holes and caves. Instead, we will generate such elements on the fly, in the editor (as in PolygonCollider2D ). We render polygons through a standard MeshRenderer with two materials (submeshes are used to separate the contour and fill).
I will not argue that it is easy to write a neat editor for polygons. But all information is available on the Internet, and AssetStore has ready-made solutions.
An editor that is indistinguishable from an editor in PolygonCollider2D.
For maximum flexibility, polygon classes are built like this:
- Core.Shapes.Shape is the main class that contains the points of the polygon and the necessary math. Not MonoBehaviour ;
- Core.Shapes.EditableShape - MonoBehaviour 's successor for storing and editing Shape ;
- Core.Shapes.ShapeRenderer — Displays a polygon from an EditableShape using a MeshRenderer ;
- Core.Shapes.ShapeCollider2D - creates a physical polygon from EditableShape using PolygonCollider2D .
For some reason, I missed the RequireComponent attribute for a very long time. This is a very convenient mechanism for automatically adding the necessary components. For example, ShapeRenderer requires EditableShape and MeshRenderer , when adding it to GameObject all dependencies are automatically created.
Pixel perfect and integer geometry
Using large pixels, we kill a whole flock of hares:
- We can render a small image (pixel to pixel) and stretch it under the screen;
- We can use complex post-effects (small textures will increase productivity);
- We can work with integer arithmetic (faster and more enjoyable);
- We can mask flaws or bugs :)
The truth for these hares will have to pay by implementing the support of "integer geometry", namely:
- Basic things such as:
- IntVector2 is essentially a copy of UnityEngine.Vector2 , but with integer coordinates. Sometimes you need to convert data from the usual UnityEngine.Vector2 , taking into account the scale or not (32 pixels in one unit, just do not need to use magic numbers!), So we add the following functions:
public Vector2 ToPixels(); public Vector2 ToUnits(); public static IntVector2 FromPixels(Vector2 v); public static IntVector2 FromUnits(Vector2 v); public static IntVector2 FromUnitsRound(Vector2 v); public static IntVector2 FromUnitsCeil(Vector2 v); - Intract. No different in functionality from UnityEngine.Rect . The LineCollision method is available to search for intersections with straight line segments ( Liang-Barsky algorithm);
- IntLine. Line segment with integer beginning and end. Used in some algorithms;
- IntMatrix. The matrix for two-dimensional transformations, where the turns are multiples of 90 °, and the displacement and scale are integer;
- Intangle. Small class for rounding degrees to 90 °, the choice of direction. Can you imagine what a beautiful cosine table is there?
- Poser. The element positioning the GameObject is multiple to the game "pixel", prohibiting turns, not multiple to the right angle and scaling to a fractional value (taking into account that SpriteRender may be in the element and then you have to take into account the sprite's pivot). This class works in the editor thanks to the [ExecuteInEditMode] attribute. Important point: when the state changes (position, rotation, scale, sprite, etc.), Poser notifies the PoserListener class about this, which is able to track changes in the editor of all Poser elements with a specific tag. This will be needed in the future;
- CameraManager. A camera controller that can align the current camera and position cameras for post-effects.
- IntVector2 is essentially a copy of UnityEngine.Vector2 , but with integer coordinates. Sometimes you need to convert data from the usual UnityEngine.Vector2 , taking into account the scale or not (32 pixels in one unit, just do not need to use magic numbers!), So we add the following functions:
- Add gizmo drawing for geometry. For example, the OnDrawGizmos method has been added to IntVector2 , IntRect and IntLine . This is very useful when debugging.
- To align the cameras is terrible. I positioned them on the lower left corner, while the coordinates of the camera are the coordinates of its center. And when changing the renderTarget of the camera, the angles obviously leave as the screen size changes in pixels. So what matters is not only how to align the cameras, but also when .
Old project structure
Remember, in the last article there was a section about shadow building? And most of it was devoted to the union of sprites in some groups to optimize the final mesh? So, forget, it's all not true. :)
Initially, all modules were written independently, in the prototyping mode. And for everyone the algorithms, structures and data types were thought out. As a result, two major problems arose (besides legacy code we will be honest):
- Duplication code. Only classes for integer coordinates were 3–4 pieces and all were nested in other classes (normal point, point with normal, point with some kind of meta-information).
- Not optimal solutions. Each module needed the same data on the sprites, but a little bit differently processed. And this data was copied back and forth with all sorts of transformations, which did not add either speed or code grace.
These modules require some information about the "solid" sprites of the locks:
- Shadows;
- Wind;
- Ambient lighting;
- Grass;
- Particles;
- Physics;
- Water;
- Others (strands of cobwebs and lighting chains)
- UnityEngine.Sprite. Graphic sprites. Base for everything else;
- Contour The contour of the object (or group of objects). It is an array of vertical and horizontal lines with normals;
- UnityEngine.Sprite [] → Contour : convert each sprite into contours, for a list of external parties.
- Rects A set of rectangles;
- UnityEngine.Sprite [] → Rects : fill the sprite with rectangles so that you can use them to combine all the objects into one.
- Shape. A class containing Contour and Rects;
- Shapes. Set Shape and aabb for quick search;
- Batch. Shape set and access functions to shared Contour;
- To build meshes;
- To test points for hardness;
- For reykast.
- Windgrid The collision cache for the wind from Batch → Shapes ;
- QuadTree. Basic (and cross-sectional) implementation of a quadrant tree for a quick search for empty volumes;
- WaterVolumes. Rectangles of water from Batch → Contour .
All this madness is used like this:
- Shadows. Batch → General Contour: for building a shadow mesh;
- Wind. WindGrid → Batch → Shapes: for calculating wind (collision search);
- Scattered lighting.
- Batch → Shapes:
- For raycast (search for direct illumination);
- For testPoint (search for solid objects).
- QuadTree → Batch → Shapes :
- To search for empty volumes.
- Grass.
- Batch → Shapes: CircleQuery method for finding nearby surfaces;
- Batch → General Contour: for planting grass;
- Particles Batch → Shapes: PopPoint method (finding the nearest open space) to push particles out of walls;
- Physics. Batch → General Contour: for building colliders;
- Water. WaterVolumes → Batch → General Circuit: Search for places where water can be created;
- Other Batch → Shapes: raycast to search for fixing points for lamps and cobwebs.
Region tree
After some analysis and long googling, we find a solution - Region tree, sometimes called the Volume tree.
We divide the two-dimensional space into 4 parts until each sheet is either completely empty or completely filled. We expose the sheet bits of fullness (or in any other way distinguish empty nodes from filled).
The possibilities that this tree provides cover all our needs:
- Building a tree. You can fill a tree, indicating solid points, rectangles, or even other trees with a certain offset. Therefore, sprites pre-calculated their own Region Tree, and then, when added to the scene, a common tree is built.
- Check point hardness. Recursively descend through the tree while the node has descendants (in my version of the tree the node is empty if Node = null, full - if Node.children == null, otherwise Node.children - an array of descendants);
- Raycast . Recursively check the intersection of the beam with the squares of the nodes.
- Search the shortest path to empty space . We find a leaf at a given point, we go up the tree, checking the neighbors' nodes (if the node is empty, we immediately count the distance to it, if there are descendants, we go down recursively and again look for the nearest empty one).
- Search for segments lying on the border . It is more difficult here, if briefly - we get all the filled squares from the tree, remove the sides belonging to several squares, optimize the result.
Visually, it looks like this (hooray, pictures!):

The visual part. The walls of the sprites, the ground - the polygons.

Estimated region tree.

Pre-calculated surfaces.
Managers
As it turned out, this quadrant tree realizes almost all the features that modules need. Now you need to connect these modules with each other.
In the "prototype" version, all controllers / managers themselves implemented the corresponding functionality (calculation of lighting, processing of particle physics, etc.) and inherited from MonoBehaviour . There were several problems: complex and overgrown code, the strong dependence of managers on each other, the absence of some kind of general data flow between controllers.
For example, when I moved an element in the editor, managers did not automatically pick up these changes. It was necessary to first poke a check in the tree manager, then in the light manager, then in the water manager, etc. And all in order to see if the new castle looks good. So so, right?
First, get rid of MonoBehaviour to the maximum. All objects whenever possible are represented with the usual # classes.
Secondly, we will spread the code across different namespaces, one name - one functional.
And, thirdly, for each functional, we implement one MonoBehaviour manager who will store the necessary settings, manage the generation of content, etc.

Managers. Combed and in ties.
So, there are controllers on the scene, each has one sphere of influence, the code is neatly packed into the NewEngine.Core namespace ( Core.Geom , Core.Illumination , Core.Rendering , etc.). Move the sprite in the editor and ... no reaction. Remember, the PoserListener class was described above ? He is able to listen to changes in position, sprite, size in objects like Poser . All managers that depend on the relevant GameObjects are inherited from this class.
Now, when we move a piece of the wall (with the " foreground " tag), Core.Quad.QuadManager is notified, and when we change the reference points for water (the " waterLayer " tag) Core.Water.WaterManager will immediately know about the changes.
It remains to link the controllers to each other, because the above-described WaterManager needs to know when the quad tree will be rebuilt in QuadManager , and it is important for ShadowMeshManager to pick up changes in SurfaceManager. To do this, we use a very convenient UnityEvent . Its only drawback is by default, if we create a generic event with some of its arguments, Unity3D does not display it in the editor. This is corrected elementarily:
public class TreeManager : MonoBehaviour { [System.Serializable] public class UpdateTreeEvent : UnityEvent<TreeManager> { } public UpdateTreeEvent onUpdateTree; ... } And now we can connect managers directly in the editor, without contaminating the code with strange dependencies:

If necessary, dependencies are executed in the editor.
Post effects
So, at the start, all modules generate the necessary content, update it, but are not able to render. Time to fix it!
In fact, the rendering in this project is very different from what is shown on youtube in the commercials with the saying names "Let's beat down my mega-cool game on Unity3D from three boxes, one sprite and RigidBody2D component". In fact, you just need to draw the sprites of the walls and the background themselves. But the light, water, etc. will have to do through post-effects.
What does this mean? With the rendering of elements, we will be doing not on the screen, but in buffers, then using different shaders to reduce these all one picture. And that's all.
There are a lot of effects. At the moment it is:
- Rendering the scene. Not really a post effect, just drawing the main geometry of the scene.
- Global coverage. It is calculated once, at the start of the level;
- Normal lighting. Includes light sources, shadows, caustics in water;
- Light decals. Small sprites that create a luminescence effect.
- Post Effect Information. Combines the results of all previous post-effects into one picture (for example, it applies lighting effects to the rendered scene).
- And finally rendering to the screen. Which simply displays the resulting texture, taking into account the pixel perfect and the difference in screen size and texture.
In general, the post-effect is a kind of script that can generate some kind of texture / textures and, possibly, additional data (for example, shader parameters). Sometimes the posteffect works only with modules, sometimes it has to trigger the rendering of a scene with certain camera settings.
The important point: post effects may depend on each other. Therefore, firstly, it is important to cause effects in the correct order, and secondly, you need to be able to store and transmit to the effects disparate data about each other.
Make the base class for the effect. Something like this:
namespace NewEngine.Core.Render { public abstract class PostEffect { public int OrderId { get; set; } // . public abstract void Apply(PipelineContext context); // . PipelineContext, . public abstract void Clear(); // . , GC, . protected Camera CreateCamera(); // . , . public List<Camera> Cameras { get; } } } And we also make a context class for binding data from post-effects.
namespace NewEngine.Core.Render { public class PipelineContext { Dictionary<System.Type, PostEffectContext>; Camera camera; Geom.IntRect viewRect; public PipelineContext(CameraManager cameraManager); public void Set<Context>(Context value) where Context : PostEffectContext; public Context Get<Context>() where Context : PostEffectContext; public Camera Camera { get; } public Geom.IntRect ViewRect { get; } } } In fact, now in the rendering manager we need to go through the correct order for all the active effects, calling them Apply and collecting data in the PipelineContext . As a result, we will draw a beautiful frame. The effects get into the manager through the analogue Poser , which informs the listener about adding / removing effects from the scene. It remains only to sort them correctly.
, , - :
[RequiredPostEffect(typeof(WaterPostEffect))] [RequiredPostEffect(typeof(IlluminationPostEffect))] public class MergerPostEffect : PostEffect { } , , PropertyDrawer:
. .
- . , — . ;
- . - . Unity3D — OnPostRender ;
- GetTemporary. , RenderTexture — . , . RenderTexture.GetTemporary , RenderTexture.ReleaseTemporary , fps ( ). Unity3D . , — .
- . E — , Unity3D (, : Unity3D ). "Show texture leaks", , ( System.Diagnostics.StackTrace() ). #ifdef .
- . TextureFormat , RenderTextureFormat . SystemInfo.SupportsTextureFormat SystemInfo.supportsRenderTextures ( ) .
- Blit. . Camera ( ). Unity3D Graphics.Blit .
- Blit. _Graphics.Blit_ , , depth buffer stencil buffer . .
static public void Blit(RenderBuffer colorBuffer, RenderBuffer depthBuffer, Material material) { Blit(colorBuffer, depthBuffer, material, material.passCount); } static public void Blit(RenderBuffer colorBuffer, RenderBuffer depthBuffer, Material material, int passCount) { Graphics.SetRenderTarget(colorBuffer, depthBuffer); GL.PushMatrix(); GL.LoadOrtho(); for (int i = 0; i < passCount; ++i) { material.SetPass(i); GL.Begin(GL.QUADS); GL.TexCoord(new Vector3(0, 0, 0)); GL.Vertex3(0, 0, 0); GL.TexCoord(new Vector3(0, 1, 0)); GL.Vertex3(0, 1, 0); GL.TexCoord(new Vector3(1, 1, 0)); GL.Vertex3(1, 1, 0); GL.TexCoord(new Vector3(1, 0, 0)); GL.Vertex3(1, 0, 0); GL.End(); } GL.PopMatrix(); Graphics.SetRenderTarget(null); } , , , — . , . , ! , . :
… . , . — .
… , , . « » — .
, , , . .
:)

.

, Unity3D ? 0

, .

, .
')
Source: https://habr.com/ru/post/312046/
All Articles