ASP.NET Core: Creating a web service front end for an application
We continue to share material on working with ASP.NET Core. In the last article, we talked about deploying an ASP.NET Core application on a Nano Server with IIS . Today we will talk about creating a front end web service for your application.

1. ASP.NET Core on Nano Server .
2. Creating the web service front end for the application .
3. Create the first web API using ASP.NET Core MVC and Visual Studio .
4. Deploy a web app in Azure App Service using Visual Studio .
5. Your first application on a Mac using Visual Studio Code .
By default, Azure Service Fabric services do not provide a public interface for web services. In order to make the application functional for HTTP clients, you need to create a web project that will act as an entry point and exchange data with individual services.
')
In this article, we will add a stateful web service to the stateful counter service in Visual Studio. If you are not familiar with the basic process of creating applications in Visual Studio, go here .
ASP.NET Core is a simple cross-platform web development tool with which you can create modern custom web interfaces and web APIs. Let's add an ASP.NET web API project to an existing application:
1. With the application project open in Solution Explorer, right-click on Services and select Add> New Service Fabric Service .
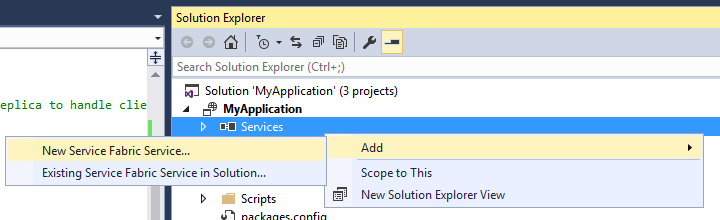
2. On the Create a Service page, select ASP.NET Core and provide a name for this service.

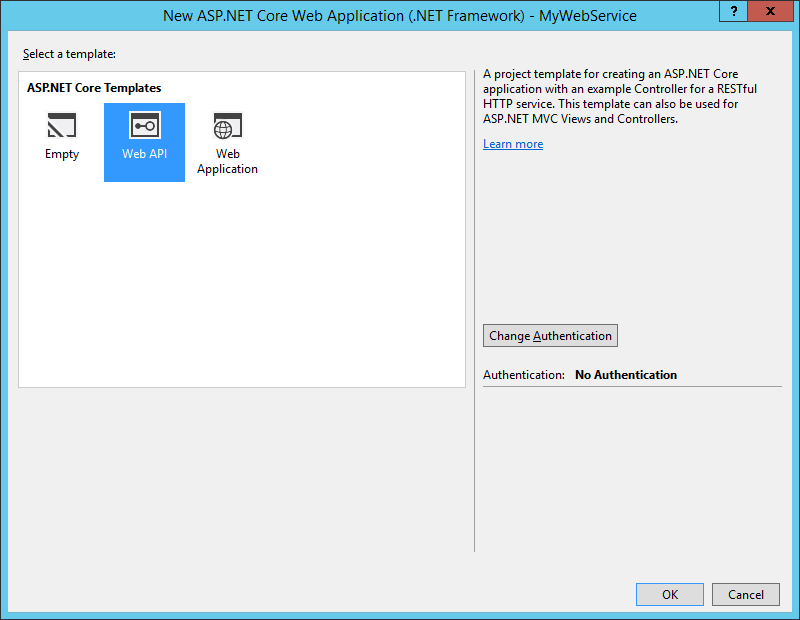
3. The next page shows a set of templates for an ASP.NET Core project. Please note that these are the same templates that are used when creating an ASP.NET Core project outside of the Service Fabric application. In this tutorial, we will use the Web API . However, you can use these methods to create a full-fledged web application.
Note: for further work, you must install .NET Core 1.0 .
After creating the web API in the application will be two services. As the application is refined, you can add new services in the same way. Each of these services can be updated separately, including to a specific version.
Note: Detailed information on creating ASP.NET Core services is provided in the ASP.NET Core documentation .
To better present the steps we have taken, let's deploy a new application and consider the default behavior associated with using an ASP.NET Core web API template:
1. To debug an application, press F5 in Visual Studio.
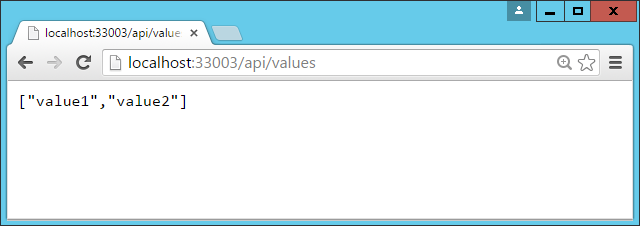
2. After the deployment is completed using Visual Studio, the browser starts with the root directory of the ASP.NET web API service, for example localhost : 33003. The port number is assigned arbitrarily and may differ. The web API template does not provide default behavior for the root directory, with the result that the browser displays an error message.
3. Add the path
After completing the steps in this guide, the default values will be replaced with the last value of the stateful service counter.
Service Fabric provides the freedom to interact with Reliable Services. In one application, there can be both services available via TCP, as well as services available via the HTTP REST API, as well as services accessible via web sockets ( see the options and the selection of the ideal ratio in the article ). Here we will use one of the simplest approaches and use the
In the
Let's start by creating an interface that will serve as a contract between a stateful service and its clients, including an ASP.NET Core project:
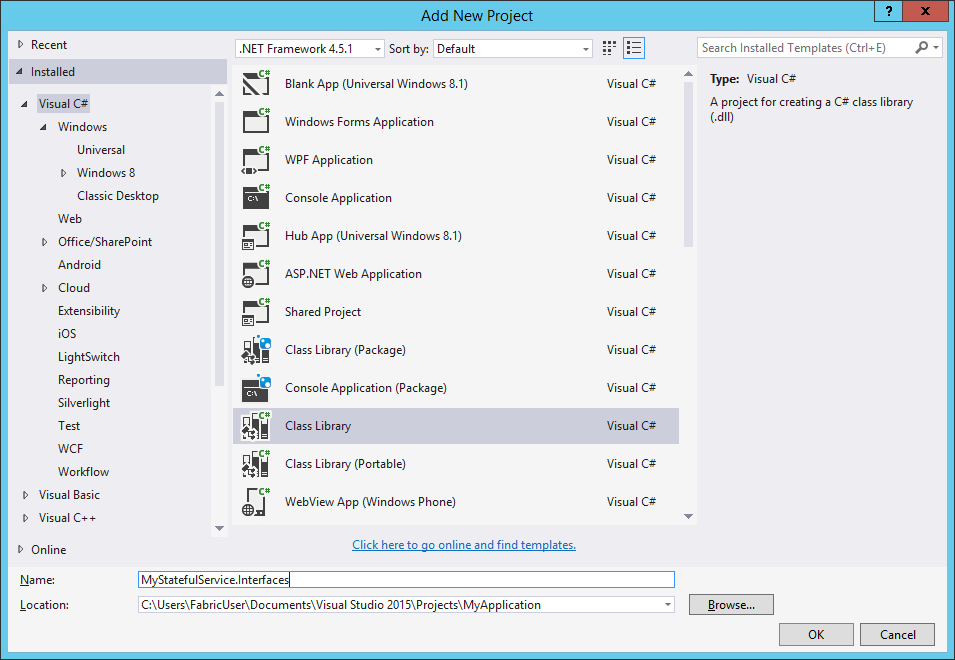
1. In the Solution Explorer, right-click on the solution and select Add> New Project .
2. In the left navigation pane, select Visual C # , then select the Class Library template. Make sure the .NET Framework version 4.5.2 is selected.
3. For an interface to be used by
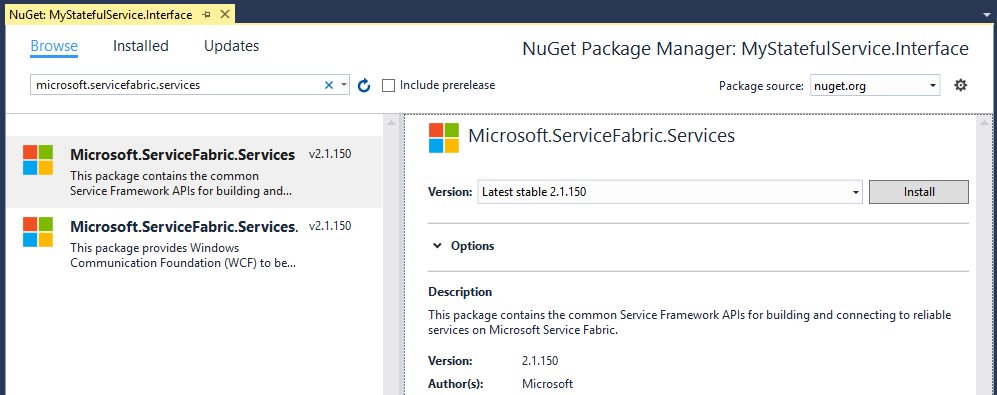
4. Locate and install the Microsoft.ServiceFabric.Services package.
5. In the class library, create an interface using a single
Now that the interface is defined, you need to implement it in a stateful service:
1. In a stateful service, add a link to the class library project that contains this interface.
2. Find a class that inherits from
3. Now implement the single method specified in the
After the implementation of the
Note: The equivalent of the method for opening a communication channel for a stateless service is
In our example, we will replace the existing
The stateful service we have prepared is ready to receive traffic from other services. Therefore, it remains only to add code to interact with it from the ASP.NET web service:
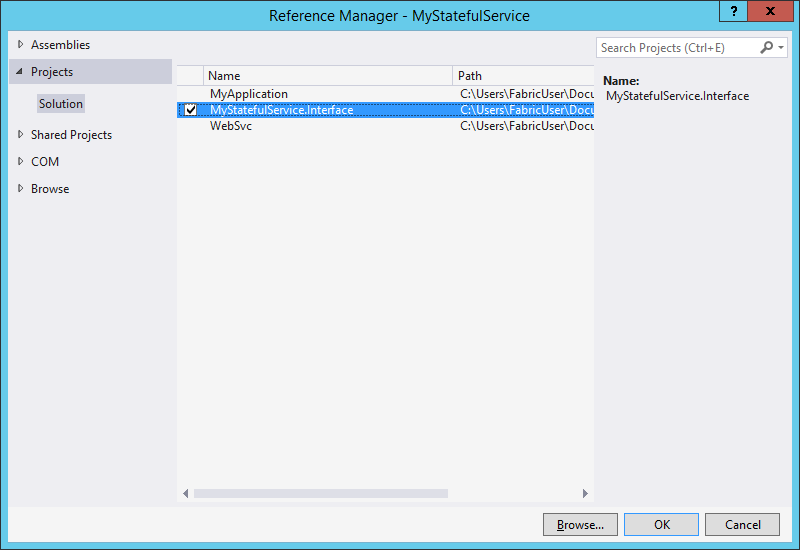
1. In an ASP.NET project, add a reference to the class library that contains the
2. From the Build menu, open Configuration Manager . It should display something like the following:
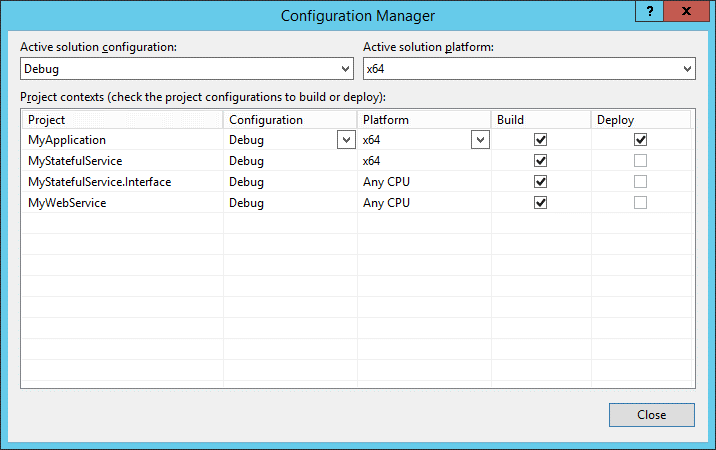
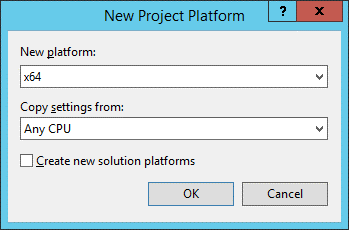
Please note that for the project of the MyStatefulService.Interface class library , the Any CPU option is selected. To work correctly with Service Fabric, a 64-bit platform must be used. Open the Platform drop-down menu, select New, and create a 64-bit platform configuration:
3. Add the Microsoft.ServiceFabric.Services package to the ASP.NET project, as you did earlier for the class library project. The
4. In the Controllers folder, open the
The first line of code is the key. To add an ICounter proxy to stateful services, you must provide two types of data: a section identifier and a service name.
Partitioning can be used to scale services with state tracking: you can break their state into different segments based on the key you specify, for example, customer ID or zip code. In this application, a stateful service has only one partition, so the key does not matter. Any specified key will result in the same partition. More information about creating sections is given in the article .
The service name is the unique resource code in the format of the fabric: / <application_name> / <service_name>.
With this data, Service Fabric can accurately identify the computer to which the request should be sent. The
After creating the proxy server, call the GetCountAsync method and get its result.
5. Press the F5 key to launch the modified application. Like last time, the browser will automatically start and load the root directory of the web project. Add the path "api / values", the current return value of the counter will be displayed:
Refresh your browser to track changes in meter readings.
It is important to remember that the ASP.NET Core web server specified in the template, known as Kestrel, does not support the processing of direct Internet traffic . For working scenarios, consider placing ASP.NET Core endpoints behind API Management or another gateway with Internet access. Please note that Service Fabric is not supported for deployment in IIS.
Here we describe the addition of a web interface to provide communication with a stateful service. However, a similar model can be used to exchange data with subjects. It is even easier.
When you create a subject project in Visual Studio, an interface project is automatically created. You can use this interface to create a proxy server in a web project to interact with the subject. The communication channel is provided automatically. Therefore, you do not need to take any steps to set up a
Deployed on a local cluster, the Service Fabric application can usually be deployed in a cluster with several computers. This application will work properly. This is because the local cluster is a configuration of five nodes located on one computer.
However, one key feature is associated with web services. If the cluster is not included in the load balancer, as provided in the Azure environment, you need to make sure that web services are deployed on each computer. This is necessary because the load balancer will simply cycle through the traffic between computers. This can be done by specifying the special value “−1” for the service
When running the web service locally, on the contrary, you need to make sure that only one instance of the service is running. Otherwise, conflicts will arise with several processes that listen on the same path and port. Therefore, for local deployments, the counter of web service instances must be set to “1”.
More information about setting different values for different environments can be found in the article .
The first cycle of articles on ASP.NET Core
1. ASP.NET Core on Nano Server .
2. Creating the web service front end for the application .
3. Create the first web API using ASP.NET Core MVC and Visual Studio .
4. Deploy a web app in Azure App Service using Visual Studio .
5. Your first application on a Mac using Visual Studio Code .
By default, Azure Service Fabric services do not provide a public interface for web services. In order to make the application functional for HTTP clients, you need to create a web project that will act as an entry point and exchange data with individual services.
')
In this article, we will add a stateful web service to the stateful counter service in Visual Studio. If you are not familiar with the basic process of creating applications in Visual Studio, go here .
Adding an ASP.NET Core Service to an Application
ASP.NET Core is a simple cross-platform web development tool with which you can create modern custom web interfaces and web APIs. Let's add an ASP.NET web API project to an existing application:
1. With the application project open in Solution Explorer, right-click on Services and select Add> New Service Fabric Service .
2. On the Create a Service page, select ASP.NET Core and provide a name for this service.
3. The next page shows a set of templates for an ASP.NET Core project. Please note that these are the same templates that are used when creating an ASP.NET Core project outside of the Service Fabric application. In this tutorial, we will use the Web API . However, you can use these methods to create a full-fledged web application.
Note: for further work, you must install .NET Core 1.0 .
After creating the web API in the application will be two services. As the application is refined, you can add new services in the same way. Each of these services can be updated separately, including to a specific version.
Note: Detailed information on creating ASP.NET Core services is provided in the ASP.NET Core documentation .
Application launch
To better present the steps we have taken, let's deploy a new application and consider the default behavior associated with using an ASP.NET Core web API template:
1. To debug an application, press F5 in Visual Studio.
2. After the deployment is completed using Visual Studio, the browser starts with the root directory of the ASP.NET web API service, for example localhost : 33003. The port number is assigned arbitrarily and may differ. The web API template does not provide default behavior for the root directory, with the result that the browser displays an error message.
3. Add the path
/api/values to the address in the browser. This will invoke the Get method of the ValuesController object in the web API template. It will return the default response provided by the template — a JSON array containing two lines:After completing the steps in this guide, the default values will be replaced with the last value of the stateful service counter.
Connecting Services
Service Fabric provides the freedom to interact with Reliable Services. In one application, there can be both services available via TCP, as well as services available via the HTTP REST API, as well as services accessible via web sockets ( see the options and the selection of the ideal ratio in the article ). Here we will use one of the simplest approaches and use the
ServiceProxy/ServiceRemotingListener classes provided in the SDK.In the
ServiceProxy approach (based on remote procedure calls or RPC), an interface is defined that acts as a public service contract. This interface is then used to create a proxy class for interacting with the service.Interface creation
Let's start by creating an interface that will serve as a contract between a stateful service and its clients, including an ASP.NET Core project:
1. In the Solution Explorer, right-click on the solution and select Add> New Project .
2. In the left navigation pane, select Visual C # , then select the Class Library template. Make sure the .NET Framework version 4.5.2 is selected.
3. For an interface to be used by
ServiceProxy , it must be derived from the IService interface. This interface is included in one of the packages of NuGet Service Fabric. To add a package, right-click on the class library project and select Manage NuGet Packages .4. Locate and install the Microsoft.ServiceFabric.Services package.
5. In the class library, create an interface using a single
GetCountAsync interface and extend the interface from IService. namespace MyStatefulService.Interfaces { using Microsoft.ServiceFabric.Services.Remoting; public interface ICounter: IService { Task<long> GetCountAsync(); } } Implementing an interface in a stateful service
Now that the interface is defined, you need to implement it in a stateful service:
1. In a stateful service, add a link to the class library project that contains this interface.
2. Find a class that inherits from
StatefulService , for example, MyStatefulService , and extend it to implement the ICounter interface. using MyStatefulService.Interfaces; ... public class MyStatefulService : StatefulService, ICounter { // ... } 3. Now implement the single method specified in the
ICounter interface, GetCountAsync . public async Task<long> GetCountAsync() { var myDictionary = await this.StateManager.GetOrAddAsync<IReliableDictionary<string, long>>("myDictionary"); using (var tx = this.StateManager.CreateTransaction()) { var result = await myDictionary.TryGetValueAsync(tx, "Counter"); return result.HasValue ? result.Value : 0; } } Providing a stateful service using a remoting service in a service
After the implementation of the
ICounter interface ICounter final step in ensuring that a service with state tracking from other services can be called will be opening the communication channel. For stateful services, Service Fabric provides an override method called CreateServiceReplicaListeners . Using this method, you can specify one or more communication listeners based on the type of communication you want to use in the service.Note: The equivalent of the method for opening a communication channel for a stateless service is
CreateServiceInstanceListeners .In our example, we will replace the existing
CreateServiceReplicaListeners method and use an instance of ServiceRemotingListener , which creates an RPC endpoint called by clients using ServiceProxy . using Microsoft.ServiceFabric.Services.Remoting.Runtime; ... protected override IEnumerable<ServiceReplicaListener> CreateServiceReplicaListeners() { return new List<ServiceReplicaListener>() { new ServiceReplicaListener( (context) => this.CreateServiceRemotingListener(context)) }; } Using the ServiceProxy class to interact with the service
The stateful service we have prepared is ready to receive traffic from other services. Therefore, it remains only to add code to interact with it from the ASP.NET web service:
1. In an ASP.NET project, add a reference to the class library that contains the
ICounter interface.2. From the Build menu, open Configuration Manager . It should display something like the following:
Please note that for the project of the MyStatefulService.Interface class library , the Any CPU option is selected. To work correctly with Service Fabric, a 64-bit platform must be used. Open the Platform drop-down menu, select New, and create a 64-bit platform configuration:
3. Add the Microsoft.ServiceFabric.Services package to the ASP.NET project, as you did earlier for the class library project. The
ServiceProxy class will be added.4. In the Controllers folder, open the
ValuesController class. Notice that the Get method currently returns a built-in string array of the values of value1 and value2, corresponding to those we saw earlier in the browser. Replace this implementation with the following code: using MyStatefulService.Interfaces; using Microsoft.ServiceFabric.Services.Remoting.Client; ... public async Task<IEnumerable<string>> Get() { ICounter counter = ServiceProxy.Create<ICounter>(new Uri("fabric:/MyApplication/MyStatefulService"), new ServicePartitionKey(0)); long count = await counter.GetCountAsync(); return new string[] { count.ToString() }; } The first line of code is the key. To add an ICounter proxy to stateful services, you must provide two types of data: a section identifier and a service name.
Partitioning can be used to scale services with state tracking: you can break their state into different segments based on the key you specify, for example, customer ID or zip code. In this application, a stateful service has only one partition, so the key does not matter. Any specified key will result in the same partition. More information about creating sections is given in the article .
The service name is the unique resource code in the format of the fabric: / <application_name> / <service_name>.
With this data, Service Fabric can accurately identify the computer to which the request should be sent. The
ServiceProxy class also consistently switches operations to another computer if a computer that hosts a stateful service section fails. This abstraction makes it easier to write client code to work with other services.After creating the proxy server, call the GetCountAsync method and get its result.
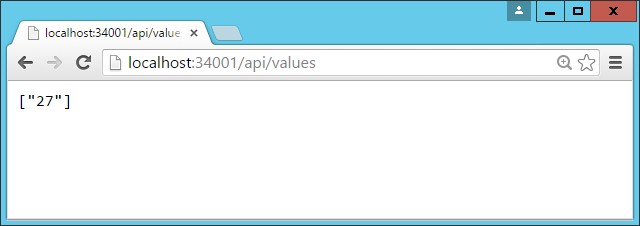
5. Press the F5 key to launch the modified application. Like last time, the browser will automatically start and load the root directory of the web project. Add the path "api / values", the current return value of the counter will be displayed:
Refresh your browser to track changes in meter readings.
It is important to remember that the ASP.NET Core web server specified in the template, known as Kestrel, does not support the processing of direct Internet traffic . For working scenarios, consider placing ASP.NET Core endpoints behind API Management or another gateway with Internet access. Please note that Service Fabric is not supported for deployment in IIS.
Data exchange with subjects
Here we describe the addition of a web interface to provide communication with a stateful service. However, a similar model can be used to exchange data with subjects. It is even easier.
When you create a subject project in Visual Studio, an interface project is automatically created. You can use this interface to create a proxy server in a web project to interact with the subject. The communication channel is provided automatically. Therefore, you do not need to take any steps to set up a
ServiceRemotingListener , as is the case with ServiceRemotingListener services.How web services work on a local cluster
Deployed on a local cluster, the Service Fabric application can usually be deployed in a cluster with several computers. This application will work properly. This is because the local cluster is a configuration of five nodes located on one computer.
However, one key feature is associated with web services. If the cluster is not included in the load balancer, as provided in the Azure environment, you need to make sure that web services are deployed on each computer. This is necessary because the load balancer will simply cycle through the traffic between computers. This can be done by specifying the special value “−1” for the service
InstanceCount parameter.When running the web service locally, on the contrary, you need to make sure that only one instance of the service is running. Otherwise, conflicts will arise with several processes that listen on the same path and port. Therefore, for local deployments, the counter of web service instances must be set to “1”.
More information about setting different values for different environments can be found in the article .
Source: https://habr.com/ru/post/311940/
All Articles