Understanding Veeam SureBackup

Backups need to be checked.
As an introduction to the simple story of the turbulent youth. Everyone is familiar with the situation when there are no resources, and you need to keep backup copies. At one time, two 500GB disks were used to store backups of their systems. As you might guess, when using RAID-1, the usable space was limited to the very 500GB, which was sorely lacking. It was decided to use Linux LVM, thereby obtaining 1000GB of space, to the detriment of reliability.
')
Over the course of the year, and perhaps more, the backup copies were added to this resource, the scripts reported that everything was fine, and the list of backups pleased the eye when viewing the contents of the directory.
The X hour came, and it was necessary to recover, there was no limit to surprise when one of the backups was damaged, because everything said that backups are being made, stored, and in general everything is fine. As it turned out later, one of the LVM disks began to crumble, some of the data could be recovered, and the other part was gone. Never do it the way I did in my time.
Now there are few companies that do not use virtualization, a little more companies that do not backup their virtual machines, and perhaps even more who do not check their backups.
For those who are interested in how Veeam checks its backups, please under the cat.
Suppose you already use the Veeam backup system in your virtual infrastructure and every day you receive a notification in the mail that all backups have been completed, but, unfortunately, this does not mean that you can use these backups. And the reasons for this are actually many:
- As in the real life example, problems with disks can affect the backup copies located on them (the most terrible case, as for me);
- The operating system may not start if inconsistent backups are used;
- An application located in the system may feel bad after the restoration of the system.
Etc.
Veeam Backup & Replication has an interesting solution called SureBackup, which allows you to check backups, as well as some applications located inside the systems. For those who are not familiar with this technology, you can read here . You can get this opportunity with Enterprise licenses , or Enterprise Plus.
The SureBackup operation algorithm is quite simple:
- An isolated lab is created on a host in a virtualization cluster;
- Using vPower NFS, the virtual machine from the backup is started in this lab;
- A series of automated tests are performed;
- A report of test recovery results is sent.
The vPower NFS technology allows you to run virtual machines on hypervisors directly from backup files.
The list of tests that SureBackup can perform:
- Check the launch of the virtual machine;
- Checking the Heartbeat operating system (VMware tools are required in the guest operating system);
- Check ping to virtual machine;
- Run scripts to check applications inside the system (an account is required to access the guest OS).
And now how to set it up.
I use a test lab in which there is a VMware ESXi 5.5 cluster, Shared Storage, as well as a separate hypervisor on which the test recovery will be performed.
All addresses are fictitious, any coincidences are random.
SureBackup is configured directly from the Veeam BR console, and the first thing to do is to prepare the Virtual Lab. You can find it on the Backup Infrastructure tab → SureBackup → Virtual Labs.
Now there are no laboratories, you need to create a new one:

Clicking on Add Virtual Lab first of all we will be asked to somehow name our laboratory and specify its description.

Next, you need to specify the host on which the virtual machines will be launched and tested. I prefer to use a separate host from the productive cluster:

The next step is to select one of the storages connected to the hypervisor, which will host the temporary files needed by Veeam for recovery, as well as the virtual machine needed to test and configure the network in the virtual lab:

To interact with test virtual machines over the network, a Proxy Appliance installation is required. You can refuse to use this feature, however, in this case, many test features, such as network testing, access to virtual machines via the network, will not be available. A proxy appliance is a virtual machine that looks one interface into the work network, and the others, depending on the settings, are isolated. This virtual machine is automatically deployed when creating a virtual lab, you do not need to install the system and configure routing manually:

To configure the Proxy Appliance correctly, you must specify the network settings for which this virtual machine will be available for the Backup & Replication server.
You must specify:
A virtual switch hypervisor network that this appliance will use;
IP settings for which this appliance will be available for the BR server;


After specifying the settings for the Proxy Appliance, the next step is to configure isolated networks for our virtual lab. Options presented 3:
- Basic single-host - automatic configuration of network settings. In this variant, only one isolated network will be created, similar to the network specified in the appliance settings;
- Advanced single-host - manual configuration of isolated networks. I think that most people use not one network for their virtual machines, but several networks divided into VLANs, respectively, in order to correctly test the network of virtual machines with different network settings, we need to create several networks;
- Advanced multi-host - Used when a virtual lab needs to be distributed to multiple hosts, for example, to test replicas. Uses the capabilities of VMware Distributed Switch (VDS).

Since I need to test virtual machines located on different networks, I will use the Advanced single-host option.
On the Isolated Networks tab, the system automatically creates one isolated network, similar to the network in which the proxy appliance is located (Virtual machines running in the laboratory from backups will be connected to isolated networks and will not broadcast to production).
In my case, this is the V39 network and VLAN ID 39:

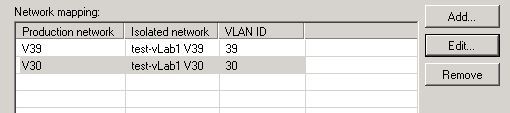
You need to add another network for virtual machines from another VLAN. When you click the Add button, a window will appear in which you must select the Production Network that corresponds to any of the vSwitch networks and compare it with the Isolated Network in the virtual lab. In my case, I add the V30 network that my virtual machine uses from the backup:
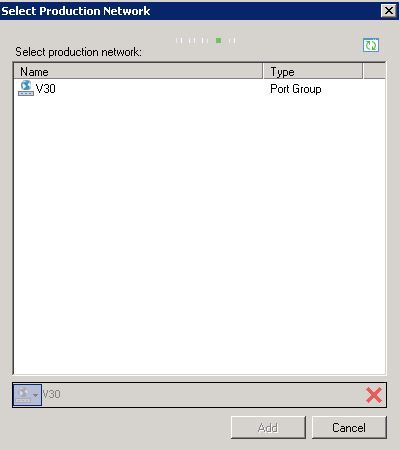
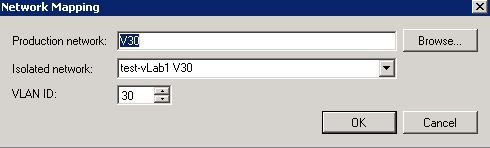
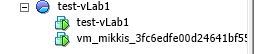
As a result, the following rule is formed: Virtual machines whose network interface uses a V30 network with a vSwitch will be connected to the test-vLab1 V30 network in a virtual laboratory, and virtual machines with a V39 network to the test-vLab1 V39 network, respectively:
The next step is perhaps the most interesting. Using the proxy appliance virtual machine, we can access the virtual machines from the outside, because the proxy acts as a router between our network and the isolated one, in which the test machines are located. Access is carried out due to the masquerading of the real addresses of the machines that are in the virtual lab, while the machines themselves work inside an isolated network with their real addresses.
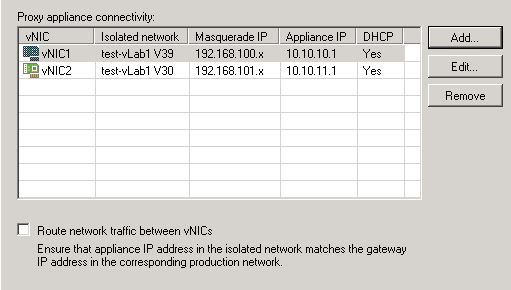
By default, the proxy appliance creates only one network interface for the first isolated network. I will create two interfaces for my two networks V30 and V39:

First of all, I will change the settings for the vNIC1 (the first interface of the proxy appliance virtual machine) to interact with the isolated V39 network. This can be done by clicking the Edit button. Initially, the settings are as follows:
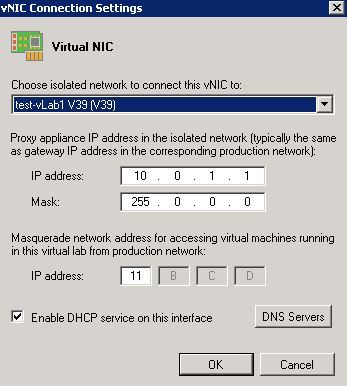
And now the changed values for my network:
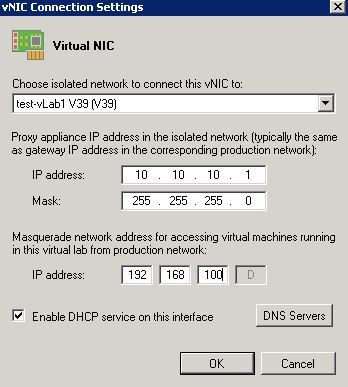
The first field is an isolated network in which our proxy appliance interface will look.
Further, the address and mask are indicated, with which the proxy will look into this network, as Veeam writes, usually it is an address similar to the gateway of this network. Virtual machines in an isolated network can communicate with each other through this gateway.
The next field is masquerading (address spoofing). It works approximately as follows (if I understand correctly):
I use a class C network mask and an appropriate mask for masquerading 192.168.100.XXX.
How does Veeam work in this case? When restoring a virtual machine to a test lab, it determines the address of the virtual machine. We admit this address 10.10.10.113.
Then, since I use the network mask / 24, the last octet is taken from this address, i.e. 113. A masked address is formed 192.168.100 + 113. As a result, from the outside my car is accessible at this address.
To get access to it, you need to update your routing table, where you need to indicate that we will go to 192.168.100.113 through the gateway (which in our case is the Proxy Appliance) with the address 10.10.10.62.
As a result, for my two isolated networks, the following configuration is obtained:
Follow on to Ready to Apply.
Upon completion of the creation of Virtual Lab, you can verify the total settings of the virtual laboratory, which will be obtained:

And, by pressing the Next button, the creation of our laboratory will begin. What is Veeam doing at this moment?
1. A resource pool is created on the dedicated host, in which the Proxy Appliance and the virtual machines being restored will be located;
2. A virtual switch vSwitch is created with the name of our laboratory;
3. On this vSwitch virtual networks are created that were specified earlier. test-vLab1 V39 and test-vLab1 V30. As you can see, this switch does not use physical network adapters, which prevents attempts to exit the virtual machines to the outside;

4. Proxy Appliance virtual machine is deployed (the machine is located on the datastore, which was specified at the very beginning);
5. In our example, this virtual machine has 3 network interfaces. The first to connect to the production network. This interface is connected to vSwitch0. Two others for an isolated network from vSwitch1 (the more networks - the more interfaces):

At this stage, the creation of a virtual laboratory is completed.
The next step is to create Appliaction Groups - a group of virtual machines that will be launched during testing. For example, DNS, Domain Controller, Mail Server. In my example, everything is simpler, just two independent virtual machines without services.
In Veeam BR, go to the Application Groups tab and select the Add App Group. Specify the name of our group:

Next, you need to select virtual machines for the test. The order in which the machines are added matters, because it is in this order that SureBackup will run them. It would be illogical to start the mail server first, and only then the DNS. To add a machine, click on Add VM. You can add a machine from the backup file, from the replica, or from the Storage Snapshot:
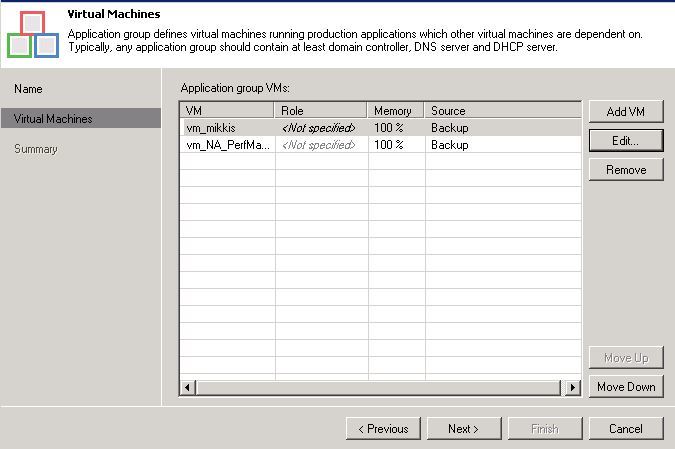
In fairness it should be noted that the order of the machines can be changed using the Move Up and Move Down buttons.
If you select a machine and click the Edit button, you can specify a list of tests that will be performed on this machine. These are roles, scripts and launch options. In my case, I want to make sure that the machine will start and respond to the ping, so I’m only interested in the Startup Options tab:
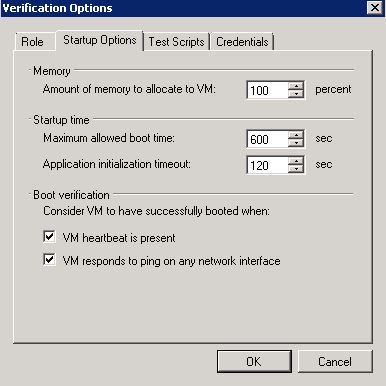
Fields of interest:
- Maximum allowed boot time - the time that SureBackup will wait for the system to start;
- VM heartbeat is present - heartbeat from the virtual machine will be verified;
- VM responds to ping on any network interface — the virtual machine responds to ping via network interfaces.
We change the settings on your own. You can also set up verification scripts and stuff, but I will leave this outside the scope of this article.
We keep our group, having previously checked the settings.
Now we have a virtual lab and a group of virtual machines that need to be tested. This is quite simple - you need to create a SureBackup task on the Backup & Replication tab :
- As elsewhere, we indicate the name of the task and its description;
- On the next tab, choose our virtual lab;
- Next, select our Application Group;
- Also, we can assign backup tasks directly to this task if Application Groups are not used;
- On the Settings tab, you can specify the email recipient, who will receive a report on verification of backups;
- The Schedule tab contains the schedule by which the scan task must be started. Validation tasks should not be launched simultaneously with backup tasks, otherwise the backup file will be blocked and one of the tasks will wait for the other to finish.
As a result, we have a SureBackup section in Jobs and our testing task:

It's time to start the task. And I will try to explain how everything works. When starting the task, we see a list of virtual machines for testing:

Testing of virtual machines will go in the order in which our Application Group is assembled.
1. Proxy Appliance starts automatically;
2. The first virtual machine is published using vPower NFS. At this moment, an additional repository from our VM is connected to our hypervisor using the NFS protocol, and it also publishes:

3. This virtual machine is started from the backup file:

4. Next, Veeam waits 600 seconds before launching the OS and starting the execution of tests, which he writes about in the logs:

From the log you can see that he found the network interface from the V30 network and assigned it the test-vLab1 V30 network. Then he checks the heartbeat and tries to pinganut the address to be determined:

In the summary log, you can observe that the tests on the first machine are completed, the second machine in the list from the Application Group is being initialized:

Note: Veeam BR server automatically assigns routes to masked addresses and, in principle, you can connect to them from it (This is the same address 192.168.101.113 from the example about masquerading above):

At the end of the test, Veeam stops the virtual machines in the reverse order and then deploys them from the vSphere:


We receive the treasured letter by email:

This is where I have everything on setting up and running SureBackup.
A little more about vPower NFS:
- vPowerNFS is mainly used in tasks such as Instant VM Recovery and SureBackup;
- vPowerNFS connects the NFS storage to the hypervisor and does not disable it at the end of work. This is done so that next time you do not have to mount it again and waste time. If you disable the NFS datastore, the next time it will be re-mounted;
- vPowerNFS presents the virtual machine from the backup file. All changes that occur in the disk subsystem of the machine are transferred to the redo log, which is stored on the vPowerNFS server, or on a specially selected datastore, while leaving the backup file unchanged. If the redo log is stored on the vPowerNFS server, take care of sufficient disk space on the server;
In general, setting up SureBackup except for the moment of setting up networks and masquerading should not cause problems. It turned out a little more than I expected, but this cannot be divided into parts.
Thanks for attention. Make and check backups.
Source: https://habr.com/ru/post/311784/
All Articles