We launch a simple blog on Wagtail CMS (Django) - part 2
Since writing the first part about Wagtail CMS , version 1.6.3 has already been released - it's time to continue our journey on creating a simple blog.
Part 1
Part 3
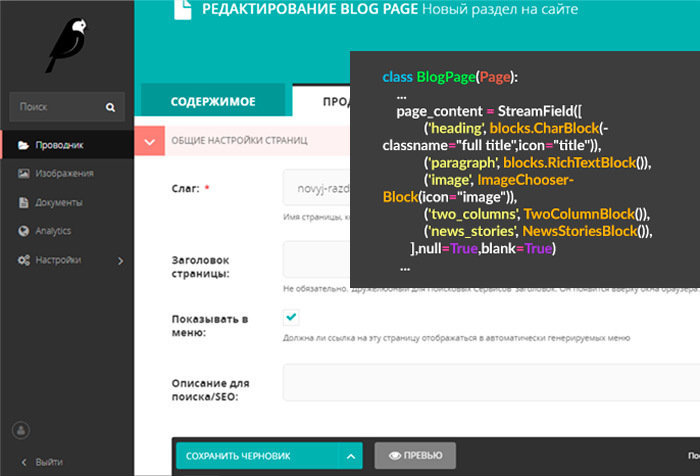
In the first part, we created only the first blog post. For the full-fledged work of our site, this is not enough, so it's time to make a full-fledged subsection, bringing home the last three posts, navigation, bread crumbs and a slider.
')
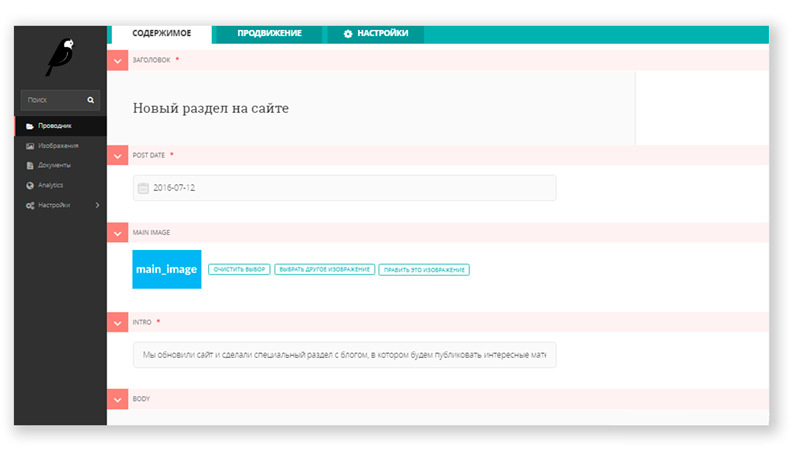
In the last part, we created a basic blog page, which by default has the main image 'main_image' .
In Wagtail, image logic is pretty simple. The following is responsible for managing images in models.py:
In the admin panel, adding an image is displayed like this:
Adding an image to a page is determined by the following block:
The image is displayed on the page due to the code in blog / templates / blog / blog_page.html :
If you have added a picture for your post, you should get a page of approximately this type.
More information about working with images in wagtail can be found in the documentation .
Now it's time to create a subsection in which all our posts will be blogindexpage.html. Add the following code to blog / models.py :
In the folder with templates, create a new one - blog / templates / blog / blog_index_page.html
and add the following code to it:
Migrate - python manage.py makemigrations and python manage.py migrate
Now the blogindexpage page template has appeared in the admin area, in which there is only a text block intro. We will add a page with this template as a child of the main page. The previously created page with the first post will need to be moved to the child section of the blogindexpage page .
Example of site structure: Home → subsection blogs → post page
We need to bring all posts to the subsection “blogs”, but if there are a lot of them, the page can be very large. Therefore, we will display only the last 9 posts, and to view the remaining posts, use the django pagination from the django.core.paginator module.
Make changes to models.py :
Now you need to create a template for post cards. In the blog / templates / blog folder, create an includes folder in which to create the html template blog_list_item.html - Example path: /blog/templates/blog/includes/blog_list_item.html
With the following content:
In the blog / templates / blog / blog_index_page.html template, you need to add the following code in the content block:
To implement pagination, add the following block to the same page:
We update everything, now you should display the last 9 posts in the blogs section, also you have a pagination.
Everything is good, it now remains to add a menu, for an easier transition between the pages of our blog.
The menu in Wagtail works out of the box, the “Show in menu:” parameter in the “Promotion” section is responsible for it when editing any page.
There is a detailed article on how to implement a menu in Wagtail.
I will briefly describe where and what should be added so that your site has a menu that can be controlled from the admin panel.
Add to base.html :
Create in the project folder / home / folder / templatestag / with the file home_tags.py , with the following content:
To somehow stylize the menu we create two templates: top_menu.html and top_menu_children.html in the folder / home / templates / home / tags /
We write in top_menu.html:
We write in top_menu_children.html:
It remains for us to make a slider for the main page, so that it becomes more fun and add the output of the last three posts from the blogs section. For this we need home_tags , created earlier.
The following code will answer for the work of the slider:
In the / home / templates / home / folder, create a folder / includes / , in it create a file slider.html :
For wagtail, you can use any slider, for example Nivo Slider, WOW or write your own. In this tutorial I use the slider that comes with materializecss.com/media.html . Choosing a slider for the site is a matter of taste and habit. To make the slider work, do not forget to add all the necessary dependencies (css, js).
Next we rule home / models.py by adding the following code:
We update, we make migrations, we restart the server and open the editing of the main page and see a new block with a slider.
To display the last three posts on the main page, add the following code:
In /home/templatestag/home_tags.py add:
In the folder / home / templates / home / tags / add a template blog_listing_homepage.html , with the content:
To display posts on the main page, add to home_page.html after the slider:
{% blog_listing_homepage%}
Be sure to make a normal markup in blocks for the home page so that all the content does not hang in one heap. Making migrations, updating, and seeing on the main page a slider and the last three posts (if you created them, of course)
We are almost ready to have a simple blog, there is a main page, a section of blogs, and you can view each post separately. We can create new sections, manage posts, change images. For starters, this is enough.
Add bread crumbs for better blog navigation and our project is ready for launch.
This is implemented by the following code in the blog_page.html and blog_index_page.html templates :
We make the block styles and get easy navigation in addition to the site menu.
The rest of the functionality can be added by analogy, create other sections, use different templates for different pages, attach banners and so on.
I hope that this basic lesson helped someone to get acquainted with the Wagtail CMS. In the next part I will write about using StreamField .
Part 1
Part 3
In the first part, we created only the first blog post. For the full-fledged work of our site, this is not enough, so it's time to make a full-fledged subsection, bringing home the last three posts, navigation, bread crumbs and a slider.
')
In the last part, we created a basic blog page, which by default has the main image 'main_image' .
In Wagtail, image logic is pretty simple. The following is responsible for managing images in models.py:
from wagtail.wagtailimages.edit_handlers import ImageChooserPanel In the admin panel, adding an image is displayed like this:
Adding an image to a page is determined by the following block:
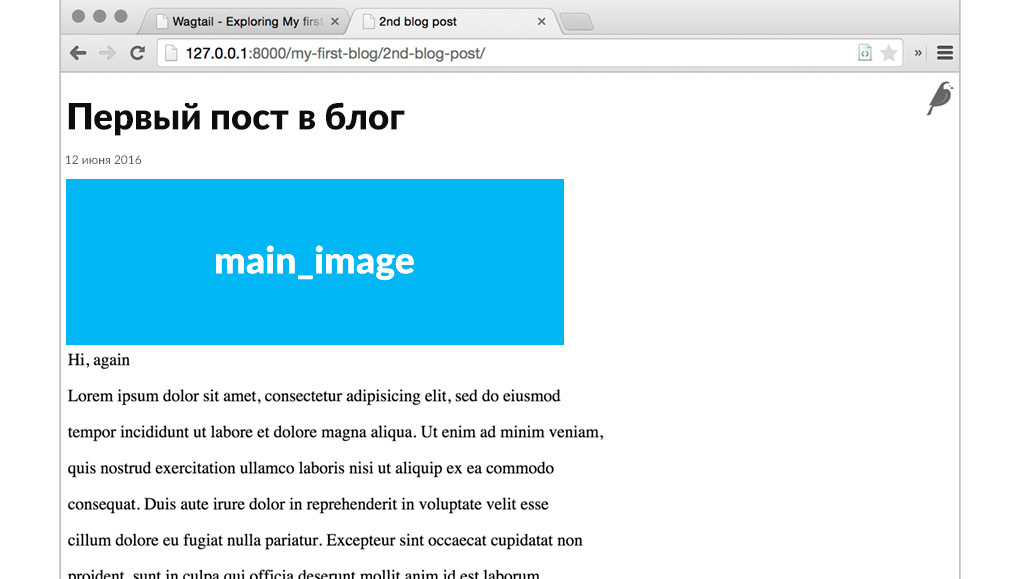
class BlogPage(Page): main_image = models.ForeignKey( 'wagtailimages.Image', null=True, blank=True, on_delete=models.SET_NULL, related_name='+' ) content_panels = Page.content_panels + [ FieldPanel('date'), ImageChooserPanel('main_image'), # . FieldPanel('intro'), FieldPanel('body'), ] The image is displayed on the page due to the code in blog / templates / blog / blog_page.html :
{% load wagtailcore_tags wagtailimages_tags %} {% if page.main_image %} {% image page.main_image width-500 %} # 500px {% endif %} If you have added a picture for your post, you should get a page of approximately this type.
More information about working with images in wagtail can be found in the documentation .
Now it's time to create a subsection in which all our posts will be blogindexpage.html. Add the following code to blog / models.py :
class BlogIndexPage(Page): intro = RichTextField(blank=True) content_panels = Page.content_panels + [ FieldPanel('intro', classname="full") ] In the folder with templates, create a new one - blog / templates / blog / blog_index_page.html
and add the following code to it:
{% extends "base.html" %} {% load wagtailcore_tags %} {% block body_class %}template-blogindexpage{% endblock %} {% block content %} <h1>{{ page.title }}</h1> <div class="intro">{{ page.intro|richtext }}</div> {% endblock %} Migrate - python manage.py makemigrations and python manage.py migrate
Now the blogindexpage page template has appeared in the admin area, in which there is only a text block intro. We will add a page with this template as a child of the main page. The previously created page with the first post will need to be moved to the child section of the blogindexpage page .
Example of site structure: Home → subsection blogs → post page
We need to bring all posts to the subsection “blogs”, but if there are a lot of them, the page can be very large. Therefore, we will display only the last 9 posts, and to view the remaining posts, use the django pagination from the django.core.paginator module.
Make changes to models.py :
from django.core.paginator import Paginator, EmptyPage, PageNotAnInteger class BlogIndexPage(Page): intro = RichTextField(blank=True) @property def blogs(self): # , blogs = BlogPage.objects.live().descendant_of(self) # blogs = blogs.order_by('-date') return blogs def get_context(self, request): blogs = self.blogs # page = request.GET.get('page') paginator = Paginator(blogs, 9) # 9 try: blogs = paginator.page(page) except PageNotAnInteger: blogs = paginator.page(1) except EmptyPage: blogs = paginator.page(paginator.num_pages) # context = super(BlogIndexPage, self).get_context(request) context['blogs'] = blogs return context content_panels = Page.content_panels + [ FieldPanel('intro', classname="full") ] Now you need to create a template for post cards. In the blog / templates / blog folder, create an includes folder in which to create the html template blog_list_item.html - Example path: /blog/templates/blog/includes/blog_list_item.html
With the following content:
{% load static wagtailcore_tags wagtailimages_tags %} # <div class="row media-object"> {% if blog.main_image %} <div class="media-object-section"> {% image blog.main_image fill-200x200 as img %} # 200px 200px <a href="{% pageurl blog %}"><img class="image_tmb" src="{{ img.url }}" /></a> </div> {% endif %} <div class="media-object-section"> <p class="data"><strong>{{ blog.date }}</strong></p> <a href="{% pageurl blog %}"><span>{{ blog.title }}</span></a> <p>{{ blog.intro }}</p> </div> </div> In the blog / templates / blog / blog_index_page.html template, you need to add the following code in the content block:
{% for blog in blogs %} {% include "blog/includes/blog_list_item.html" %} {% empty %} {% endfor %} To implement pagination, add the following block to the same page:
# - django.core.paginator # <div class="row"> <ul class="pagination center"> {% if blogs.has_previous %} <li class="waves-effect"><a href="?page={{ blogs.previous_page_number }}{% for key,value in request.GET.items %}{% ifnotequal key 'page' %}&{{ key }}={{ value }}{% endifnotequal %}{% endfor %}""><i class="material-icons">chevron_left</i></a></li> {% endif %} {% if blogs.has_previous %} <li class="waves-effect"><a href="?page={{ blogs.previous_page_number }}{% for key,value in request.GET.items %}{% ifnotequal key 'page' %}&{{ key }}={{ value }}{% endifnotequal %}{% endfor %}"">{{ blogs.previous_page_number }}</a></li> {% endif %} {% if blogs.has_next %} <li class="active"><a href="">{{ blogs.number }}</a></li> <li class="waves-effect"><a href="?page={{ blogs.next_page_number }}{% for key,value in request.GET.items %}{% ifnotequal key 'page' %}&{{ key }}={{ value }}{% endifnotequal %}{% endfor %}">{{ blogs.next_page_number }}</a></li> {% else %} <li class="active"><a href="">{{ blogs.number }}</a></li> {% endif %} {% if blogs.has_next %} <li class="waves-effect"><a href="?page={{ blogs.next_page_number }}{% for key,value in request.GET.items %}{% ifnotequal key 'page' %}&{{ key }}={{ value }}{% endifnotequal %}{% endfor %}"><i class="material-icons">chevron_right</i></a></li> {% endif %} </ul> </div> We update everything, now you should display the last 9 posts in the blogs section, also you have a pagination.
Everything is good, it now remains to add a menu, for an easier transition between the pages of our blog.
The menu in Wagtail works out of the box, the “Show in menu:” parameter in the “Promotion” section is responsible for it when editing any page.
There is a detailed article on how to implement a menu in Wagtail.
I will briefly describe where and what should be added so that your site has a menu that can be controlled from the admin panel.
Add to base.html :
{% load home_tags %} #home_tags.py {% block menu %} {% get_site_root as site_root %} {% top_menu parent=site_root calling_page=self %} {% endblock %} Create in the project folder / home / folder / templatestag / with the file home_tags.py , with the following content:
from django import template from home.models import * from blog.models import * register = template.Library() @register.assignment_tag(takes_context=True) def get_site_root(context): return context['request'].site.root_page def has_menu_children(page): return page.get_children().live().in_menu().exists() @register.inclusion_tag('home/tags/top_menu.html', takes_context=True) def top_menu(context, parent, calling_page=None): menuitems = parent.get_children().live().in_menu() for menuitem in menuitems: menuitem.show_dropdown = has_menu_children(menuitem) menuitem.active = (calling_page.url.startswith(menuitem.url) if calling_page else False) return { 'calling_page': calling_page, 'menuitems': menuitems, 'request': context['request'], } @register.inclusion_tag('home/tags/top_menu_children.html', takes_context=True) def top_menu_children(context, parent): menuitems_children = parent.get_children() menuitems_children = menuitems_children.live().in_menu() return { 'parent': parent, 'menuitems_children': menuitems_children, 'request': context['request'], } To somehow stylize the menu we create two templates: top_menu.html and top_menu_children.html in the folder / home / templates / home / tags /
We write in top_menu.html:
{% load home_tags wagtailcore_tags %} {% get_site_root as site_root %} <li class="nav-item"><a href="{% pageurl site_root %}" class="menu_link_main" title="{{ site_root.title }}"></a></li> {% for menuitem in menuitems %} <li class="nav-item"> {% if menuitem.show_dropdown %} <a data-toggle="dropdown" class="menu_link_item" href="#">{{ menuitem.title }}</a> {% top_menu_children parent=menuitem %} {% else %} <a href="{% pageurl menuitem %}">{{ menuitem.title }}</a> {% endif %} </li> {% endfor %} We write in top_menu_children.html:
{% load home_tags wagtailcore_tags %} <ul class="dropdown-menu"> <li><a href="{% pageurl parent %}">{{ parent.title }}</a></li> {% for child in menuitems_children %} <li><a href="{% pageurl child %}">{{ child.title }}</a></li> {% endfor %} </ul> Please note - in the {% load%} block, you must make a call to your home_tags , otherwise it will not work. And, of course, do not forget to register all menu styles in the css file.It remains for us to make a slider for the main page, so that it becomes more fun and add the output of the last three posts from the blogs section. For this we need home_tags , created earlier.
The following code will answer for the work of the slider:
In the / home / templates / home / folder, create a folder / includes / , in it create a file slider.html :
{% load wagtailimages_tags wagtailembeds_tags %} {% if slider_items %} <div class="slider" id="homeSlider"> <ul class="slides"> {% for slider_item in slider_items %} <li> {% image slider_item.image width-1200 as imageslider %} <img src="{{ imageslider.url }}" class='home_slider' alt="{{ imageslider.alt }}" /> </li> {% endfor %} </ul> </div> {% endif %} For wagtail, you can use any slider, for example Nivo Slider, WOW or write your own. In this tutorial I use the slider that comes with materializecss.com/media.html . Choosing a slider for the site is a matter of taste and habit. To make the slider work, do not forget to add all the necessary dependencies (css, js).
Next we rule home / models.py by adding the following code:
from django.db import models from wagtail.wagtailcore.models import Page, Orderable from wagtail.wagtailcore.fields import RichTextField from wagtail.wagtailadmin.edit_handlers import (FieldPanel, InlinePanel, MultiFieldPanel, PageChooserPanel) from wagtail.wagtailimages.edit_handlers import ImageChooserPanel from wagtail.wagtailsearch import index from modelcluster.fields import ParentalKey from wagtail.wagtailsnippets.models import register_snippet class HomePage(Page): body = RichTextField(blank=True) disc_t = RichTextField(blank=True) search_fields = Page.search_fields + [ index.SearchField('body'), index.SearchField('disc_t'), ] content_panels = Page.content_panels + [ InlinePanel('slider_items', label=""), # FieldPanel('body', classname="full"), FieldPanel('disc_t', classname="full"), ] class LinkFields(models.Model): link_external = models.URLField("URL", blank=True) link_page = models.ForeignKey( 'wagtailcore.Page', null=True, blank=True, related_name='+' ) @property def link(self): if self.link_page: return self.link_page.url else: return self.link_external panels = [ FieldPanel('link_external'), PageChooserPanel('link_page'), ] class Meta: abstract = True class SliderItem(LinkFields): image = models.ForeignKey( 'wagtailimages.Image', null=True, blank=True, on_delete=models.SET_NULL, related_name='+' ) panels = [ ImageChooserPanel('image') ] class Meta: abstract = True class HomePageSliderItem(Orderable, SliderItem): page = ParentalKey('HomePage', related_name='slider_items') We update, we make migrations, we restart the server and open the editing of the main page and see a new block with a slider.
To display the last three posts on the main page, add the following code:
In /home/templatestag/home_tags.py add:
@register.inclusion_tag( 'home/tags/blog_listing_homepage.html', takes_context=True ) def blog_listing_homepage(context, count=3): #count=3 3 blogs = BlogPage.objects.live().order_by('-date') # return { 'blogs': blogs[:count].select_related('main_image'), 'request': context['request'], } In the folder / home / templates / home / tags / add a template blog_listing_homepage.html , with the content:
{% if blogs %} {% for blog in blogs %} {% include "blog/includes/blog_list_item.html" %} {% endfor %} {% endif %} To display posts on the main page, add to home_page.html after the slider:
{% blog_listing_homepage%}
Be sure to make a normal markup in blocks for the home page so that all the content does not hang in one heap. Making migrations, updating, and seeing on the main page a slider and the last three posts (if you created them, of course)
We are almost ready to have a simple blog, there is a main page, a section of blogs, and you can view each post separately. We can create new sections, manage posts, change images. For starters, this is enough.
Add bread crumbs for better blog navigation and our project is ready for launch.
This is implemented by the following code in the blog_page.html and blog_index_page.html templates :
{% if self.get_ancestors|length > 1 %} <div class="breadcrumb_page"> {% for page in self.get_ancestors %} {% if page.is_root == False %} <a class="breadcrumb" href='{% pageurl page %}'>{{ page.title }}</a> {% endif %} {% endfor %} <span class="breadcrumb_active">{{ self.title }}</span> </div> {% endif %} We make the block styles and get easy navigation in addition to the site menu.
The rest of the functionality can be added by analogy, create other sections, use different templates for different pages, attach banners and so on.
I hope that this basic lesson helped someone to get acquainted with the Wagtail CMS. In the next part I will write about using StreamField .
Source: https://habr.com/ru/post/311756/
All Articles