GUI for php, or we cross written extension with a screenshot
This article will discuss the practical application of the gtkPHP7 extension, which we wrote earlier in this article , and srcphp (php screenshot) written in this article . Since the publication of the article, where we wrote the extension gtkPHP7 several days have passed. And I was thinking how to build this library so that it would be in the spirit of php. Simple and convenient to use, as well as could satisfy (so far only my) needs for it. For details, I ask under the cat.
Today we will touch on several topics:
2. 1. The principle of the expansion
2. The technical side of the solution
3. Tools debug expansion
')
The main goal was usability. As we all know, php works in one thread, there are, of course, extensions that allow us to create threads and work with them, but in the case of using threads, difficulties arise related to managing them. And in principle, while this is not necessary. Therefore, for me, the priority was the straightness of the logic of work, i.e. if we call the class method:
Then we get the following result:
And when you click on the ok button:

That is, the concept is to become PHP, start-> any execution of any sequential actions-> completion of the script.
I decided to split the extension to the main part (main.cpp), and modules, each of which implement one or another widget for use in php. To do this, I created the src / folder where the actual code lies, and transferred all the sources to a new directory. When the source is transferred, we need to fix the Makefile as follows, specifying where the .cpp files are located:
Below is an example of a class that implements the preview window:
File previewWindow.h
Next, let's take a look at the file itself, namely, analyze the preview.
The method turned out to be quite long, so let's try to consider only the key points.
With these three lines we create an instance of the application and the builder (something like a factory in php). And load the picview.glade file.
Yes, to facilitate the creation of forms, I used glade - a form editor for gtk.
By creating a file describing the position of the elements (or in other words layouts) in xml format. We simply load it and take the elements we need:
In cancelClick:
We remove mainWindow and set the status of the cancel button as clicked. The final touch is to launch the application (in this case, display the window):
At this moment, a “loop” is created, which keeps the window open, and does not continue. But the moment we click on the button, we delete mainWindow, and the program goes to the method:
which returns a string indicating what was pressed.
Probably every “C” programmer knows what gdb is, but not every php programmer knows about it, although it can be very useful, even if you are not developing in “C”. For example, I somehow learned why apache gave segfault and generated core dump ...
So, gdb - gnu debuger debugger for c and c ++ can do a lot: set breakpoints, read memory dumps, build stack trace. So, imagine that your extension falls from segfault, but rather php (since the extension is connected to the interpreter). Like everything, compiled and should work. But no.
First we need to recompile our project, with the option -g. For this, I fixed the Makefile:
And compiled with this option. After that, a php script was written that caused the core dump, and launched under gdb:
Thus, gdb shows us the error that occurred, and the backtrace, by which you can determine exactly what the problem is (at least for me the project is small).
As a conclusion
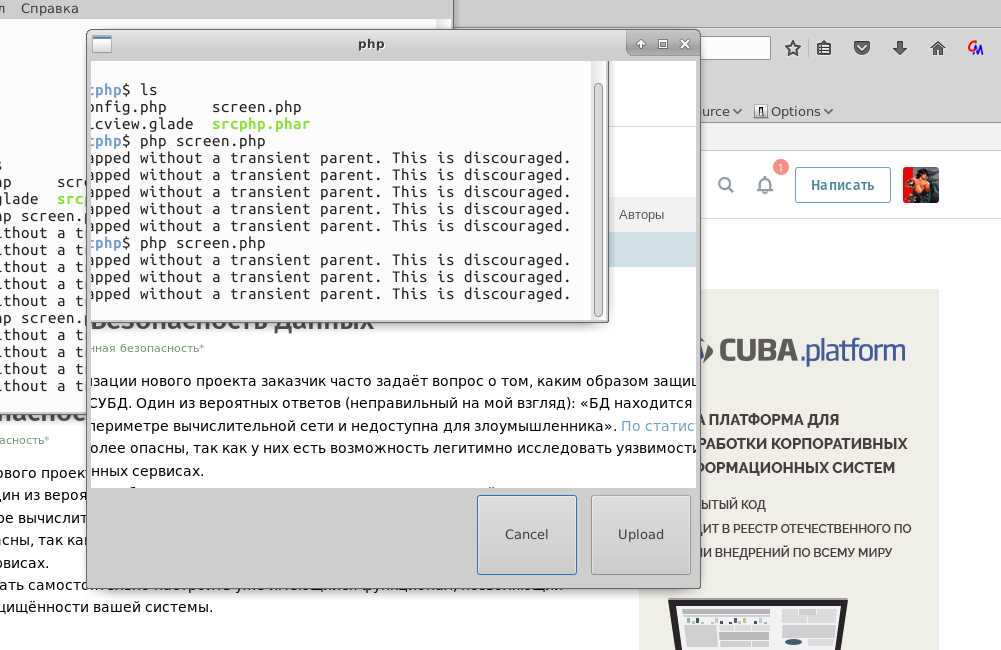
After debugging the extensions, I integrated the gui into the screenshot:
This script works in three steps:
1. Alert, which displays a hint how to make a screenshot:
2. After selecting a site and creating a screenshot, a preview opens:

3. After clicking on the upload button, an alert appears with a link

In conclusion.
Repository links:
Dependencies:
Today we will touch on several topics:
2. 1. The principle of the expansion
2. The technical side of the solution
3. Tools debug expansion
')
Expansion principle
The main goal was usability. As we all know, php works in one thread, there are, of course, extensions that allow us to create threads and work with them, but in the case of using threads, difficulties arise related to managing them. And in principle, while this is not necessary. Therefore, for me, the priority was the straightness of the logic of work, i.e. if we call the class method:
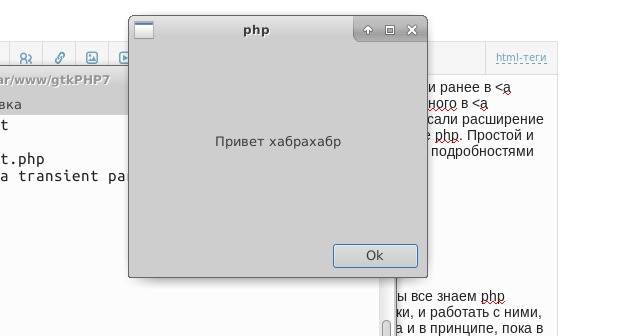
$result = $gtk->alert(" !"); var_dump($result); Then we get the following result:
And when you click on the ok button:
That is, the concept is to become PHP, start-> any execution of any sequential actions-> completion of the script.
The technical side of the issue
I decided to split the extension to the main part (main.cpp), and modules, each of which implement one or another widget for use in php. To do this, I created the src / folder where the actual code lies, and transferred all the sources to a new directory. When the source is transferred, we need to fix the Makefile as follows, specifying where the .cpp files are located:
SOURCES = $(wildcard src/*.cpp) Below is an example of a class that implements the preview window:
The same screen and hat
File previewWindow.h
class GtkPhpPreviewWindow { private: Gtk::Window *mainWindow = nullptr; // protected: int statusUpload = 0; // upload int statusCancel = 0; // cancel public: std::string preview(char *fileSrc); // void uploadClick(); // callback void cancelClick(); std::string getStatusUpload(); // }; Next, let's take a look at the file itself, namely, analyze the preview.
listing preview
/** * run preview window */ std::string GtkPhpPreviewWindow::preview(char *fileSrc) { int argc = 0; char **argv = NULL; auto app = Gtk::Application::create(argc, argv, "org.gtkmm.gtkphp7"); auto refBuilder = Gtk::Builder::create(); try { refBuilder->add_from_file("picview.glade"); } catch (const Glib::FileError &ex) { std::cerr << "FileError: " << ex.what() << std::endl; } catch (const Gtk::BuilderError &ex) { std::cerr << "BuilderError: " << ex.what() << std::endl; } refBuilder->get_widget("window1",mainWindow); Gtk::Image *image = nullptr; refBuilder->get_widget("preview", image); Gtk::Button *buttonUpload = nullptr; refBuilder->get_widget("upload", buttonUpload); buttonUpload->signal_clicked().connect( sigc::mem_fun(*this, &GtkPhpPreviewWindow::uploadClick) ); Gtk::Button *buttonCancel = nullptr; refBuilder->get_widget("cancel", buttonCancel); buttonCancel->signal_clicked().connect( sigc::mem_fun(*this, &GtkPhpPreviewWindow::cancelClick) ); image->set(fileSrc); app->run(*mainWindow); return getStatusUpload(); } The method turned out to be quite long, so let's try to consider only the key points.
auto app = Gtk::Application::create(argc, argv, "org.gtkmm.gtkphp7"); auto refBuilder = Gtk::Builder::create(); refBuilder->add_from_file("picview.glade"); With these three lines we create an instance of the application and the builder (something like a factory in php). And load the picview.glade file.
Yes, to facilitate the creation of forms, I used glade - a form editor for gtk.
Preview in glade
By creating a file describing the position of the elements (or in other words layouts) in xml format. We simply load it and take the elements we need:
Gtk::Button *buttonCancel = nullptr; refBuilder->get_widget("cancel", buttonCancel); // buttonCancel->signal_clicked().connect( sigc::mem_fun(*this, &GtkPhpPreviewWindow::cancelClick) // ); In cancelClick:
/** * callback cancel button */ void GtkPhpPreviewWindow::cancelClick() { statusCancel = 1; delete mainWindow; } We remove mainWindow and set the status of the cancel button as clicked. The final touch is to launch the application (in this case, display the window):
app->run(*mainWindow); At this moment, a “loop” is created, which keeps the window open, and does not continue. But the moment we click on the button, we delete mainWindow, and the program goes to the method:
/** * get status upload * @return */ std::string GtkPhpPreviewWindow::getStatusUpload() { if (statusUpload == 1) { return "upload"; } else { return "cancel"; } } which returns a string indicating what was pressed.
Debugging tools
Probably every “C” programmer knows what gdb is, but not every php programmer knows about it, although it can be very useful, even if you are not developing in “C”. For example, I somehow learned why apache gave segfault and generated core dump ...
So, gdb - gnu debuger debugger for c and c ++ can do a lot: set breakpoints, read memory dumps, build stack trace. So, imagine that your extension falls from segfault, but rather php (since the extension is connected to the interpreter). Like everything, compiled and should work. But no.
First we need to recompile our project, with the option -g. For this, I fixed the Makefile:
COMPILER = g++ -g And compiled with this option. After that, a php script was written that caused the core dump, and launched under gdb:
$ gdb php $ /.. gdb ../ (gdb) run ./test.php # $ .... coredump (gdb) bt # backtrace Thus, gdb shows us the error that occurred, and the backtrace, by which you can determine exactly what the problem is (at least for me the project is small).
As a conclusion
After debugging the extensions, I integrated the gui into the screenshot:
New code
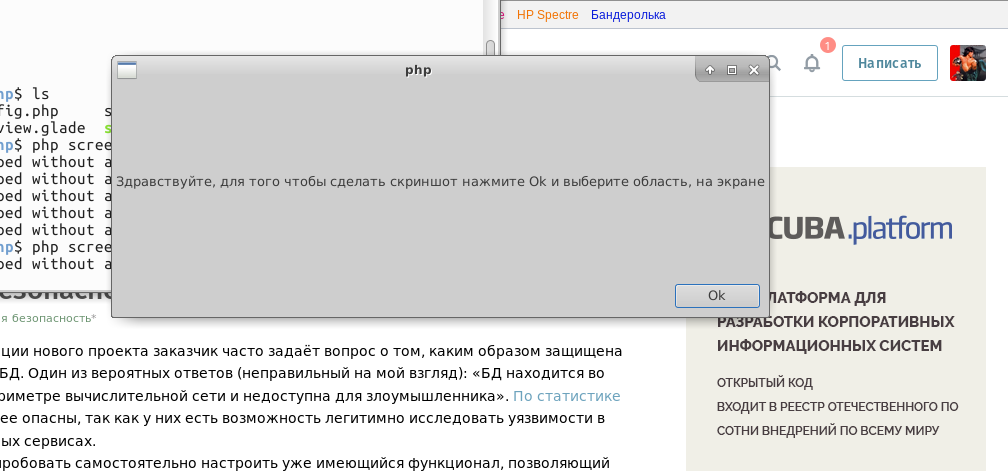
#!/usr/bin/php <?php require_once('classis/autoload.php'); class screenShoter { protected $_nameScreenshot = null; protected $_config = null; protected $_gtk = null; public function __construct() { $this->_gtk = new GtkPhp(); $request = new Request(); if(isset($argv[1]) && $argv[1] == '--getToken') { echo $request->getOauthLink();die; } $home = $_SERVER['HOME']; $this->_config = include($home . '/.config/scrphp/config.php'); $this->_nameScreenshot = date('Y_m_d_G_i_s_') . 'screen.png'; $this->scrot(); } public function scrot() { $this->_gtk->alert(", Ok , "); system('scrot -s /tmp/'.$this->_nameScreenshot); $resultPrev = $this->_gtk->preview('/tmp/'.$this->_nameScreenshot); if($resultPrev == 'upload') { $this->upload(); } else { $this->scrot(); } } public function upload() { $request = new Request(); $result = $request ->setToken($this->_config['token']) ->setFileNameOnDisk($this->_nameScreenshot) ->setPathToFile('/tmp/'.$this->_nameScreenshot) ->upload() ->publicateFile(); $url = $result['public_url']; $this->_gtk->alert(" :".$url); } } new screenShoter(); This script works in three steps:
1. Alert, which displays a hint how to make a screenshot:
2. After selecting a site and creating a screenshot, a preview opens:
3. After clicking on the upload button, an alert appears with a link
In conclusion.
Repository links:
1. gtkPHP7
2. srcphp screenshot
Dependencies:
1. gtkmm3
2. gtk3
3. glade
Source: https://habr.com/ru/post/311746/
All Articles