Backup and restore mail from the cloud using Veeam Backup for Microsoft Office 365
An increasing number of users are switching to Microsoft Office 365, and, naturally, they want to be sure that their data is safe when working with the cloud solution. At first glance it seems that if the letters are in the cloud, they are automatically reliably protected from failures and losses, but in fact this is not the case. In fact, you are provided with the resiliency of the mail server, but not backup emails. After all, if, for example, a virus that runs on the user's side encrypts emails in the cloud, then recovering them just won't work. Therefore, we decided to make a product that would allow us to store backup copies of letters locally. The tool to restore the contents of mailboxes was already available - this is Veeam Explorer for Microsoft Exchange, which successfully passed the test of time.
So, today I present to you the new Veeam Backup for Microsoft Office 365, which is scheduled for release in the 4th quarter of this year.
UPD: The release took place on November 29, read the description in Russian and download the trial version here .
For details, welcome under cat.
')

Of course, the administrator keeps track of the policies on the Exchange side — in particular, the retention policy for deleted objects. If the period for storing the letter in the Deleted Items Store has not yet been reached, then it can be taken out and restored. By default, the retention period is 30 days, the remote mailbox will be stored for the same amount (there is a policy for it, with the same default value). You can change this value in the Exchange Admin Center. You can read more about MRM (messaging records management) policy settings here .

Microsoft also uses the Exchange Data Availability Group (DAG) to protect its data. Well and, of course, traditional backup tools are quite applicable for internal use on the manufacturer's side - backups should help in the event of a disaster recovery. We have to admit, however, that accidents happen on the user’s side, and what to do in this case, how to protect and recover data is not entirely obvious. It turns out that the service level agreements on the side of the user organization depend on the policies of the manufacturer, but at the same time do not guarantee data recovery. This is where the new tool offered by Veeam can help - with its help you can provide backup copies on your side, as well as flexible recovery options.
As can be seen from the picture below, the scheme of work is quite simple:
1. Veeam Backup for Microsoft Office 365 collects information about the hierarchy and the actual mailbox data from Exchange Online using Exchange Web Services and PowerShell. Data is stored in a repository (local folder) in a structure identical to the Exchange database. It is convenient to start this process automatically on a schedule, for which the administrator creates a backup task. Each successful pass of such a task creates a recovery point that contains the structure and data of the Exchange database at the relevant time.
2, 3. In the Veeam Backup for Microsoft Office 365 console, you can select a recovery point according to what state you need to restore the object (s) from the mail database — this can be the last created point, or the one that was created in specified time. The base - in the state it was in when creating this point - is automatically opened for viewing (directly from the repository) using Veeam Explorer for Microsoft Exchange.
4. Now you can use the search, export and restore features of mailbox objects, folders and mailboxes in Exchange Online.
With this, everything is quite transparent: download the ZIP archive, there are two installers in it, one of which is the new Veeam Backup for Microsoft Office 365 itself, the second is the familiar Veeam Explorer for Microsoft Exchange, slightly modified to support the new tool.
You can install them together or separately, both on the physical and on the virtual machine.
Important! Supports Windows 2008 R2 and higher (64-bit). If you install on different machines, make sure that the one where Veeam Explorer for Exchange is to be installed has an OS version not lower than that of Veeam Backup for Office 365. You will also need local administrator rights for the installation.
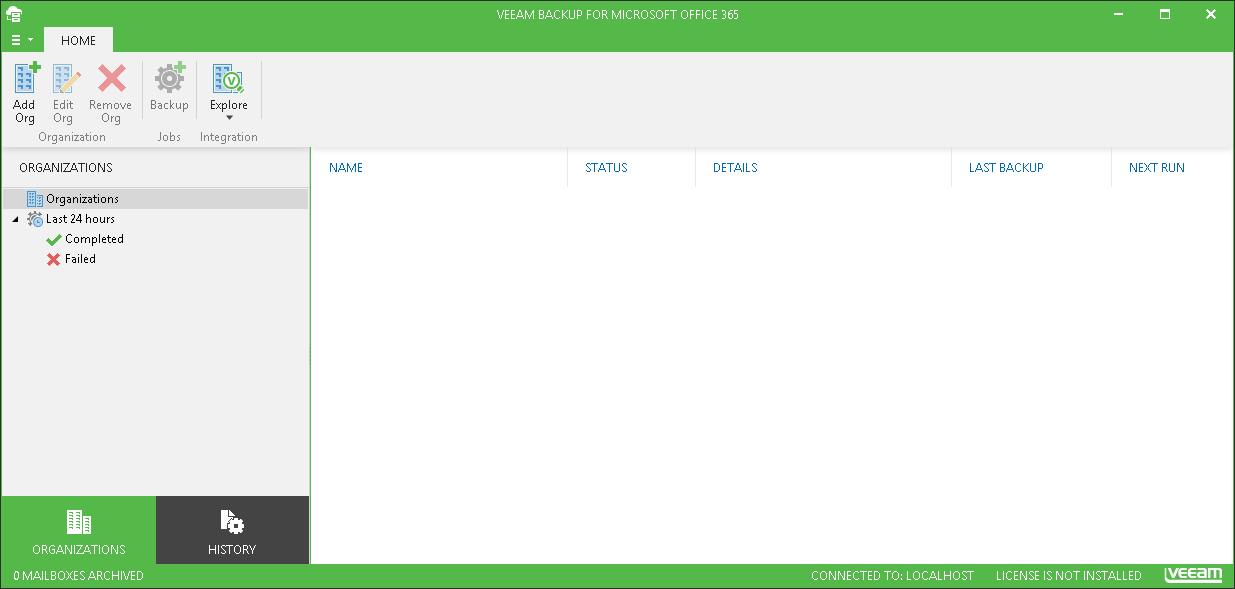
After installation, two freshly deployed applications will appear in the list of applications. We launch Veeam Backup for Microsoft Office 365. Its console immediately after installation will look like this:
Perform initial setup:
Important! The settings will be global, i.e. valid for all backup jobs!
With all the settings. We turn to thewater procedures of the main window - here we need to specify the organization of Office 365, whose mail will be backed up.
Note: In principle, no one bothers you to assign these roles manually using the same PowerShell cmdlets - in this case, Veeam simply checks for their presence, and if everything is in order, then you can continue working.
Now you need to create a backup task:
A few important points:
To restore, we need Veeam Explorer for Microsoft Exchange. You can run it, for example, like this:
Now you can use the familiar features of Veeam Explorer to export, transfer or restore an object to the desired location:
Perhaps today is all. You can get a trial version for self-reference at the link below.
UPD: NFR keys are now available for 10 user boxes; The conditions for obtaining them are the same as always (you can read about it here ). A license request can be sent from here .
So, today I present to you the new Veeam Backup for Microsoft Office 365, which is scheduled for release in the 4th quarter of this year.
UPD: The release took place on November 29, read the description in Russian and download the trial version here .
For details, welcome under cat.
')
What is being done in the cloud to preserve Office 365 Exchange Online data
Of course, the administrator keeps track of the policies on the Exchange side — in particular, the retention policy for deleted objects. If the period for storing the letter in the Deleted Items Store has not yet been reached, then it can be taken out and restored. By default, the retention period is 30 days, the remote mailbox will be stored for the same amount (there is a policy for it, with the same default value). You can change this value in the Exchange Admin Center. You can read more about MRM (messaging records management) policy settings here .
Microsoft also uses the Exchange Data Availability Group (DAG) to protect its data. Well and, of course, traditional backup tools are quite applicable for internal use on the manufacturer's side - backups should help in the event of a disaster recovery. We have to admit, however, that accidents happen on the user’s side, and what to do in this case, how to protect and recover data is not entirely obvious. It turns out that the service level agreements on the side of the user organization depend on the policies of the manufacturer, but at the same time do not guarantee data recovery. This is where the new tool offered by Veeam can help - with its help you can provide backup copies on your side, as well as flexible recovery options.
How Veeam Backup for Microsoft Office 365 works
As can be seen from the picture below, the scheme of work is quite simple:
1. Veeam Backup for Microsoft Office 365 collects information about the hierarchy and the actual mailbox data from Exchange Online using Exchange Web Services and PowerShell. Data is stored in a repository (local folder) in a structure identical to the Exchange database. It is convenient to start this process automatically on a schedule, for which the administrator creates a backup task. Each successful pass of such a task creates a recovery point that contains the structure and data of the Exchange database at the relevant time.
2, 3. In the Veeam Backup for Microsoft Office 365 console, you can select a recovery point according to what state you need to restore the object (s) from the mail database — this can be the last created point, or the one that was created in specified time. The base - in the state it was in when creating this point - is automatically opened for viewing (directly from the repository) using Veeam Explorer for Microsoft Exchange.
4. Now you can use the search, export and restore features of mailbox objects, folders and mailboxes in Exchange Online.
Installation and Setup
With this, everything is quite transparent: download the ZIP archive, there are two installers in it, one of which is the new Veeam Backup for Microsoft Office 365 itself, the second is the familiar Veeam Explorer for Microsoft Exchange, slightly modified to support the new tool.
You can install them together or separately, both on the physical and on the virtual machine.
Important! Supports Windows 2008 R2 and higher (64-bit). If you install on different machines, make sure that the one where Veeam Explorer for Exchange is to be installed has an OS version not lower than that of Veeam Backup for Office 365. You will also need local administrator rights for the installation.
After installation, two freshly deployed applications will appear in the list of applications. We launch Veeam Backup for Microsoft Office 365. Its console immediately after installation will look like this:
Perform initial setup:
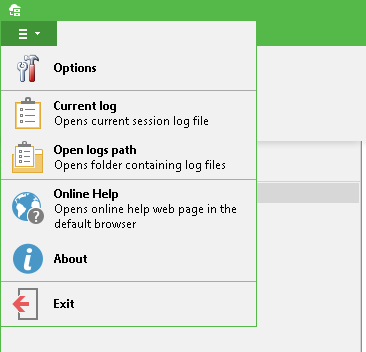
- Open the main menu by clicking on its icon in the upper left, next to the Home tab, and select Options from the list of commands:
- In the dialog that opens, we first need to set the repository settings, so we work with the Repository tab:
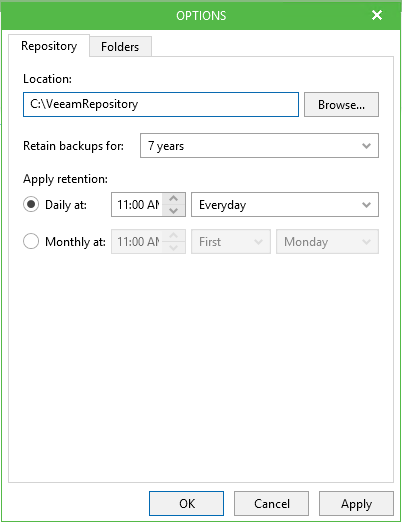
- Location - specify the path to the local folder into which the data from the cloud will be backed up. The default is C: \ VeeamRepository .
- Retain backups for - specify how long we want to store this data in the repository. The minimum is 1 month, the maximum is 7 years, the default will be 3 years ( 3 years ).
- Apply retention - when to check if the data retention period has expired. You can adjust the desired frequency. Shelf life will be counted from the inspection date. Objects that have expired will be deleted.
- Then go to the Folders tab and specify the exceptions - that is, what folders we will not back up.
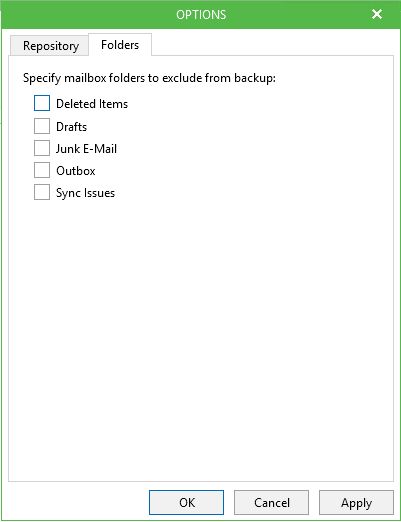
- Click Apply , saving the settings, and then OK , closing the dialog.
Important! The settings will be global, i.e. valid for all backup jobs!
With all the settings. We turn to the
- In the menu, select the Add Org command, after which the Add Organization wizard will start.
- Specify the username and password that will be used to access the Office 365 organization.
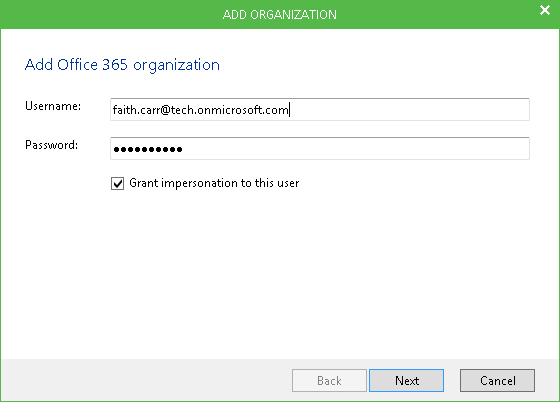
- The option Grant impersonation to this user is selected by default. Clicking Next will check if the user has the necessary roles. If not, they will be assigned using PowerShell. These are Role Management , View-Only Configuration and View-Only Recipients .
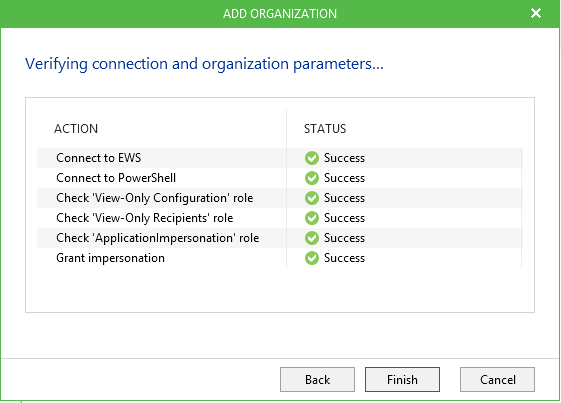
Note: In principle, no one bothers you to assign these roles manually using the same PowerShell cmdlets - in this case, Veeam simply checks for their presence, and if everything is in order, then you can continue working.
Backup
Now you need to create a backup task:
- We select our organization in the tree and click on the Backup command, launching the wizard.
- In the first step, enter the name of the task and, if necessary, a brief description.
- Then choose what we will back up. This can be either all the mailboxes from this organization ( Backup all mailboxes ), or only the selected mailboxes ( Backup the following mailboxes ) - in the latter case, you must click Select and select the ones you need in the loaded list.
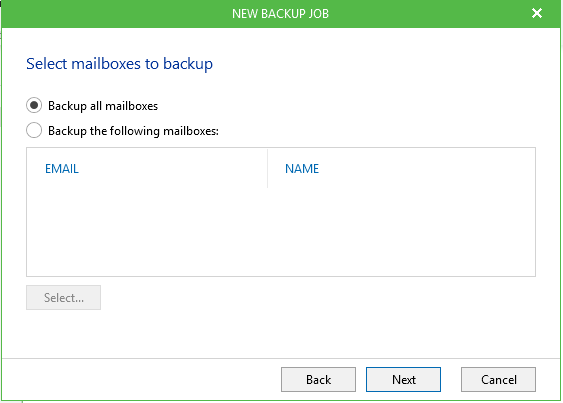
Note: Remember that the exception folders (Junk e-mail, Deleted Items, etc.) that we configured in the global options will not be backed up by any task. - Finally, we set up the schedule - everything is clear: periodically with the specified frequency, automatic termination in case of too long work (4 hours by default), restart in case of failure (by default 3 restarts, after waiting 10 minutes).
If we want the task to start immediately after the completion of the wizard, select the Run the job when I click Finish option.
A few important points:
- If you want to edit or delete the task at all, you must first deactivate it, for which you need to select Disable in the menu.
- Do not include the same mailbox in the processing of different tasks.
- In the beta, limits on the number of processed mailboxes comply with Microsoft’s SMB (small company) restrictions — that is, up to 300 mailboxes; own licensing scheme of this product will be prepared for the release version.
Object Recovery
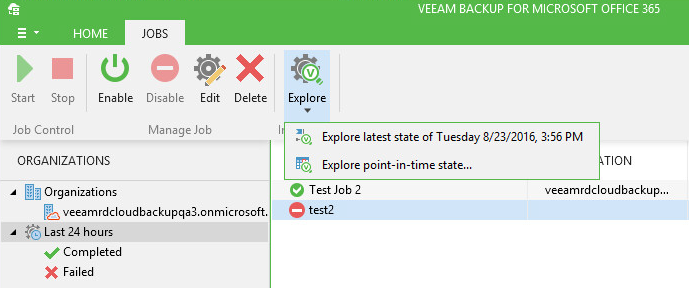
To restore, we need Veeam Explorer for Microsoft Exchange. You can run it, for example, like this:
- In the Veeam Backup menu for Microsoft Office 365, select the command Explore latest state as of <date_time> (view the last backup state from <date_time>) or Explore point-in time state (view the state at the time)
- If you need a specific point, then in the Explore Backup dialog that opens, select the corresponding recovery point and, if necessary, enable the options:
- Show items that have been deleted by user - show objects deleted by the user (at the time of creating the selected restore point)
- Show all versions of items that have been modified by user - show all versions (history) of objects deleted by user
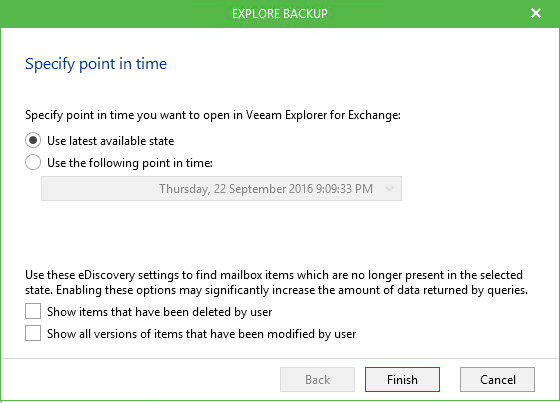
- After clicking Finish, the mail storage hierarchy will be “hooked” to Veeam Explorer for Microsoft Exchange directly from the backup and displayed in the Veeam Explorer window, which will automatically start:
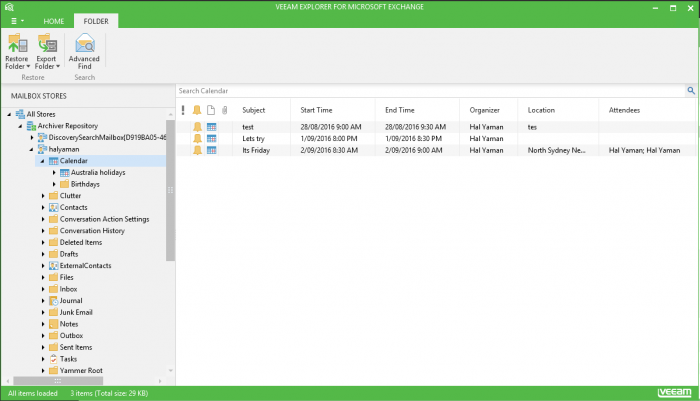
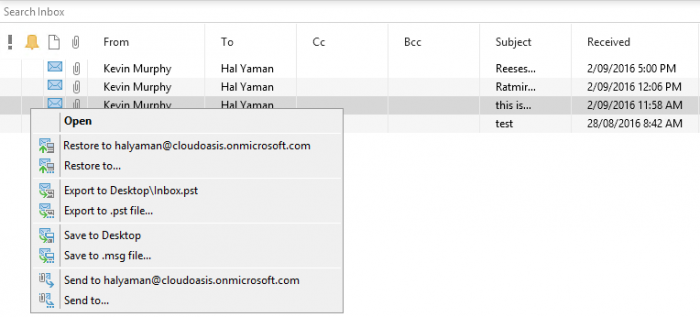
Now you can use the familiar features of Veeam Explorer to export, transfer or restore an object to the desired location:
Perhaps today is all. You can get a trial version for self-reference at the link below.
UPD: NFR keys are now available for 10 user boxes; The conditions for obtaining them are the same as always (you can read about it here ). A license request can be sent from here .
useful links
- Veeam Backup for Microsoft Office 365 Overview and Trial Version Download Link
- Suggestions, comments and suggestions can be left on the forum Veeam (in English. Language)
- Article on Habré about the restoration of application objects using the tools of Veeam Explorers
- Veeam Explorer for Microsoft Exchange Review (in Russian)
Source: https://habr.com/ru/post/311738/
All Articles