Installing OTRS 5 on a server with Nginx

Installing Helpdesk OTRS, I was faced with the fact that the work is officially supported only with the Apache HTTP Server , and I needed Nginx . As it turned out, there is no detailed installation guide for OTRS on a WEB server running Nginx on the Internet, we will try to fix it. This article will describe only the installation of OTRS version 5.0.13, and its configuration is a separate topic. CentOS 7 will be the OS on which the server will be deployed.
Nginx
We connect repositories of Epel and Nginx.
yum install epel-release yum localinstall http://nginx.org/packages/centos/7/noarch/RPMS/nginx-release-centos-7-0.el7.ngx.noarch.rpm Install Nginx.
yum update && yum install wget bzip2 nginx ')
We create an approximate Nginx configuration file, this article was taken as a basis.
mv /etc/nginx/nginx.conf /etc/nginx/nginx.conf.orig vi /etc/nginx/nginx.conf Hidden text
user nginx; worker_processes 2; worker_rlimit_nofile 4096; error_log /var/log/nginx/error.log warn; pid /var/run/nginx.pid; events { worker_connections 1024; } http { include /etc/nginx/mime.types; default_type application/octet-stream; log_format main '\$remote_addr - \$remote_user [\$time_local] "\$request" ' '\$status \$body_bytes_sent "\$http_referer" ' '"\$http_user_agent" "\$http_x_forwarded_for"'; access_log /var/log/nginx/access.log main; sendfile on; tcp_nopush on; keepalive_timeout 65; server_names_hash_bucket_size 128; server_tokens off; gzip on; include /etc/nginx/conf.d/*.conf; } Create a host config by replacing HOST with your domain name.
vi /etc/nginx/conf.d/default.conf Hidden text
#server { # listen 80; # server_name otrs.HOST; # rewrite ^ https://$http_host$request_uri? permanent; #} server { listen 80; listen 443 ssl; server_name otrs.HOST; root /opt/otrs/var/httpd/htdocs; error_log /var/log/nginx/otrs-error.log warn; ssl_certificate /etc/letsencrypt/live/HOST/fullchain.pem; ssl_certificate_key /etc/letsencrypt/live/HOST/privkey.pem; ssl_dhparam /etc/ssl/HOST/dhparam.pem; ssl_session_cache shared:SSL:1m; ssl_session_timeout 1h; ssl_stapling on; ssl_stapling_verify on; ssl_trusted_certificate /etc/letsencrypt/live/otrs.HOST/fullchain.pem; resolver 77.88.8.88 8.8.8.8 valid=300s; resolver_timeout 10s; ssl_protocols TLSv1 TLSv1.1 TLSv1.2; ssl_ciphers 'ECDHE-RSA-AES128-GCM-SHA256:ECDHE-ECDSA-AES128-GCM-SHA256:ECDHE-RSA-AES256-GCM-SHA384:ECDHE-ECDSA-AES256-GCM-SHA384:DHE-RSA-AES128-GCM-SHA256:DHE-DSS-AES128-GCM-SHA256:kEDH+AESGCM:ECDHE-RSA-AES128-SHA256:ECDHE-ECDSA-AES128-SHA256:ECDHE-RSA-AES128-SHA:ECDHE-ECDSA-AES128-SHA:ECDHE-RSA-AES256-SHA384:ECDHE-ECDSA-AES256-SHA384:ECDHE-RSA-AES256-SHA:ECDHE-ECDSA-AES256-SHA:DHE-RSA-AES128-SHA256:DHE-RSA-AES128-SHA:DHE-DSS-AES128-SHA256:DHE-RSA-AES256-SHA256:DHE-DSS-AES256-SHA:DHE-RSA-AES256-SHA:AES128-GCM-SHA256:AES256-GCM-SHA384:AES128-SHA256:AES256-SHA256:AES128-SHA:AES256-SHA:AES:DES-CBC3-SHA:!RC4:!aNULL:!eNULL:!MD5:!EXPORT:!EXP:!LOW:!SEED:!CAMELLIA:!IDEA:!PSK:!SRP:!SSLv:!aECDH:!EDH-DSS-DES-CBC3-SHA:!EDH-RSA-DES-CBC3-SHA:!KRB5-DES-CBC3-SHA'; ssl_prefer_server_ciphers on; add_header Strict-Transport-Security "max-age=15768000; includeSubDomains; preload;"; add_header X-Content-Type-Options nosniff; add_header X-Frame-Options "SAMEORIGIN"; add_header X-XSS-Protection "1; mode=block"; add_header X-Robots-Tag none; add_header X-Download-Options noopen; add_header X-Permitted-Cross-Domain-Policies none; location = / { return 301 https://otrs.HOST/otrs/customer.pl; } location /otrs-web { gzip on; alias /opt/otrs/var/httpd/htdocs; } location ~ ^/otrs/(.*.pl)(/.*)?$ { fastcgi_pass unix:/var/run/fcgiwrap.sock; fastcgi_index index.pl; fastcgi_param SCRIPT_FILENAME /opt/otrs/bin/fcgi-bin/$1; include fastcgi_params; } } Firewalld
Stop and mask NetworkManager.
systemctl stop NetworkManager systemctl mask NetworkManager systemctl stop NetworkManager-wait-online.service systemctl mask NetworkManager-wait-online.service We configure the Firewall, we will assume that the external interface is called enp5s0 .
firewall-cmd --permanent --zone=external --change-interface=enp5s0 firewall-cmd --permanent --zone=external --add-icmp-block=echo-reply firewall-cmd --permanent --zone=external --add-icmp-block=destination-unreachable firewall-cmd --permanent --zone=external --add-icmp-block=echo-request firewall-cmd --permanent --zone=external --add-icmp-block=time-exceeded firewall-cmd --permanent --zone=external --add-icmp-block=parameter-problem firewall-cmd --permanent --zone=external --add-service=http firewall-cmd --permanent --zone=external --add-service=https firewall-cmd --reload Restart the firewall and check what happened.
systemctl restart firewalld.service firewall-cmd --reload Fastcgi
For the interaction of OTRS and Nginx, we need the FCGI wrapper. Here the choice is not particularly great - use the Perl script from Denis S. Filimonov, or the FastCGI wrapper from Grzegorz Nosek . As an example, I cite both options, but I will continue to use the latter.
fastcgi-wrapper.pl
wget http://nginxlibrary.com/downloads/perl-fcgi/fastcgi-wrapper -O /usr/bin/fastcgi-wrapper.pl To work through the Unix socket, insert into the sub main section
$socket = FCGI::OpenSocket( "/var/run/perl-fcgi/perl-fcgi.sock", 10 ); and comment.
$socket = FCGI::OpenSocket( "127.0.0.1:8999", 10 ); We also make the corresponding changes to the Nginx config.
fastcgi_pass unix:/var/run/perl-fcgi/perl-fcgi.sock; For his work wrote Systemd service.
vi /etc/systemd/system/perl-fcgi.service [Unit] Description=Perl FastCGI service [Install] WantedBy=multi-user.target [Service] User=otrs Group=nginx Type=simple Restart=always PermissionsStartOnly=true ExecStartPre=/usr/bin/mkdir -p /var/run/perl-fcgi ExecStartPre=/usr/bin/chown otrs.nginx /var/run/perl-fcgi ExecStart=/usr/local/bin/fastcgi-wrapper.pl ExecStop=/usr/bin/rm -rf /var/run/perl-fcgi fcgiwrap
Just download and install the fcgiwrap package .
yum localinstall fcgiwrap-1.1.0-3.20150530git99c942c.el7.centos.x86_64.rpm and run it:
systemctl enable fcgiwrap.socket systemctl start fcgiwrap.socket If someone has an attack of paranoia, here srpm, you can collect it yourself.
Mysql
We connect MariaDB repository.
vi /etc/yum.repos.d/MariaDB.repo # http://downloads.mariadb.org/mariadb/repositories/ [mariadb] name = MariaDB baseurl = http://yum.mariadb.org/10.1/centos7-amd64 gpgkey=https://yum.mariadb.org/RPM-GPG-KEY-MariaDB gpgcheck=1 Install MariaDB server.
yum update && yum install MariaDB-server MariaDB-client We start the service.
systemctl start mysql Perform the initial setup.
/usr/bin/mysql_secure_installation Create a database.
mysql -u root -p create database `otrs-db` character set utf8; create user 'USER'@'localhost' identified by 'PASS'; GRANT ALL PRIVILEGES ON `otrs-db`.* to `USER`@`localhost`; FLUSH PRIVILEGES; exit; Stop the service.
systemctl stop mysql For normal operation of OTRS, we make minor adjustments to server.cnf.
vi /etc/my.cnf.d/server.cnf [mysqld] max_allowed_packet = 20M query_cache_size = 32M innodb_log_file_size = 256M In order for MySQL to start after changing the innodb_log_file_size parameter, you need to rename or delete old log files.
mv /var/lib/mysql/ib_logfile0 /var/lib/mysql/ib_logfile0_1 mv /var/lib/mysql/ib_logfile1 /var/lib/mysql/ib_logfile1_1 We start the service and add it to autoload.
systemctl start mysql systemctl enable mysql OTRS
Installing dependencies.
yum install bash-completion perl perl-Archive-Zip perl-Crypt-SSLeay perl-DBI perl-IO-Socket-SSL perl-LDAP perl-Net-DNS perl-Template-Toolkit perl-TimeDate perl-URI perl-XML-LibXML perl-XML-LibXSLT perl-XML-Parser perl-Digest-SHA perl-LWP-Authen-Negotiate perl-DBD-MySQL perl-YAML-LibYAML perl-Crypt-Eksblowfish perl-Mail-IMAPClient perl-Text-CSV_XS perl-core perl-libwww-perl procmail Disable SELINUX.
vi /etc/selinux/config SELINUX=permissive Execute the command to disconnect without rebooting.
setenforce 0 Download and unpack the archive OTRS.
wget http://ftp.otrs.org/pub/otrs/otrs-5.0.13.tar.gz tar -xvf otrs-5.0.13.tar.gz -C /opt/ mv /opt/otrs-5.0.13 /opt/otrs cd /opt/otrs We create on the server "user otrs".
useradd -d /opt/otrs/ -g nginx -s /sbin/nologin -c 'OTRS System User' otrs Using the otrs.CheckModules.pl utility, we check for the presence of the necessary Perl modules and if everything is okay we continue further.
su otrs -s /bin/bash -c "/opt/otrs/bin/otrs.CheckModules.pl" Activate "Default Config Files".
cp Kernel/Config.pm.dist Kernel/Config.pm for foo in var/cron/*.dist; do mv $foo var/cron/`basename $foo .dist`; done cp .procmailrc.dist .procmailrc cp .fetchmailrc.dist .fetchmailrc cp .mailfilter.dist .mailfilter We check that all required modules are installed.
perl -cw /opt/otrs/bin/cgi-bin/index.pl /opt/otrs/bin/cgi-bin/index.pl syntax OK perl -cw /opt/otrs/bin/cgi-bin/customer.pl /opt/otrs/bin/cgi-bin/customer.pl syntax OK perl -cw /opt/otrs/bin/otrs.Console.pl /opt/otrs/bin/otrs.Console.pl syntax OK Configuring access rights to OTRS files.
/opt/otrs/bin/otrs.SetPermissions.pl --otrs-user=otrs --web-group=nginx We update the configuration and delete the cache.
su otrs -s /bin/bash -c "/opt/otrs/bin/otrs.Console.pl Maint::Config::Rebuild"; su otrs -s /bin/bash -c "/opt/otrs/bin/otrs.Console.pl Maint::Cache::Delete"; We create systemd service OTRS.
vi /etc/systemd/system/otrs.service [Unit] Description=OTRS Help Desk. After=network.target [Service] Type=forking User=otrs Group=nginx ExecStart=/opt/otrs/bin/otrs.Daemon.pl start ExecStop=/opt/otrs/bin/otrs.Daemon.pl stop [Install] WantedBy=multi-user.target We start services
systemctl enable nginx.service systemctl enable otrs.service systemctl start nginx.service systemctl start otrs.service and go to the web interface to complete the configuration.
Push the "Forward" button.

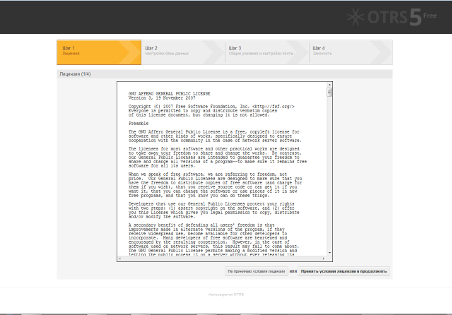
Accept user agreement.
We choose the type of database, in my case it is MySQL.
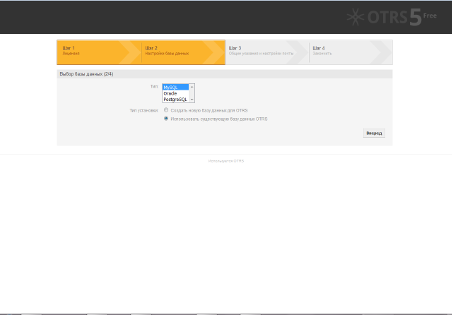
Enter your credentials: IP address and database name.

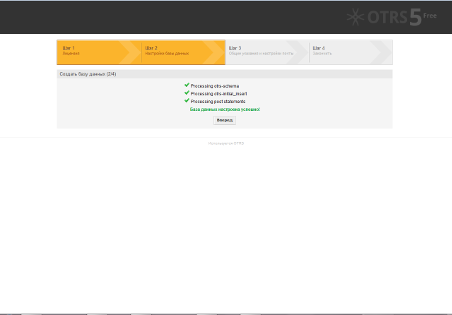
We check the connection and if everything goes fine.
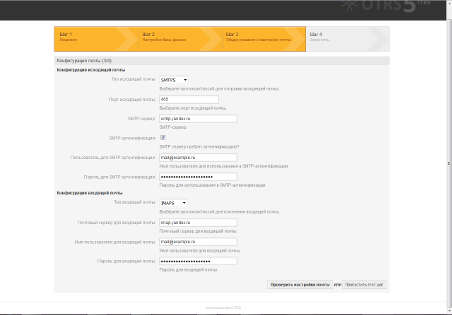
At this step, we select the numbering of tickets, specify the FQDN-server name and the account of the mailbox to which the letters will come.
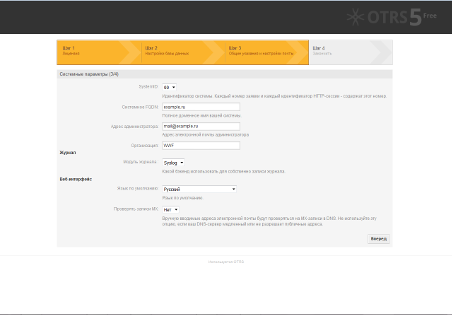
Here we specify the settings of the mail server for receiving and sending mail.
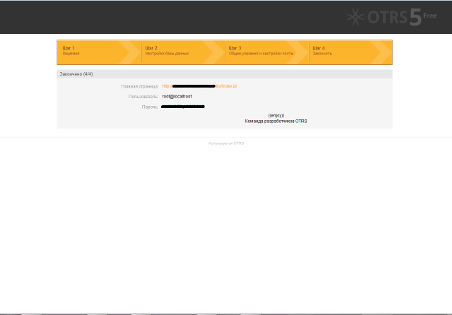
Go to the address we specified and log in to the WEB interface.
Let's Encrypt
To get the Let's Encrypt certificate, you need to install CertBot.
yum install certbot Here we indicate our mail and the domain name for which we receive the certificate.
certbot certonly --webroot --email mail@HOST -w /opt/otrs/var/httpd/htdocs -d otrs.HOST Create a systemd service for CertBot to automatically renew the certificate.
vi /etc/systemd/system/certbot.service [Unit] Description=Renew Certbot certificate (nginx) After=network-online.target [Service] Type=oneshot ExecStart=/usr/bin/certbot renew --renew-hook "/usr/bin/systemctl reload nginx.service" Create a timer
vi /etc/systemd/system/certbot.timer [Unit] Description=Renew Certbot certificate (nginx) [Timer] OnCalendar=daily RandomizedDelaySec=1day Persistent=true [Install] WantedBy=timers.target And activate.
sudo systemctl daemon-reload systemctl start certbot.timer systemctl enable certbot.timer You can check the scheduled task with the command
systemctl list-timers Create a file with parameters for DHE-cipher.
openssl dhparam -out /etc/ssl/HOST/dhparam.pem 2048 Next, you need to uncomment the lines in the host configuration
server { listen 80; server_name otrs.HOST; rewrite ^ https://$http_host$request_uri? permanent; } and comment out in the section with ssl.
listen 80; Then restart Nginx.
systemctl reloadt nginx.service What else can you do?
Automatic download of letters in tickets
By default, the mail server is polled once every 10 minutes to change this setting.
OTRS: Administration → System Administration → System Configuration
Insert Daemon :: SchedulerCronTaskManager :: Task into the “Action” field and click on “Search”.
Find the MailAccountFetch parameter and change the value from 10 minutes, for example, to 5.
Disable user registration via the Web interface
If there is no need to register users via the WEB interface, it should be disabled.
Systems → System configuration and in the “Action” field insert Frontend :: Customer and click on “Search”. Find the item CustomerPanelCreateAccount and select "No".
Source: https://habr.com/ru/post/311714/
All Articles