Authentication and authorization in microservice applications

Author: Vyacheslav Mikhailov, Solutions Architect
This is an introductory piece of material based on a report I read last summer. Printed material suggests more information, because in one report it is usually not possible to talk about all the details.
We will deal with the user authentication process, the work of the Single Sign-On technology (Single sign-on / SSO), we will give a general overview of OAuth2 technology and its principles, without going into particular technical implementation. In the next article, as an example of successful implementation, we will look at the Thinktecture Identity Server v3 library; we’ll discuss its functionality in more detail; let's talk about how to build the minimum set of components necessary for working in microservice architecture and worthy of use in a combat system. In the third part, we will show how to expand this library, adjusting to the needs of your system, and will complete a series of articles reviewing various scenarios that many developers have met with recommendations for each case.
What is authentication?
The division of access rights is based on the authentication and authorization processes, without which no more or less serious application can do. Therefore, to understand how they happened before and are happening now is very important, but before delving into the description of the technology, let's look at the key terms.
')
Identification is the process of determining what kind of person is in front of us. Authentication is the process of confirming that this person is exactly who he claims to be. Authorization is the process of deciding what exactly this authenticated person is allowed to do. That is, these are three different, consistent and mutually not replaceable concepts. Identification is often implied as part of authentication. The most important thing is to clearly distinguish between authentication and authorization.
During the authentication process, we make sure that the person who came to us has proof of identity. This article is mainly about authentication.
Authentication Methods
When using the HTTP protocol, the simplest authentication method is Basic access authentication. In principle, this protocol is outdated and is rarely used on the Internet, especially in unprotected connections, but still remains in the intracorporate systems, simply because some of them have been created for a long time. It is worth understanding how it works.
HTTP Basic Authentication
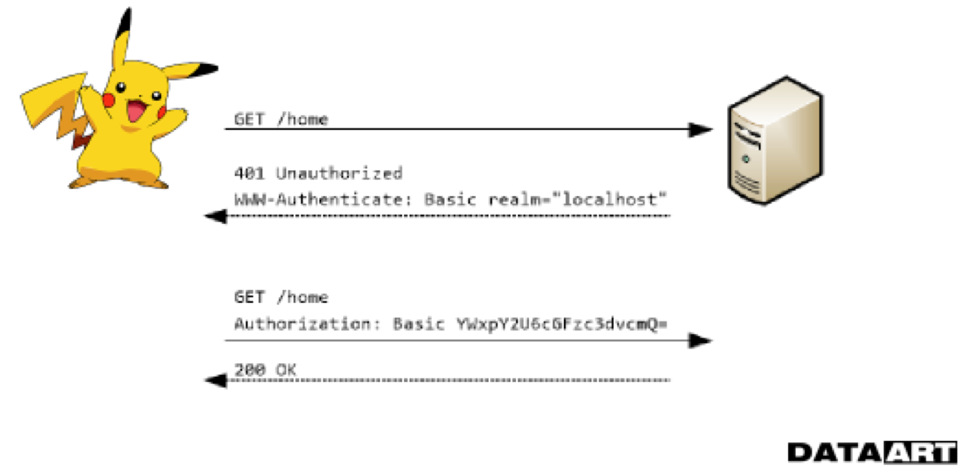
The first thing that, when accessing a protected resource, the server will give to a user who does not have access, will be error 401 Unauthorized. The response also contains information about the type of authentication (in our case, Basic), which it can accept, and the context within which this authentication is valid (Realm). The user enters a username and password, they are packaged in Base64 and sent to the server for verification. There are various dangers here. The most common is the threat of a man-in-the-middle attack, or a mediator attack, during which when using an unprotected connection, attackers can be intercepted by attackers at the time of transfer from the client to the server or vice versa.
HTTP Digest Authentication
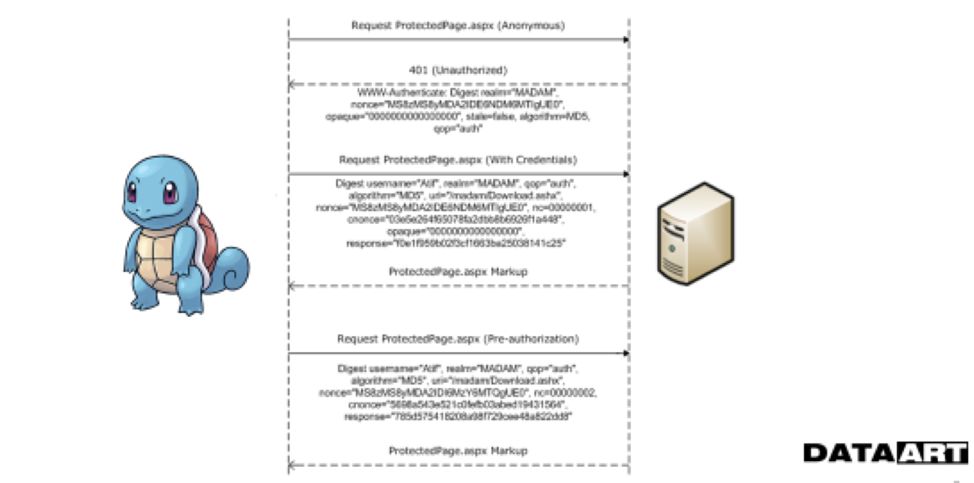
The next stage in the development of the technology was a slightly more complex HTTP digest authentication system, which eliminates the transfer of credentials in the clear form - here the MD5 hash with some impurities is used for verification, which avoids the selection of a login and password. Of course, this algorithm looks more reliable, but it is also subject to a number of not very complicated attacks. For example, here you can read about attacks in more detail.
Forms Authentication
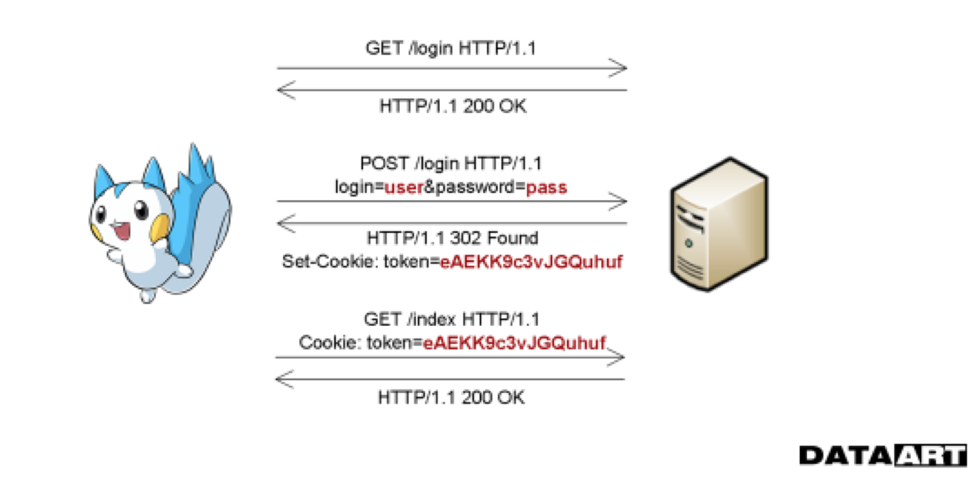
Later, the Forms authentication process appeared, in which authentication occurs at a higher level of the abstraction model. The HTTP server does not report an access error, but simply redirects the unauthenticated user to another page. Usually this page displays the fields for entering a login and password, after filling in which a POST request with data is formed and is sent to the server via a secure channel. The server side, in turn, returns the token to the user or the session identifier, which is stored in Cookies and later used to access the protected resource.
Token authentication
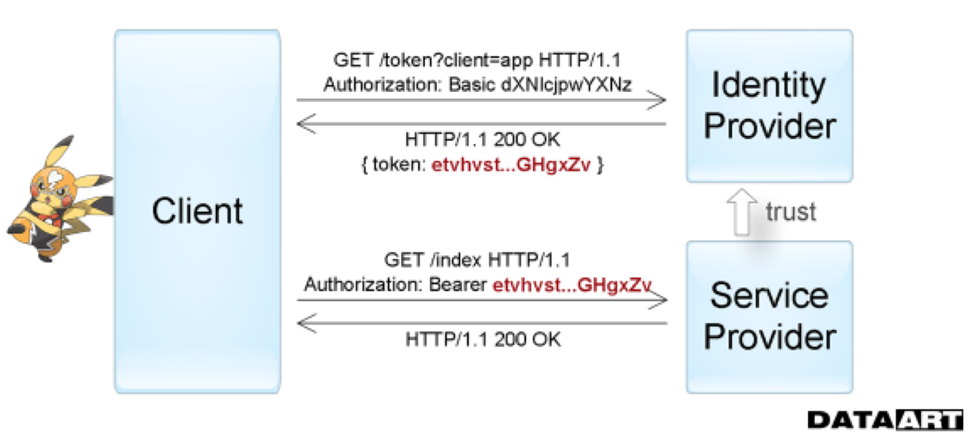
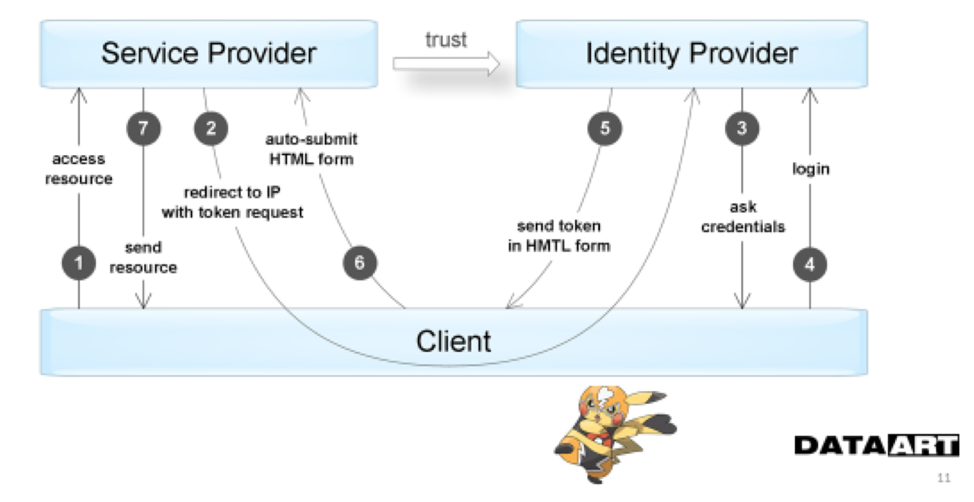
The next generation of authentication methods is Token Based Authentication, which is commonly used when building Single sign-on (SSO) systems. When using it, the requested service delegates the function of validating user information to another service. That is, the service provider trusts the delivery of the tokens necessary for access to the token provider itself (Identity provider). This is what we see, for example, entering applications through accounts on social networks. Outside IT, the simplest analogy of this process is using a civil passport. The official document is the token issued to you - all state services by default trust the police department that handed it over, and considers the passport to be sufficient for your authentication throughout the entire validity period while maintaining its integrity.
The diagram clearly shows how and in what sequence applications exchange information when using authentication by tokens.
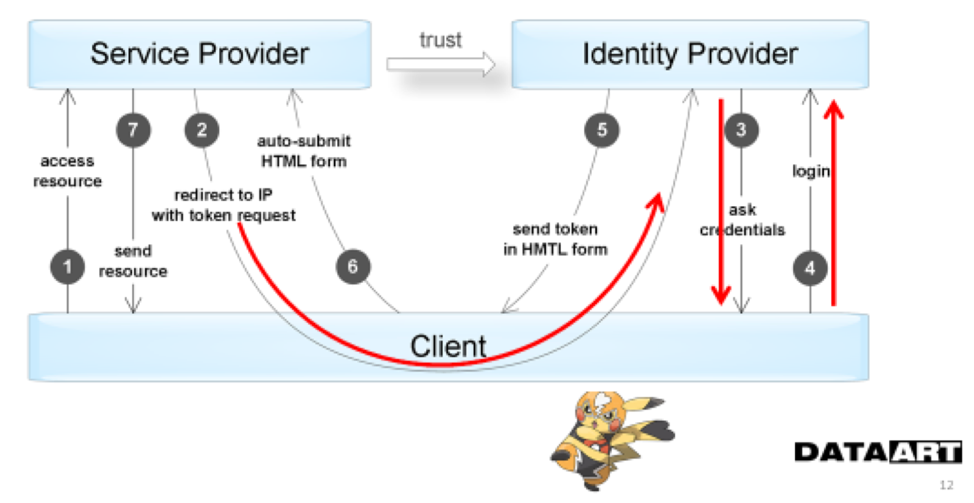
The following diagram additionally reflects the interaction stages in which the user is directly involved. This moment is the disadvantage of such a scheme - we always need a user to access the resource.
OAuth2 & Open ID Connect
Further improvement of the process was needed because token authentication requires the presence of the user at the time of accessing the protected resource. Because the Identity provider, when transferring control to it, will interact with the user, requesting, for example, a login and password.
In the case of a service that, on behalf of the user, must poll a certain third resource at certain intervals, say, access to the list of contacts in the social network, token-authentication will no longer work. The fact is that session identifiers usually live for a very short time, so that if they are intercepted, attackers only get access to the service for a limited time. But due to the short duration of the token is not enough, for example, on the night process.
In 2006, in the course of working on the implementation of the Open ID protocol for Twitter, the need for a new open authorization protocol was discovered. In 2007, Google and AOL engineers began working together on it, and in 2009, Twitter offered its users a solution that delegated access to accounts to third-party services and based on the OAuth protocol. Three years later, a new version was published - OAuth 2, which simplified the development of client applications and received a number of new features, including the token update without user intervention. Many services began to use this protocol even before its official approval.
We understand in detail xy xy
At the moment, the following protocols are well known:
- OpenID - to verify user credentials (identification & authentication).
- OAuth is about accessing something.
- OpenID Connect - and about the one and the other at the same time.
All three protocols allow the user to not disclose their secret username and password to untrusted applications. OpenID & OAuth were developed in parallel until 2014 and eventually merged into OpenID connect.
OpenID 1.0 (2006) & OpenID 2.0 (2007) allowed the application (arb) to request from the trusted server (authority) user verification (user). The differences between the versions are insignificant for us.
- User -> App: Hi, this is Misha.
- App -> Authority: Here is “this” Misha?
- Authority and User communicate face to face.
- Authority -> App: Yes, this is Misha.
OpenID Attribute Exchange 1.0 (2007) extends OpenID 2.0 allowing you to retrieve and store a user profile.
- User -> App: Hi, this is Misha.
- App -> Authority: Here is “this” Misha? And if this is Misha, then send me his email.
- Authority and User communicate face to face.
- Authority -> App: Yes, this is Misha. And his email is xxx@xxx.xxx .
OAuth 1.0 (2010) allows the user to allow an application to get limited access on third-party servers (trust servers) that trust the authentication center.
- App -> User: We would like to receive your pictures from another server.
- Authority and User communicate face to face.
- Authority -> App: Here's a ticket (access token) for 15 minutes.
- App -> Third-party server: We can get pictures for this user here with a ticket.
OAuth 2.0 (2012) does the same thing as OAuth 1.0, but only the protocol has changed significantly and become simpler.
OpenID Connect (2014) combines the capabilities of OpenID 2.0, OpenID Attribute Exchange 1.0, and OAuth 2.0 into one common protocol. It allows applications to use a certification authority to:
- Verify user credentials.
- Get user profile (or parts of it).
It is important to understand that OpenID Connect does not provide access to external resources. It uses OAuth 2.0 to present profile parameters as if they were such resources.
Top view
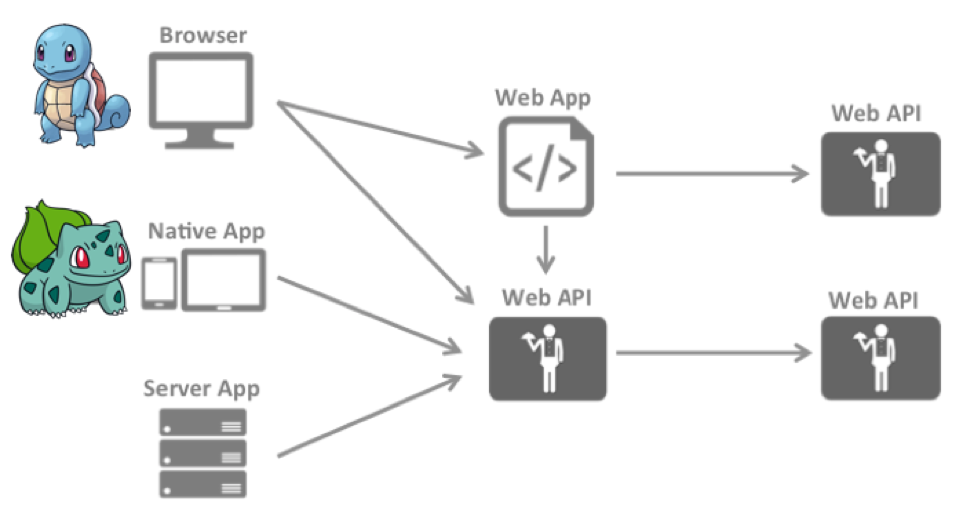
Typically, systems have different components: users working through the browser, users interacting with the server through mobile applications, and just server applications that need data belonging to you, stored on other servers, which are accessed through the Web API.
Single sign-on — single sign-on technology — allows the user to switch between different applications without re-authentication. Using SSO, multiple logins can be avoided, so the user simply will not notice these switches. At the same time, there are more than one such situations within your infrastructure where such applications occur. Single sign-on technology is particularly useful in large enterprise systems consisting of dozens of applications that are loosely coupled. It is unlikely that users will be satisfied by entering a username and password each time they access a time tracking system, corporate forum or internal document database.
As an implementation, we consider the OAuth2 protocol. In principle, there are others, for example, Kerberos, which successfully interacts with Windows, but in the case of a heterogeneous network in which there are computers using both Windows, and Mac, and UNIX systems, it is often inconvenient to use proprietary protocols. Moreover, this applies to cases where access to your services through the web - here OAuth2 is the best candidate.
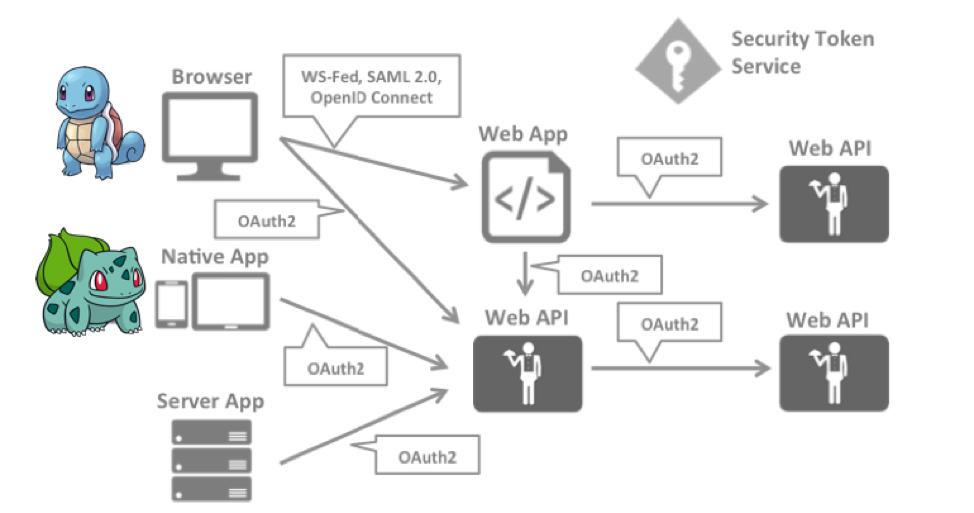
The figure above shows which protocols are used for each type of interaction.
As we know from the section “we understand in detail xy from xy ”, OpenID onnect is needed to get the user credentials from the user and check them. OAuth 2.0 is needed to get access tokens and access resources with them.
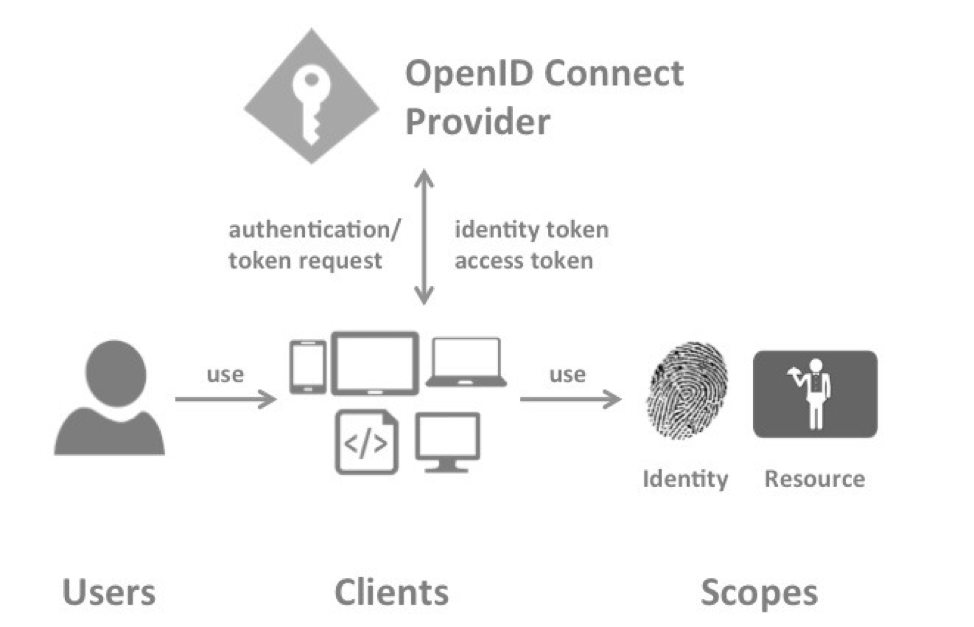
OAuth2 & OpenID Connect Terminology
- OpenID Connect Provider (OP)
- Client
- User
- Scope
- Identity scopes - openid, profile, email
- Resource scopes - various API
- Authentication / Token Request
- Identity token
- Access token
- Refresh token
Token issuance service
Open ID Connect Provider is the most important object of the whole design of a centralized authentication service, it can also be called Security Token Service, Identity Provider authorization server, etc. Different sources call it differently, but in the sense it is a service that issues tokens to customers.
Main functions:
- Authenticate users using internal user storage or an external source (for example, Active Directory).
- Manage customers (store) and authenticate them.
- Provide session management and the ability to implement Single sing-on.
- Issue identity tokens and access tokens to clients.
- Check previously issued tokens.
Customer
Client - a device or program (browser, application) that needs either a token to authenticate a user, or a token to access a resource (it is assumed that this resource is “familiar” with the specific “ Security Token Service ” from which the client requests a token for access).
User
User - actually the end user - the person.
Scope
Scope - the identifier of the resource to which the client wants to access. The scope list is sent to the token issuing service as part of the authentication request .
By default, all clients have the ability to request any areas, but this can (and should) be limited in the configuration of the token issuing service .
Scopes come in two forms:
- Identity scopes is a request for information about a user. His name, profile, gender, photo, email address, etc.
- Resource scopes - the names of external resources (Web APIs) that the client wants to access.
Authentication Request
Authentication / Token Request is an authentication request process.
Depending on which areas (scopes) are requested, the service for issuing tokens will return:
- Only Identity Token if only Identity scopes is requested.
- Identity Token and Access Token if Resources scopes is also requested.
- Access Token and Refresh Token if Offline Access is requested.
You can read more about the authentication process in the “authentication process ” section.
Personality token
Identity Token - authentication confirmation. This token contains the minimum set of user information.
Access token
Access Token - information that a specific user is allowed to do. The client requests Access Token and then uses it to access resources (Web APIs). Access Token contains information about the client and user, if present. It is important to understand that there are such types of authorization, in which the user is not directly involved in the process (more on this in the next part)
Update token
Refresh Token - the token by which the STS will return the new Access Token. Depending on the mode of operation, Refresh Token can be reusable and disposable. In the case of a one-time token, when requesting a new Access Token, a ready-made Refresh Token will also be generated, which should be used when re-updating. Obviously, one-time tokens are safer.
For more information about the composition of tokens in the section " token structure ".
Authentication process
When a user accesses the client, he redirects the user to the Open ID Connect Provider, which prompts the user for a username and password. If the verification of the authentication parameters is successfully passed, it returns back the identity token and access token with which the user can access the protected resource.
Token structure
Format
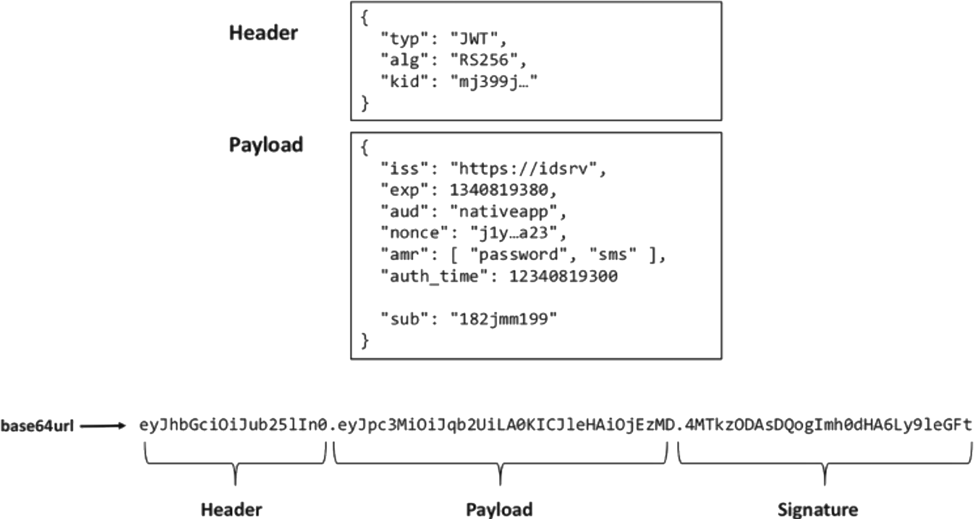
The OAuth2 implementation uses a so-called jwt-token, which consists of three parts. For example, when accessing the Identity provider, you send a login / password and receive a token in return. It will include: Header (title), Payload (content) and Signature (signature). On the website jwt.io you can decode it and view the contents of the JSON format. On this site you will also find a description of the rules for the formation of jwt-tokens.
The fact that tokens in the exchange process are transmitted unencrypted, there is nothing terrible. We initially proceed from the assumption that communication takes place over a secure HTTPS channel, and re-encryption of the token would be redundant. The only thing we need to make sure is that the token has not been changed or falsified on the client side, for this it is enough to have a signature and check it on the server. In addition, the token does not contain any critical information.
In addition to identity tokens, there is also access tokens, which contain information about the stamps issued to the user. The duration of access token is quite short, because its theft can provide unauthorized access to the resource. That is, an attacker, if he manages to get a token of this type, will receive access for a very short time. To obtain a new access token, use the refresh token, which usually does not appear in unprotected environments, in particular, in the access mode from the browser, it is not used at all. What kind of tokens will be returned to the client in the authentication process, let's look at the next part.
Primary Fields
Let us briefly discuss what standard fields in the token are and why they are needed:
- iss is the address or name of the certification authority.
- sub - user ID. Unique within the certification center, at least.
- aud is the client name for which the token is issued.
- exp - the validity of the token.
- nbf is the time from which it can be used (not earlier than).
- iat - time to issue a token.
- jti - unique identifier of the token (needed so that the token cannot be “released” a second time).
Conclusion of the first part
In this article we have tried to give a theoretical and terminological foundation that we will need to create a working solution in the following articles.
Stay tuned.
Spoiler second part
The minimal implementation of integrating the Identity Server into your application looks like this:
Minimal implementation of web client integration with Identity Server:
Minimal implementation of web API integration with Identity Server:
public void Configuration(IAppBuilder app) { var factory = new IdentityServerServiceFactory(); factory.UseInMemoryClients(Clients.Get()) .UseInMemoryScopes(Scopes.Get()) .UseInMemoryUsers(Users.Get()); var options = new IdentityServerOptions { SiteName = Constants.IdentityServerName, SigningCertificate = Certificate.Get(), Factory = factory, }; app.UseIdentityServer(options); } Minimal implementation of web client integration with Identity Server:
public void Configuration(IAppBuilder app) { app.UseCookieAuthentication(new CookieAuthenticationOptions { AuthenticationType = "Cookies" }); app.UseOpenIdConnectAuthentication(new OpenIdConnectAuthenticationOptions { ClientId = Constants.ClientName, Authority = Constants.IdentityServerAddress, RedirectUri = Constants.ClientReturnUrl, ResponseType = "id_token", Scope = "openid email", SignInAsAuthenticationType = "Cookies", }); } Minimal implementation of web API integration with Identity Server:
public void Configuration(IAppBuilder app) { app.UseIdentityServerBearerTokenAuthentication( new IdentityServerBearerTokenAuthenticationOptions { Authority = Constants.IdentityServerAddress, RequiredScopes = new[] { "write" }, ValidationMode = ValidationMode.Local, // credentials for the introspection endpoint ClientId = "write", ClientSecret = "secret" }); app.UseWebApi(WebApiConfig.Register()); } Source: https://habr.com/ru/post/311376/
All Articles