How to create a theme for Magento 2 from scratch

Hello, dear users! In this publication I want to describe the process of creating a theme for Magento 2 from scratch. Magento 2 has a fairly large number of innovations and improvements compared with the first version. For the most part they belong to the client side.
Here are some of them:
')
- Full support for HTML5 and CSS3;
- Built-in preprocessor LESS ;
- Asynchronous loading of modules using RequireJS (without manually adding scripts to the head section);
- jQuery / jQuery UI instead of the Prototype library;
- Magento UI library (a set of components for a simple and flexible rendering of the user interface).
The most interesting - under the cut!
Regarding the development of themes, Magento 2 introduced a new modular code structure. Now all static sss, js, as well as image files are placed in the theme's web folder, and the skin folder has been removed from the Magento root directory. In addition, the view folder was introduced in the modules, which stores templates and files that relate to the MVC presentation level specifically for each module.
You should create a new theme and consider in more detail the structure of directories and files. Go!
Creating a theme directory
Topics in Magento 2 are in the (M2_root) / app / design / frontend directory. First you need to create a Vendor folder (called Package in Magento 1) and create a folder for the theme in it.
For example: (M2_root) / app / design / frontend / Singree / walkbeyond. Where Singree is vendor, and walkbeyond is the theme code. In the code, you can use any combination of letters and numbers.
After creating these directories, the topic must be declared so that it can be made active in the administrative part.
Announcement and registration
In order for Magento 2 to see the created theme, you need to create a file: (M2_root) / app / design / frontend / (vendor) / (theme codename) / theme.xml with the following content:
<theme xmlns:xsi="http://www.w3.org/2001/XMLSchema-instance" xsi:noNamespaceSchemaLocation="urn:magento:framework:Config/etc/theme.xsd"> <title>walkbeyond</title> <parent>Magento/blank</parent> <media> <preview_image>media/walkbeyond.jpg</preview_image> </media> </theme> The title tag indicates the title of the topic. The parent specifies the theme that is set as the parent (all non-found static files / template files will be taken from the parent theme). The example indicates a blank that comes with M2. She is basic and has no parent. However, the inheritance levels in Magento 2 can be any number, and there are no restrictions here, unlike the first version.
The preview_image tag indicates a thumbnail to represent the theme in the admin section.
To register a topic in the system, you need to create the registration.php file in the root:
<?php \Magento\Framework\Component\ComponentRegistrar::register( \Magento\Framework\Component\ComponentRegistrar::THEME, 'frontend/Singree/walkbeyond', __DIR__ ); Optional, but you can create the composer.json file to distribute the theme as a composer package. Sample file:
{ "name": "Singree/walkbeyond", "description": "N/A", "require": { "php": "~5.5.0|~5.6.0|~7.0.0", "magento/theme-frontend-blank": "100.0.*", "magento/framework": "100.0.*" }, "type": "magento2-theme", "version": "100.0.1", "license": [ "OSL-3.0", "AFL-3.0" ], "autoload": { "files": [ "registration.php" ] } } Creating directories for static files
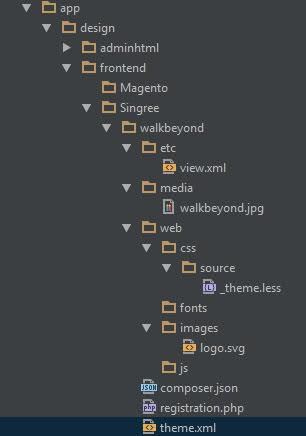
To store styles, javascript scripts, images and fonts, you must create a web folder in the root directory of the theme. The folder structure is as follows:
app/design/frontend/Singree/walkbeyond/ ├── web/ │ ├── css/ │ │ ├── source/ │ ├── fonts/ │ ├── images/ │ ├── js/ Note that all these folders are optional.
The images folder contains all the static theme files, you can also add logo.svg (the default name) to override the theme logo. In the folder sss / source, according to the parent theme blank, you can create a _theme.less file with a redefinition of the base variables Magento UI. In the (M2_root) / lib / web / css / source / lib / variables / folder in the source files, you can find the default values for those variables that can be overridden. In sss / source, you can set styles for modules in the _module.less file and for widgets in the _widgets.less file. For minor edits, you can create a _extend.less file.
Image configuration
The subject is mandatory for the theme file etc / view.xml (if it is not defined in the parent theme), which contains property values for product images, such as height, width, transparency, background color, etc. This file must be completely copied from the base theme (values are not inherited). Image properties are set by identifier and type attributes within the element:
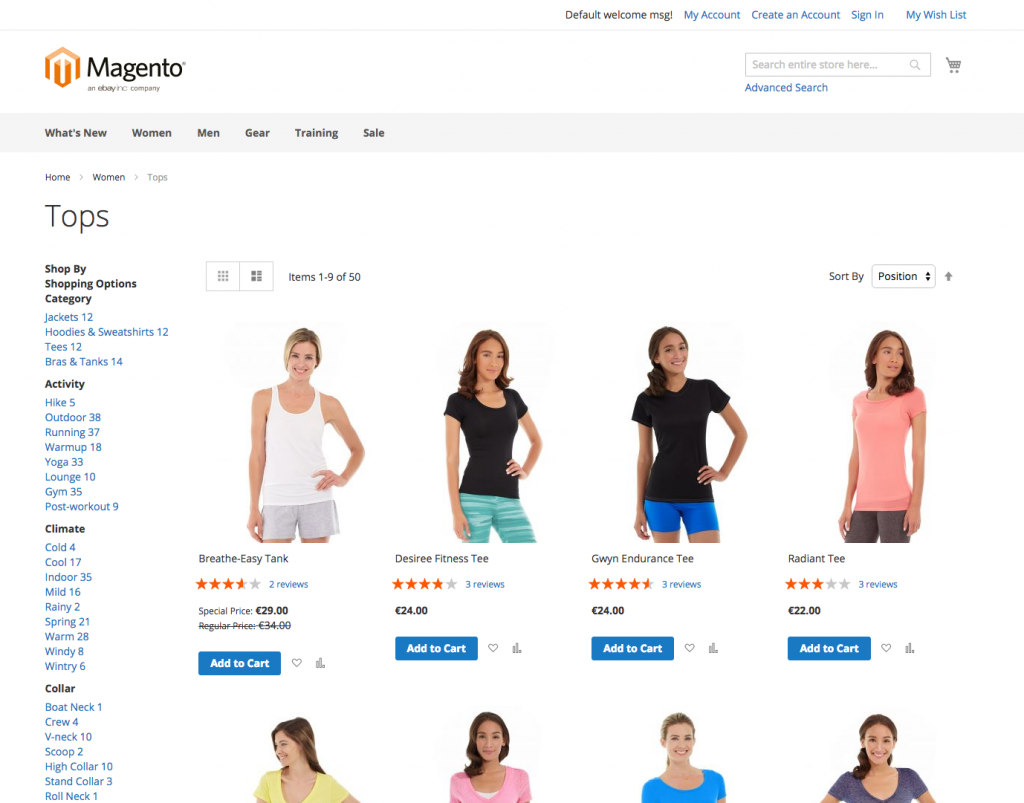
<images module="Magento_Catalog"> ... <images/> For example, you can change the size of the image in the table view of the products catalog.
Etc / view.xml file:
<?xml version="1.0"?> <view xmlns:xsi="http://www.w3.org/2001/XMLSchema-instance" xsi:noNamespaceSchemaLocation="urn:magento:framework:Config/etc/view.xsd"> <media> <images module="Magento_Catalog"> <image id="category_page_grid" type="small_image"> <width>200</width> <height>200</height> </image> ... </media> ... </view> The category_page_grid identifier is unique within the theme. The type small_image corresponds to the Small Image Role in the administrative part. Valid values for image types are: image, small_image, swatch_image, swatch_thumb, and thumbnail.

After saving the goods, all the images are cached. After resizing, you can run the php (M2_root) / bin / magento catalog command: images: resize to regenerate images.
As a result, the following structure was obtained:
Application of the topic in the administrative part
The theme can be activated in the store settings after creation in the file system. To do this, go to the Content - Design - Themes section and check that the created theme is in the list:

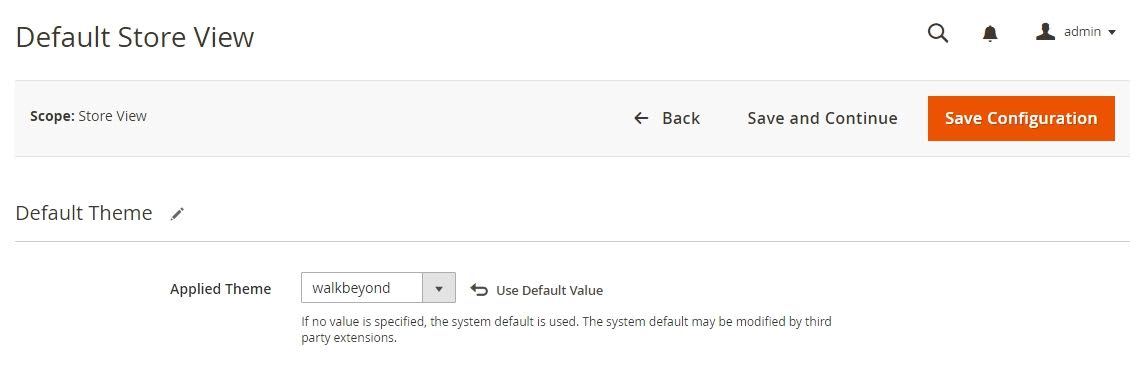
If we see the created theme in the list, go to Content → Design → Configuration and there we press edit for a specific website or selected store:

Select a theme (Applied Theme) and click Save configuration:
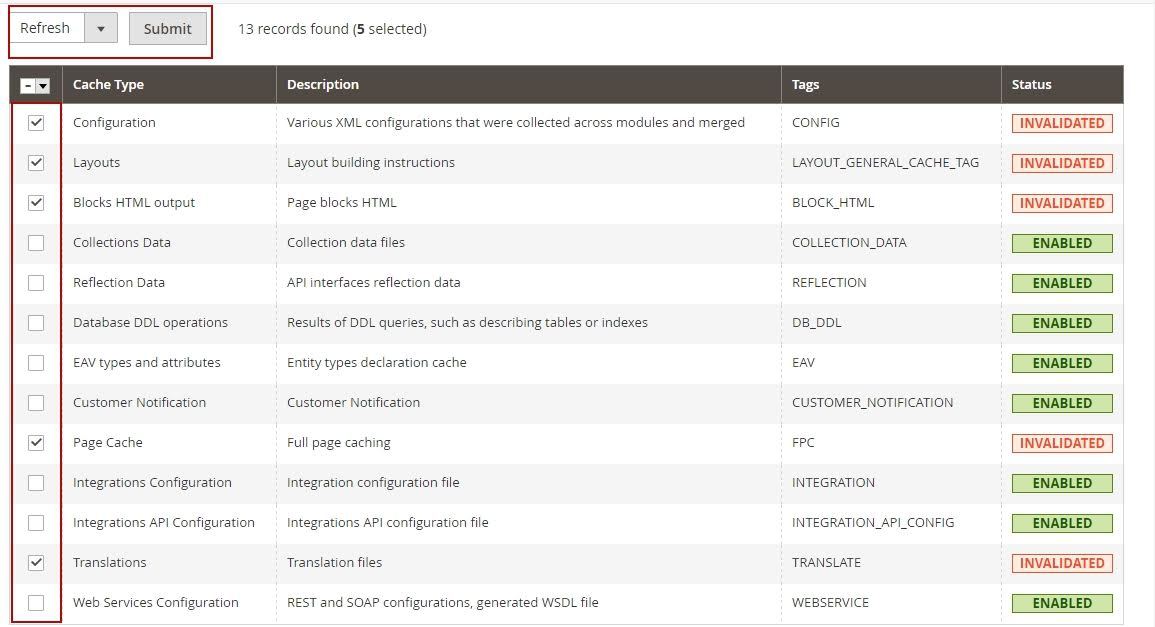
If your cache is enabled, you need to clear it after applying the theme. To do this, go to the System - Cache Management section and update all non-valid cache types:
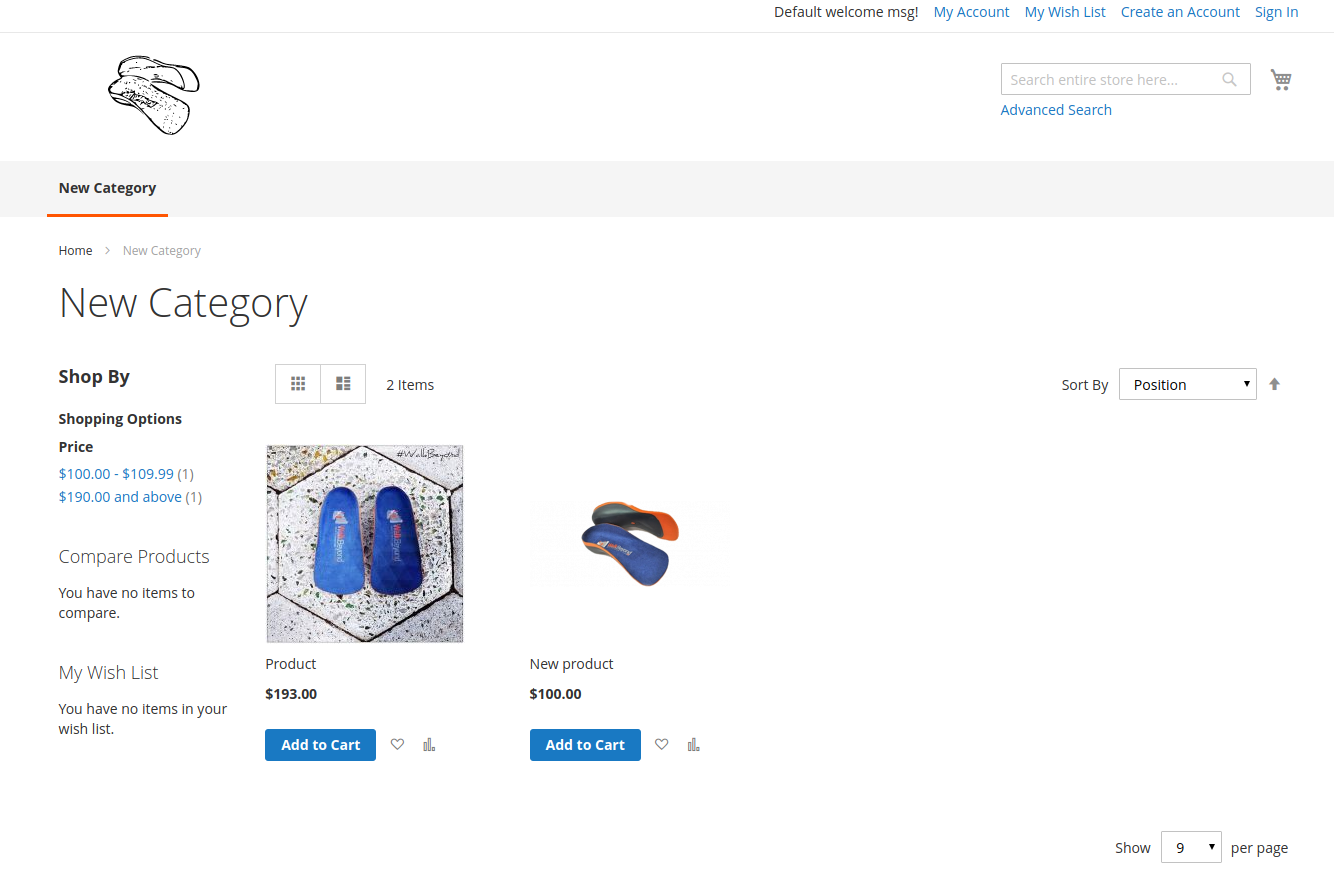
As a result, we will get the same magento / blank theme, but with a different logo and image size:
Use LESS to change styles.
After creating a theme, you can begin to change the look of the pages. To edit project styles, you need to use one of several types of LESS preprocessing in Magento 2:
- LESS server compilation;
- Client compilation of LESS using less.js.
Client compilation is more often used in development mode, since all changes will be immediately visible: the browser will perform a compilation every time you access the style files. In server compilation, you must manually delete the contents of the pub / static and var / view_preprocessed folders every time. These actions can be optimized using the Grunt taskrner. It will track changes in files, clean the specified folders and compile less automatically.
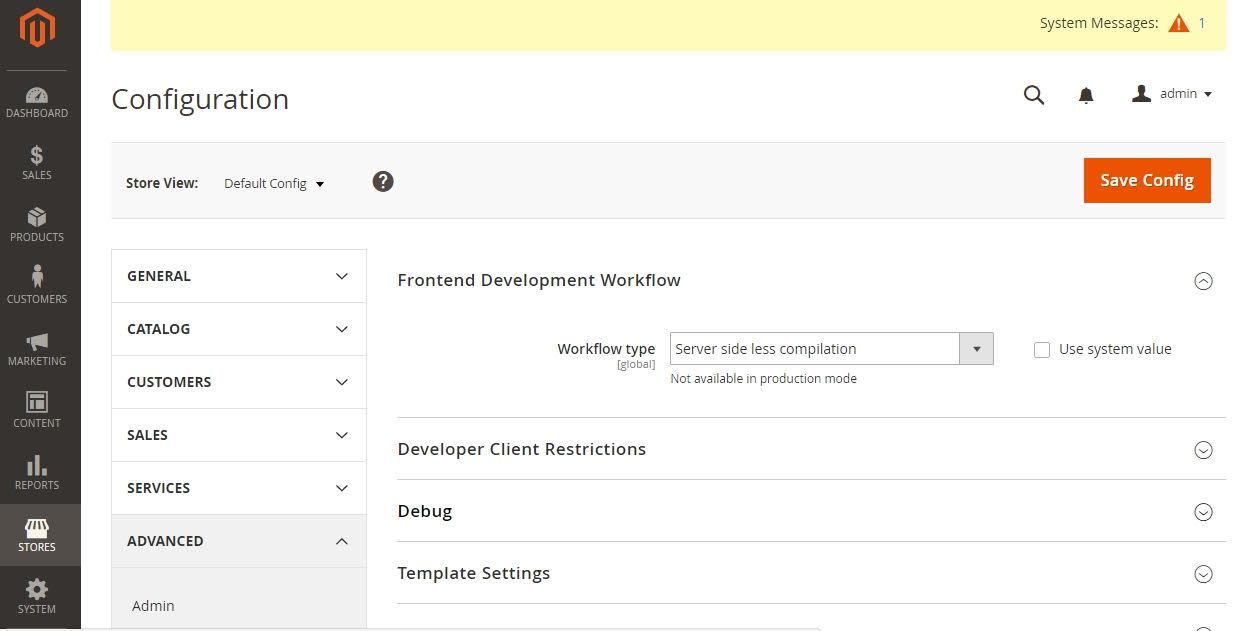
You can change the type of compilation in the admin part along the path: Stores → Configuration → Advanced → Developer → Front-end development workflow → Workflow:
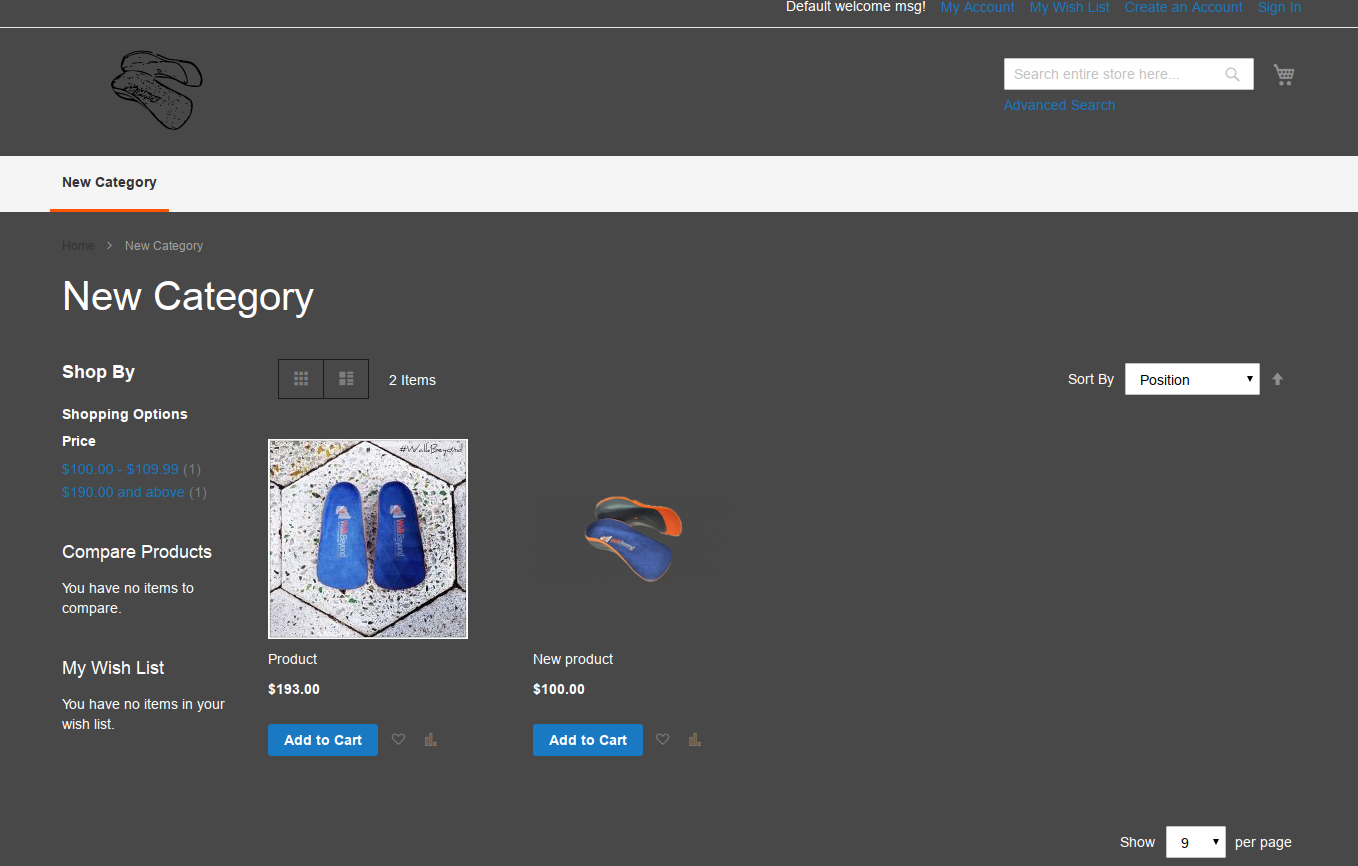
In our simple example server compilation will be used, which is installed by default. Set the background color of the site, as well as the font in the created _theme.less file:
@page__background-color: #484848; @text__color: #fff; @font-family__base: 'Arial', sans-serif; After deleting the contents of the directories / pub / static / frontend / Singree / walkbeyond / en_US and var / view_preprocessed, we can see the change in the appearance of the site:
Magento 2: using layouts in the theme

In Magento 2, in a specific topic, you can either expand or redefine layouts. In order not to completely copy the page or general layouts from the base theme, you only need to specify the extension pattern in the theme folder in the following ways:
<theme_dir> |__/<Namespace>_<Module> |__/layout |--<layout1>.xml |--<layout2>.xml For example, to expand the catalog_category_view model of the Catalog module, which is located along the path (atalog_module_dir) /view/frontend/layout/catalog_category_view.xml, you need to create a file along the path: (theme_dir) /Magento_Catalog/layout/catalog_category_view.xml
Delete any block (for example, the description of the category), you can:
<?xml version="1.0"?> <page xmlns:xsi="http://www.w3.org/2001/XMLSchema-instance" xsi:noNamespaceSchemaLocation="urn:magento:framework:View/Layout/etc/page_configuration.xsd"> <body> <referenceBlock name="category.description" remove="true"/> </body> </page> Not all customization tasks can be performed by extension of the layout. If the number of changes is extremely large, it is better to override the layout. That is, this new file will be used instead of the file from the parent theme (or the main layout).
Examples of customization layouts that imply a redefinition of the layout:
- Calling a method that suppresses another method of the parent layout (If there is a method that cancels the action of a specific method of the parent layout, then you can call it and not override the entire layout);
- Change the number of method arguments;
- Cancel block / container removal using the remove attribute;
- Setting XML block / container attributes (some attributes, such as htmlClass, htmlId, label can be changed in extensions);
- Remove block arguments;
- Delete all descriptors by overriding the layout file with an empty descriptor;
- Modifying the inclusion of descriptors.
You can override the basic base layouts by creating an override / base folder in the theme module folder:
<theme_dir> |__/<Namespace_Module> |__/layout |__/override |__/base |--<layout1>.xml |--<layout2>.xml These files will override the layouts:
<module_dir>/view/frontend/layout/<layout1>.xml <module_dir>/view/frontend/layout/<layout2>.xml You can also override the layouts of the parent theme by creating the override / theme folder in the theme module folder:
<theme_dir> |__/<Namespace_Module> |__/layout |__/override |__/theme |__/<Parent_Vendor> |__/<parent_theme> |--<layout1>.xml |--<layout2>.xml These files will override the layouts that are in the following paths:
<parent_theme_dir>/<Namespace>_<Module>/layout/<layout1>.xml <parent_theme_dir>/<Namespace>_<Module>/layout/<layout2>.xml Theme Templates
In Magento 2 themes, it is possible to completely override module templates, as is the case with layouts. To redefine module templates (module_dir) / view / frontend / templates / (path_to_templates), you need to create the templates folder in the theme module (theme_dir) / (Namespace) _ (Module) / templates / (path_to_templates) folder.
For example, in the mini-basket file Singree / walkbeyond / Magento_Checkout / templates / cart / minicart.html you can add a text message to display “Number of Products”:
<div data-block="minicart" class="minicart-wrapper"> <a class="action showcart" href="<?php /* @escapeNotVerified */ echo $block->getShoppingCartUrl(); ?>" data-bind="scope: 'minicart_content'"> <span class="cart-title hidden-xs"><?php /* @escapeNotVerified */ echo __('Shopping cart'); ?></span> <span class="counter total-qty empty" data-bind="css: { empty: cart().summary_count == 0 }, blockLoader: isLoading"> <?php /* @escapeNotVerified */ echo __('Products count:'); ?> <span class="counter-number"><!-- ko text: cart().summary_count --><!-- /ko --></span> <span class="counter-label"> <!-- ko if: cart().summary_count --> <!-- ko text: cart().summary_count --><!-- /ko --> <!-- ko i18n: 'items' --><!-- /ko --> <!-- /ko --> </span> </span> </a> <?php if ($block->getIsNeedToDisplaySideBar()): ?> <div class="block block-minicart empty" data-role="dropdownDialog" data-mage-init='{"dropdownDialog":{ "appendTo":"[data-block=minicart]", "triggerTarget":".showcart", "timeout": "2000", "closeOnMouseLeave": false, "closeOnEscape": true, "triggerClass":"active", "parentClass":"active", "buttons":[]}}'> <div id="minicart-content-wrapper" data-bind="scope: 'minicart_content'"> <!-- ko template: getTemplate() --><!-- /ko --> </div> </div> <?php endif ?> <script> window.checkout = <?php /* @escapeNotVerified */ echo \Zend_Json::encode($block->getConfig()); ?>; </script> <script type="text/x-magento-init"> { "[data-block='minicart']": { "Magento_Ui/js/core/app": <?php /* @escapeNotVerified */ echo $block->getJsLayout();?> }, "*": { "Magento_Ui/js/block-loader": "<?php /* @escapeNotVerified */ echo $block->getViewFileUrl('images/loader-1.gif'); ?>" } } </script> </div> Topic localization
Translation of the topic is carried out using translation dictionaries. Dictionaries with translations are searched in such locations:
- <parent_theme_dir> / i18n / (viewing in all parent themes)
- <current_theme_dir> / i18n /
The i18n folder can be in each module or globally in the app folder. Dictionaries with theme folders have a higher priority in the search for the translated string.
To generate a file with translations in the theme folder, you can use the i18n tool .
You can run this command in the root directory of magento 2:
php bin/magento i18n:collect-phrases --output="app/design/frontend/Singree/walkbeyond/i18n/en_US.csv" app/design/frontend/Singree/walkbeyond It will collect all the lines in the dictionary. Next, the dictionary file: app / design / frontend / Singree / walkbeyond / i18n / en_US.csv. It can be opened with any table editor and change the translation of any lines in the right column. Translated strings, instead of the main ones, can be seen after applying the theme.
Deleting a topic
If the theme is a Composer package, you can delete it with the command (from the root directory):
php bin/magento theme:uninstall [-c|--clear-static-content] {theme path} ... {theme path} {theme path} - relative path to the theme, starting with the name area (frontend). In our case: frontend / Singree / walkbeyond.
- clear-static-content - removes static files (for which automatic generation is not needed: css, js, images).
In case the theme is not a omposer package, to remove it, you must perform the following steps:
- Delete the theme folder app / design / frontend / (Vendor);
- Remove contents var / view_preprocessed;
- Delete the contents of pub / static / frontend /;
- Open the Magento 2 database, find the theme table and delete the row with the theme name;
- Delete cache with the php command bin / magento cache: flush.
Conclusion
The article reviewed the main components of the topic: how to create from scratch the directory structure and theme files, a preview image. The process of redefining styles, layouts and theme templates was also reviewed: the site was translated using translation dictionaries. Next, you should consider the table of constituent topics:

Most of this structure was addressed in our article. It would also be worthwhile to mention the rules for working with client Javascript libraries (for example, require.js) or describe in more detail how to work with blocks and containers of layouts, but then the size of the article would increase too much and it would become completely inconvenient to read it.
Thank you all for your attention!
Source: https://habr.com/ru/post/311350/
All Articles