We work in the cloud based on Hyper-V, Part 2: Deploying Exchange Server
Part 1: Introduction to the Control Panel
Part 2: Deploying Exchange Server
Part 3: Storage Spaces
Last week, we met with the Azure Pack-based cloud infrastructure management portal , learned how to create a virtual network and virtual machines. Today will deploy and configure Exchange Server from a template.
Content

')
In the course of our experiment, we will create an IT infrastructure with the following characteristics:
As part of this material, we will not create a DMZ network, but for the safe operation of the combat system and protection from outside attacks, it is necessary to have a buffer between the external network and the intranet.
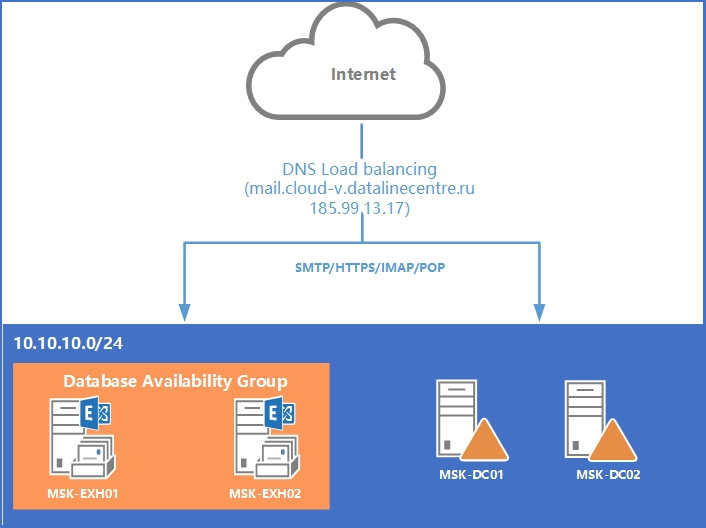
Scheme of our IT infrastructure.
Before installing Microsoft Exchange Server 2013, you need to prepare your Active Directory forest and its domains. Information about user mailboxes and the configuration of Exchange servers should be stored somewhere. We will use an Active Directory domain controller for this.
Active Directory we have. Usually, before deploying Exchange Server, you need to expand your Active Directory schemas and prepare domains . When you deploy an Exchange Server virtual machine from a template, all actions for schema extension and domain preparation are performed automatically. As with Active Directory, we create the role of a virtual machine.
We connect to our virtual machines with Exchange Server through the RDP console.
DNS records In order for Exchange Server to send and receive mail, pass anti-spam checks, you need to add the following DNS records to the external zone. In our case, the entries will look like this:
Do not forget for A-records to add PTR-records in the reverse zone of the provider, which owns external IP-addresses. They are needed to pass anti-spam checks.
Creating port forwarding rules. For the correct operation of the server, we need the following ports:
Here we also add ports of POP3 110/995 and IMAP 143/993 protocols, if we plan to use them to connect clients.
We have deployed two Exchange servers to ensure greater availability. Based on them, we will configure a failover cluster - Database Availability Group (DAG) .
DAGs can be created through the Exchange Management Shell or the Exchange Control Panel. We will continue to work with EMS.
Clients can connect to the Exchange server in various ways:
All specified connection methods use an encrypted connection that requires a SAN or Wildcard SSL certificate .
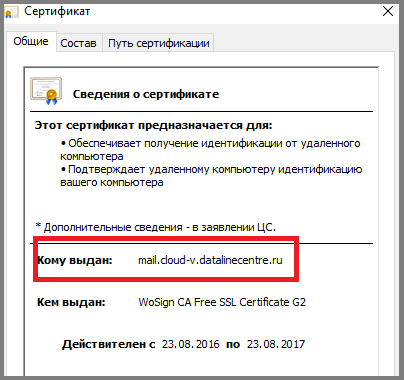
To work correctly with the mail server, we need at least 2 names in the SSL certificate. In our case, this is the name for SMTP, HTTPS, POP, IMAP services, as well as the name for the Autodiscover service (autodiscover): Mail.cloud-v.datalinecentre.ru and Autodiscover.cloud-v.datalinecentre.ru.
Install certificate. To issue a certificate, you must create a Certificate Signing Request (CSR) . This procedure is easiest to perform through the Exchange Control Panel (ECP):
We installed the certificate on one of the Exchange servers. To install the certificate on other servers, go to the server where the certificate is already installed, and export it with a private key.
Setting up virtual directories. Using virtual directories, clients get access to OWA, ECP, address book (OAB), ActiveSync protocol, Web services (EWS).
In our case, we set the ExternalURL parameter to configure virtual directories. The autodiscover service will give it to clients. You can also specify the InternalURL parameter if your organization has domain clients connecting to Exchange within the organization's local area networks.
Open the EMS and alternately configure the virtual directories using the commands:
Configure Autodiscover Services. Autodiscover automatically configures Microsoft Outlook clients and transfers server connection parameters, which makes life easier for administrators. Read more about this service here and here .
Outlook Anywhere allows you to configure Remote Access to Exchange and Outlook Mobile App.
For Outlook Anywhere to work, you need to specify the name of the connection to the service, in our case, it is Mail.cloud-v.datalinecentre.ru. Open the EMS and execute the command:
Get-OutLookAnyWhere | Set-OutlookAnyWhere –ExternalHostName “external connection name to the service” –ExternalClientRequireSsl: $ true –IISAuthenticationMethods “Basic”, ”NTLM”, ”Negotiate” –ExternalClientAuthenticationMethod “Negotiate”
To ensure the operation of Autodiscover, we added 2 A-records in the external DNS zone pointing to the Exchange server:
Verify that Microsoft Outlook clients connect. Create a profile, specify the email address and password:
Outlook clients connect correctly.
Out of the box, the Exchange server allows you to send mail only within the organization. To send mail to the Internet you need:
These are all the steps required for the basic configuration of the mail server from the Exchange Server 2013 template. Ask questions in the comments if something remains unclear.
Part 2: Deploying Exchange Server
Part 3: Storage Spaces
Last week, we met with the Azure Pack-based cloud infrastructure management portal , learned how to create a virtual network and virtual machines. Today will deploy and configure Exchange Server from a template.
Content
Expand virtual machine with Active Directory role
Deploy a virtual machine with the role of Exchange Server 2013
Verify that Exchange Server services start correctly
Configuring DNS zones and port forwarding rules
Configuring Exchange Server Database Cluster
Configure Client Access
Mail Transport Configuration
')
In the course of our experiment, we will create an IT infrastructure with the following characteristics:
Active Directory Domain Name: cloud-v.datalinecentre.ru
External DNS name: cloud-v.datalinecentre.ru
Domain controller 1: MSK-DC01 (2 CPU / 2Gb RAM / 40 HDD)
Domain controller 2: MSK-DC02 (2 CPU / 2Gb RAM / 40 HDD)
Exchange server with the role of mailboxes and client access 1: MSK-EXH01 (4CPU / 8Gb RAM / 50Gb + 170Gb HDD)
Exchange server with mailbox and client access 2: MSK-EXH02 (4CPU / 8Gb RAM / 50Gb + 170Gb HDD)
Virtual organization network: 10.10.10.0/24
Balancing Method: DNS
As part of this material, we will not create a DMZ network, but for the safe operation of the combat system and protection from outside attacks, it is necessary to have a buffer between the external network and the intranet.
Scheme of our IT infrastructure.
Expand virtual machine with Active Directory role
Before installing Microsoft Exchange Server 2013, you need to prepare your Active Directory forest and its domains. Information about user mailboxes and the configuration of Exchange servers should be stored somewhere. We will use an Active Directory domain controller for this.
- In the management portal, go to the Virtual Machines section and click Create .
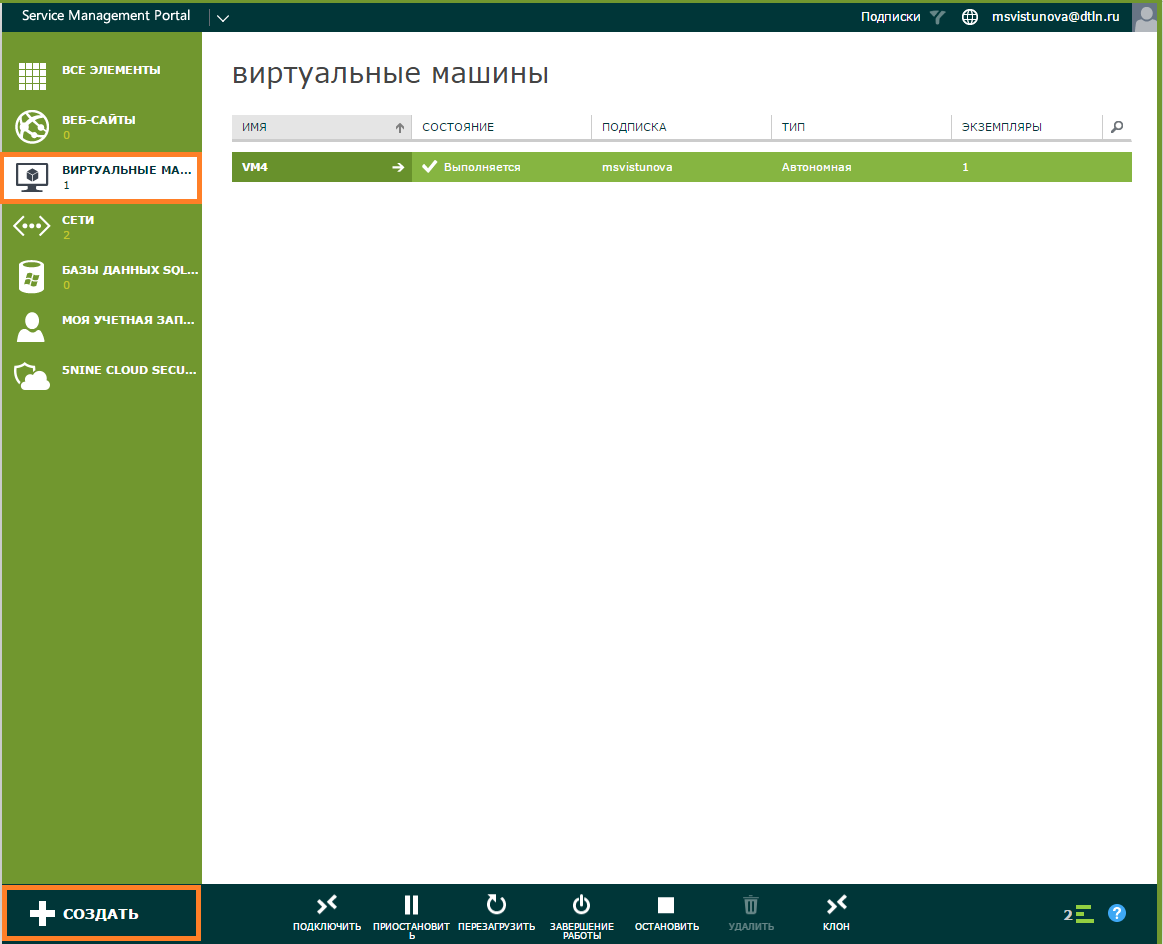
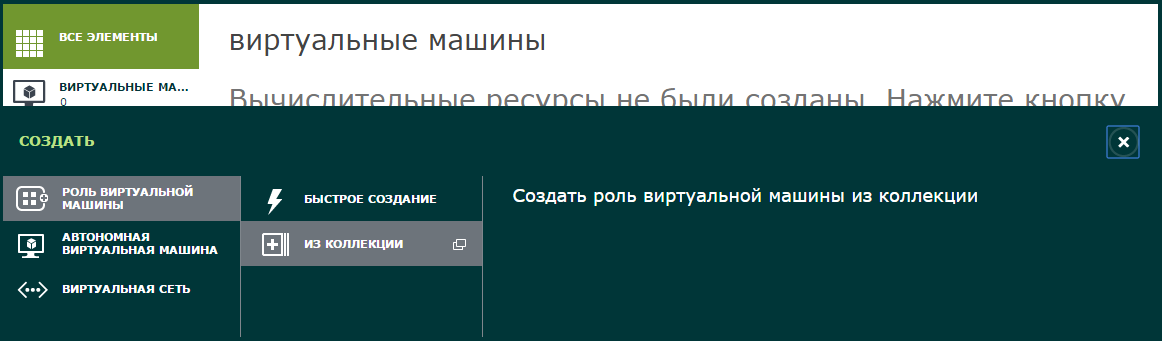
- Select the role of the virtual machine , from the collection.
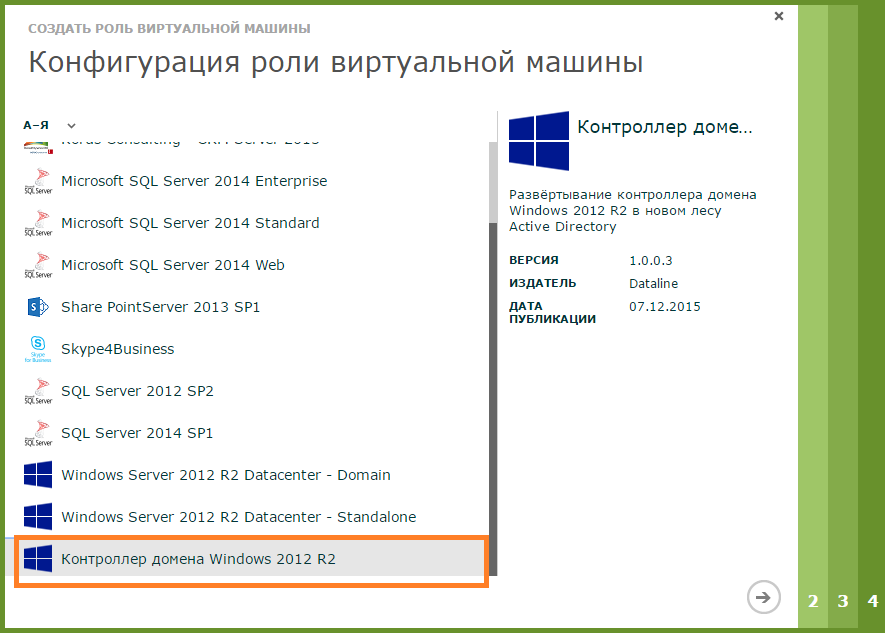
- Choose a template for a Windows 2012 R2 Domain Controller.
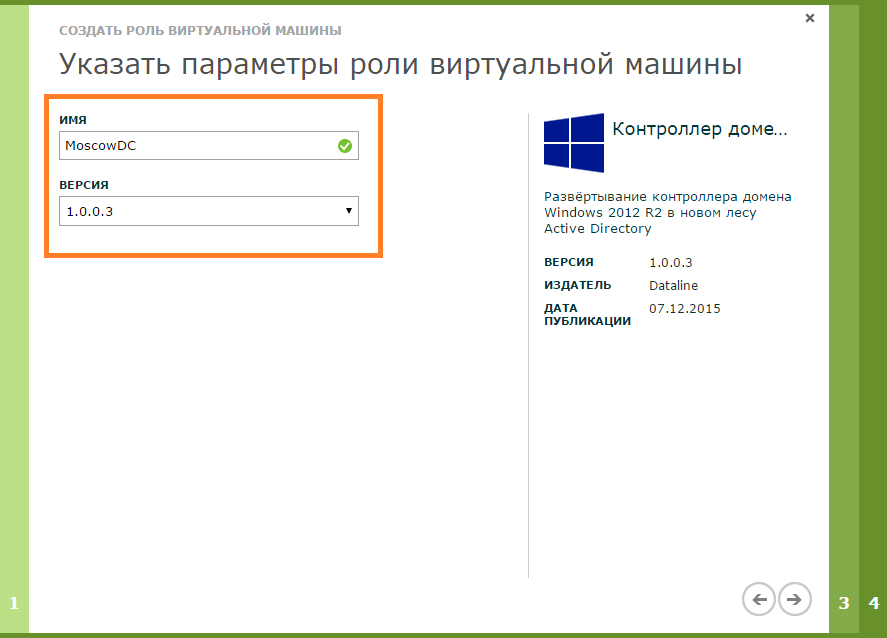
- Specify the name of the role of the virtual machine.
- Specify the parameters of the virtual machine:
- Size (CPU, RAM, HDD)
- Local Administrator Password and Login
- Timezone
- Virtual machine name
- Virtual network
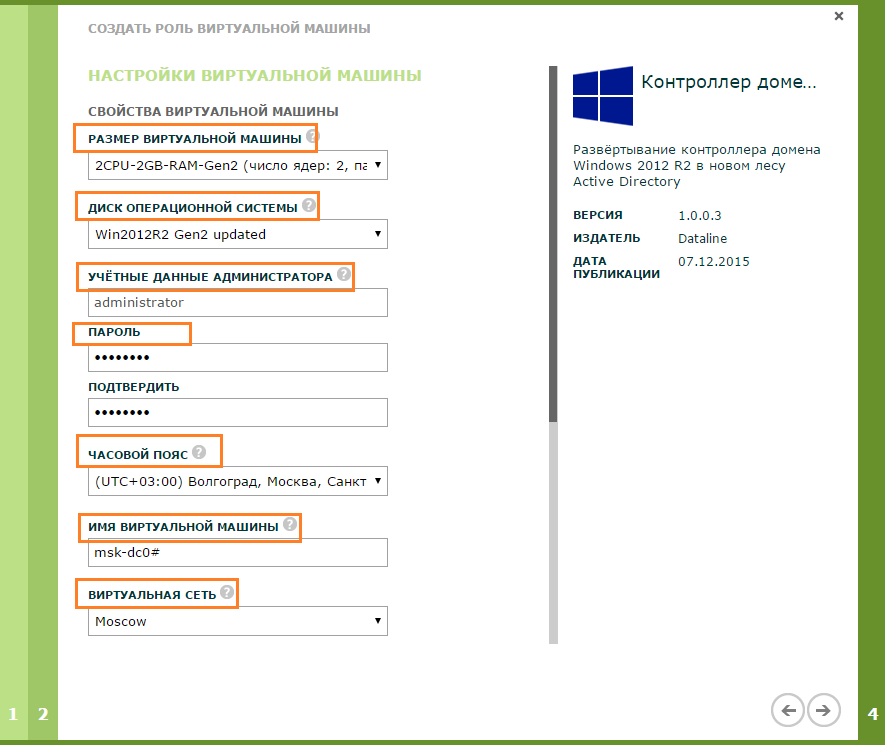
- Enter the parameters of the Active Directory forest being created and click OK .
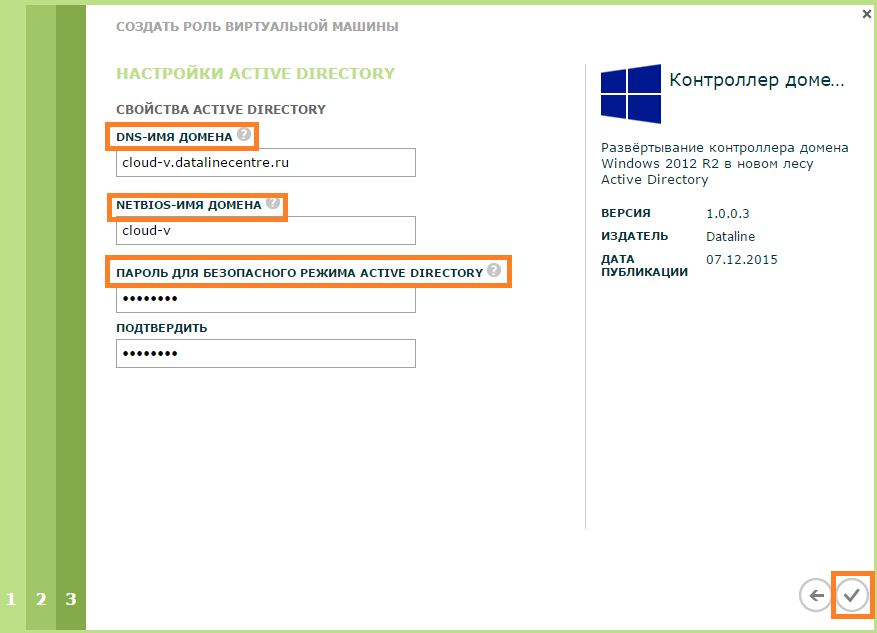
- Is done. Active Directory role virtual machine is deployed.
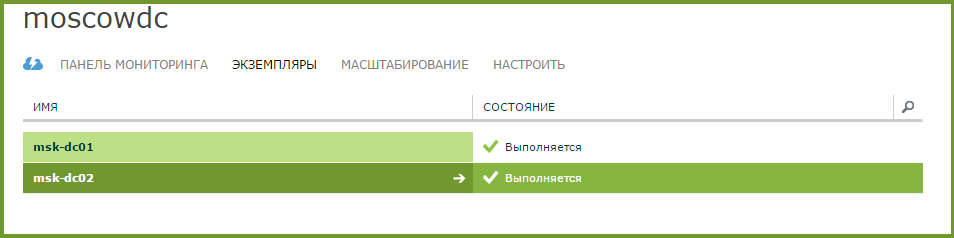
To ensure fault tolerance, we recommend deploying at least two domain controllers in your infrastructure. Let's create the second virtual machine with the Active Directory role. To do this, we use the scaling function, which is in the panel. - We select the necessary Virtual machine from the list. Go to the Scaling tab and select the desired number of instances on the slider. Click Save .
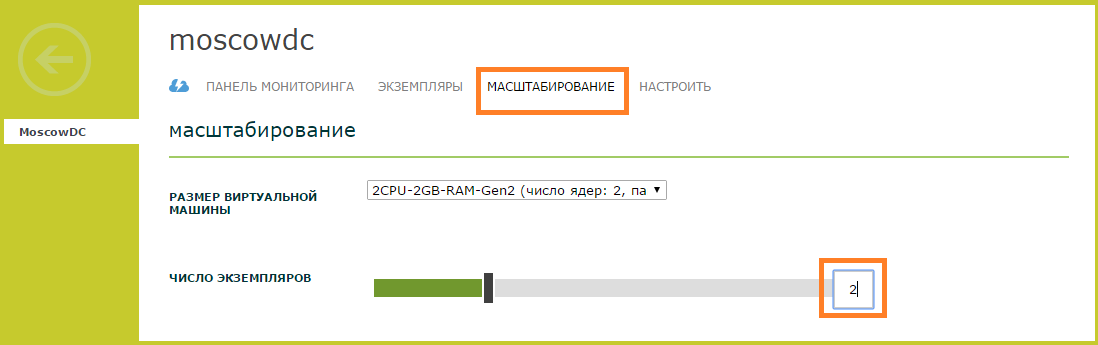
- Is done. The Instances tab has a second virtual machine with the role of a domain controller attached to an existing Active Directory domain.
Deploy a virtual machine with the role of Exchange Server 2013
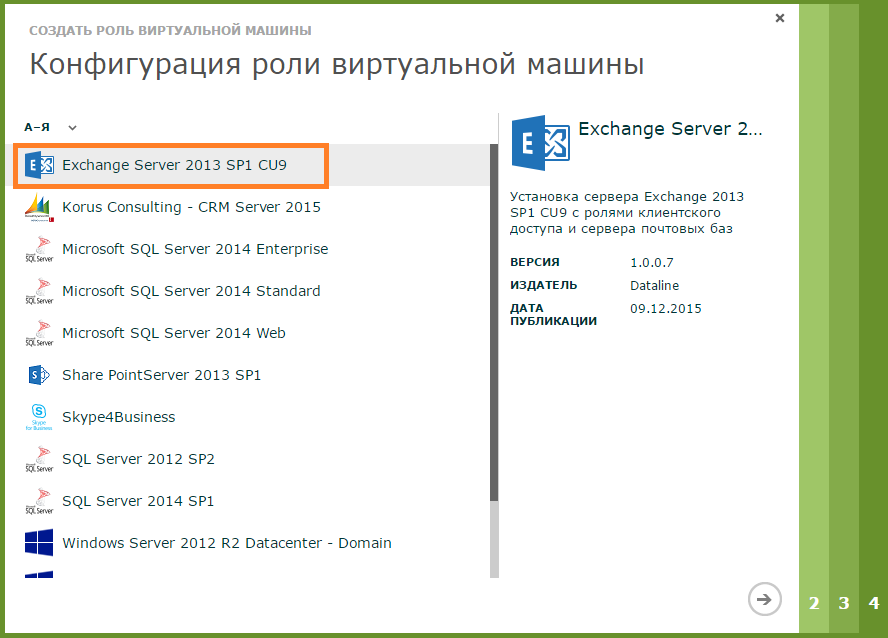
Active Directory we have. Usually, before deploying Exchange Server, you need to expand your Active Directory schemas and prepare domains . When you deploy an Exchange Server virtual machine from a template, all actions for schema extension and domain preparation are performed automatically. As with Active Directory, we create the role of a virtual machine.
- Select From the collection of Exchange Server 2013 SP1 CU9.
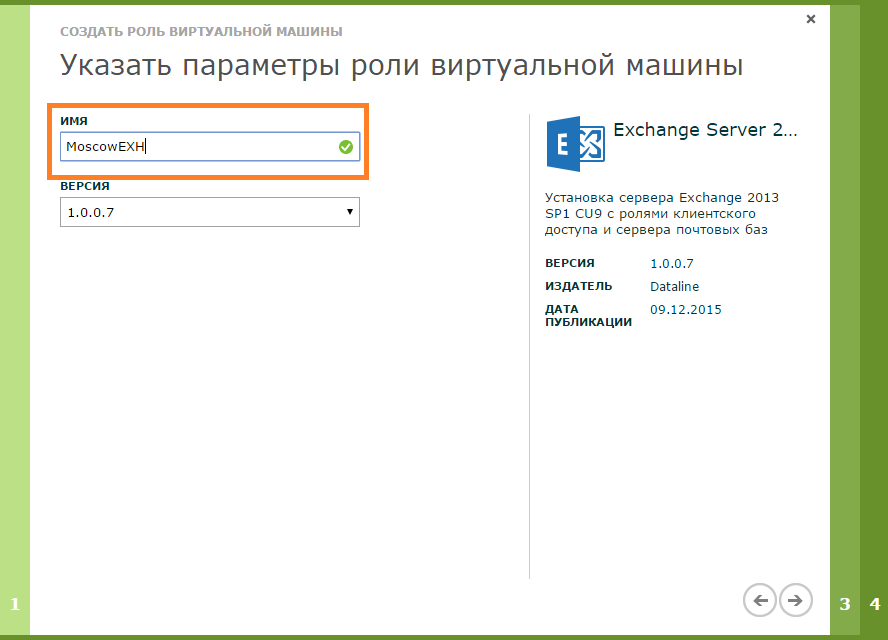
- We set the name of the role of the virtual machine.
- We set parameters of the virtual machine.
- Size (CPU, RAM, HDD)
- Local Administrator Password and Login
- Timezone
- Virtual machine name
- Virtual network - we connect the virtual machine to the same network in which we created the VM with Active Directory.
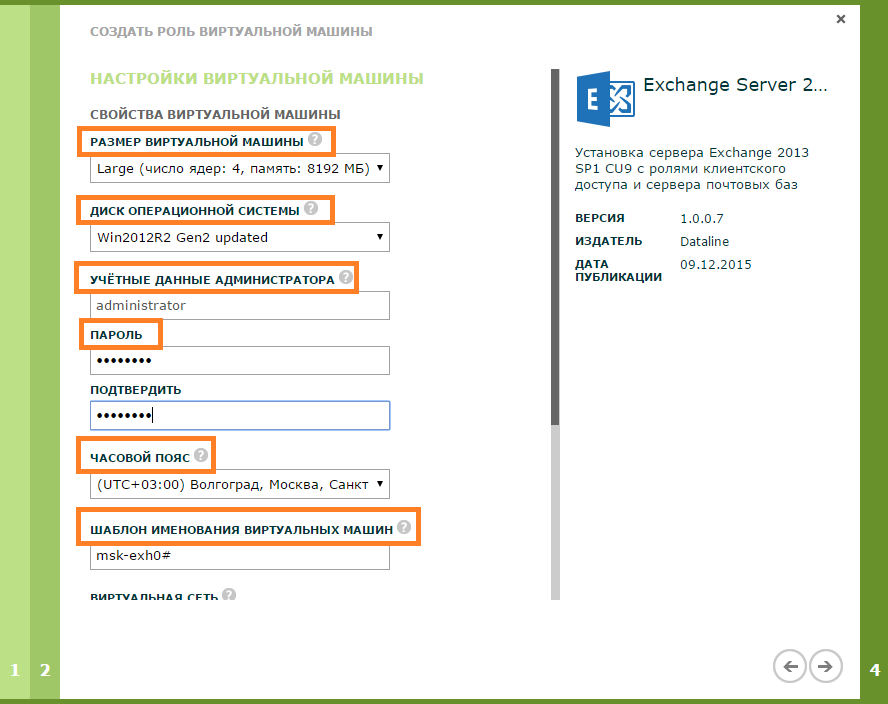
- Set the account settings.

- Is done.
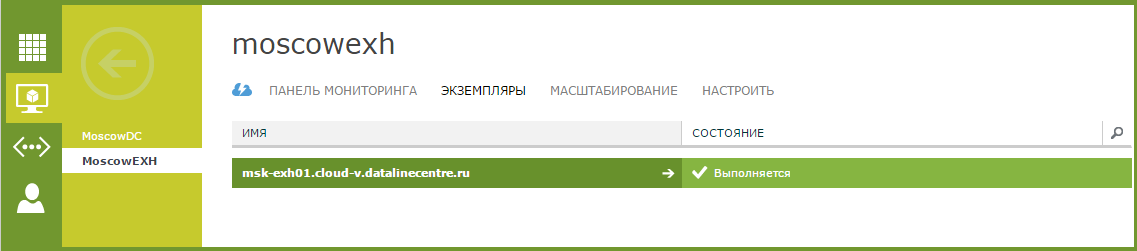
- As in the case of Active Directory, we create an additional Exchange Server virtual machine using the scaling function.
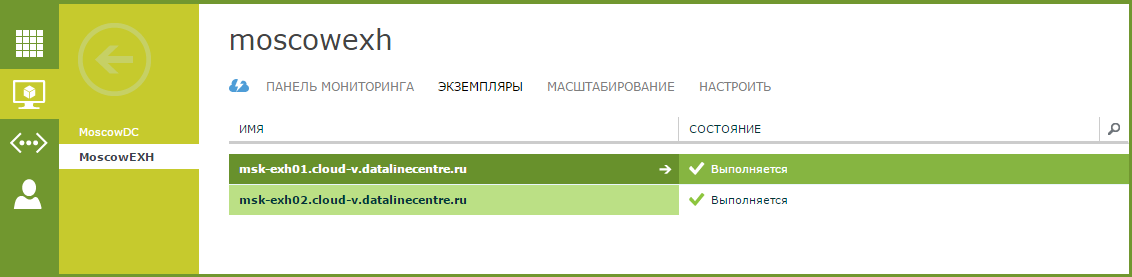
Verify that Exchange Server services start correctly
We connect to our virtual machines with Exchange Server through the RDP console.
- Select the virtual machine and click on the Connect , Console command bar.

- Through the saved RDP file, we connect to the virtual machine.
- Check the status of Exchange Server services through the Exchange Management Shell (EMS).
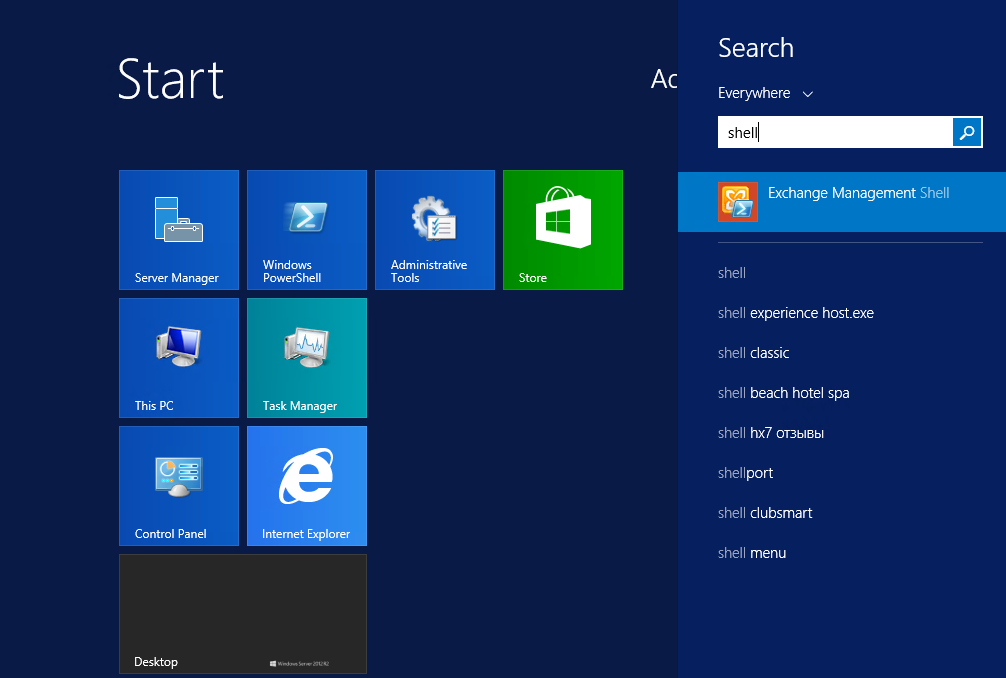
- Run the test-servicehealth –Server “Exchange Server Name” command.
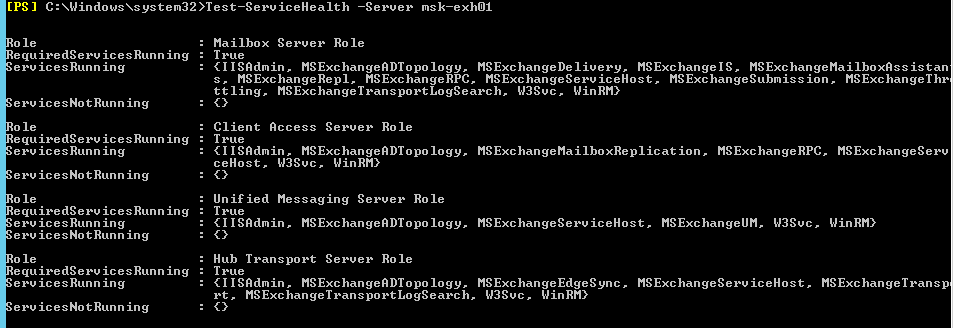
- Also, after deploying a virtual machine with Exchange, we recommend running through the logs for errors.
Configuring DNS zones and port forwarding rules
DNS records In order for Exchange Server to send and receive mail, pass anti-spam checks, you need to add the following DNS records to the external zone. In our case, the entries will look like this:
A-records:MX record:
- Autodiscover.cloud-v.datalinecentre.ru 185.99.13.17
- Autodiscover.cloud-v.datalinecentre.ru 185.99.13.19
- Mail.cloud-v.datalinecentre.ru 185.99.13.17
- Mail.cloud-v.datalinecentre.ru 185.99.13.19
Mail.cloud-v.datalinecentre.ru 5
Txt record:
"V = spf1 ip4: 185.99.13.19 ip4: 185.99.13.17 -all"
Do not forget for A-records to add PTR-records in the reverse zone of the provider, which owns external IP-addresses. They are needed to pass anti-spam checks.
Creating port forwarding rules. For the correct operation of the server, we need the following ports:
- 25 / 587– SMTP
- 80/443 - HTTP / HTTPS
Here we also add ports of POP3 110/995 and IMAP 143/993 protocols, if we plan to use them to connect clients.
- In the management portal, go to the Networks section and select the network in which the Exchange machines are running. Go to the Rules tab .

- Click Add Rule .

- Fill in the fields and save.
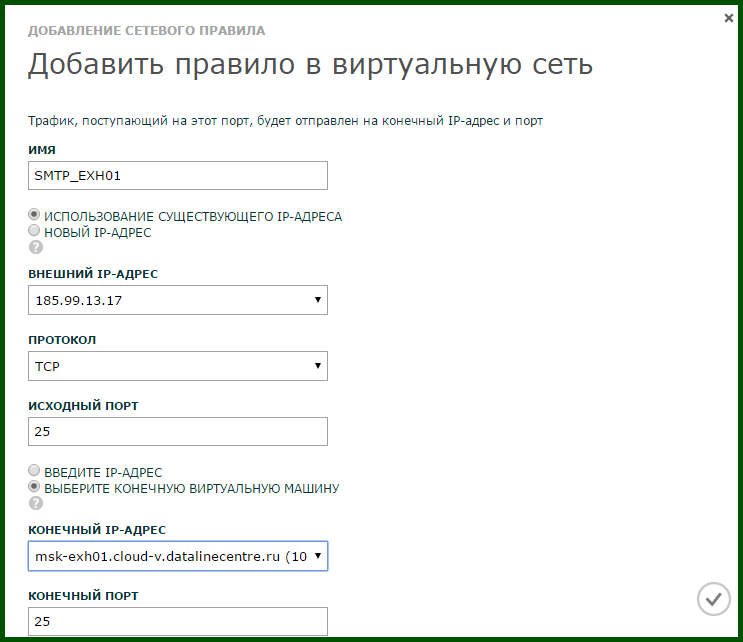
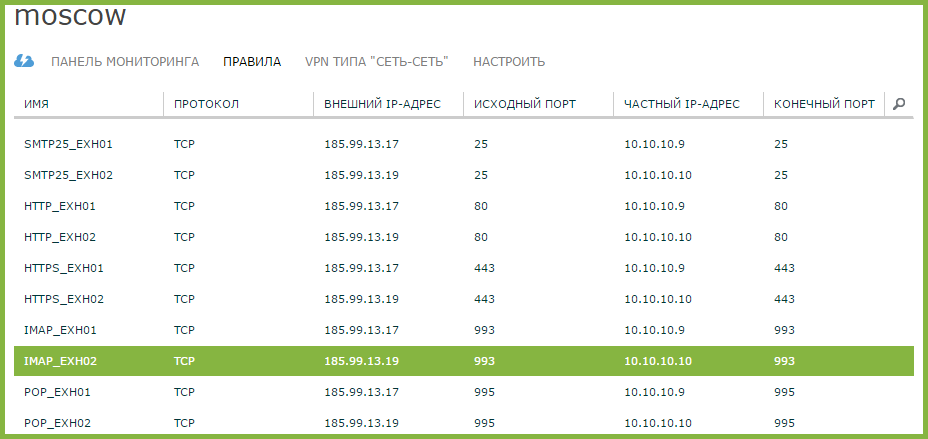
- By analogy, we add rules for each external IP address: we have two (185.99.13.19 and 185.99.13.17), since two Exchange servers are deployed. This is what should happen in the end:
Configuring Exchange Server Database Cluster
We have deployed two Exchange servers to ensure greater availability. Based on them, we will configure a failover cluster - Database Availability Group (DAG) .
DAGs can be created through the Exchange Management Shell or the Exchange Control Panel. We will continue to work with EMS.
- Connect to the virtual machine via the console, enter the command
New-DatabaseAvailabilityGroup , where:- Name - the name of the availability group;
- WitnessServer - server witness;
- WitnessDirectory - directory on the witness server in which service information will be stored;
- DatabaseAvailabilityGroupIpAddress - cluster IP address.

Important: with an even number of servers in the DAG, you must have a server witness that will determine the quorum in the cluster . This server cannot be one of the cluster members. The Exchange Trusted Subsystem group must be included in the local administrators group of this server. In our case, the role of server witness will be performed by a domain controller. In a productive environment, you cannot do this and it’s better to use a dedicated server.
With an odd number of servers in the DAG server witness is not needed. - Add the msk-exh01 and msk-exh02 servers to the DAG. We execute the command
Add-DatabaseAvailabilityGroupServer , where:- Identity - the name of the DAG group;
- MailboxServer is a mailbox server that we want to add to the cluster.
- Check that the servers are added to the cluster. Get-DatabaseAvailabilityGroup command .

- Add a passive copy of our mailbox database. The Add-MailboxDatabaseCopy command, where:
- Identity - the name of the database for which you want to create a copy;
- Mailboxserver - the name of the server on which to place a copy;
- ActivationPreference is a value that indicates the order in which the copy is activated in the event of an unplanned failure of the active copy.

- Check the status of a copy of the database with the command Get-mailboxDatabaseCopy.

Configure Client Access
Clients can connect to the Exchange server in various ways:
- Outlook Anywhere is a protocol that has replaced the RPC / TCP protocol, which is inaccessible since Exchange Server 2013. In fact, it is the same RPC, but wrapped in HTTP, with traffic encryption using SSL / TLS.
- Outlook Web Access (browser access)
- POP3 protocol
- IMAP protocol
- Exchange ActiveSync (for connecting mobile clients)
All specified connection methods use an encrypted connection that requires a SAN or Wildcard SSL certificate .
To work correctly with the mail server, we need at least 2 names in the SSL certificate. In our case, this is the name for SMTP, HTTPS, POP, IMAP services, as well as the name for the Autodiscover service (autodiscover): Mail.cloud-v.datalinecentre.ru and Autodiscover.cloud-v.datalinecentre.ru.
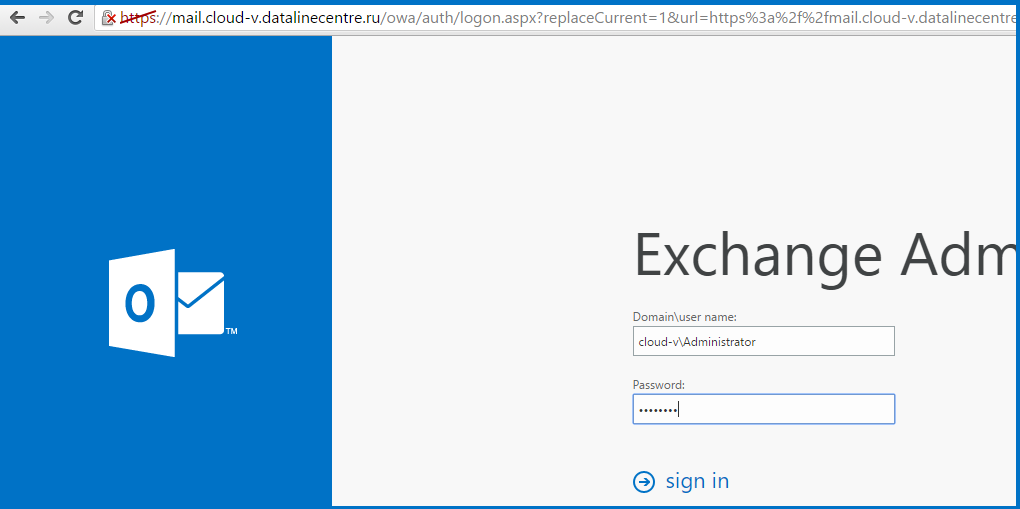
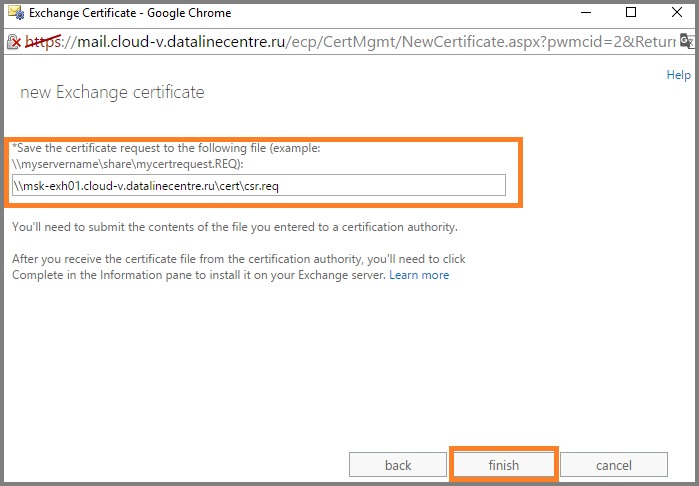
Install certificate. To issue a certificate, you must create a Certificate Signing Request (CSR) . This procedure is easiest to perform through the Exchange Control Panel (ECP):
- We go in the ECP.
- Go to the Servers section, the Certificates tab. Choose one of our servers,
click “+”.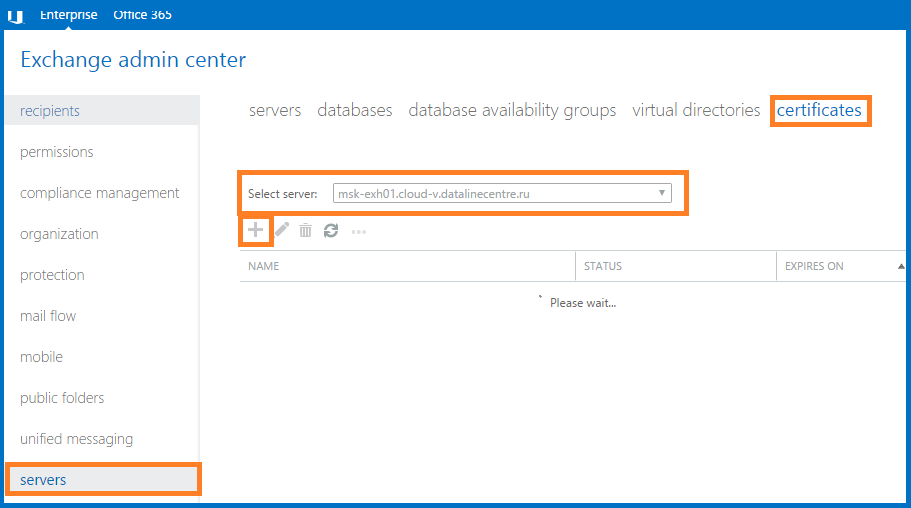
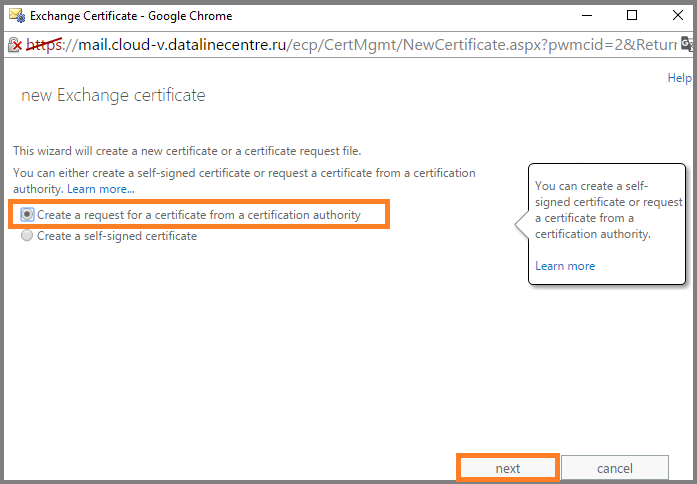
- Select the option Create a request for certification from certification authority.
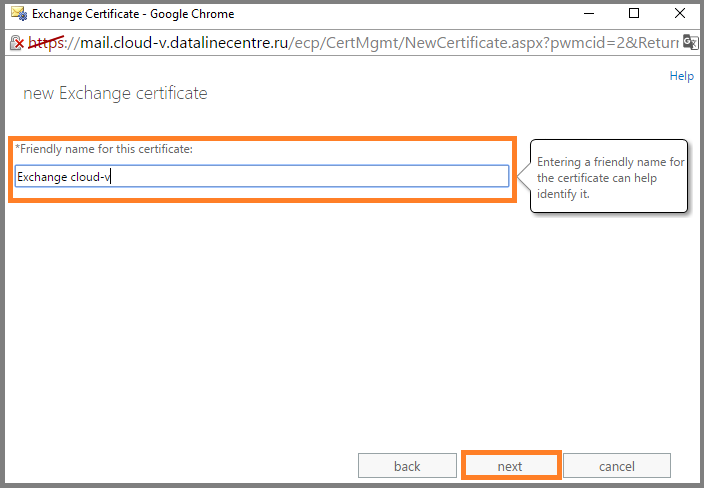
- We enter Friendly name.
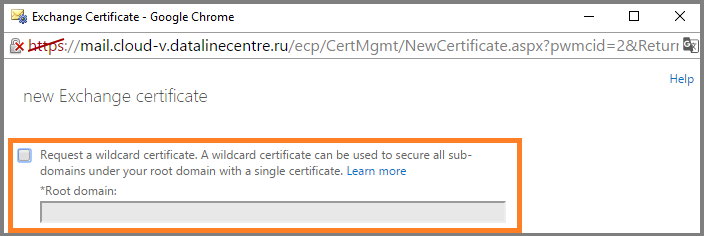
- Remove the check mark to request a wildcard certificate, since we will use the SAN certificate.
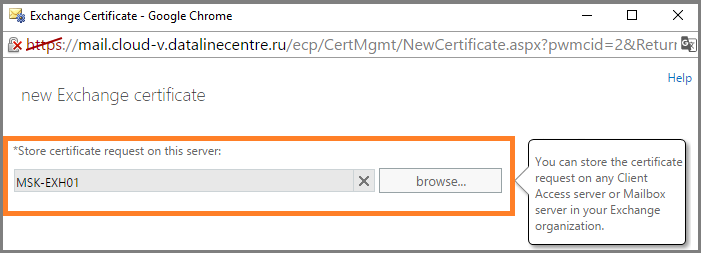
- Specify which server to save the request to.
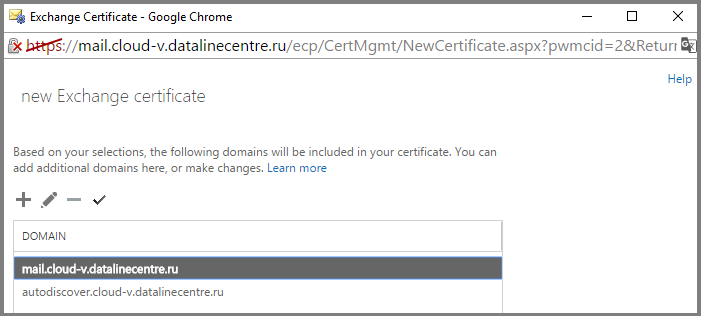
- Specify the names that will contain our SAN certificate.
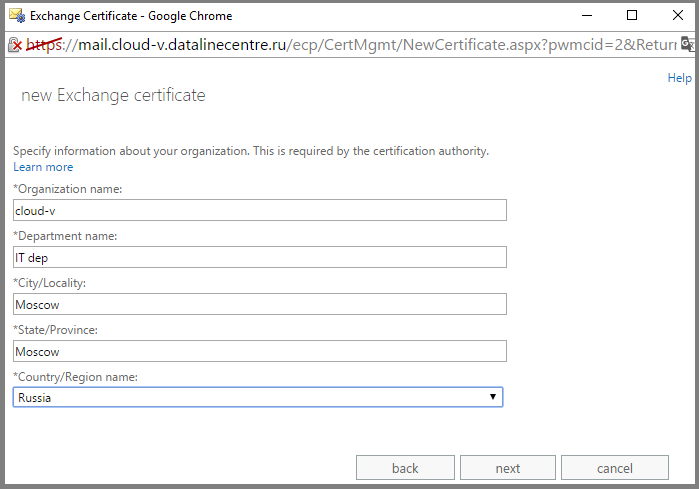
- Fill in the required fields.
- Specify the path where our CSR will be stored. Click Finish .
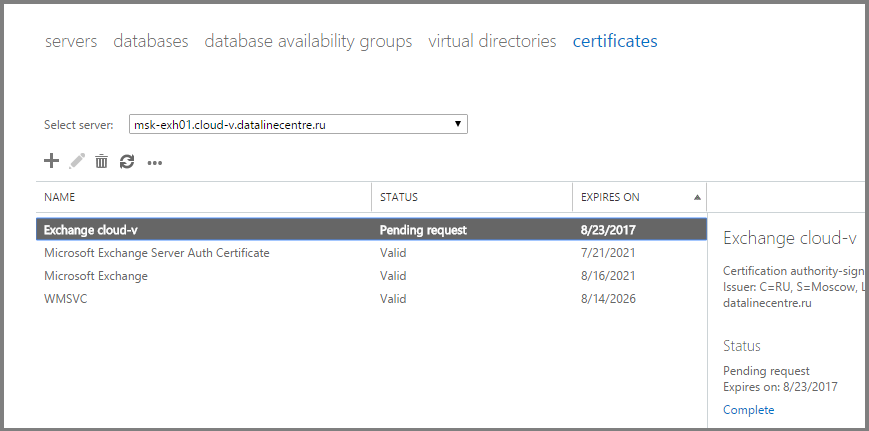
- Is done. CSR is created. Based on our CSR, we issue a certificate and install it on the server.
- Create a “shared” folder on any of the created servers and save the certificate there.
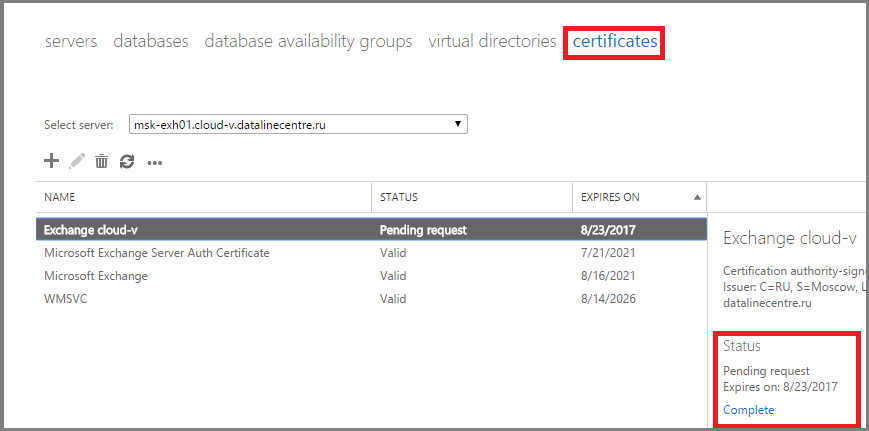
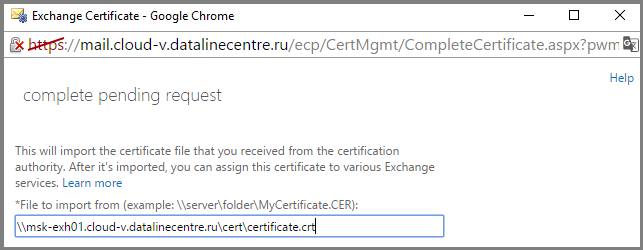
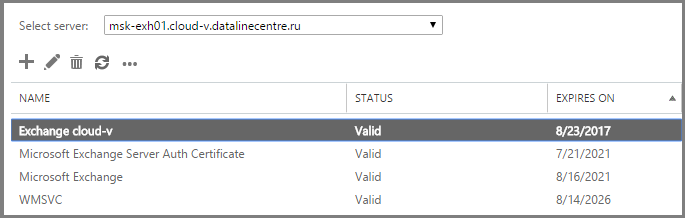
- Go to the console ECP. In the Servers section, go to the Certificates tab. In the Status field, click Complete .
- Specify the path to the folder in which our certificate lies.
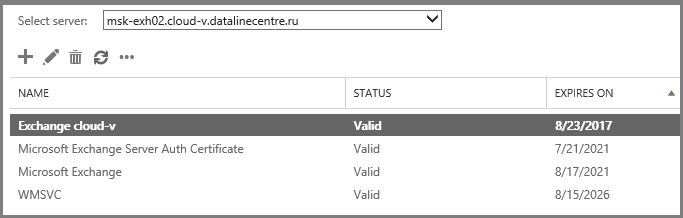
- Certificate added. It is important that the status of the certificate is valid.
- Now let's assign SMTP, IIS, POP, IMAP services to it. Double click on our certificate, go to Services and tick the services we need.
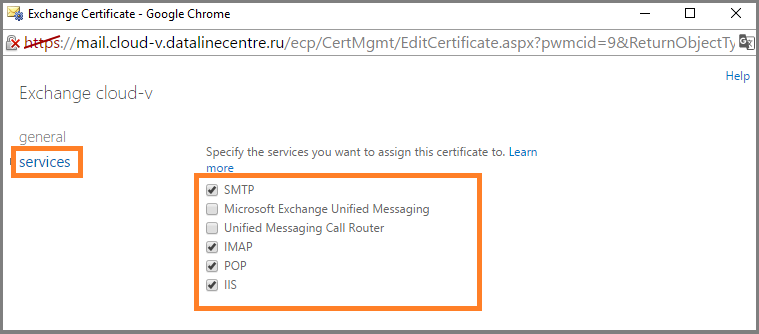
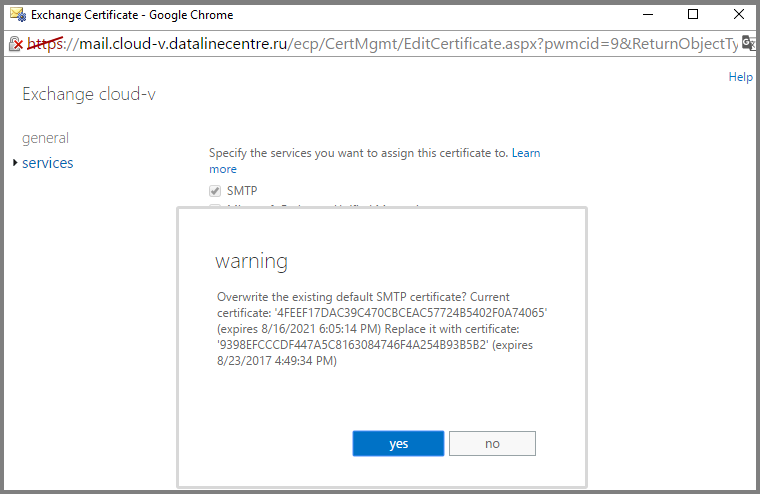
- Click Yes when the warning appears.
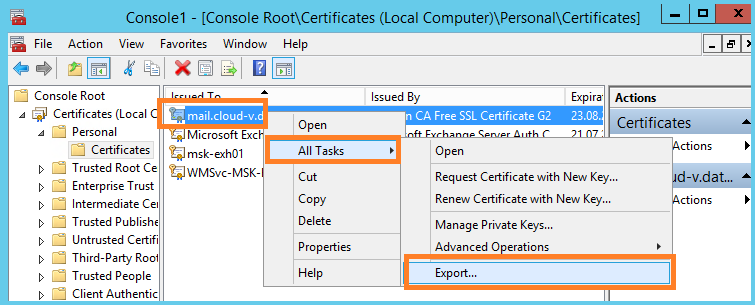
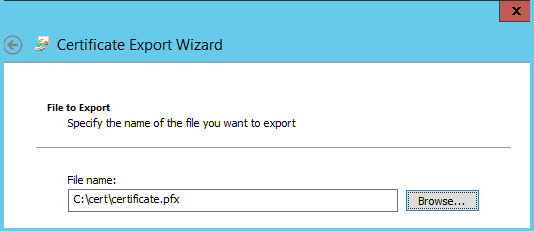
We installed the certificate on one of the Exchange servers. To install the certificate on other servers, go to the server where the certificate is already installed, and export it with a private key.
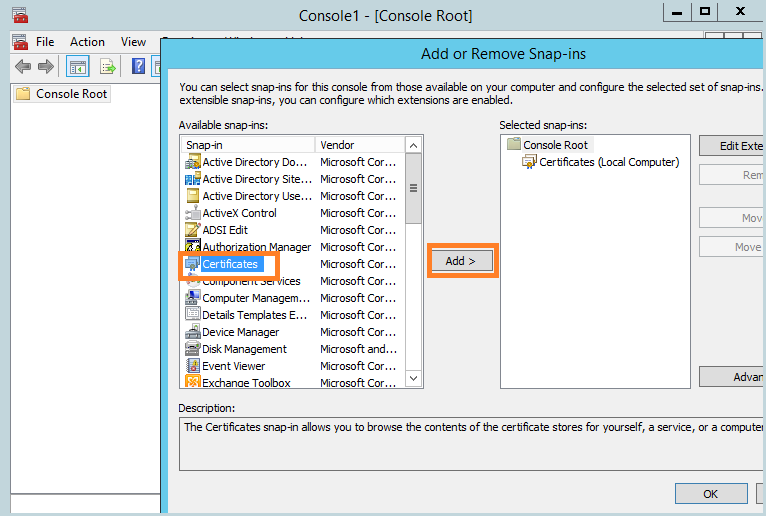
- Open the Microsoft Management Console (MMC), add the computer certificate management snap-in.
- Go to the personal certificates tab, export.
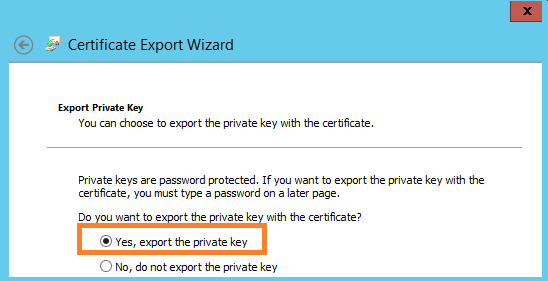
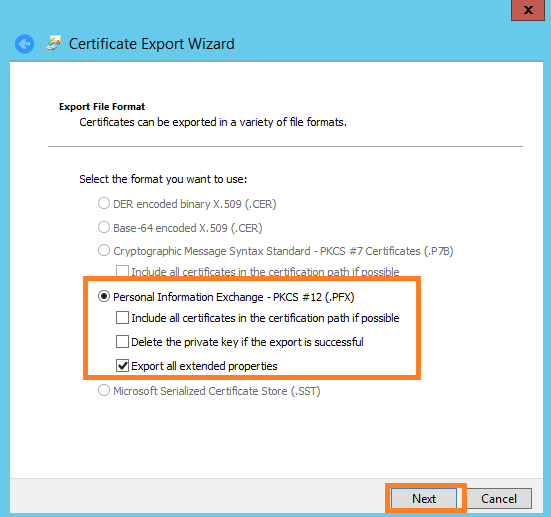
- We perform the export of a private key.
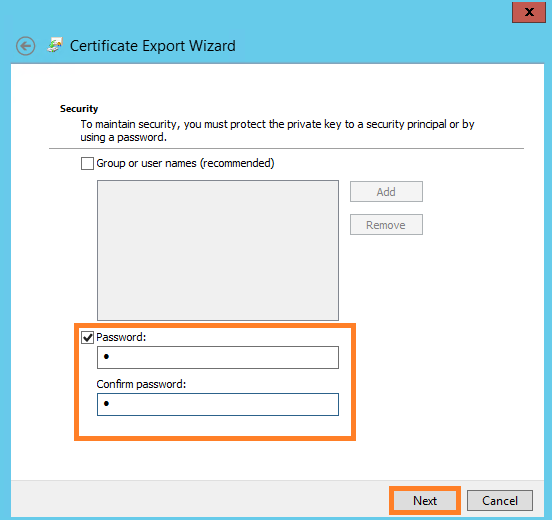
- Specify a secure password that must be entered when importing the certificate.
- Specify the place where the certificate will be saved. Click Finish .
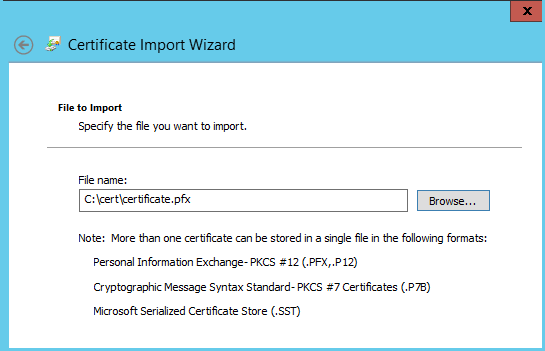
- The exported certificate is transferred to the remaining server. In our case, this is msk-exh02. Open the MMC, add the computer certificate management snap-in, go to the personal certificates tab, import.
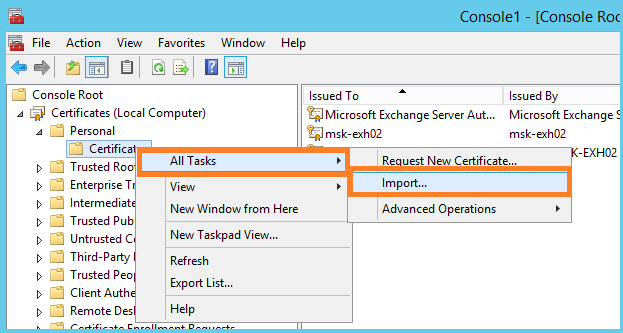
- Specify the path to the certificate.
- Specify the password that we set when exporting. You can also check the option to export the private key.

- Is done. The certificate is imported along with the private key.

- In ECP, we assign services to it, as we did for the first server.
- Is done. Our SSL certificate is imported to both Exchange servers.
- Verify that when logging into OWA, the correct certificate appears in the browser.

Setting up virtual directories. Using virtual directories, clients get access to OWA, ECP, address book (OAB), ActiveSync protocol, Web services (EWS).
In our case, we set the ExternalURL parameter to configure virtual directories. The autodiscover service will give it to clients. You can also specify the InternalURL parameter if your organization has domain clients connecting to Exchange within the organization's local area networks.
Open the EMS and alternately configure the virtual directories using the commands:
- Get-EcpVirtualDirectory | Set-EcpVirtualDirectory –externalURL “External URL of the directory”
- Get-OwaVirtualDirectory | Set-OwaVirtualDirectory –externalURL “External URL of the directory”
- Get-WebServicesVirtualDirectory | Set-WebServicesVirtualDirectory –ExternalURL “External URL of the directory”
- Set-OabVirtualDirectory | Set-OabVirtualDirectory –externalURL “External URL of the directory”
- Get-ActiveSyncVirtualDirectory | Set-ActiveSyncVirtualDirectory –ExternalURL “External URL of the directory”
Configure Autodiscover Services. Autodiscover automatically configures Microsoft Outlook clients and transfers server connection parameters, which makes life easier for administrators. Read more about this service here and here .
Outlook Anywhere allows you to configure Remote Access to Exchange and Outlook Mobile App.
For Outlook Anywhere to work, you need to specify the name of the connection to the service, in our case, it is Mail.cloud-v.datalinecentre.ru. Open the EMS and execute the command:
Get-OutLookAnyWhere | Set-OutlookAnyWhere –ExternalHostName “external connection name to the service” –ExternalClientRequireSsl: $ true –IISAuthenticationMethods “Basic”, ”NTLM”, ”Negotiate” –ExternalClientAuthenticationMethod “Negotiate”
To ensure the operation of Autodiscover, we added 2 A-records in the external DNS zone pointing to the Exchange server:
- Autodiscover.cloud-v.datalinecentre.ru 185.99.13.17
- Autodiscover.cloud-v.datalinecentre.ru 185.99.13.19
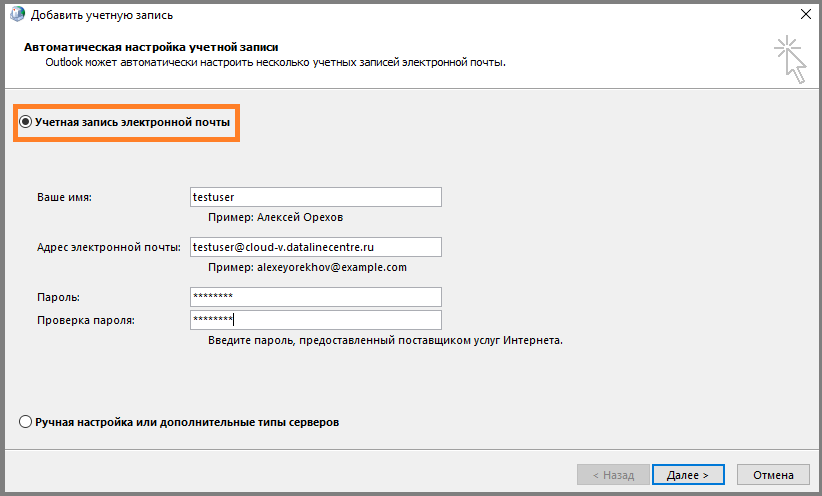
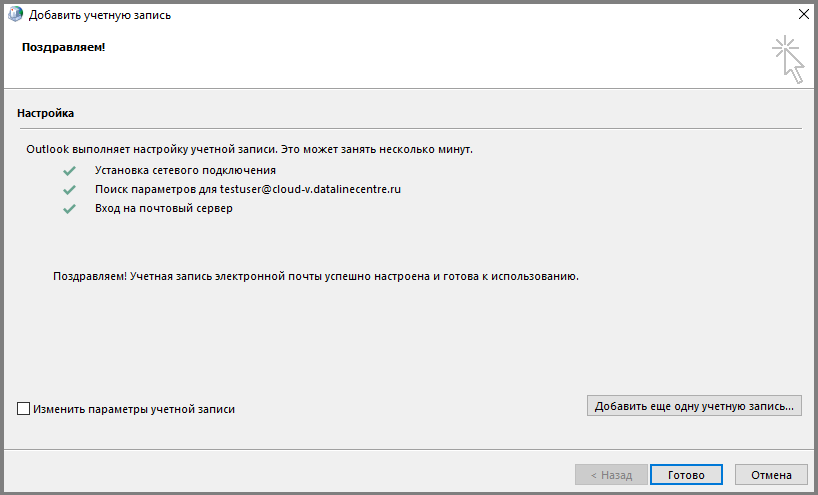
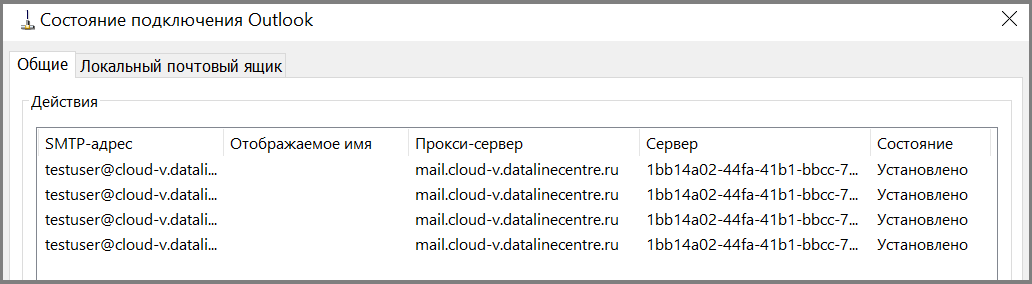
Verify that Microsoft Outlook clients connect. Create a profile, specify the email address and password:
Outlook clients connect correctly.
Mail Transport Configuration
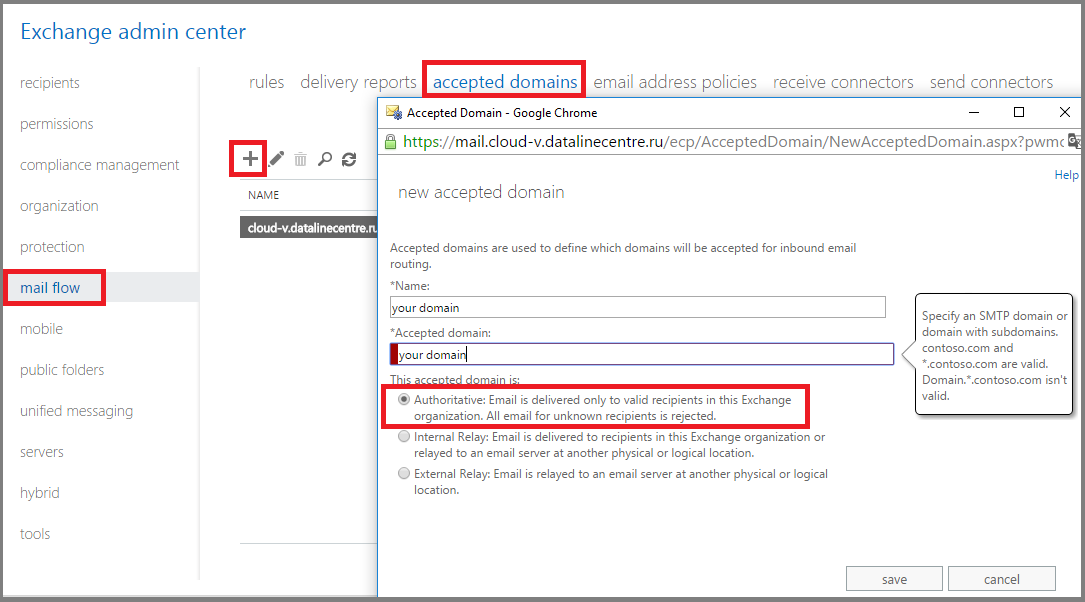
Out of the box, the Exchange server allows you to send mail only within the organization. To send mail to the Internet you need:
- Create accepted domains . This is the address space that serves our Exchange mail server. You can create multiple domains.
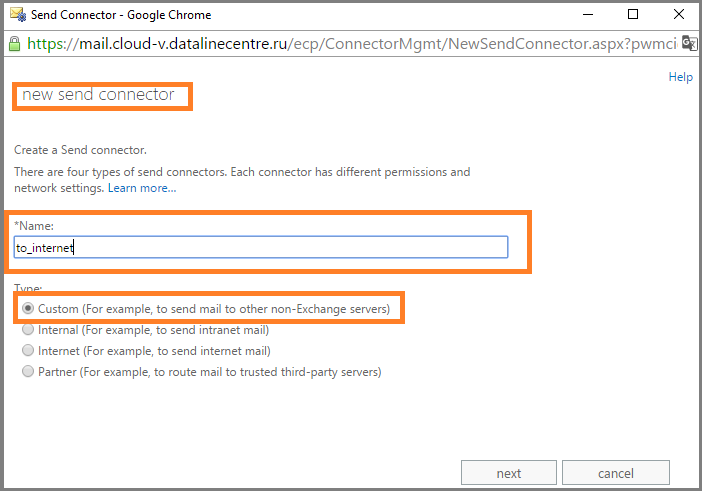
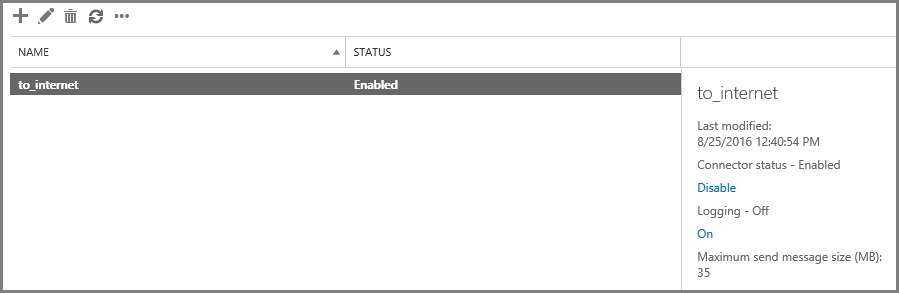
- Create a send connector . With it, we can manage the mail flow by specifying various settings.
- In ECP, in the mail flow section, go to the accepted domains tab. Click “+”. Specify the name of our domain, choose the type Authoritative . We save.
- In the mail flow section, go to the send connectors tab. Click “+”. Set the name and specify the type Custom .
- Specify sending via MX records.
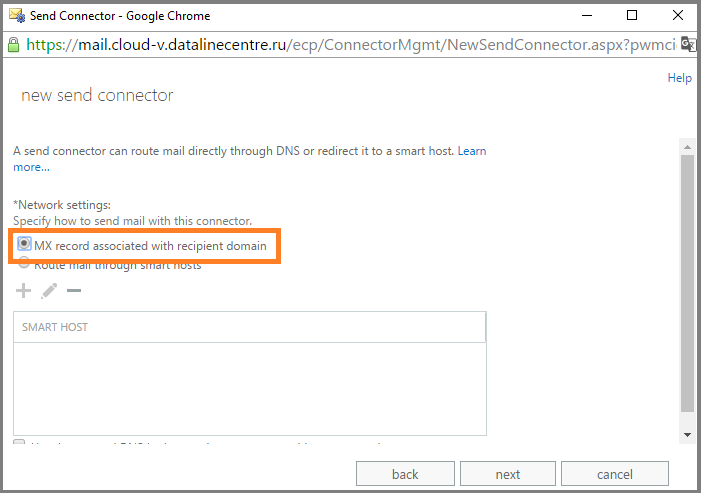
- Specify the address space. In our case, this is “*”, meaning the entire domain name space.
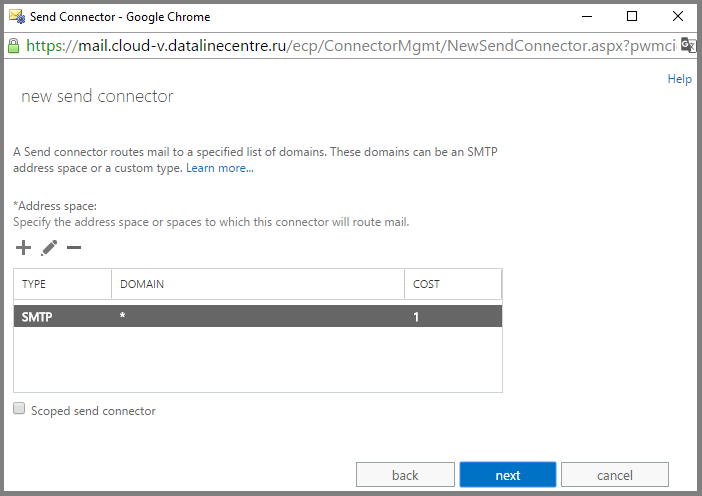
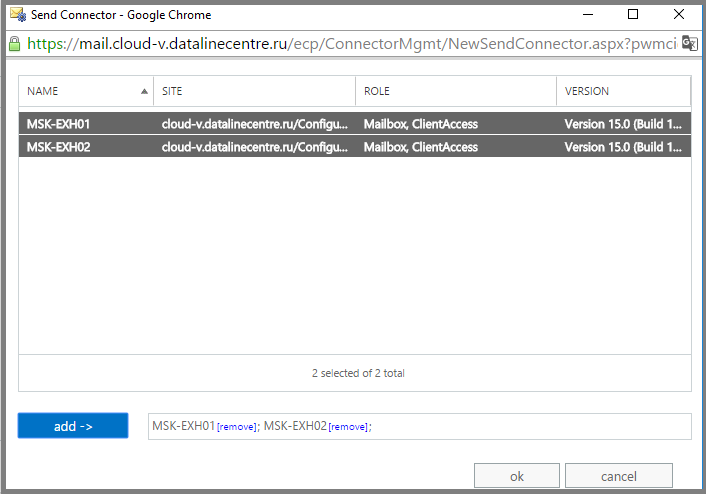
- Specify the server from which mail will be sent outside the Exchange organization. In our case, these are both servers. Click Add .
- In order for our server to successfully pass an anti-spam check, we specify the FQDN HELO parameter in the send connector. This is the name that will be presented to our server when creating an SMTP session. The receiving mail server will perform reverse dns lookup, matching the name of the PTR record with the name we specified in the send connector. If the names do not match, the sending server will not pass the anti-spam check.
To configure the name HELO, go to the send connector parameters and enter the name of our server.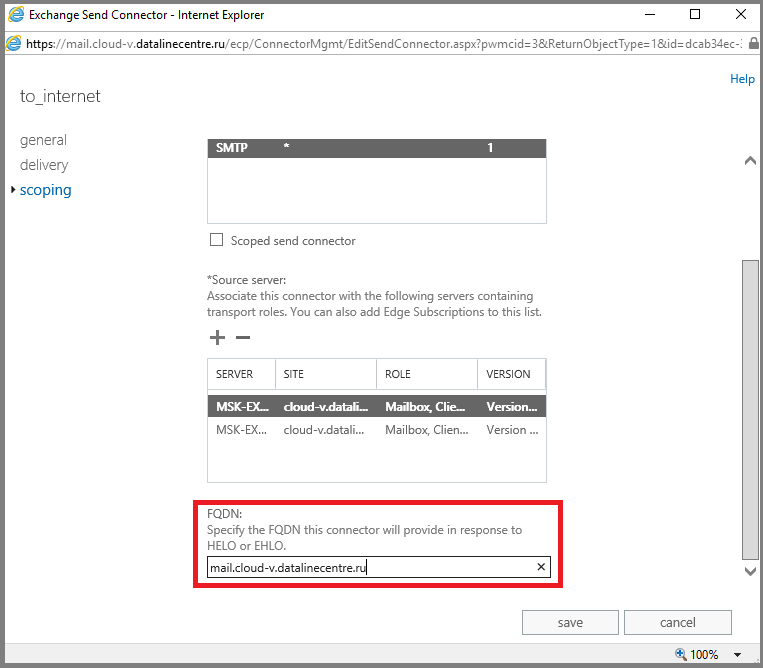
These are all the steps required for the basic configuration of the mail server from the Exchange Server 2013 template. Ask questions in the comments if something remains unclear.
Source: https://habr.com/ru/post/311306/
All Articles