learnopengl. Lesson 1.3 - Hello Window
 In the last lesson we prepared a workspace and now we are fully ready to create a window.
This translation was prepared jointly with FERusM for which many thanks to him.
Interested please under the cat.
Content
Part 1. Start
Part 2. Basic lighting
Part 3. Loading 3D Models
')
Part 4. OpenGL advanced features
Part 5. Advanced Lighting
- Opengl
- Creating a window
- Hello window
- Hello triangle
- Shaders
- Textures
- Transformations
- Coordinate systems
- Camera
Part 2. Basic lighting
Part 3. Loading 3D Models
')
Part 4. OpenGL advanced features
- Depth test
- Stencil test
- Mixing colors
- Face clipping
- Frame buffer
- Cubic cards
- Advanced data handling
- Advanced GLSL
- Geometric shader
- Instancing
- Smoothing
Part 5. Advanced Lighting
Part 1.3. Hello window
After installing GLFW, it 's time to make a simple program, as is customary in such materials, let it be Hello World. First you need to create a .cpp file and connect several headings, you also need to set the variable GLEW_STATIC , which indicates that we will use the static version of the GLEW library.
// GLEW GLFW. // GLEW #define GLEW_STATIC #include <GL/glew.h> // GLFW #include <GLFW/glfw3.h> Make sure that GLEW is connected before GLFW. The GLEW header file contains the connection of all the necessary OpenGL header files, such as GL / gl.h
Translator's Note
As TrueBers noted , this is supposedly just an outdated crutch and modern versions of GLFW themselves connect the required libraries, however, if the GLFW_INCLUDE_NONE flag is not set, and by default it is not declared.
Next, write the function main, so far it will create a GLFW window. It will look like this:
int main() { // GLFW glfwInit(); // GLFW // OpenGL. // glfwWindowHint(GLFW_CONTEXT_VERSION_MAJOR, 3); // glfwWindowHint(GLFW_CONTEXT_VERSION_MINOR, 3); // glfwWindowHint(GLFW_OPENGL_PROFILE, GLFW_OPENGL_CORE_PROFILE); // glfwWindowHint(GLFW_RESIZABLE, GL_FALSE); return 0; } In this function, we first initialize GLFW by calling the function glfwInit , then proceed to configure it using the function glfwWindowHint . glfwWindowHint has a very simple signature, the first argument is to pass the identifier of the parameter that is being changed, and the second parameter is the value that is set to the corresponding parameter. Parameter identifiers, as well as some of their values, are in a common listing with the GLFW_ prefix. More details on setting the GLFW context can be found in the official GLFW documentation . If when you run this example, you get errors that are very similar to undefined behavior, it means that you have incorrectly connected the GLFW library.
Since the articles will use OpenGL version 3.3, you need to tell GLFW that we are using this version, which happens as a result of calling the glfwWindowHint method with arguments:
GLFW_CONTEXT_VERSION_MAJOR, 3 GLFW_CONTEXT_VERSION_MINOR, 3 Thus, GLFW takes all the necessary steps when creating an OpenGL context. This ensures that if the user does not have the required version of OpenGL (in this case, version 3.3 is being considered), then GLFW will simply not start. In addition to the installation version, we clearly indicated that we will use the profile GLFW_OPENGL_CORE_PROFILE . This will result in an error when using legacy OpenGL functions. If you are using Mac OS X, you must add the following function call glfwWindowHint (GLFW_OPENGL_FORWARD_COMPAT, GL_TRUE) to the GLEW initialization code.
Make sure that your hardware supports OpenGL version 3.3 and above and that the corresponding version of OpenGL is installed in the OS. To find out the version of OpenGL on your Linux computer, use glxinfo in the console. For Windows, you can use the OpenGL Extension Viewer . If the OpenGL version is lower than necessary, make sure your hardware supports it and / or try updating the drivers.
Now we need to create a window object. This object contains all the necessary information about the window and is used by GLFW functions.
GLFWwindow* window = glfwCreateWindow(800, 600, "LearnOpenGL", nullptr, nullptr); if (window == nullptr) { std::cout << "Failed to create GLFW window" << std::endl; glfwTerminate(); return -1; } glfwMakeContextCurrent(window); The signature of the function glfwCreateWindow requires the following arguments: “Window height”, “Window width”, “Window name” (we will not need the remaining arguments). Returns a pointer to an object of type GLFWwindow, which we will need later. Next, we create a window context, which will be the main context in this thread.
GLEW
In the last lesson we said that GLEW manages pointers to OpenGL functions, so we must initialize GLEW before calling any OpenGL functions.
glewExperimental = GL_TRUE; if (glewInit() != GLEW_OK) { std::cout << "Failed to initialize GLEW" << std::endl; return -1; } Notice that we set the glewExperimental variable to GL_TRUE before initializing GLEW. Setting the value of glewExperimental to GL_TRUE allows GLEW to use the latest techniques to control OpenGL functionality. Also, if you leave this variable with the default value, you may experience problems using the Core-profile mode.
Viewport
Before we begin to draw anything, we need to do something else. We need to tell OpenGL the size of the window being drawn, so that OpenGL knows how we want to display data and coordinates relative to the window. We can set these values through the glViewport function.
int width, height; glfwGetFramebufferSize(window, &width, &height); glViewport(0, 0, width, height); The first 2 arguments to glViewport are the position of the bottom left corner of the window. The third and fourth are the width and height of the rendered window in px, which we get directly from GLFW. Instead of manually setting the widths and heights of 800 and 600, respectively, we will use the values from GLFW, since this algorithm also works on screens with high DPI (like Apple Retina).
We can also set smaller values for the viewport. In this case, all rendered information will be smaller, and we will be able, for example, to draw another part of the application outside the viewport.
Behind the scenes, OpenGL uses data passed through glViewport to convert 2D coordinates to screen coordinates. For example, the position (-0.5, 0.5) as a result will be converted to (200, 450). Notice that the OpenGL coordinates being processed are in the range from -1 to 1, respectively, we can effectively convert from (-1, 1) to (0.800) and (0.600).
We prepare the engines
We do not want the application to fall immediately after rendering one image. We want the program to continue to render the images and process user input until it is closed. To do this, we need to create a loop called the game loop , which will be processed until we tell GLFW to stop.
while(!glfwWindowShouldClose(window)) { glfwPollEvents(); glfwSwapBuffers(window); } The function glfwWindowShouldClose checks at the beginning of each iteration of the cycle whether GLFW received a close instruction, if so, the function will return true and the game loop will stop working, after which we will be able to close our application.
The glfwPollEvents function checks whether any events were triggered (such as keyboard input or mouse movement) and calls the installed functions (which we can set via callback functions). Usually we call the event-handling functions at the beginning of the loop iteration.
The glfwSwapBuffers function replaces the color buffer (a large buffer containing color values for each pixel in the GLFW window) that was used for drawing during the current iteration and shows the result on the screen.
Double buffering
When an application draws to a single buffer, the resulting image may flicker. The reason for this behavior is that the drawing is not instantaneous, but pixel by pixel from the top left, right down. Since the image is not displayed instantly, but gradually, it can have a lot of artifacts. To avoid these problems, windowing applications use double buffering. The front buffer contains the resulting image displayed to the user; at the same time, the rear buffer is being drawn. As soon as the drawing is finished, these buffers are swapped and the image is displayed to the user at the same time.
Something else
As soon as we are out of the game cycle, we need to clear the resources allocated to us. This is done with the glfwTerminate function at the end of the main function.
glfwTerminate(); return 0; This code will clear all resources and exit the application. Now, try building the application and if there are no problems with this, you will see the following:
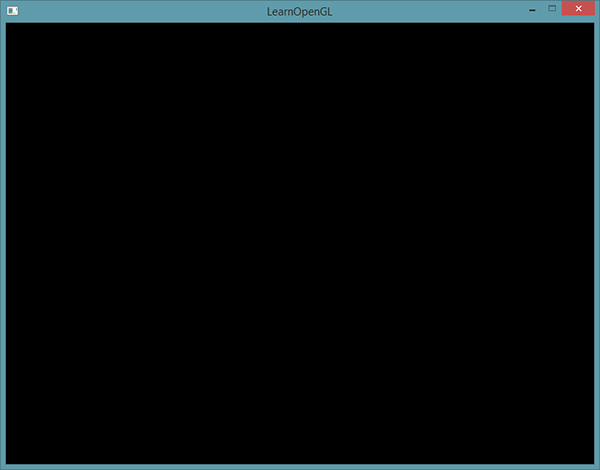
If you have the most boring black picture, then you did everything right! If you draw something else or you have problems connecting all the examples in the lesson, then try this source code.
If you have problems building the application, first of all, make sure that the linker in your IDE is configured correctly (as described in the last lesson). Also make sure your code has no errors. You can easily compare it with the source code presented above. If you still have problems, review the comments on the original article, maybe there you will find a solution to your problem.
Input
To achieve some control over input, we can use callback functions in GLFW. Callback functions are pointers to functions that can be passed to GLFW so that they are called at the right time. One of these functions is KeyCallback , which will be called each time the user uses the keyboard. The prototype of this function is as follows:
void key_callback(GLFWwindow* window, int key, int scancode, int action, int mode); This function takes as its first argument a pointer to the GLFWwindow, then comes the number describing the key pressed, the action performed on the key, and the number describing the modifiers (shift, control, alt or super). When the key is pressed, GLFW will call this function and pass the required arguments to it.
void key_callback(GLFWwindow* window, int key, int scancode, int action, int mode) { // ESC, WindowShouldClose true, // if(key == GLFW_KEY_ESCAPE && action == GLFW_PRESS) glfwSetWindowShouldClose(window, GL_TRUE); } In our (new) key_callback function, we check whether the key pressed is the ESC key and if it was clicked (not released), then we close the GLFW by setting the WindowShouldClose property to true using glfwSetWindowShouldClose. The next state loop check will break the loop and the application will close.
It remains only to transfer this function to GLFW. This is done as follows:
glfwSetKeyCallback(window, key_callback); There are a large number of callback functions that can be overridden. For example, we can override functions for window resizing, error handling, etc. Register the callback function is necessary after creating the window and before the game cycle.
Drawing
We would like to place all the drawing commands in the game loop, since we want the drawing to take place at each iteration of the cycle. It should look something like this:
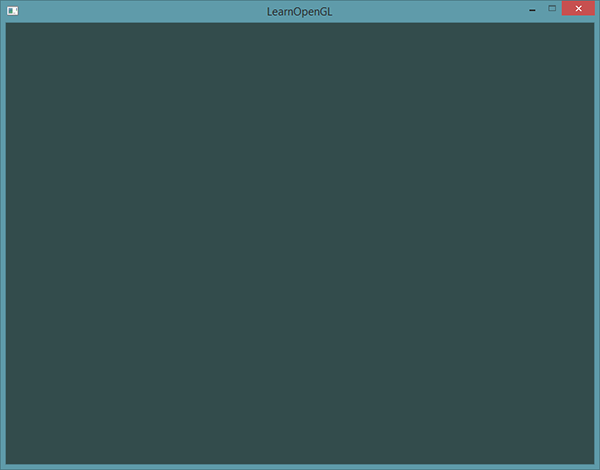
// while(!glfwWindowShouldClose(window)) { // . glfwPollEvents(); // ... // glfwSwapBuffers(window); } To just make sure that everything works as it should, we will clear the screen, filling it with our own color. At the beginning of each iteration of rendering, it is often necessary to clear the screen, otherwise we will see the results of past rendering (sometimes you really need to achieve this effect, but often this is not so). We can easily clear the buffer using glClear , into which we will pass special bits to indicate which particular buffers need to be cleared. The bits we can set now are GL_COLOR_BUFFER_BIT , GL_DEPTH_BUFFER_BIT, and GL_STENCIL_BUFFER_BIT . Now we need to clear only the color buffer.
glClearColor(0.2f, 0.3f, 0.3f, 1.0f); glClear(GL_COLOR_BUFFER_BIT); Notice that we also set the color we want , which will clear the screen, via glClearColor . As soon as we call glClear, the entire buffer will be filled with the specified color. In the result, you get a green-blue color.
As you can see, glClearColor is a state setting function, and glClear is a state function that uses state to determine the fill color of a screen.
The complete lesson source code can be found here .
Now we have everything to start filling the game loop with calls to the rendering functions, but we will save it for the next lesson.
Source: https://habr.com/ru/post/311234/
All Articles