learnopengl. Lesson 1.2 - Creating a window
 In the last lesson we figured out what OpenGL is. In this tutorial, we’ll talk about the reason why GLFW, GLEW, and CMake are needed, and also look at how to use them. And also let's refresh in memory the difference between static and dynamic linking.
Interested please under the cat.
Content
Part 1. Start
Part 2. Basic lighting
')
Part 3. Loading 3D Models
Part 4. OpenGL advanced features
Part 5. Advanced Lighting
- Opengl
- Creating a window
- Hello window
- Hello triangle
- Shaders
- Textures
- Transformations
- Coordinate systems
- Camera
Part 2. Basic lighting
')
Part 3. Loading 3D Models
Part 4. OpenGL advanced features
- Depth test
- Stencil test
- Mixing colors
- Face clipping
- Frame buffer
- Cubic cards
- Advanced data handling
- Advanced GLSL
- Geometric shader
- Instancing
- Smoothing
Part 5. Advanced Lighting
Part 1.2 - Creating a window
Before we start creating stunning graphics, we need to create a context and an application window in which we will draw these graphics. But, unfortunately, these operations are specific to each operating system and OpenGL tries its best to abstract from these operations. This means that we will have to create the window, define the context and work with user input.
GLFW
GLFW is a library written in C that is specifically aimed at providing OpenGL with the most essential content to draw to the screen. It allows us to create a context, define window parameters and work with user input, and that’s all it needs right now.
Basically, in this and the next lesson, we will make GLFW work normally, check the creation of the OpenGL context and draw the window in which we will draw the graphics. This lesson will tell you step by step about building and linking the GLFW library. For this tutorial, we will use Microsoft Visual Studio 2012 (note that the process will be slightly different for other VS versions). If you do not use VS - then do not worry, this process is very similar for all IDEs.
Build GLFW
GLFW can be downloaded from the download page of the official site. GLFW comes with precompiled binaries and header files for VS, but for the sake of completeness, we will compile the GLFW ourselves. So let's download the source package.
If you are using precompiled binaries - make sure that you have downloaded the 32 bit version, and not the 64 bit version. (If you do not know what the difference is). Since the 64 bit version generates a rather strange behavior for most readers.
After you download the package - unzip it. We are interested in the following elements:
- Compilation result
- Folder include
Building a library from source code ensures that the resulting library will work perfectly on your CPU / OS, which is not the case with the precompiled libraries that are supplied (sometimes they are simply not available for your system). The main problem of providing source code to the world is that not everyone uses the same IDE to develop their application, which means that Project files may simply be incompatible with other IDEs. And because of this, people have to collect their own projects with their hands, which is obviously not very convenient. Specifically, in order to avoid this problem, CMake was invented.
CMake
CMake is a tool for generating Project / Solution files for an IDE selected by a user (Visual Studio, Code :: Blocks, Eclipse) from a set of source codes and CMake scripts. This configuration allows Visual Studio 2012 to generate project files so that we can easily build the library. First we need to download CMake, you can do it on the download page . I am using Win32 installer.
Once CMake is installed, you can choose to launch CMake from the console or as a graphical application. Since we try not to overload the lessons, we will choose a graphical application. CMake requires you to specify the source code directory and the folder where the result will be written as binary files. In the quality of the source code directory, we specify the root folder of the unpacked GLFW package with the source code, and as the folder for binary files, we specify the new directory <build .
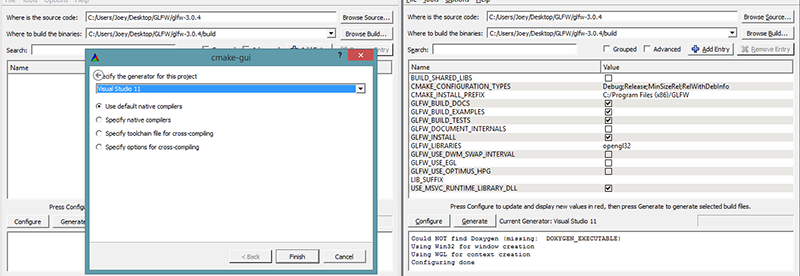
After installing the required directories, click Configure , so CMake would read the required settings and source code. Then we need to choose a generator for the project. Since we are going to use Visual Studio 2012 we select Visual Studio 11 (Visual Studio 2012 is also known as Visual Studio 11). Next CMake will display the possible assembly settings, you can leave them unchanged by clicking Configure again to save them. After saving the settings, we can proceed to the generation of the project, to do this, click on Generate and the project files will be created in the build folder.
Compilation
The GLFW.sln file appeared in the build folder, open it with Visual Studio. CMake had to generate a project with all the required settings, so just start the build by clicking on the Build Solution and as a result we get glfw3.lib (we are using version 3) in the src / Debug folder,
After the library has been generated, you need to make sure that the IDE knows where to look for the library and header files. There are 2 ways to do this:
- We search for the / lib and / include folders of the IDE or Compiler and add the include folder and lib from GLFW. This will work, but it's better not to do that. This method is difficult to track and you will lose all files when you reinstall or change the compiler / IDE.
- The recommended way is to create a set of directories containing all the header files and third-party libraries that you could refer to when using your IDE or Compiler. Personally, I use the same folder containing the Libs and Include folders where I store all my header files and libraries for OpenGL projects. Now all my third-party libraries are in one place (and easily moved between different PCs). The only drawback is the need for each new project to specify the location of this folder.
Upon completion of your chosen action, you can proceed to creating our first OpenGL project with GLFW.
Our first project
First, let's open Visual Studio and create a new project. Select Visual C ++ and Empty Project (don't forget to give the project an acceptable name). We now have a workspace to create our first application using OpenGL.
Linking
To use GLFW, we also need to associate it with our project. This is done by indicating that we want to use glfw3.lib in the linker settings, but our project still doesn’t know where to look for glfw3.lib (if you didn’t select option 1 while solving the problem with the location of the library files), respectively, we need to add these directories in the project.
We can add those directories, for this go to VC ++ Directories , as shown in the image below:
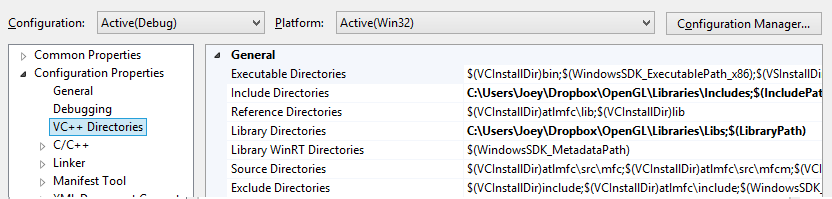
And from there you can add your own directories so that the project knows where to look for the required files. This can be done manually, simply by inserting the path into the text field, or by clicking on Edit ... where you can add values in a special window.
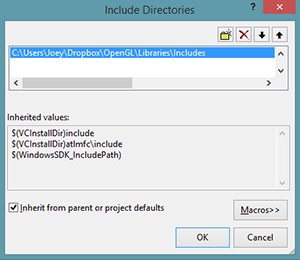
Here you can add as many directories as you like, and the IDE will also search for the required files there. Now that the Include folder is listed for the environment, you can find all the required GLFW header files in <GLFW / ..>. The same applies to the library directory.
And after Visual Studio found out where to look for the required libraries, we can finally link GLFW and our project:
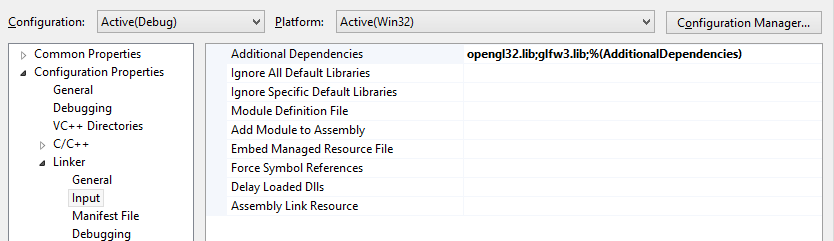
Here you need to specify the name of the link library, in our case it is glfw3.lib and we add it to the Additional Dependencies field (you can also do this by changing your hands or using the <Edit ...> button) and now GLFW will link to the project during compilation. You also need to specify the OpenGL library, but this process is different for different operating systems.
OpenGL library for Windows
If you are using Windows, the library called opengl32.lib comes with the Microsoft SDK, which is installed by default when you install Visual Studio. Since in this tutorial we already use Visual Studio - here it will be enough just to add opengl32.lib to the linker settings.
OpenGL library for Linux
On Linux systems, you need to use the libGL.so library, using the -lGL flag in the linker settings. If you can not find this library, then you probably need to put Mesa, NVidia or AMD dev packages, but I will not go into details, since it is very specific for the platform (plus I am not a Linux expert).
At the end of adding GLFW and OpenGL libraries to the linker settings, you can connect GLFW as follows:
#include <GLFW\glfw3.h> This is the final stage of installing and configuring OpenGL.
GLEW
But we haven't finished setting up OpenGL. Something else needs to be done. Since OpenGL is only a specification, the implementation falls on the shoulders of video card developers. For this reason, since there are many implementations of OpenGL, the actual location of OpenGL functions is not available at compile time and must be obtained at run time. In fact, getting the addresses of functions falls on the programmer’s shoulders. The process of obtaining addresses specific to each platform, for Windows, it looks like this:
// typedef void (*GL_GENBUFFERS) (GLsizei, GLuint*); // GL_GENBUFFERS glGenBuffers = (GL_GENBUFFERS)wglGetProcAddress("glGenBuffers"); // GLuint buffer; glGenBuffers(1, &buffer); As you can see, the code looks rather confusing, and the need to produce an address for each OpenGL function makes this process just painful. But fortunately there are libraries that implement this dynamic linking and one of the most popular libraries is GLEW
Building and Linking GLEW
GLEW stands for OpenGL Extension Wrangler Library and manages all the cumbersome work mentioned above. Since GLEW is also a library, we will again have to assemble it and link it with our project. GLEW can be downloaded from the official page , where you will find both precompiled libraries and the source code. And again, I repeat: if you are not sure what bitiness to use, use the 32 bit version.
We will use the static version of GLEW, which is called glew32s.lib (note the `s` prefix). Therefore, add it to your folder with libraries, and also add header files to your folder with header files. Now we can link GLEW to the project by adding glew32s.lib to the linker settings in Visual Studio. Notice that GLFW3 is built by default as a static library.
Static linking means that the library will be integrated with the executable file at compile time. The advantage of this approach is that you do not need to keep track of additional files besides the executable file. The disadvantages of this approach are that the executable file grows in size and that when updating the library you have to recompile the executable file.
Dynamic linking is done using .dll and .so files, splitting the library code and application code, reducing the size of the executable file and simplifying updating the library. The disadvantage of this approach is the fact that you have to release the DLL files along with the final application.
If you want to use GLEW as a static library, then before connecting GLEW you should set the preprocessor variable GLEW_STATIC .
#define GLEW_STATIC #include <GL/glew.h> If you want dynamic linking, then you can omit the GLEW_STATIC preprocessor variable task. Remember that if you use dynamic linking then you will have to copy the .DLL file to the folder with the executable file.
For Linux users compiling a project using GCC in an assembly, the following keys can help:
-lGLEW -lglfw3 -lGL -lX11 -lpthread -lXrandr -lXi.
Incorrect use of these keys can lead to a lot of undefined behavior.
Now that we have finally compiled and linked GLFW and GLEW, we are all set for the next lesson in which we will discuss how to use GLFW and GLEW to set up an OpenGL context and create a window. Make sure that your directories with header files and library files are correct and that there are no errors in the library names in the linker settings. If you are stuck - check the comments on the source article or other sources, perhaps you made some specific error.
Additional resources
- Build applications : provides detailed information about the process of linking and compiling an application with a large number of different possible errors;
- GLFW with Code :: Blocks : build GLFW to Code :: Blocks IDE;
- Starting CMake : a small lesson about running CMake under Windows and Linux;
- Writing a build system for Linux : a lesson on autotools from Wouter Verholds describing the process of writing a build system in Linux specially configured for these lessons;
- Polytonic / Glitter : a simple template project that comes pre-configured with all the required libraries; ideal if you want to see an example of a fully working LearnOpenGL project.
Source: https://habr.com/ru/post/311198/
All Articles