Development in InterSystems Caché in your favorite IDE
 Hello! In InterSystems Caché there is a very practical way to develop solutions without the use of integrated tools. All project code can be stored in the form of traditional source code files, edited in your favorite development environment, indexed by a version control system and a single command to import and compile classes in a Caché database system. Moreover, it provides the ability to use any other external tools, for example, for assembling and preprocessing code. This article will be considered so far not traditional for Caché, but rather practical development cycle of projects.
This article describes several simplest ways to organize project development on InterSystems technologies without using embedded tools (studio). Each method can be modified and expanded to a full-fledged tool for downloading, assembling, or even debugging projects at InterSystems Caché, but the purpose of the article is to provide the basics of the proposed approach to organizing development and discussing it.
The ways of organizing the development described below include the following:
- The entire project (its source code) is located in the file system, with an arbitrary directory structure.
- The project directory is indexed by the Git version control system.
- The source code of the classes is written to files in a “pure form”, the hierarchy of classes and packages is observed.
- Work on the project is carried out entirely in the file system, writing code - in any external editor or IDE.
- It is possible to connect any additional tools, for example, for code preprocessing, macro substitutions at the assembly stage, front end assembly, and so on.
This article will not cover routines, CSP and other files. Work with the first can be organized in the same way as with the classes, so if necessary, by analogy with the presented example in the article, you can implement support for the routines yourself. CSP-files are just files on the disk, and they do not need to be imported into Caché DBMS, but just moved from one directory to another by analogy with the method given in the article.
')
The method described in the article does not require any additional tools and platforms, except for the installed version of InterSystems Caché 2016.2+ (respectively, Ensemble and others). In addition, the assembly and preprocessing of client code performed on the Node.JS technology, open and free to be installed on the working machine, will be considered. This method can also be performed using any other technology, including the Caché DBMS itself. NodeJS was chosen because there are many ready-made packages for it to perform the tasks of building and preprocessing projects.
Motivation and benefits
The question arises, why not just continue to develop in the studio, or go to a “new studio” called Atelier? What is the point of not using it?
The Caché ObjectScript programming language (COS) is different from other common languages such as C #, Java, JavaScript, Python, Ruby, etc. that out of the box only development tools offered and supported by InterSystems are available. There are also several author's solutions , but all of them are not much different from programming in the studio. Caché ObjectScript programs, like their source code, are stored directly in the Caché DBMS itself. Before the appearance of UDL support in InterSystems Caché 2016.2 (or CDL in version 2013.2 - read below), in order to extract the source code from the database, it was necessary to write a considerable program to the files, and put more effort into putting the code back into DBMS Caché. Now that this is possible with just one command, you can easily organize a “traditional” model for developing solutions: editing source code files — compiling — getting results.
Before the advent of the not yet released to the world of Atelier (at the time of writing, the Field Test version is available) it was simply impossible to develop in Linux / MacOS / ..., since Caché Studio exists only for Windows platforms. The method described in the article is completely cross-platform.
Projects rarely include exclusively Caché classes. The question arises of how to properly store the source code of the entire project in one repository of the version control system. To this day, a kind of development cycle is used for projects at InterSystems Caché - the actual work on the classes in the Caché DBMS is conducted in the studio, and the project repository receives only an XML representation of the class, not intended for any modifications. In the case of Atelier, the development cycle, again, is designed to work exclusively in itself, without any interaction with external tools. The only thing is that the new IDE has the obvious ability to export / import source code into UDL files, which can later be indexed by the version control system, but no more. There is no interaction with external tools, collectors, code analyzers, preprocessors, there is no support for an arbitrary project structure, meta-files and, in general, will only support what InterSystems considers necessary to support within Atelier and Eclipse.
Finally, the most important motivation, taking into account all of the above, is to open Caché ObjectScript for the whole world. This can cause open-source plug-ins to support COS with the most popular community-supported IDEs, inevitably impending syntax highlighting of cls-files, including on GitHub, and many different tools, for example, for analyzing or refactoring code.
Introduction
In Caché version 2016.2, there is support for uploading source code to UDL (Universal Definition Language) using the methods of the $ system.OBJ class. This article will deal with the methods of this particular class. In earlier versions, starting with InterSystems Caché 2013.2, unloading the class code in its original form was also possible using the methods of the class% Compiler.UDL.TextServices. All this allows you to download and upload physical files from Caché with source code of classes or routines in the form in which they can be viewed in the studio. It is also worth noting that, starting from version 2016.2, the Atelier REST API is also available for uploading the definition of classes from the Caché DBMS.
Since it was previously possible to export and import only the XML representation of classes, which largely made the source code obscure, UDL opens up new possibilities for developing projects with InterSystems products (Caché, Ensemble, HealthCare, and others).
The result of this article will be a simplest project organized in the file system, and several scripts that allow a single command to build and import it into the Caché DBMS.
Training
Suppose we have, or already have, a project at InterSystems Caché, which consists of Caché classes (as well as, possibly, a routine and a static front end). This is a necessary and sufficient condition to start applying the development method described in the article to an existing or new project.
It is assumed that the machine already has a locally installed DBMS Caché version 2016.2+, into which the project will be imported. To implement this method of development in earlier versions of InterSystems Caché (starting with 2013.2), you will need to adapt the proposed examples using the% Compiler.UDL.TextServices methods. By filling out the form on the link , you can download and install a trial version of the product. When installing, specify Unicode encoding instead of 8-bit, and leave all the other items suggested by the installation wizard unchanged.
The article will use the Git version control system . If you do not have Git installed, you must install it .
Project creation
The directory structure of the demonstration project is as follows:
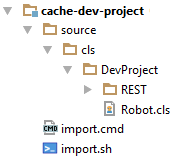
Wherein:
- The source code of the project is located in the “source” directory, and in the appropriate subdirectory of “cls” there is a tree of project package classes. In the screenshot of the project above, as an example, the DevProject package is located, and in it is the Robot class (DevProject.Robot), REST is a subpackage with the class inside (DevProject.REST.Index).
- The import. * Script imports the project into the Caché DBMS.
The project code shown above is available on GitHub . It is proposed to clone the project to the local machine by following the instructions below:
git clone https://github.com/ZitRos/cache-dev-project The project contains the source / cls directory, which contains the usual package hierarchy. For the demonstration, a simplest class was created containing the Message class-method, which displays the message “Welcome, Anonymous!”:
Class DevProject.Robot { ClassMethod Message(name As %String = "Anonymous") { write "Welcome, ", name, "!" } } To import this and other classes into Caché DBMS, you can use one of the following methods:
1. Use the new development environment from InterSystems - Atelier:

Of course, performing these actions every time you need to test the work of the project is expensive, so we will use the second option.
2. Run the following command in the terminal:
do $system.OBJ.ImportDir("D:/Path/To/Project/source/cls",,"ck /checkuptodate=all",,1) This command recursively loads all files from the D: / Path / To / Project / source / cls directory into the current namespace, and also compiles those classes that have changed since the last moment of import. Thus, reloaded classes without changes will not take time to compile.
The second option is also not the most convenient solution - every time a project starts, you need to open a Caché terminal, enter a login-password pair (on instances with a normal protection level and above), switch to the desired namespace and finally execute the command saved somewhere in a notebook. It is possible to automate this using the third option.
3. Create a shell script (batch script) and call it every time you need to import classes into InterSystems Caché:
import The simplicity of calling the latter in the case of development in almost any external IDE can be reduced to the click of a button. Thus, the entire project is in the file system, work is being done with the files, and if necessary, only one command is executed to compile and run the project.
Import script
Consider a script that imports a project in Caché DBMS. In order to do this, he needs some additional information about your Caché instance, namely the location of the installed Caché, the area into which the download will be made, as well as the username and password to log in to the system. This data is edited directly in the script. The script is recommended to be stored in the repository and make its local copy with the actual data when the project is deployed on the local machine.
The source code of the script is available on GitHub for Windows and * nix systems. All that needs to be done is to edit several variables in the script once before starting work on the project.
The script runs the cache.exe executable file, which is located in the / bin / directory of the installed DBMS, and passes two arguments to it - the database directory and the namespace. Then, the script sends a user name, a password, and a few simple Caché ObjectScript commands to the input interface via the InterSystems Caché terminal interface, importing classes and reporting a successful import or error.
Thus, the user gets all the necessary information about the import and compilation of classes, as well as about errors that occurred during compilation. Example output when calling the import.bat script:
Importing project... Node: DESKTOP-ILGFMGK, Instance: ENSEMBLE20162 USER> Load of directory started on 06/29/2016 22:59:10 Loading file C:\Users\ZitRo\Desktop\cache-dev-project\source\cls\DevProject\Robot.cls as udl Loading file C:\Users\ZitRo\Desktop\cache-dev-project\source\cls\DevProject\REST\Index.cls as udl Compilation started on 06/29/2016 22:59:10 with qualifiers 'ck /checkuptodate=all' Class DevProject.REST.Index is up-to-date. Compiling class DevProject.Robot Compiling routine DevProject.Robot.1 Compilation finished successfully in 0.003s. Load finished successfully. IMPORT STATUS: OK Now you can make sure that the project is loaded. To do this, you can call the class test method from the Caché terminal:
USER > do ##class(DevProject.Robot).Message() Welcome, Anonymous! If the installed version of the Caché DBMS is less than 2016.2, you will receive the following error:
#5840: '/root/source/cls/Index.cls', .. . Advanced example
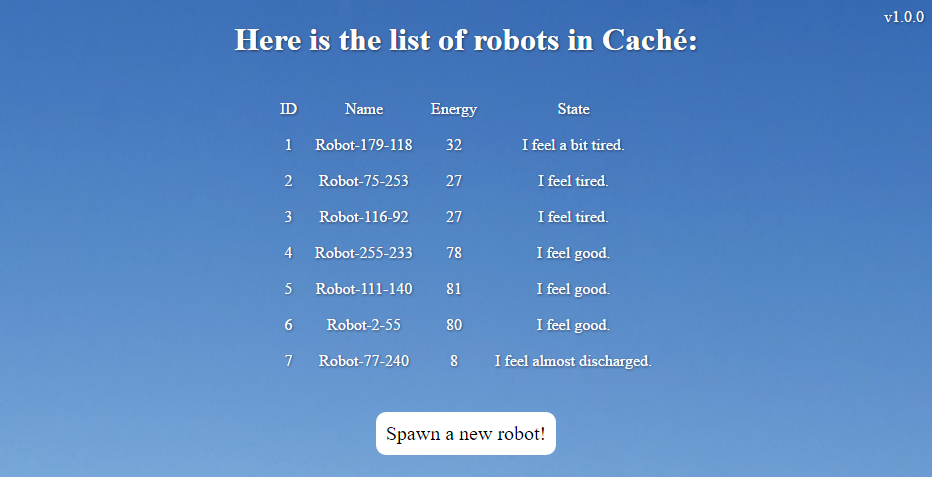
To maximize the benefits of developing a project using InterSystems technologies, we will try to do something more attractive by adding a graphical interface and building the project on NodeJS and Gulp. The result will be a web page whose image is shown below.
Emphasis will be placed on how it is possible to organize the development of such a project. First you need to consider the architecture of the proposed solution.

The project consists of static client code (HTML, CSS, JavaScript), a class on the server that describes the REST interface, and one class stored in the database.
A client with a GET request gets a list of robots that are located on the server. Also, when you click on the “Spawn a new robot!” Button, the client sends a GET request to the server, as a result of which a new instance of the Robot class is created and added to the display list.
Technical implementation of the project can be viewed on GitHub (branch “extended”) . In the article, further attention will be paid to the method of developing such projects.
The directory structure of the extended demonstration project has the form shown in the image on the left.

Here, unlike the previous example, the client part of the application is added, which is located in the `source / static` directory, and the project is built using Node.JS and Gulp .
For example, besides other code in the project there are special comments. Example:
<div class="version">v<!-- @echo package.version --></div> When building a project, this comment will be replaced with the project version, which is listed in the package.json file. The collector also minimizes CSS and JavaScript code, and copies all the processed code into the `build` directory.
In the `import` script, unlike the previous example, the following changes were added:
- Before importing, the project is assembled.
- Import files are now imported from the `build` directory, as they pass through the preprocessor.
- The files are copied from the build / static directory to the Caché `csp / user` directory with CSP files. Thus, after importing the application immediately becomes available.
Detailed instructions for installing and running this project are in the description of the repository.
The result is a project that needs to be set up only once, by modifying several variables in the `import. *` File.
The considered development cycle is used in several projects - Caché Visual Editor and Caché Web Terminal . Soon it may be used in other projects, including your own.
Development environment and debugging
This development method does not provide debugging without InterSystems Caché. If you debug COS-code more than by simply logging to globals, you still have to use integrated debugging tools in Caché.
With the described development method, there is a big advantage - the ability to use your favorite development environment for writing COS code, vim or a simple notebook, to develop in Mac OS or * nix on COS as well as in any other programming languages. But on the other hand, COS now has practically no support outside of this database. This means that even syntax highlighting is currently not supported by editors, let alone autocompletion. But all this is bound to change for the better in the near future, and all aids today are ready to be brought to life.
In the meantime, while Caché ObjectScript is distributed, you can use elementary syntax highlighting for keywords that some IDEs offer, such as IntelliJ. And she is doing quite well with her task:

In the case of IntelliJ, you can try it right now - here is the settings file you need to import using the File -> Import Settings menu. Backlight author, incomplete, additions are welcome.
Conclusion
The purpose of this article is to introduce something new into the world of development at InterSystems Caché, present another version of development to the public and contribute to the spread of Caché ObjectScript as a programming language as a whole. Any feedback, ideas and discussions are welcome.
PS
An experienced reader might have noticed that in the event that the import occurs in the Caché instance with the security settings minimal, Caché does not request the username and password, and as a result, if the script is left unchanged, due to the script’s attempt to enter the username and password where it was expected, a syntax error is returned twice. This does not affect the script in any way until the username or password, for example, is halt.
Offer in the comments how to determine if Caché requires a username and password to be entered, and if not, then do not submit them to the input. Of course, for such needs, you can simply cut a few lines from the script, which is absolutely enough, but let this question remain open.
Offer in the comments how to determine if Caché requires a username and password to be entered, and if not, then do not submit them to the input. Of course, for such needs, you can simply cut a few lines from the script, which is absolutely enough, but let this question remain open.
Source: https://habr.com/ru/post/311078/
All Articles