Development addon firefox, or another screenshot using webExtensions and addon sdk
In this article we will look at how to develop an extension for Firefox, using addon sdk, and also look at the key development points: installing sdk (jpm), initializing a project, testing, compiling and publishing our extension to addons.mozila.org, using the example of the same screenshoter ...

I must immediately make the reservation that the extension is supported only by linux systems and is developed on linux.
And so, from the beginning we have to install the jpm package in our system, for this we install nodejs and npm (if not):
After installing node.js and npm, install jpm with the command:
')
This command will set us jpm in the global area, you can also install it locally by lowering the key - global.
Next we need to create a directory for future expansion. Let's call it habrscreen:
And we initialize the extension in this directory, for this we need to go to the folder and execute the initialization command:
After this command is executed, the skeleton of the future application is created in the directory.
habrscreen
- index.js
- package.json
- test
- test-index.js
Consider the configuration of our addon package.json:
What could be interesting here? This is the same manifest only in json format. Yes, this is the same manifesto with the version, description and name of addons. And also we defined the settings of our module in it while there will be 4 of them:
1. client id - client id yandex oauth
2. get OAuth token - when you click a button, go to Yandex and get an authorization token
3. oauth token - the actual field to enter the token
4. autocopy to clipboard - a flag which automatically copies the link to the screenshot to the clipboard.
After defining the settings, we need to think about the button, when clicked, our screenshot will be launched. To do this, open index.js for editing and describe this button in it:
The code is pretty simple, for starters, we import the sdk components we need, and create a button object. We need to create a data folder in its image directory, the last one to copy the pre-prepared button pictures, the picture should be 3 sizes 64, 32, 16 ... Done, the pictures are loaded, the setting is created. Let's try to run:
After executing the command, firefox will start with our module, we will see the result of this button on the top right, and the addon setting.
We process the logic of the getOauth button in the extension settings. To do this, you need to handle the event generated by the button:
And so by clicking on the button, the browser will open a new one in the masonry with Yandex authentication, where we can agree with the permissions and get the token, which we copy into the token field in the settings.
Next, we will process the pressing of the 'make screen' button above, we have indicated that the handler is the function makeScreen:
This function is trivial. It launches a package with which a screenshot of the selected area is taken. Next, the uploadToYandex function starts with the screenshot file name parameter.
This function produces a query using the class Request to the api disk. Unfortunately, the request could not be implemented by the put method, it is in the object, but the content parameter accepts either an object or a string, and therefore the binary data is converted into a string of the request body, which leads to the unloading of dead files. I had to write my putRequest using XMLHttpRequest, if anyone knows how to implement using Request, write in the comments. I will be grateful if someone will help bring the code to a common denominator.
Here, too, everything is simple, we open the file and create a stream, which, in fact, transfer to the request body. According to the documentation "disk" we must always send "Content-Type: application / binary" and do. All our request is ushol, with the last request we publish the file publicateFile:
This function sends a publication request to yandex, which returns a link for the next request, confirmation. The second query returns an object with information about the file, in which there is a link to the public_url file. If everything successfully opens the browser tab with a screenshot, and depending on the settings, copy the link to the clipboard ...
When everything is ready and the efficiency of the extension is checked, we need to assemble it into the xpi file for this we enter the command:
Next, we register at addons.mozilla.org and fill out the form to send an extension to moderation here developer hub .
And on this we will finish our application, the screenshot is designed and published in addons.mozilla.org ...
"As always, I am sharing a link to the full github.com code: firefox-sdk-addons
"Here is our, link to the habrahabr-screenshoter extension
Thank you all for your attention, and all the best.
I must immediately make the reservation that the extension is supported only by linux systems and is developed on linux.
And so, from the beginning we have to install the jpm package in our system, for this we install nodejs and npm (if not):
$ sudo apt-get install nodejs nodejs-legacy npm After installing node.js and npm, install jpm with the command:
')
$ sudo npm install jpm --global This command will set us jpm in the global area, you can also install it locally by lowering the key - global.
Next we need to create a directory for future expansion. Let's call it habrscreen:
$ mkdir ~/habrscreen And we initialize the extension in this directory, for this we need to go to the folder and execute the initialization command:
$ cd ~/habrscreen $ jpm init After this command is executed, the skeleton of the future application is created in the directory.
habrscreen
- index.js
- package.json
- test
- test-index.js
Consider the configuration of our addon package.json:
{ "title": "habrahabr screenshoter", "name": "habrscreen", "version": "0.0.1", "description": "This add-on for make screenshot and upload to yandex disk", "main": "index.js", "author": "Roman", "engines": { "firefox": ">=38.0a1" }, "license": "MIT", "keywords": [ "jetpack" ], "preferences": [ { "name": "hClientId", "title": "client id", "description": "client id", "type": "string", "value": "8fc231e60575439fafcdb3b9281778a3" }, { "type": "control", "label": "get oAuth token", "name" : "getYaToken", "title": "Token" }, { "description": "oauth token", "name": "oauthKey", "type": "string", "title": "oauth token" }, { "description": "automaticaly copy to clipboard", "title": "autocopy to clipboard", "name":"autoCopy", "type":"bool", "value":true } ] } What could be interesting here? This is the same manifest only in json format. Yes, this is the same manifesto with the version, description and name of addons. And also we defined the settings of our module in it while there will be 4 of them:
1. client id - client id yandex oauth
2. get OAuth token - when you click a button, go to Yandex and get an authorization token
3. oauth token - the actual field to enter the token
4. autocopy to clipboard - a flag which automatically copies the link to the screenshot to the clipboard.
After defining the settings, we need to think about the button, when clicked, our screenshot will be launched. To do this, open index.js for editing and describe this button in it:
var ui = require('sdk/ui'); var {ActionButton} = require('sdk/ui/button/action'); var button = ui.ActionButton({ id: "mozilla-link", label: "Make screenshot", icon: { "16": "./image/camera16.png", "32": "./image/camera32.png", "64": "./image/camera64.png" }, onClick: makeScreen }); The code is pretty simple, for starters, we import the sdk components we need, and create a button object. We need to create a data folder in its image directory, the last one to copy the pre-prepared button pictures, the picture should be 3 sizes 64, 32, 16 ... Done, the pictures are loaded, the setting is created. Let's try to run:
$ jpm run After executing the command, firefox will start with our module, we will see the result of this button on the top right, and the addon setting.
We process the logic of the getOauth button in the extension settings. To do this, you need to handle the event generated by the button:
var sp = require("sdk/simple-prefs"); sp.on("getYaToken", function () { tabs.open('https://oauth.yandex.ru/authorize' + '?response_type=token' + '&client_id=' + require('sdk/simple-prefs').prefs['hClientId']); }); And so by clicking on the button, the browser will open a new one in the masonry with Yandex authentication, where we can agree with the permissions and get the token, which we copy into the token field in the settings.
Next, we will process the pressing of the 'make screen' button above, we have indicated that the handler is the function makeScreen:
/** * click to button screenshot * @param state */ function makeScreen(state) { var date = new Date(); var fileScreen = date.getTime().toString() + '_screen.png'; var args = ["-s", "/tmp/" + fileScreen]; system( '/usr/bin/scrot', args ); uploadToYandex(fileScreen); } This function is trivial. It launches a package with which a screenshot of the selected area is taken. Next, the uploadToYandex function starts with the screenshot file name parameter.
/** * upload screenshot to yandex * @param name */ function uploadToYandex(name) { var Request = require('sdk/request').Request; const fileIO = require("sdk/io/file"); Request({ url: "https://cloud-api.yandex.net/v1/disk/resources/upload?path=" + name, headers: getHeaders(), onComplete: function (response) { var result = JSON.parse(response.text); if (result.method == "PUT") { putRequest(result.href, '/tmp/' + name); // publicate file publicateFile(name); } } }).get(); } This function produces a query using the class Request to the api disk. Unfortunately, the request could not be implemented by the put method, it is in the object, but the content parameter accepts either an object or a string, and therefore the binary data is converted into a string of the request body, which leads to the unloading of dead files. I had to write my putRequest using XMLHttpRequest, if anyone knows how to implement using Request, write in the comments. I will be grateful if someone will help bring the code to a common denominator.
/** * put request to yandex api * @param url * @param file */ function putRequest(url, file) { const {Cc, Ci} = require("chrome"); // Make a stream from a file. var stream = Cc["@mozilla.org/network/file-input-stream;1"] .createInstance(Ci.nsIFileInputStream); var fileIo = Cc["@mozilla.org/file/local;1"].createInstance(Ci.nsILocalFile); fileIo.initWithPath(file); stream.init(fileIo, 0x04 | 0x08, 0644, 0x04); // file is an nsIFile instance var req = Cc["@mozilla.org/xmlextras/xmlhttprequest;1"] .createInstance(Ci.nsIXMLHttpRequest); req.open('PUT', url, false); req.setRequestHeader('Content-Type', "application/binary"); req.send(stream); } Here, too, everything is simple, we open the file and create a stream, which, in fact, transfer to the request body. According to the documentation "disk" we must always send "Content-Type: application / binary" and do. All our request is ushol, with the last request we publish the file publicateFile:
/** * publicate file on yandex disk * @param name */ function publicateFile(name) { var Request = require('sdk/request').Request; var result; Request({ url: "https://cloud-api.yandex.net/v1/disk/resources/publish?path=" + name, headers: getHeaders(), onComplete: function (responsePublic) { result = JSON.parse(responsePublic.text); if (result.method == "GET") { Request({ url: result.href, headers: getHeaders(), onComplete: function (resp) { result = JSON.parse(resp.text); if (require('sdk/simple-prefs').prefs['autoCopy']) { var clipboard = require("sdk/clipboard"); clipboard.set(result.public_url); } tabs.open(result.public_url); } }).get(); } } }).put(); } This function sends a publication request to yandex, which returns a link for the next request, confirmation. The second query returns an object with information about the file, in which there is a link to the public_url file. If everything successfully opens the browser tab with a screenshot, and depending on the settings, copy the link to the clipboard ...
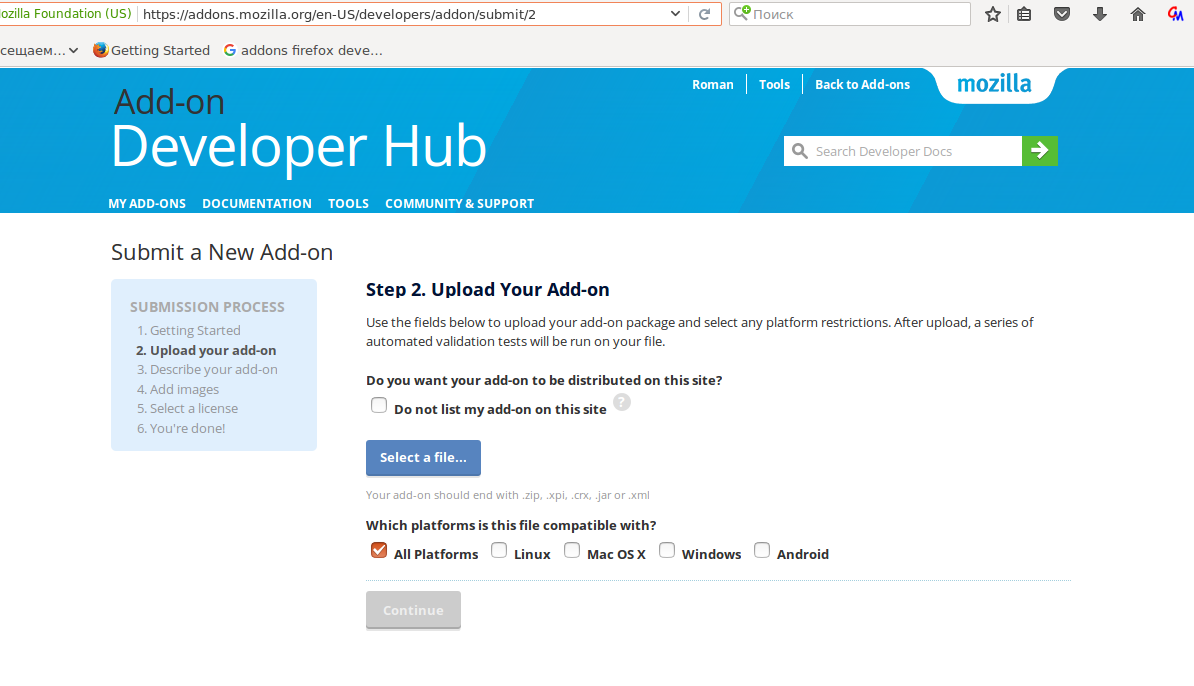
When everything is ready and the efficiency of the extension is checked, we need to assemble it into the xpi file for this we enter the command:
$ jpm xpi Next, we register at addons.mozilla.org and fill out the form to send an extension to moderation here developer hub .
And on this we will finish our application, the screenshot is designed and published in addons.mozilla.org ...
"As always, I am sharing a link to the full github.com code: firefox-sdk-addons
"Here is our, link to the habrahabr-screenshoter extension
Thank you all for your attention, and all the best.
Source: https://habr.com/ru/post/311020/
All Articles