Development extensions for firefox, or my first experience, on the example of a screenshot
After writing the article System scripts in php for linux, we write a screenshoter , I had the idea “Why not write an extension to tie into my script, with the option of automatically uploading to the Yandex disk.” ... After reading the documentation on the development of extensions, I decided start writing.
This is a small button and a screenshot on the Yandex disk, the result of a prototype extension written in a couple of hours. About the process of its creation under the cut ...
Attention: this is the first version of the application, in the future the script from the previous article will be a screenshoter ...
')
The extension I developed has the following file structure:
Now we are interested in files: chrome.manifest and install.rdf. chrome.manifest contains the description of the project structure:
The first two lines of the chrome manifest contain: data type, package name, path to the package files.
The third line records the so-called overlay (surface layer) i.e. This layer fits as if on top of an existing one, and adds controls to the browser.
The install.rdf file is an installation manifest that contains information about the extension to be added:
As you can see. It contains an identifier, application name, version, creator, application type, settings panel URL, etc. information.
I do not think that it is necessary to focus on this file, since everything is quite obvious. We can only parse one options optionsURL, this is the url that leads to the expansion settings, the settings are in turn described by the options.xul file:
In this file, we described only 2 fields of login and password. Pay attention to the names "extensions.xulphpsrc.login" and "extensions.xulphpsrc.pass" they contain a sort of tree structure, and it will be more convenient to get them from the total mass of records, and there is some guarantee of uniqueness of the keys ...
Next, consider the browserOverlay.xul file:
What is he doing? it connects two files browserOverlay.css, browserOverlay.js and creates a toolbar and a single button on it “Screenshot”:

All application logic is embedded in browserOverlay.js
We will analyze this file in a little more detail, although it is trivial and performs only 2 actions: it takes a screenshot and downloads it to the yandex disk. It makes a screenshot by calling the system utility crot, and loads the result using curl. Handler "click" on the button "screenshot" we put the method makeScreen:
This is the entry point into the application, the name of the future screenshot is formed here and the call, linux program, scrot occurs We select the screen area with the mouse and take a snapshot, after that the program goes to the next method UploadToYandex, and passes the file name for upload.
In this method, as you can see there is nothing extraordinary, it makes 2-va requests using curl in yandex.disk, one loads the created file, the other publishes it. Thanks to lexore for the comment . In the end, we get a notification that the screenshot is saved.
Well, now we have an extension how to install it? For development, we can, simply, create a file under the name of the application in the folder:
Where id is an identifier, [user] is a firefox user for example, I did this:
And containing the path to the directory with the extension files: ~ / extensions / phpsrc / (for example, I have one).
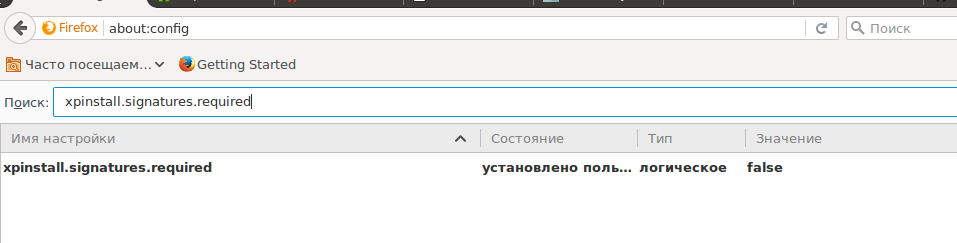
The final touch, we need to disable the signature check extensions in firefox. To do this, go to the address about: config, find the xpinstall.signatures.required option and set the value to false.
Reboot firefox and everything is ready ... Setting up the extension, go to the add-ons and look for your extension, click on the button to set up, enter the username and password from yandex'a and ready, now you can click the button and take a screenshot ...
Conclusions: The first time I wrote an extension for firefox, and it took me more time to write an article. This is the first version of the application in the future there are plans to develop in the direction of using php in this area. All screenshots are made by the developed extension. Thank you all for your attention, all the best ...
UPD: github repository
This is a small button and a screenshot on the Yandex disk, the result of a prototype extension written in a couple of hours. About the process of its creation under the cut ...
Attention: this is the first version of the application, in the future the script from the previous article will be a screenshoter ...
')
The extension I developed has the following file structure:
Structure
-chrome.manifest
-install.rdf
--content
---- browserOverlay.js
---- browserOverlay.xul
---- options.xul
--skin
---- browserOverlay.css
-install.rdf
--content
---- browserOverlay.js
---- browserOverlay.xul
---- options.xul
--skin
---- browserOverlay.css
Now we are interested in files: chrome.manifest and install.rdf. chrome.manifest contains the description of the project structure:
chrome.manifest
content xulphpsrc content/ skin xulphpsrc classic/1.0 skin/ overlay chrome://browser/content/browser.xul chrome://xulphpsrc/content/browserOverlay.xul The first two lines of the chrome manifest contain: data type, package name, path to the package files.
The third line records the so-called overlay (surface layer) i.e. This layer fits as if on top of an existing one, and adds controls to the browser.
The install.rdf file is an installation manifest that contains information about the extension to be added:
install.rdf
<?xml version="1.0"?> <RDF xmlns="http://www.w3.org/1999/02/22-rdf-syntax-ns#" xmlns:em="http://www.mozilla.org/2004/em-rdf#"> <Description about="urn:mozilla:install-manifest"> <em:id>phpsrc@phpsrc.ru</em:id> <em:name>xulphpsrc</em:name> <em:description>PHP screenshoter extensions!</em:description> <em:version>0.1</em:version> <em:optionsURL>chrome://xulphpsrc/content/options.xul</em:optionsURL> <em:creator>Naumov</em:creator> <em:type>2</em:type> <!-- Mozilla Firefox --> <em:targetApplication> <Description> <em:id>{ec8030f7-c20a-464f-9b0e-13a3a9e97384}</em:id> <em:minVersion>4.0</em:minVersion> <em:maxVersion>10.*</em:maxVersion> </Description> </em:targetApplication> </Description> </RDF> As you can see. It contains an identifier, application name, version, creator, application type, settings panel URL, etc. information.
I do not think that it is necessary to focus on this file, since everything is quite obvious. We can only parse one options optionsURL, this is the url that leads to the expansion settings, the settings are in turn described by the options.xul file:
options.xul
<?xml version="1.0"?> <?xml-stylesheet href="chrome://global/skin/" type="text/css"?> <prefwindow id="xulphpsrc-prefs" title="phpsrc api yandex settings" xmlns="http://www.mozilla.org/keymaster/gatekeeper/there.is.only.xul"> <prefpane id="phpsrc_api_set" label="PHPsrc setting api yandex"> <preferences> <preference id="phpsrc_login" name="extensions.xulphpsrc.login" type="string"/> </preferences> <preferences> <preference id="phpsrc_pass" name="extensions.xulphpsrc.pass" type="string"/> </preferences> <hbox align="center"> <label control="phpsrc_login_label" value=" : "/> <textbox preference="phpsrc_login" id="phpsrc_login_label" maxlength="40"/> <label control="phpsrc_pass_label" value=" : "/> <textbox preference="phpsrc_pass" id="phpsrc_pass_label" maxlength="40"/> </hbox> </prefpane> </prefwindow> In this file, we described only 2 fields of login and password. Pay attention to the names "extensions.xulphpsrc.login" and "extensions.xulphpsrc.pass" they contain a sort of tree structure, and it will be more convenient to get them from the total mass of records, and there is some guarantee of uniqueness of the keys ...
Next, consider the browserOverlay.xul file:
browserOverlay.xul
<?xml version="1.0"?> <?xml-stylesheet type="text/css" href="chrome://global/skin/" ?> <?xml-stylesheet type="text/css" href="chrome://xulphpsrc/skin/browserOverlay.css" ?> <overlay id="xulphpsrc-browser-overlay" xmlns="http://www.mozilla.org/keymaster/gatekeeper/there.is.only.xul"> <script type="application/x-javascript" src="chrome://xulphpsrc/content/browserOverlay.js" /> <toolbar> <hbox> <toolbarbutton id="xulphpsrc-button" class="button-screen" label="" tooltiptext="" oncommand="XULPHPsrcChrome.BrowserOverlay.makeScreen(event);"/> </hbox> </toolbar> </overlay> What is he doing? it connects two files browserOverlay.css, browserOverlay.js and creates a toolbar and a single button on it “Screenshot”:
All application logic is embedded in browserOverlay.js
browserOverlay.js
/** * XULPHPsrcChrome namespace. */ if ("undefined" == typeof(XULPHPsrcChrome)) { var XULPHPsrcChrome = {}; } /** * Controls the browser overlay. */ XULPHPsrcChrome.BrowserOverlay = { /** * craete screen shot by rect * @param aEvent */ makeScreen: function (aEvent) { var date = new Date(); var fileScreen = date.getTime().toString() + '_screen.png'; var args = ["-s", "/tmp/" + fileScreen]; this.systemRequest( '/usr/bin/scrot', args ); this.uploadToYandex(fileScreen); }, /** * analog php system * @param shell * @param args */ systemRequest: function (shell, args) { var file = Components.classes["@mozilla.org/file/local;1"] .createInstance(Components.interfaces.nsIFile); file.initWithPath(shell); var process = Components.classes["@mozilla.org/process/util;1"] .createInstance(Components.interfaces.nsIProcess); process.init(file); process.run(true, args, args.length); }, /** * upload screen to yandex * @param name */ uploadToYandex: function (name) { var xml = '<propertyupdate xmlns="DAV:"><set><prop><public_url xmlns="urn:yandex:disk:meta">true</public_url></prop></set></propertyupdate>'; var auth = this.getPreference().login + ':' + this.getPreference().pass; this.systemRequest('/usr/bin/curl', [ '-s', '--user', auth, '-T', '/tmp/' + name, '-X', 'PUT', 'https://webdav.yandex.ru' ]); this.systemRequest('/usr/bin/curl', [ '-s', '--user', auth, '-d', xml, '-X', 'PROPPATCH', 'https://webdav.yandex.ru/' + name ]); alert(" "); }, /** * get system configuration * @returns {{login: *, pass: *}} */ getPreference: function () { var prefs = Components.classes["@mozilla.org/preferences-service;1"] .getService(Components.interfaces.nsIPrefService); var myPrefs = prefs.getBranch("extensions.xulphpsrc."); return { login: myPrefs.getCharPref('login'), pass: myPrefs.getCharPref('pass') } } }; We will analyze this file in a little more detail, although it is trivial and performs only 2 actions: it takes a screenshot and downloads it to the yandex disk. It makes a screenshot by calling the system utility crot, and loads the result using curl. Handler "click" on the button "screenshot" we put the method makeScreen:
/** * craete screen shot by rect * @param aEvent */ makeScreen: function (aEvent) { var date = new Date(); var fileScreen = date.getTime().toString() + '_screen.png'; var args = ["-s", "/tmp/" + fileScreen]; this.systemRequest( '/usr/bin/scrot', args ); this.uploadToYandex(fileScreen); }, This is the entry point into the application, the name of the future screenshot is formed here and the call, linux program, scrot occurs We select the screen area with the mouse and take a snapshot, after that the program goes to the next method UploadToYandex, and passes the file name for upload.
/** * upload screen to yandex * @param name */ uploadToYandex: function (name) { var xml = '<propertyupdate xmlns="DAV:"><set><prop><public_url xmlns="urn:yandex:disk:meta">true</public_url></prop></set></propertyupdate>'; var auth = this.getPreference().login + ':' + this.getPreference().pass; this.systemRequest('/usr/bin/curl', [ '-s', '--user', auth, '-T', '/tmp/' + name, '-X', 'PUT', 'https://webdav.yandex.ru' ]); this.systemRequest('/usr/bin/curl', [ '-s', '--user', auth, '-d', xml, '-X', 'PROPPATCH', 'https://webdav.yandex.ru/' + name ]); alert(" "); }, In this method, as you can see there is nothing extraordinary, it makes 2-va requests using curl in yandex.disk, one loads the created file, the other publishes it. Thanks to lexore for the comment . In the end, we get a notification that the screenshot is saved.
Well, now we have an extension how to install it? For development, we can, simply, create a file under the name of the application in the folder:
~/.mozilla/firefox/[id].[user]/extensions/ Where id is an identifier, [user] is a firefox user for example, I did this:
~/.mozilla/firefox/pta4nm6g.default/extensions/phpsrc@phpsrc.ru And containing the path to the directory with the extension files: ~ / extensions / phpsrc / (for example, I have one).
The final touch, we need to disable the signature check extensions in firefox. To do this, go to the address about: config, find the xpinstall.signatures.required option and set the value to false.
Reboot firefox and everything is ready ... Setting up the extension, go to the add-ons and look for your extension, click on the button to set up, enter the username and password from yandex'a and ready, now you can click the button and take a screenshot ...
Conclusions: The first time I wrote an extension for firefox, and it took me more time to write an article. This is the first version of the application in the future there are plans to develop in the direction of using php in this area. All screenshots are made by the developed extension. Thank you all for your attention, all the best ...
UPD: github repository
Source: https://habr.com/ru/post/310844/
All Articles