We work in the cloud based on Hyper-V, part 1: familiarity with the control panel
Part 1: Introduction to the Control Panel
Part 2: Deploying Exchange Server
Part 3: Storage Spaces
Last summer, we talked about a test launch of a virtual infrastructure (IaaS) based on the Hyper-V platform. During the year of operation, we stuffed a lot of cones, debugged the work of the service and launched the Cloud-V cloud in a big voyage. Today we will examine in detail the basic features of the control panel, and in the following posts we will explain how to deploy and configure Active Directory, Exchange and more.
The cloud management portal was made on the basis of Windows Azure Pack , designed to run resources and services in a private or public cloud in self-service mode. Our engineers refined it and added the missing functionality to the vanilla version: creating virtual machines without an operating system, cloning virtual machines, adding disks and ISO images without stopping virtual machines and loading their own ISO images and virtual machines.
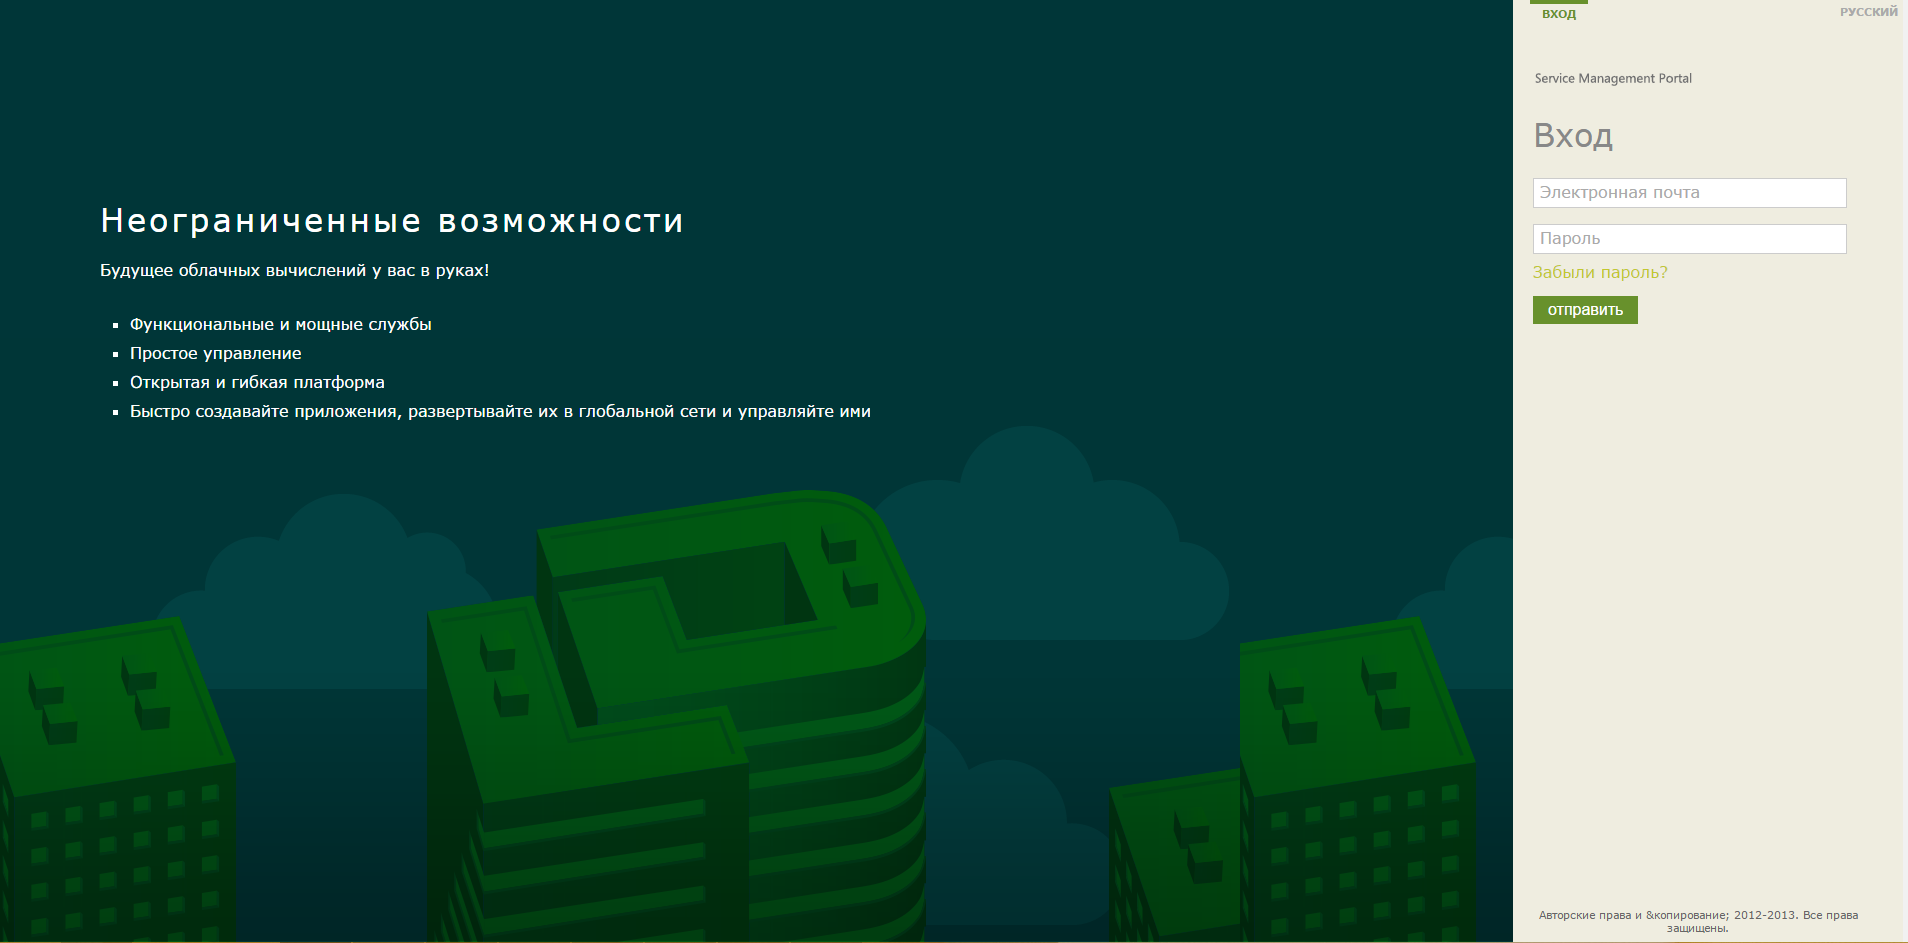
To access resources on Cloud-V, enter the account information on the site.
')
To make it easier to navigate in a brave new world, let's deal with the main elements of the management portal My.Cloud-V.
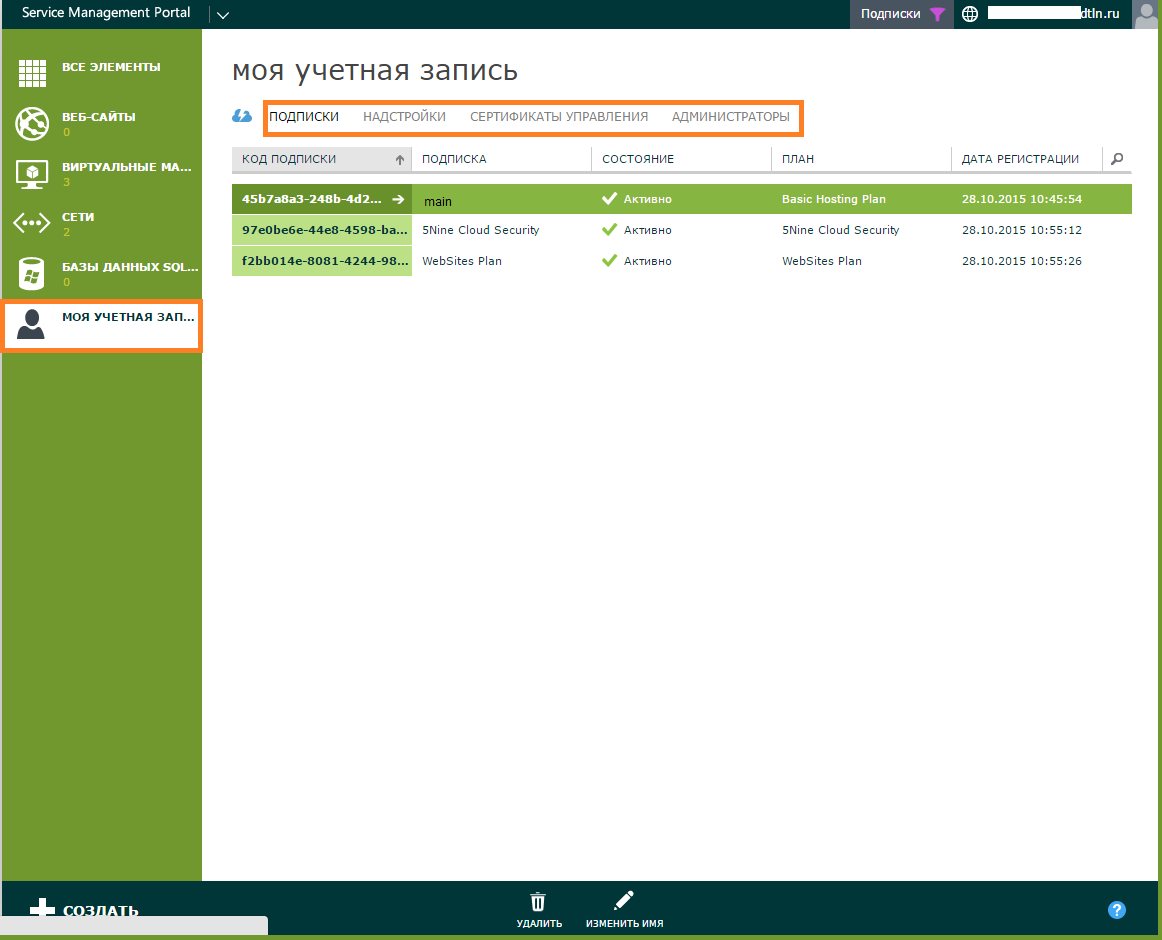
All these entities can be managed in the My Account tab.
With virtual machines in My.Cloud-V also has its own nuances. You can create as “empty” virtual machines, or with a “body kit”. There are several entities for this:
Autonomous virtual machine - a virtual machine from the collection with a pre-installed operating system: Windows Server, CentOs, Debian, RedHat and others, or an “empty” virtual machine with resources to install its own OS.
The role of the virtual machine is a template with a set of functions for quick service deployment. A virtual machine deployed within a role is called an instance. You can choose a role from Microsoft Exchange, SQL or MS Dynamics CRM and run the Domain Controller or Skype4Business from the template.
From theory to practice, we will show you step by step how to create a network and virtual machines.
In order for your virtual machines to be interconnected and have access to the Internet, you need to create a virtual network.
The role of the virtual machine is created almost as well. In the next article, we will show you in detail how to create a VM role with Active Directory and Exchange Server.
Virtual machine management. All VM management takes place through the Command Panel .
Here are all the available actions:
Virtual machine scaling . To change the size of the VM, go to the Virtual Machines section, select the VM you need and complete its work.
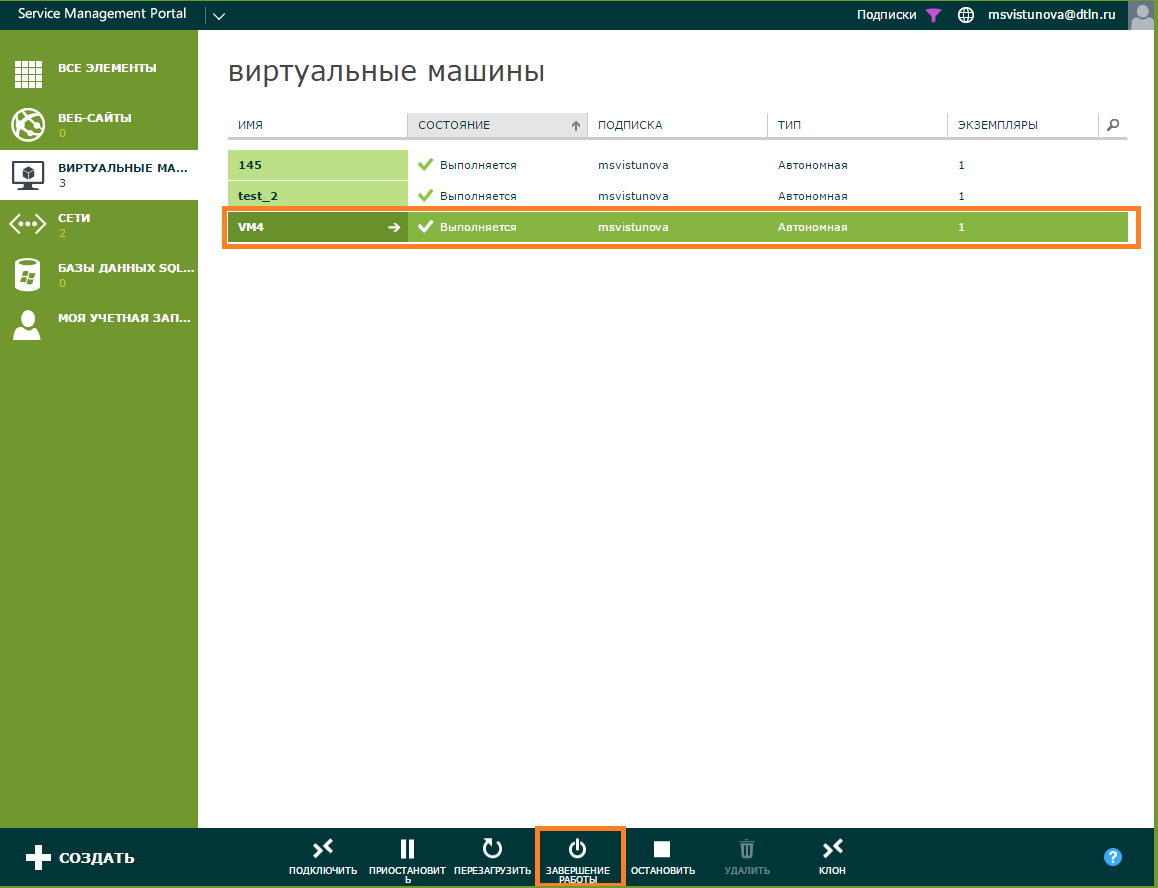
Click on the arrow.

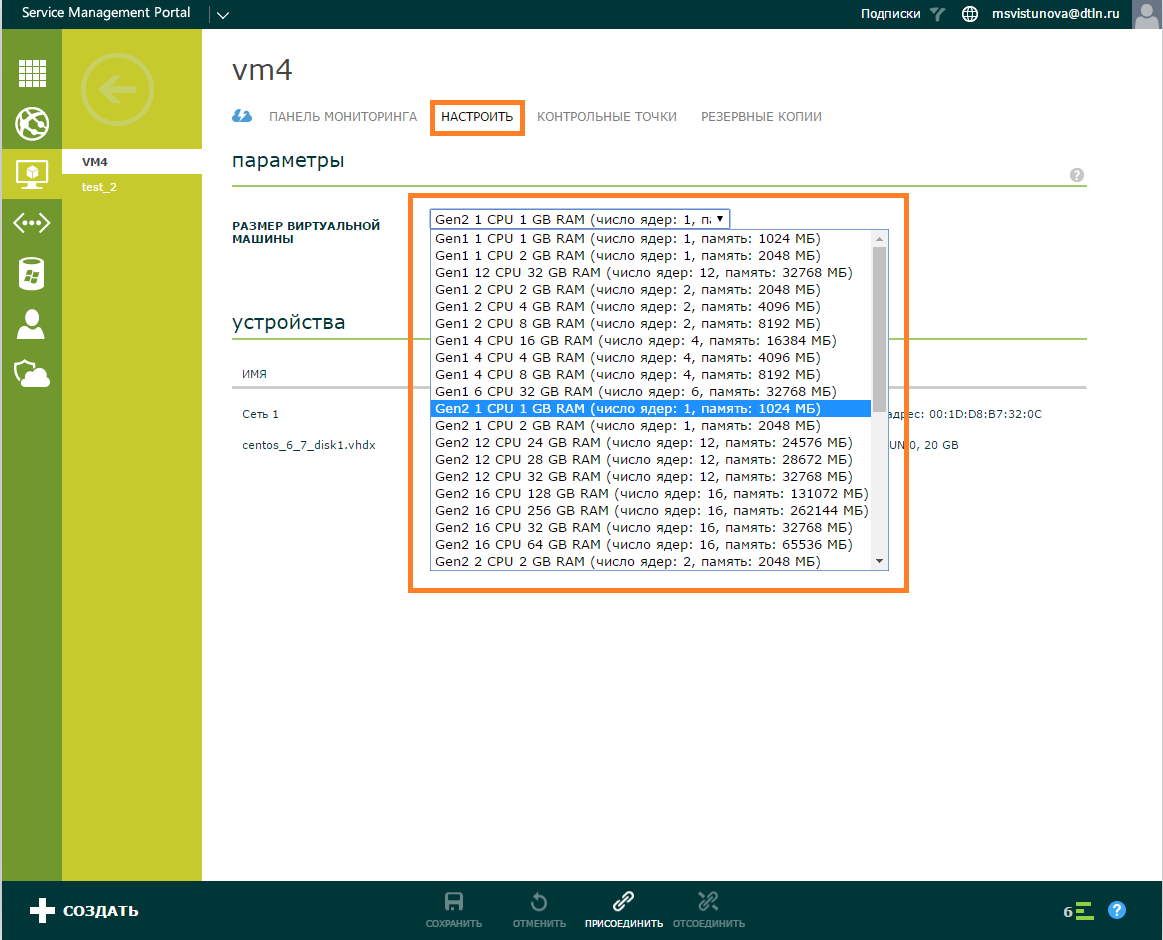
Open the Customize tab and select the desired size of the virtual machine from the list.
Ready-made VM size templates are created to fully match the portal with the “big” Azure UX. Reducing the size of the virtual machine will not affect data integrity - the number of cores and the size of the RAM will change, the disk volume will remain the same.
Connection / disconnection of the network. Turn off the desired virtual machine.
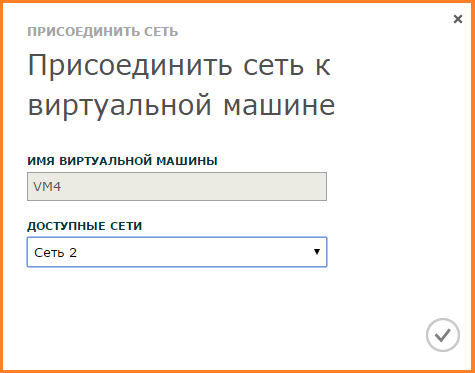
Go to the Configure section, select the Attach option on the command panel and select the Network option.

Select the desired network from the list.
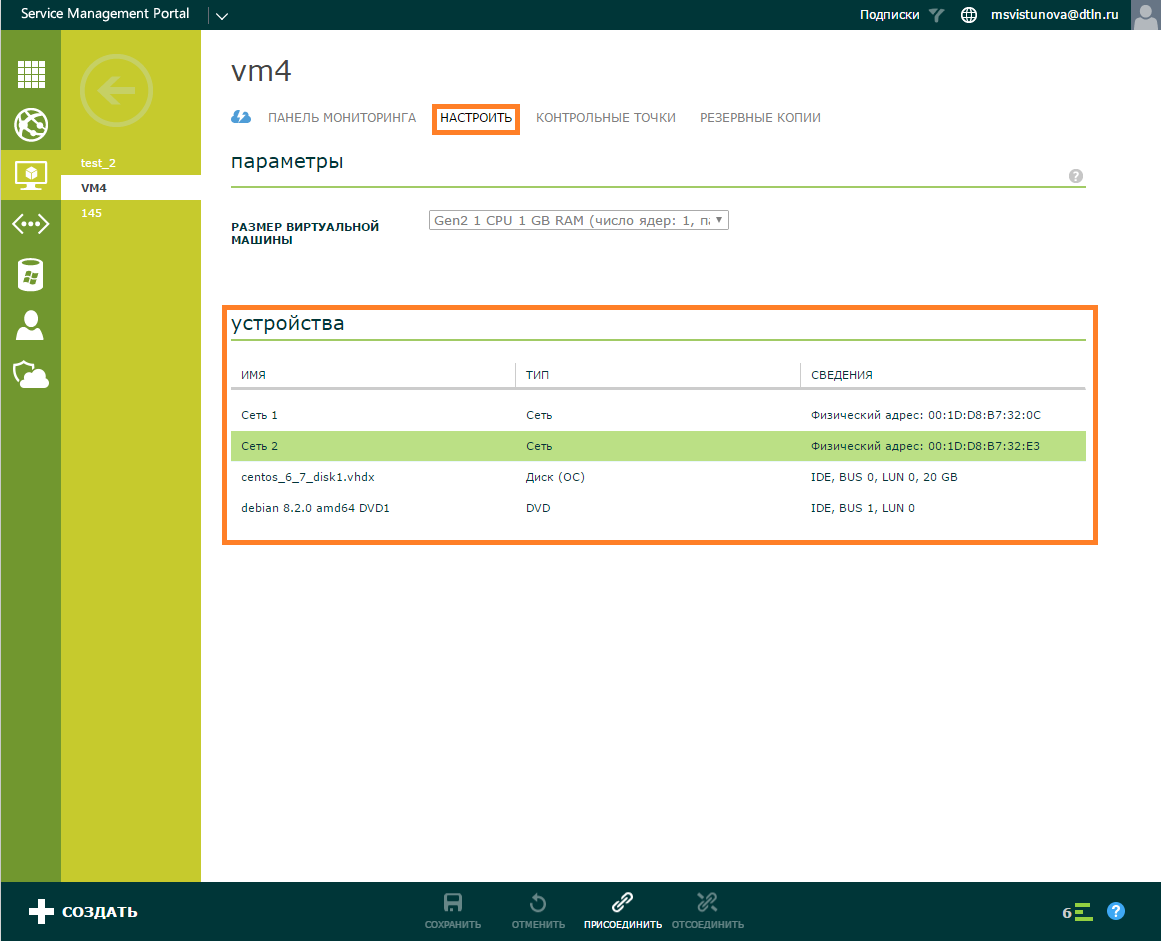
Network added.
Connecting ISO images and disks. ISO-images and virtual hard disks can be connected “on hot”, i.e. without stopping VM.
In the Virtual Machines section , go to the Configure tab, click Attach on the command bar. Select the disk option if you want to add a virtual hard disk. ISO-image is added via the DVD option.

Add a virtual hard disk. Select a disk and a SCSI channel (bus) from the list. By default, the first free channel will be assigned.
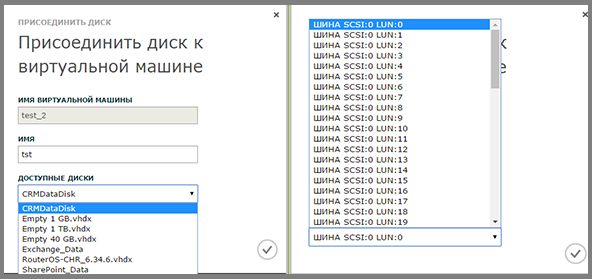
The disc is added.
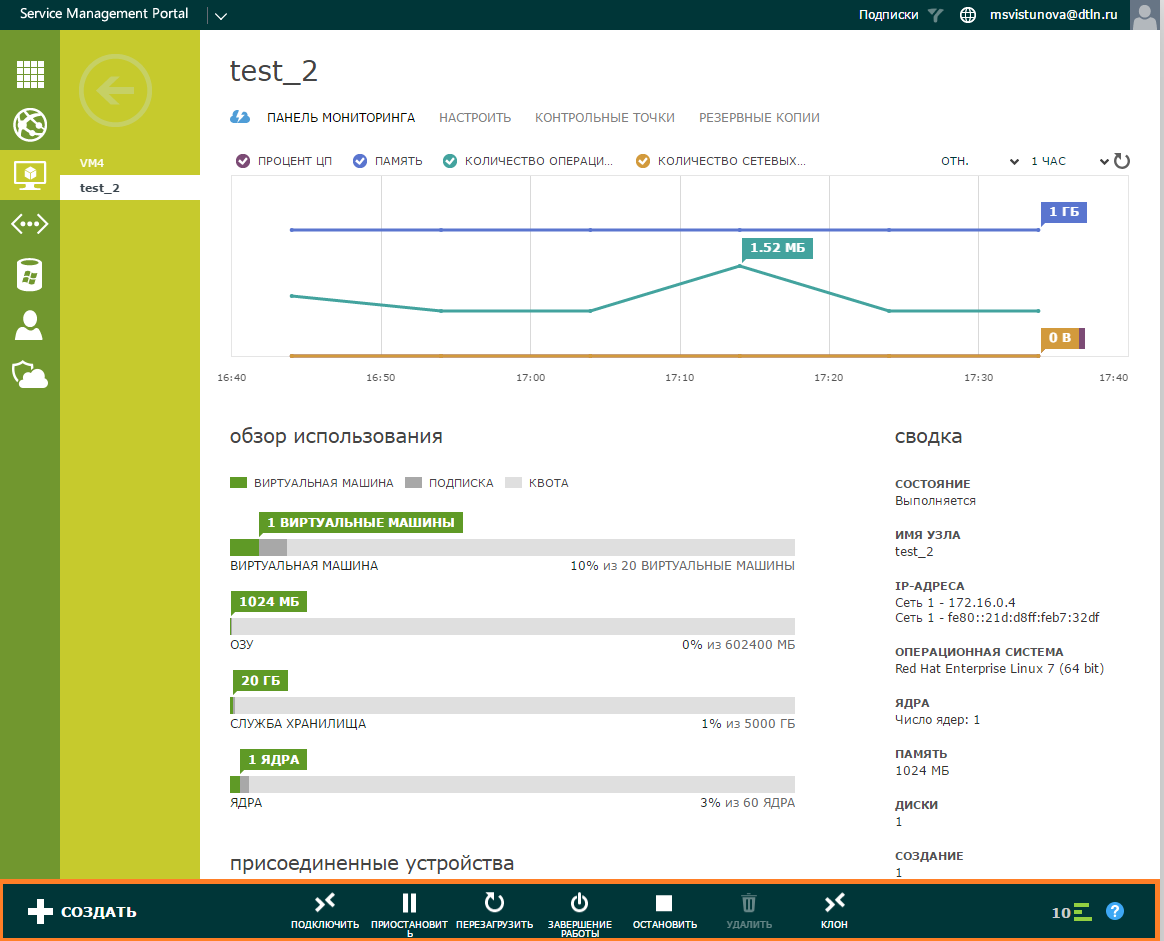
Monitoring In the menu of our virtual machine, you can see its working parameters and dimensions.
In the Virtual Machines section , select the required VM and click on the arrow.
Monitoring will show:
That's all we wanted to tell you today about the Hyper-V based cloud management portal. Next time we will explain how to deploy and configure the Exchange Server in Cloud-V.
Author: Sergey Gruzdov
Part 2: Deploying Exchange Server
Part 3: Storage Spaces
Last summer, we talked about a test launch of a virtual infrastructure (IaaS) based on the Hyper-V platform. During the year of operation, we stuffed a lot of cones, debugged the work of the service and launched the Cloud-V cloud in a big voyage. Today we will examine in detail the basic features of the control panel, and in the following posts we will explain how to deploy and configure Active Directory, Exchange and more.
The cloud management portal was made on the basis of Windows Azure Pack , designed to run resources and services in a private or public cloud in self-service mode. Our engineers refined it and added the missing functionality to the vanilla version: creating virtual machines without an operating system, cloning virtual machines, adding disks and ISO images without stopping virtual machines and loading their own ISO images and virtual machines.
Some theory
To access resources on Cloud-V, enter the account information on the site.
')
To make it easier to navigate in a brave new world, let's deal with the main elements of the management portal My.Cloud-V.
Subscription is the resource pool allocated to you according to the plan you purchased: virtual processors, number of cores, RAM, and disk size.
Add - ons are additional resources that connect to the standard resource pool. Here you can find information about the resources that you additionally acquire after activating the basic subscription.
Administrators - accounts with subscription control rights.
Management certificates - in this tab you can connect management certificates for remote management of your subscription. And work with the cloud through Azure PowerShell - a set of modules with cmdlets for the Windows PowerShell command line. The Microsoft blog has an article on how to set up Azure PowerShell .
All these entities can be managed in the My Account tab.
With virtual machines in My.Cloud-V also has its own nuances. You can create as “empty” virtual machines, or with a “body kit”. There are several entities for this:
Autonomous virtual machine - a virtual machine from the collection with a pre-installed operating system: Windows Server, CentOs, Debian, RedHat and others, or an “empty” virtual machine with resources to install its own OS.
The role of the virtual machine is a template with a set of functions for quick service deployment. A virtual machine deployed within a role is called an instance. You can choose a role from Microsoft Exchange, SQL or MS Dynamics CRM and run the Domain Controller or Skype4Business from the template.
From theory to practice, we will show you step by step how to create a network and virtual machines.
Create a network
In order for your virtual machines to be interconnected and have access to the Internet, you need to create a virtual network.
- Go to the Networks menu, click Create Virtual Network .
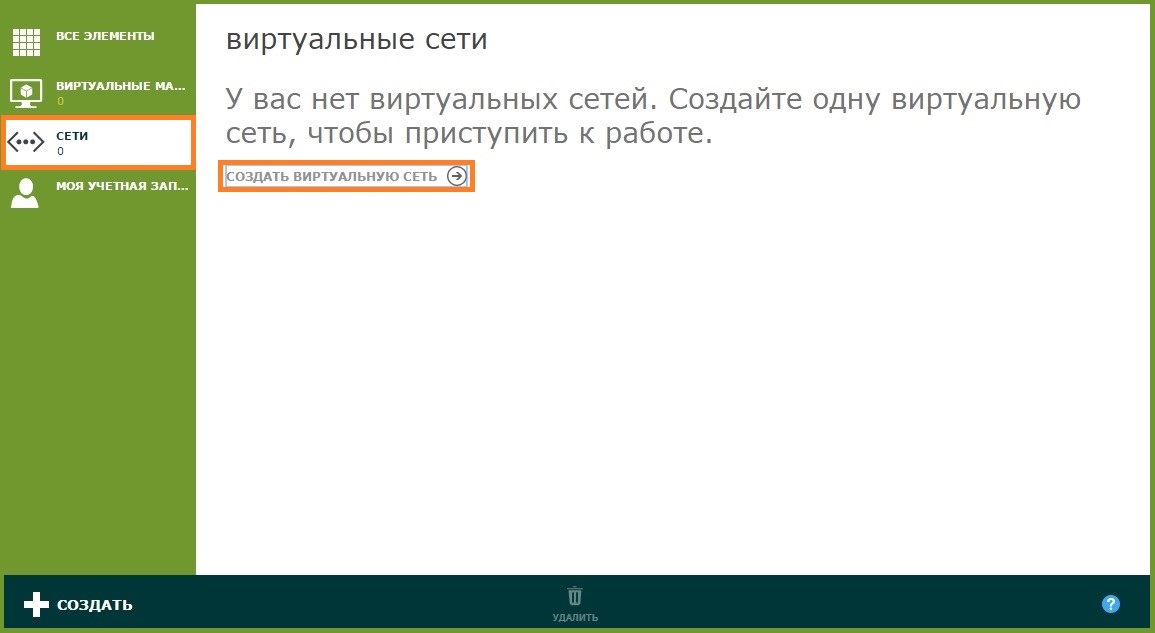
- Select the Virtual Network tab. There are two options: fast and custom creation. Custom network creation allows you to specify network settings when creating it in more detail. In “Quick creation”, only the name, address space and the number of IP addresses can be set.
For our experiment, choose Custom creation .
- Specify the version of the IP protocol, as well as the name of the virtual network.

- We set IP addresses of DNS servers. Put a tick Enable direct access to the Internet, if we need this access. When creating a VPN connection “network-network”, make sure that the gateway subnet does not overlap with the subnets of the virtual machines that will be on this network.
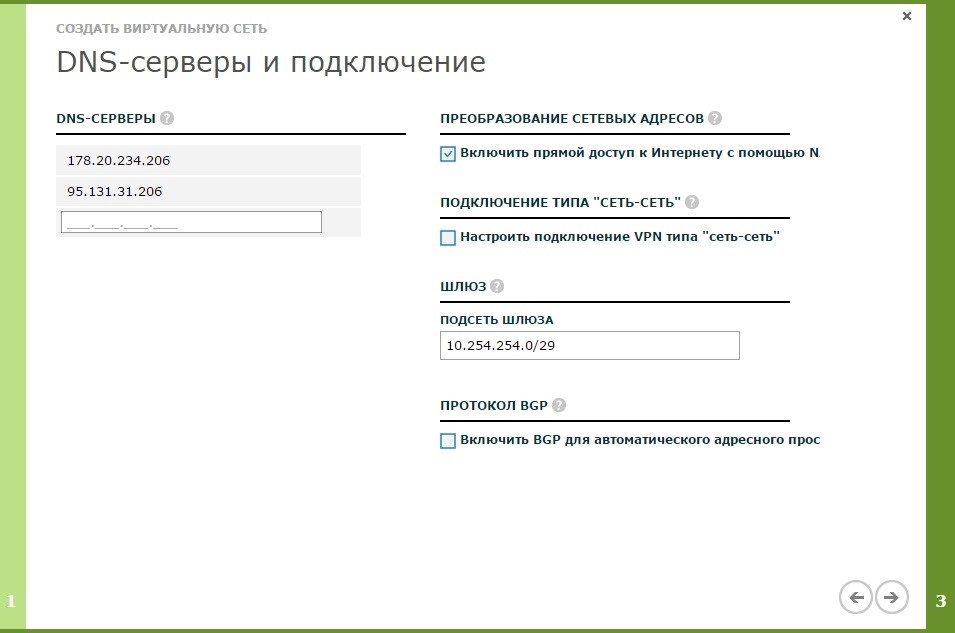
- Specify the size of the address space. In our case, this is a network with a 24-bit mask - 10.10.10.0/24.

- Virtual network created.

Create a standalone virtual machine (quick version)
- Go to the Virtual Machines menu and click Create .

- Select the Autonomous Virtual Machine and Quick Create tabs.
Creating "From the Collection" allows you to deploy virtual resources without an operating system (Empty templates), or from one of the proposed operating systems. Empty option is not provided for “Quick Create”.
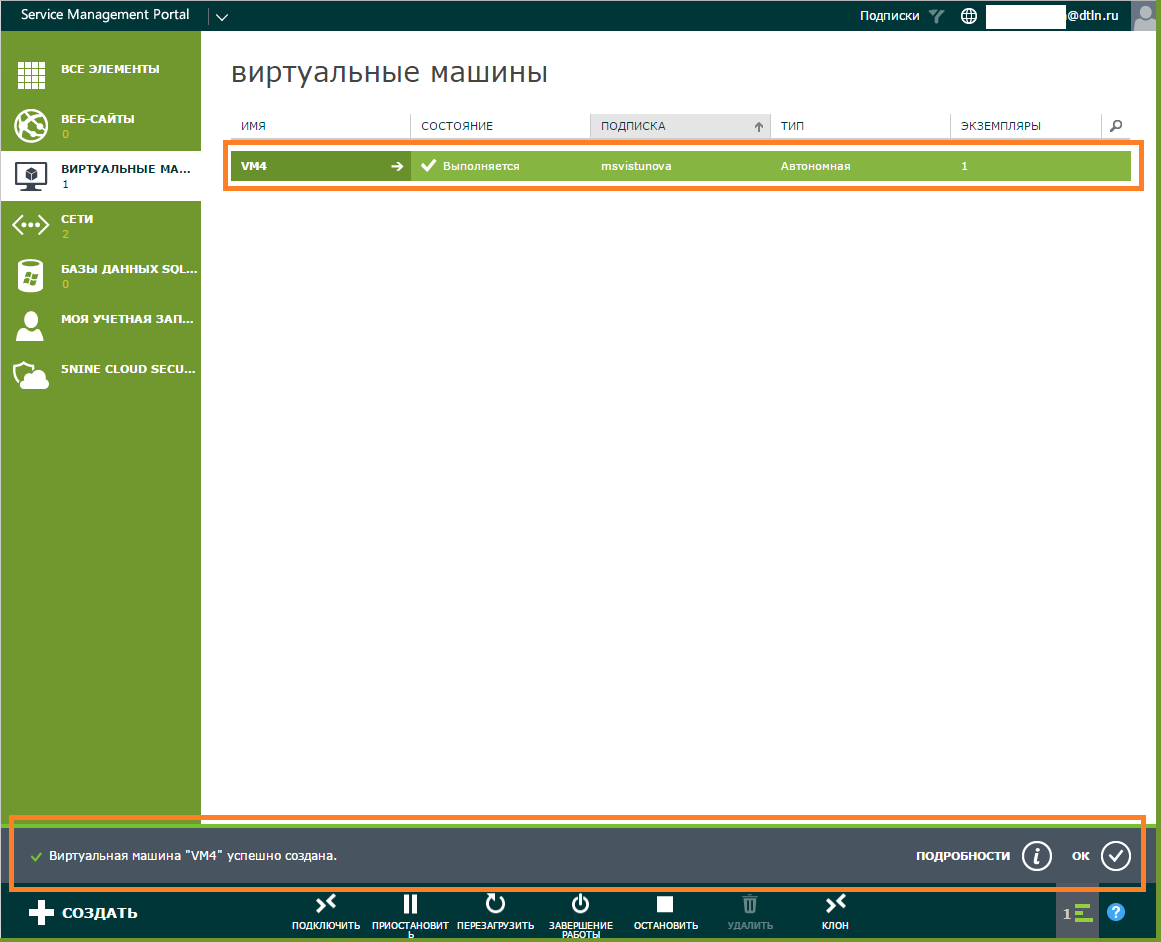
- We give the virtual machine a name. Choose a template with a pre-installed OS. We set the password and connect the virtual machine to the network. Click Create Instance VM .

- Is done. The created virtual machine will be displayed in the corresponding section.
The role of the virtual machine is created almost as well. In the next article, we will show you in detail how to create a VM role with Active Directory and Exchange Server.
Work with a virtual machine
Virtual machine management. All VM management takes place through the Command Panel .
Here are all the available actions:
- Connect — connects to the virtual machine via the management console.
- Suspend - standby mode. Allows you to pause the VM to test the infrastructure without this virtual machine and run it again in a second without having to go through the entire OS boot cycle.
- Shut down is a “soft” shutdown of the virtual machine, the essence is the same as that of the “Shut down” command on computers. In this state, it is possible to attach / detach networks and disks to VM, change VM sizes, remove machines
- Stop - emergency shutdown of the VM, comparable to turning off the computer with a button on the power supply or pulling the cord out of the socket. It is worth using only if the operating system of the machine is not responding.
- Clone - VM cloning. As we told at the beginning, this function was added by our specialists and is missing in the classic Azure Pack.
- Reload, Delete - everything is clear here.
Virtual machine scaling . To change the size of the VM, go to the Virtual Machines section, select the VM you need and complete its work.
Click on the arrow.
Open the Customize tab and select the desired size of the virtual machine from the list.
Ready-made VM size templates are created to fully match the portal with the “big” Azure UX. Reducing the size of the virtual machine will not affect data integrity - the number of cores and the size of the RAM will change, the disk volume will remain the same.
Connection / disconnection of the network. Turn off the desired virtual machine.
Go to the Configure section, select the Attach option on the command panel and select the Network option.
Select the desired network from the list.
Network added.
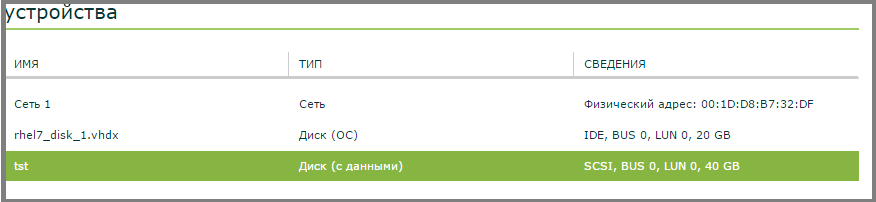
Connecting ISO images and disks. ISO-images and virtual hard disks can be connected “on hot”, i.e. without stopping VM.
In the Virtual Machines section , go to the Configure tab, click Attach on the command bar. Select the disk option if you want to add a virtual hard disk. ISO-image is added via the DVD option.
Add a virtual hard disk. Select a disk and a SCSI channel (bus) from the list. By default, the first free channel will be assigned.
The disc is added.
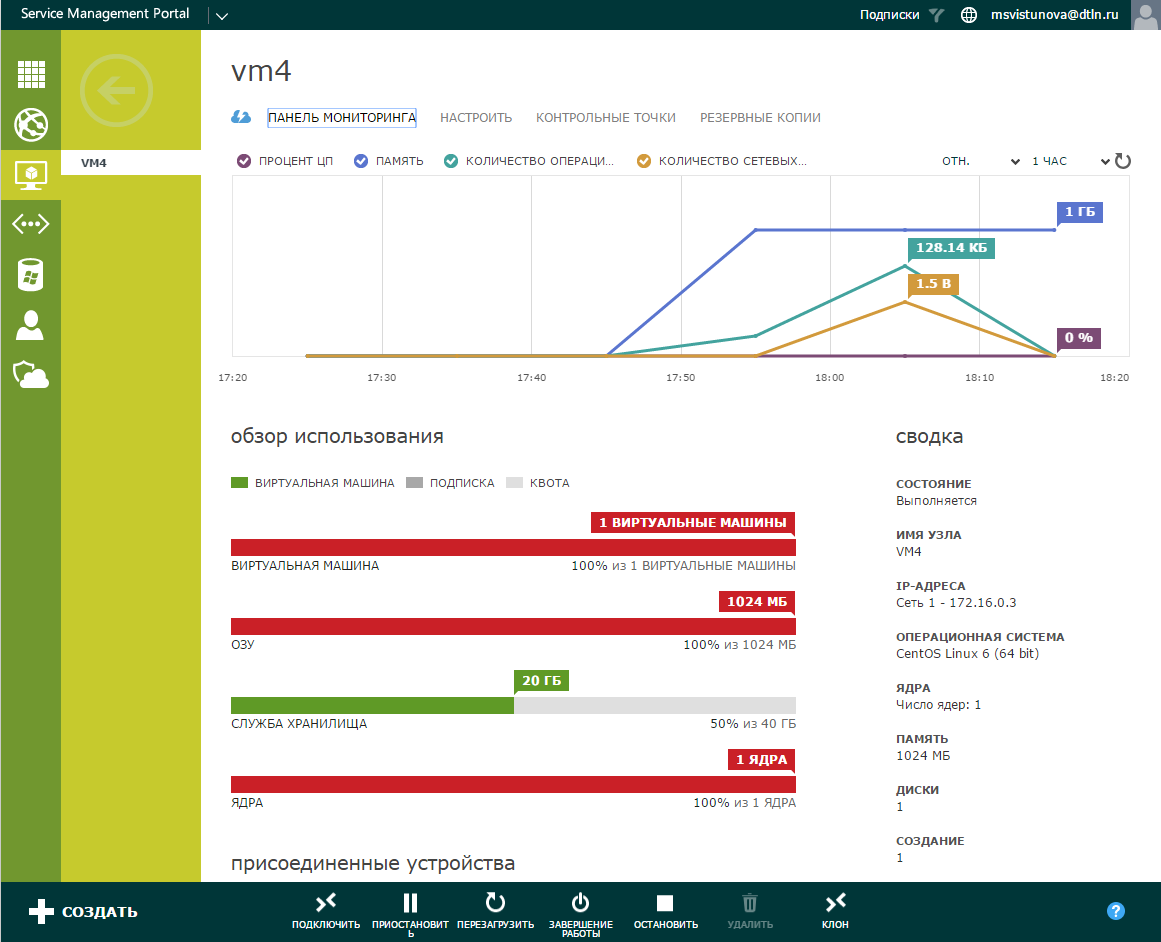
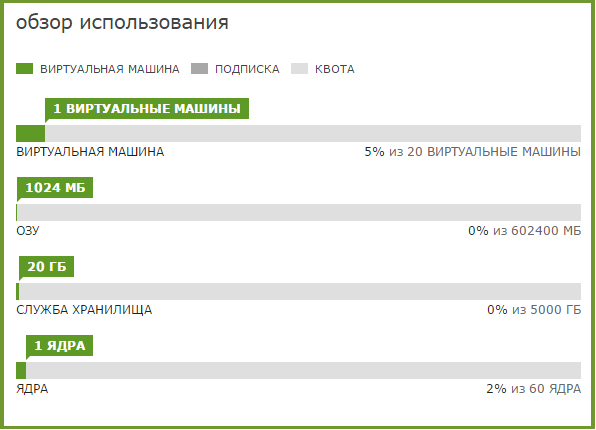
Monitoring In the menu of our virtual machine, you can see its working parameters and dimensions.
In the Virtual Machines section , select the required VM and click on the arrow.
Monitoring will show:
- Performance graph — CPU utilization percentage, memory, storage and network bandwidth.

- The amount of resources occupied by the virtual machine.
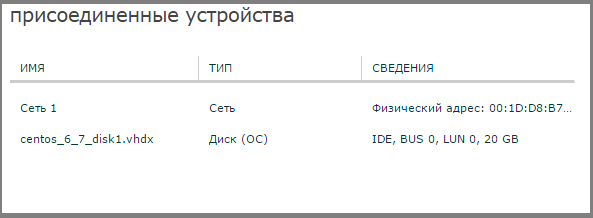
- Attached devices - networks and devices connected to a virtual machine.
- Summary — the state, the name of the virtual machine server, the IP addresses associated with it, the OS installed on it, the number of cores, the number of disks attached to it.

That's all we wanted to tell you today about the Hyper-V based cloud management portal. Next time we will explain how to deploy and configure the Exchange Server in Cloud-V.
Author: Sergey Gruzdov
Source: https://habr.com/ru/post/310730/
All Articles