Nursery project on React-redux with diapers

Earlier this year, we at HeadHunter launched a project aimed at automating various HR processes for client companies. The architecture of this project at the front chose React-Redux stack.
For 9 months it has grown from a small application for testing employees into a multi-module project, which today is called “Talent Evaluation” . As it grew, we encountered the following questions:
- storage of the state, its normalization;
- building a scalable project architecture, convenient hierarchy - both in structure and in business logic.
This was manifested in a change in the approach to the construction of components, the architecture of reducer.
')
Let's talk about how we developed the project and what decisions we made. Some of them may be “holivar”, while others, on the contrary, “classics” in the construction of a large project on redux. I hope that the practices described below will help you in building react-redux applications, and living examples will help you understand how this or that approach works.
General information. Intro.
The web application is a SPA. Application rendering only on the client (we will explain why below). When developing, we used React-redux stack with various middlewares, for example redux-thunk. In the project we use es6, compiled when building through babel. Development is carried out without the use of es7, because we do not want to take solutions that are not accepted in the standard.
Partially, the project is available at test.hh.ru , but it can be used only by companies registered on hh.
Project structure
As a project structure, we initially took the division of the application into several parts. The result is a “classic” structure for this stack:
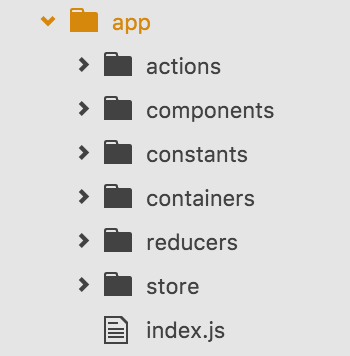
Here:
- actions are responsible for storing all the action creators of the project;
- components - all react components;
- constants - constants. It is important that in this folder we collect not only constants like
ENTER_KEY = 13, but also various names of actions, for example:export const FETCH_ACCOUNT = 'FETCH_ACCOUNT'; export const RECEIVE_ACCOUNT = 'RECEIVE_ACCOUNT';
This is done so that the import can easily see the dependencies, without the need to line up.
We do not make those constants that are relevant only for a specific component. For example: the distance in pixels from the lower border of the container, upon reaching which we load new data (that is, an infinite scroll); - containers is a specific directory. It consists of page components, which, if necessary (for example, lack of data) call the action creators and send the components to render. In addition to similar page components, there are various decorators / fronts in the folder. What is such a decorator? To do this, analyze the code of one of the containers:
import React, { Component } from 'react'; import { connect } from 'react-redux'; import { compose } from 'redux'; import Content from '../components/content/content'; import Managers from '../components/managers/managers'; import composeRestricted from './restricted/restricted'; import { loadManagers } from '../actions/managers'; import title from './title/title'; class ManagersPage extends Component { componentWillMount() { if (!this.props.firstLoad) { this.props.loadManagers(this.props.location); } } render() { return ( <div className='page'> <Content> <Managers /> </Content> </div> ); } } export default compose( connect( state => state.location, {loadManagers} ), title('managers', 'title.base'), composeRestricted({user: true}) )(ManagersPage);
Here we are interested in the lower part, which describes the export module. connect is the standard react-redux decorator. It wraps our component in the additional react component, which subscribes to state changes of the global redux store and transfers the location field (plus wraps the action creator loadManagers in the dispatch store). Title, composeRestricted are handwritten decorators that likewise wrap a component. Here title adds titles. The second decorator - composeRestricted - is responsible for determining the user's rights, drawing restricted pages if the backend sent the corresponding error: for example, there are no rights or no data. There may be a large number of such decorators: “something went wrong”, additional calculations, etc .; - reducers - nothing interesting, just managing the application's state;). It also stores a “root” reducer that unites all the others (using combineReducers);
- store - store configuration, its initialization;
- index.js is the entry point to our application. Initializes react, describes the routing, creates a stor, etc .;
With such a structure, we began to develop our project. It is impossible to predict in advance all the requirements for the system and all the difficulties that may be encountered in the development process. Therefore, we have chosen the path of incremental modernization of our project. It works as follows:
- choose a specific application model;
- We face the fact that some approach does not solve our problems in the way we want;
- we refactor, change the structure of the application.
Let us analyze the change in the structure of the application over time:
Building a structure. Childhood
When a project is young and not overgrown with a large number of files, it is advisable to choose a simple construction model. This is exactly what we did.
All action creators were stored according to the principle - one group of operations, combined in the sense = one file. All files were stored in one list in a folder.
It looked like this:
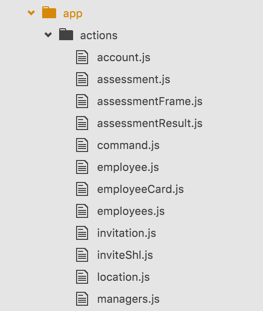
What is “one group of operations”? It can be said that one action creators file is responsible for actions within one reducer. In this case, both the action creator and the reducer have the same name, but this does not happen 100% of the time. In the sense, these are operations on one type of objects. For example, employee.js contains various methods for working with a particular object - “employee”. This is getting information about him, handling data loading errors, changing data and adding a new employee.
Typical code of similar operations:
export function loadEmployee(id) { return dispatch => { // action, , employee dispatch(fetchEmployee()); fetch(`/employees/${id}`) // .then(checkStatus) // .then(result => result.json()) .then(result => { // , (, , ) dispatch(receiveEmployee(result)); }) .catch(() => { // , : 1) ; 2) ; 3) ; 4) react . dispatch(releaseEmployee()); dispatch(errorRecord(t('employee.error'))); }); }; } It is important to note that in this code we process a single catch at once a group of errors — both server-side and work of reducers and reactant components. In more detail, why we decided to make just such an architecture - in the section of ambiguous decisions at the end of the article.
A similar construction model was adopted for reducers, containers and components. For components, there are only some “conventions”. Each component is in a separate folder. This allows us to put inside the folder as a .js module, as well as styles, and in some cases also images / other data:

Adolescence
This structure lived exactly until the end of the work on the first module. Before moving to a new module, we looked at the resulting set of components with a sober look and decided that as the system was enlarged, this approach to the project structure would bring “porridge”, where there would be a huge number of files on one level of the system. In addition, if we decide to send all js to the front not in one file (for example, when the size of our js bundle grows into megabytes of minifen-aglyphine information), but in several bundles, then we will have to settle all the dependencies of the modules for quite a long time.
That is why we made the following decision (I will describe for the two modules A and B, you can scale to any number):
- All action creators, reducers and containers are divided into three types: common, moduleA, moduleB.
- All constants that do not describe the action type are inside the constants folder. The same folder contains the actions directory, which describes the action types we need. Moreover, they are also divided into two types.
- Components are divided into 4 types:
common - includes general react modules. They are the dummy react component (i.e., components that only describe the UI, do not control it, do not affect / do not depend directly on the application state, do not cause actions) In fact, these are components that are reusable anywhere in the application.
blocks - components that depend on the overall application state. For example, the “notification” or “notification” block.
moduleA, moduleB - specific components for the module.
Both blocks and modules can be smart components, trigger some actions, etc.
With the accepted rules, the structure of the application began to look as follows:

Thus, we have a clear structure that describes the modular essence of the project, in which you can easily determine the ratio of the js file to a particular module, which means that if we decide to create different bundles for modules, then it will not be difficult for us (just “set off "Webpack for the necessary parts).
Division of application state into modules
Ok, we shared our files structurally, the eye is happy, but what about the support of a multi-module structure at the level of logic, reducers?
For small applications, the description of a root viewer is usually:
export const createReducer = () => { return combineReducers({ account, location, records, managers, tooltip, validation, progress, restrictedData, command, translations, status, features, module, settings, menu, routing: routeReducer, }); }; For small applications, this is convenient, since all data is located in a plain-collection. But with the increase in the size of the application, the amount of data sent increases, there is a need for crushing reducer, dividing them into modules. How can I do that? Before proceeding to the result, consider two situations.
Situation one: “Crushing an object into separate reducers”
Suppose we have the essence of employees. This entity is perfect for analyzing various situations and describing decision making. With the essence of “employee”, company managers can do various actions: upload, edit, create, invite to tests, view test results. This field is an object with two fields: status and data. status defines the current state of the field (FETCH \ COMPLETE \ FAIL), and data defines useful data, an array of employees. This is enough to get data from the server and display a list of employees.
Now we need to add the ability to select employees:

This problem can be solved in three ways:
Method one:
We modify the elements inside the employees.data array so that, in addition to the id, first name, last name, position, each element will contain the selected field. When rendering a checkbox, we look at this field, and we count the total amount, for example, like this:
employees.data.reduce((employee, memo) => employee.selected ? memo + 1 : memo, 0); If in the future we need to send the selected id, then we find them all through the same filter. Adding \ deleting selected is done in the same way, via map. The advantage of this method is that the data is stored centrally. With a minus, we touch on the whole object for each “sneeze” (adding / removing the selected flag). This leads to a considerable amount of action. Logic to work with selected employees is added to the employees redundant, action creator. If you want to separate these parts (since working with selected employees does not affect the main task of the employees reducer - output employees and do pagination), then you should look at two other ways.
Method two:
Create a separate reducer, for example
selectedEmployees . This is an immutable map (you can optionally have an array, just an object) that stores only the selected id. Adding and removing id from such a structure looks much easier. Drawing the checkbox is complicated only by the need to go along the path store.selectedEmployees.has(id) . Accordingly, all work with selected employees goes into a separate reducer, a separate group of actions.This solution is better in that it does not deal with the modification and loading of another part of the state, but adds one more side by side. Total, if our application consists of these two reduers, we get the following structure:
employees {state: COMPLETE, data: [{id: 1, ...}, {id: 2, ...}]} selectedEmployees Map({1 => true}) Method three:
Over time, if you use the second method each time, we will get a bloated state, which will consist of employees, selectedEmployees, employee, employeeTest, etc. Note that reductors are related to each other: selectedEmployees refers to employees, and employeeTest to employee . Therefore, we structure the application by creating a combined reducer. This will give us a clearer and more convenient structure:
employees: - list [{id: 1, ...}, {id: 2, ...}] - selected Map({1 => true}) - status COMPLETE employee: - data - test To achieve such a structure, you can build a hierarchy of reducers:
export const createReducer = () => { return combineReducers({ employees: combineReducers({ list: employees, selected: selectedEmployees, status: employeesStatus }) routing: routeReducer, }); }; Note: status is not important at this level, it can be left inside the reducer, which was responsible for the list of employees, as it was before.
This is the way we decided to use. It is great for various situations where group work with objects is necessary.
Situation Two: “Data Normalization”
When developing a SPA, data normalization plays a big role. We will continue to work with our employees. We selected the right employees and sent them to the test. Then the employee passes it, and the company receives the test results. Our application needs to store data - employee test results. One employee may have several results.
A similar problem can also be solved in several ways.
Bad way (man-orchestra)
This method proposes to refine the employees structure in order to preserve complete data about the test inside itself. I.e:
employees: { status: COMPLETE, list: [ { id: 1, name: '', testResults: { id: 123, score: 5 speed: 146, description: '...' ... } } ] } We got an orchestra object in our store. This is inconvenient, it carries in itself an extra nesting. The solution with normalized data looks much more beautiful.
Good way
Note that the employee and the test have an id. In the database there is a link between tests and employees just by employee id. We adopt the same approach from the backend and get the following structure:
employees: { status: COMPLETE, list: [ { id: 1, name: '', testResults: [123] } ] }, tests: { 123: { id: 123, score: 5 speed: 146, description: '...' ... } } In rutovom reducer we get:
export const createReducer = () => { return combineReducers({ employees: combineReducers({ list: employees, selected: selectedEmployees, status: employeesStatus }), tests, routing: routeReducer, }); }; We structured our story, put everything on the shelves, getting a clear understanding of the functionality of the application.
Add modules
When adding modules, we divide the presentation of the state into a common group and groups belonging to different modules:
export const createReducer = () => { return combineReducers({ moduleA: combineReducers({ employees: combineReducers({ list: employees, selected: selectedEmployees, status: employeesStatus }), tests, }), moduleB: combineReducers({...}), // common , notifications, routing: routeReducer, }); }; This method allows to repeat the file structure in the structure of the store. Thus, the structure of the application is repeated both at the file and at the logical level. This means that the understanding of the work of the entire application as a whole is simplified and the threshold for new developers to enter the project is reduced.
Principles of building React components
We have successfully built the structure of the application, divided the code into modules, our actions and reducers are hierarchical and allow us to write scalable code. It's time to return to the question of how to build the components responsible for the UI.
We adhere to the principles of redux, which means that the global stor is the only source of truth. Our goal is to build the application in such a way that, according to the data from the site, you can completely restore the site display at any time. Of the permissible errors, we allow ourselves not to recover data about animations / states of dropdowns, tooltips - open / closed.
Based on these conditions, we construct an application model.
Smart and dumb components
The approach to building and dividing by these attributes is well described in the following resources:
" Medium.com/@dan_abramov/smart-and-dumb-components-7ca2f9a7c7d0#.aszvx1fh1
» Jaketrent.com/post/smart-dumb-components-react
We follow a similar approach. All common components are dummy components that only get properties, etc. Components related to a module can be either smart or dumb. We do not make a hard distinction between them in the structure, they are stored nearby.
Pure components
Virtually all of our components do not have their own state. Such components either get a state, the action creators through the connect decorator, or with the help of a “waterfall” from the parent components.
But there are about 5% of the components that have their own state. What are such components? What is kept in your stey? Similar components in our application can be divided into two groups.
Popup Status:

One more example:
This group contains components that store information - display a pop-up element (dropdown, tooltip) or not.
Typical code for such a component:
import React, { Component } from 'react'; import PseudoLink from '../pseudoLink/pseudoLink'; import Dropdown from '../../common/dropdown/dropdown'; import './dropdownHint-styles.less'; class DropdownHint extends Component { constructor(props, context) { super(props, context); this.state = { dropdown: false, }; } renderDropdown() { if (!this.state.dropdown) { return ''; } return ( <Dropdown onClose={() => { this.setState({ dropdown: false, }); }}> <div className='dropdown-hint'>{this.props.children}</div> </Dropdown> ); } render() { return ( <PseudoLink onClick={() => { this.setState({ dropdown: true, }); }}> {this.renderDropdown()} {this.props.text} </PseudoLink> ); } } export default DropdownHint; The second task of the internal state: temporary caching or addition.
Consider the following example:

Notifications at the top of the screen are animated when they appear and hide. The essence of the notification is stored in the global state of the application, but for the process of hiding (and then deleting) the notification, you can use one of several approaches without contaminating the global state with such unimportant information as animation.
The first method is caching.
Pretty easy way. We create the NotificationsManager component, which is responsible for rendering the Notification components (Notification). After the NotificationsManager has rendered the next notification, it starts the timer, after which the action to hide the notification will be called. Before calling NotificationsManager, it caches notifications in its state. This allows you to delete the notification itself from the store, and the cached data inside the local state of the component allows you to animate its disappearance.
This method is inconvenient because we deceive our story - he believes that there is no notification, but it is actually stored in the local style of our component. We want an “honest” story, so this method does not suit us.
Method two - we supplement information from the store locally.
This method is more honest and attractive, as it does not interfere with high accuracy to recover data from the store. It consists in the fact that the NotificationsManager, when receiving notification changes from the side of the store, adds information to its state about what needs to be done with the notification (to animate its appearance, disappearance or nothing to do). In this case, the NotificationManager notifies the story through the CLOSE_NOTIFICATION action only at the moment when the animation of the disappearance of the notification is completed. This approach eliminates unnecessary information in the store (the status of the animation of the notification), and at the same time the story remains “the only source of truth” with which you can accurately restore the display of the entire application.
We describe approximately how this approach will work. In the store we get:
notifications: [ { id: 1, text: ' , ' }, { id: 2, text: ' , ' }, { id: 3, text: ' , ?' }, ] In the local component stack:
notifications: { 1: 'out', 3: 'in' } Let's look at an example. At the level of the entire application, we know that we have 3 notifications. At the local component level, we save information that does not carry a semantic load for the application, but is important for the local render: id === 1 disappears, id == 3 leaves, and id === 2 is static.
, . , . . “- ”.
. , , , . . , . .
. Rendering
. react-router, redux react-router-redux.
.
, json, : , , ( ). .
:
- js ;
- , ;
- node.js .
json-. acceptType-.
:

employees (employees) (account).
, html-, json:
window.pageData = { account: // employees: // } , , .
:
const initialData = window.pageData.employees; export default function employees(state = initialData, actions) { // reducer } employees , -, .
— . action creator, acceptType: application/json ( ). . “ ”.
action creator':
export function loadEmployee(id) { return dispatch => { // action, , employee dispatch(fetchEmployee()); fetch(`/employees/${id}`) // .then(checkStatus) // .then(result => result.json()) .then(result => { // , (, , ) dispatch(receiveEmployee(result)); }) .catch(() => { dispatch(releaseEmployee()); dispatch(errorRecord(t('employee.error'))); }); }; } receiveEmployee. , , , . . — catch :
- ;
- ;
- ;
- react .
- “” . , , t('employee.error'). t — , ().
“” . , , , . . , : . . , :
export function loadEmployee(id) { return async dispatch => { // action, , employee dispatch(fetchEmployee()); let json; try { const res = await fetch(`/employees/${id}`); checkStatus(res); json = await getJson(res); } catch () { dispatch(releaseEmployee()); dispatch(errorRecord(t('employee.error'))); } dispatch(receiveEmployee(result)); }; } try-catch dispatch:
dispatch(receiveEmployee(result));
, catch:
export function loadEmployee(id) { return async dispatch => { // action, , employee dispatch(fetchEmployee()); let json; try { const res = await fetch(`/employees/${id}`); checkStatus(res); json = await getJson(res); } catch () { dispatch(releaseEmployee()); dispatch(errorRecord(t('employee.error'))); } try { dispatch(receiveEmployee(result)); } catch() { dispatch(releaseEmployee()); dispatch(errorRecord(t('employee.error'))); } }; } , .
, , , , .
, , , “ ”. (, 5—10 , 40—50 ) . Why do so? , . , . , “ ” , . , , , -, , -, (, , ). , , . . , .
:
» github.com/reactjs/redux/issues/37#issue-85098222
» gist.github.com/gaearon/0a2213881b5d53973514
» stackoverflow.com/questions/34095804/replacereducer-causing-unexpected-key-error
:
1.
, . , . ( ).
Step 2.
. :
export const createReducer = () => { return combineReducers({ moduleA: combineReducers({ employee: combineReducers({ list: employees, selected: selectedEmployees, status: employeesStatus }), tests, }), moduleB: combineReducers({...}), // common , notifications, routing: routeReducer, }); } :
export const createReducer = (dynamicReducers = {}) => { return combineReducers(Object.assign({}, { notifications, routing: routeReducer, // , module, }, dynamicReducers)); }; , :
export const aReducers = { moduleA: combineReducers({ employee: combineReducers({ list: employees, selected: selectedEmployees, status: employeesStatus }), tests, }), } Step 3.
, :
export function configureStore() { const store = createStoreWithMiddleware(createReducer()); store.dynamicReducers = {}; storeInstance = store; switch (store.getState().module) { case A: injectAsyncReducer(aReducers); break case B: injectAsyncReducer(bReducers); break; // } return store; } export function injectAsyncReducer(reducers) { if (reducers !== storeInstance.dynamicReducers) { storeInstance.dynamicReducers = reducers; storeInstance.replaceReducer(createReducer(storeInstance.dynamicReducers)); } } injectAsyncReducer, .
4.
action creator. action . For example:
export const checkoutAModule = () => { // injectAsyncReducer(aReducers); return { type: CHECKOUT_MODULE, module: A, }; }; , , .
5.
, . :
import React, { Component } from 'react'; import { connect } from 'react-redux'; import { checkoutModuleA } from '../../actions/module'; import { A } from '../../constants/module'; export default function checkoutA() { return Container => { class AContainer extends Component { componentWillMount() { if (this.props.module !== A) { this.props.checkoutModuleA(); } } render() { return ( <Container {...this.props} /> ); } } return connect( state => { return { module: state.module, }; }, { checkoutModuleA, } )(AContainer); }; } , , .
6.
:
import React, { Component } from 'react'; import { connect } from 'react-redux'; import { compose } from 'redux'; import Content from '../components/content/content'; import Managers from '../components/managers/managers'; import composeRestricted from './restricted/restricted'; import { loadManagers } from '../actions/managers'; import title from './title/title'; class ManagersPage extends Component { componentWillMount() { if (!this.props.firstLoad) { this.props.loadManagers(this.props.location); } } render() { return ( <div className='page'> <Content> <Managers /> </Content> </div> ); } } export default compose( connect( state => state.location, {loadManagers} ), checkoutA(), title('managers', 'title.base'), composeRestricted({user: true}) )(ManagersPage); Done! . , . , “” . (, , ).
Instead of output
. , . , , , , . , ( ), .
Source: https://habr.com/ru/post/310524/
All Articles