Universal mobile electronic key
I can not say that I felt a great enthusiasm when I was invited to participate in the project “Device Lab from Google” , however, no doubt, there was interest. Once I did a project with various interactions via Bluetooth, and I got very interesting implementations. However, it turned out that in the course of Bluetooth manipulation, all the phones, whose owners, due to an oversight, had put them off within the Bluetooth radius, lost their charge three times faster than usual. Colleagues, of course, were not very happy. The project had to close. In this regard, I have long wanted to hold the last generation beacons in the “tenacious” hands. And the project Device Lab gave me this opportunity.

Article author Dmitry Senashenko ( @DmitrySen ), in the framework of the competition "Device Lab from Google . "
On the market now there are many beacons and their manufacturers. And most of them are designed to determine the geolocation inside buildings. There are interesting ideas from the category of embedding beacons in suitcases to search for them at the airport at their signal. But, given the power, it looks like a toy. I wanted to invent and implement something original and useful at the same time. So, a few formalities on the site and in the office of Habr, and the iBKS beacon in my hands:

Much has been written about beacons. For example: “ Google's beacon platform. Part 1 "or" Google's beacon platform. Part 2 ". I will not repeat, but I will say that it was intended to use the beacon with Google's beacon platform and work with it using the API. Reality dotted the “i”, which I will discuss later.
')
In life, I work with telephony and intelligent IVR with support for email, html, sms, etc. Therefore, there are ready-made stands, it is easy to get the necessary equipment, etc. And it was precisely to this subject that I wanted to adapt the beacons.
So, I got the idea to use beacons as an authorization key to the doors in the office. As everyone knows, every office has doors with electronic locks and a reader at the entrance. Each employee has a key in the form of a card, and to enter the door, he needs to attach this card to the reader, after which the door will open. In the world, the number of such doors amounts to many billions, and the number of cards, probably trillions. Although in reality it is not very convenient to use them. If you are in a hurry for an important meeting, then it is very tiring to waste time trying to remove the card (or remove the object in which this card - the wallet, the folder with documents) lies.
However, every person in his pocket now has a phone. And for some - even worn on hand electronics. It is easier to meet a person who has forgotten the card than the one who has forgotten his phone. Therefore, it is more convenient and cost-effective to replace the card with a telephone and the reader with a beacon. Of course, there are some good ideas in this direction.
For example, doorknob with a fingerprint reader, NFC in the phone, etc. But NFC technology never appeared in every smartphone, but there is Bluetooth just in every smartphone. Therefore, technologically, this idea is actually ready for implementation.
In addition, this solution increases the level of employee comfort. Approaching the door, just click on the application icon, and after passing the authorization the door will open. Those. it can be opened from the elevator or on the way to the door. In addition, you can open the door with a clock or say so in the headphones with a microphone to a personal assistant. An important factor is authorization. Let's take a look at this in more detail. See Figure 1.
The phone enters the visibility area of the beacon, finds it using Beacon Discover, and via Nearby messages API gets its attachment from Google Beacons Registry. Further, via Wifi or mobile Internet in an encrypted session, the phone sends this attachment and its IMEI or other unique code specified when installing the application to the authorization server. The authorization server identifies the access rights and, in the event of a positive decision, commands the electronic lock management server to open the corresponding lock based on data from the attachment, which uniquely characterizes the door. The electronic lock control server instructs the actuator to open the door.

Figure 1. The scheme of the organization of interaction
Here is a solution that occurred to me, and now let's try to implement it.
I had at my disposal an Avaya PBX with a G250 gateway. This is an old gateway, long out of production. But its new replacement - the G450 / G430 gateway - also has the components we need, namely the drive for controlling the electronic door lock. A dry relay is built into this gateway for the needs of small offices - the so-called Contact Closure Adjunct (see Figure 2).

Figure 2. Avaya G430 Gateway
This connector can control the dialing of an arbitrary pre-configured telephone number. When you dial this number, the gateway closes the relay and gives a signal to open the electronic lock.
Further, I had a working stand with an IVR (Interactive Voice Response) manufactured by Avaya as well. This is a fully software service with the ability to handle not only voice requests, but also email, sms and, in this solution, it will need html requests. Also, this IVR can initiate not only email and SMS, but also voice calls. Those. in relation to this project, this IVR can receive a request via html with the transfer of variables and, based on the results of processing these variables, initiate an outgoing voice call to a certain number. Request processing in IVR can be carried out both by in-built tools and using the Java programming language. In this regard, just this IVR was used as the authorization server. In the role of an electronic lock management server, an Avaya Aura Communication Manager PBX was used with a G250 gateway. An electronic lock was also available.
Thus, the application on the mobile phone was required to obtain a beacon identifier, contact the Google Beacons Registry and receive its attachment, then in the html request to send this information and its IMEI to IVR, which, having checked it, will dial the PBX, thus giving a signal to close the Contact Closure dry relay on the G250 and thus open the door.
Well, the last step in preparing for the implementation was getting a mobile phone running the Android operating system. It was HTC Desire c Android Lollipop 5.1.1. And, of course, it was also necessary to install Android Studio on your laptop.
Everything was ready, and I started. As usual, reality dotted the “i”.
To start the beacon is required to register with Google Beacon Registry. The easiest way to do this is through the Google Beacon Tools mobile app, available in both the Google Play Market and the Apple App Store.
I turned on the beacon, removing the plastic disconnector between the microcircuit and the battery, installed Google Beacon Tools and began to search for the beacon. He did not appear. Then I downloaded the app maker iBKS Config Tool. This application is also available for both Android and IOS devices. And - lo and behold! The beacon appeared.
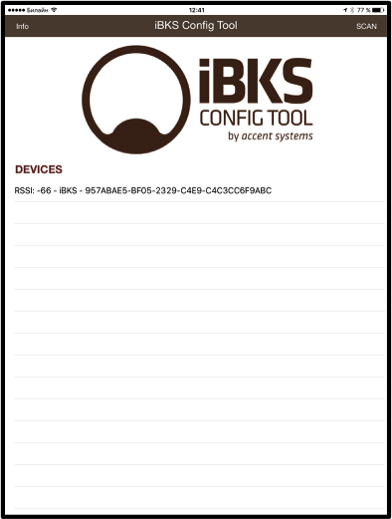
Figure 3. iBKS Config Tool
However, in Google Beacon Tools, he stubbornly did not want to appear. Having studied the Internet, I read that it is required to enter the editing mode on the iBKS Config Tool and change the type of the beacon. The application persistently refused to enter the editing mode, both on Android and iOS. It was possible to enter this mode only after the beacon was turned off and on again by removing the battery. For everything about everything was about 30 seconds, then the beacon was blocked again. I did not manage to understand whether this is a feature or a bug. It was not described anywhere. See Figure 4.

Figure 4. Edit mode of iBKS Config Tool
Having changed Advertising Mode from 1 to 7 (see Figure 5), I finally saw the beacon in Google Beacon Tools (see Figure 6). But he persistently refused to register.

Figure 5. Selecting Advertising Mode

Figure 6. Google Beacon Tools
For registration, Google Beacon Tools required the beacon to be in iBeacon or Eddystone UUID mode, but in this mode, it was hard to see it. In the Eddystone URL mode, he saw it, but refused to register. The behavior of this application on Android and IOS was the same, although on Android the application first selected the project and only then refused to register the beacon.
It was not possible to find out what caused the behavior of the beacon during the project. It seems that the beacon itself was a problem. It was worth replacing him, of course, but the project was limited in time, and there was no time for a new trip to Habr's office. From experiences with iBKS Config Tool and Google Beacon Tools, it was clear that the beacon radiates, while transmitting its unique identifier. Therefore, it was decided to identify the beacon for the demonstration stand not by the attachment received from Google Beacons Registry, but by its identifier. In general, for a prototype solution such a replacement is quite adequate.
So, it remains only to find a Java library that would allow Android Studio to organize the detection of the beacon identifier. Of course, GitHub and the Radiusnetwork.com.eddystonedemo library came to the rescue. This library allows you to see the identifier transmitted by the beacon, which is also visible through the iBKS Config Tool. The description is given here .
An Activity was organized (see Figure 7), which had a large gray button. This button after finding the beacon changed the color, name and property of Clickable. That is, until the beacon is found, nothing happens when you press the button. As soon as the beacon is found, the button turns red and allows itself to be pressed. When you click on the button, the URL is called leading to the IVR application with the transfer of IMEI, which checks it, and if successful, forms a call using the SIP protocol to the control server of the electronic lock. In case of loss of a beacon signal (increasing the distance to it or turning it off), the button changes color and the Clickable property back.
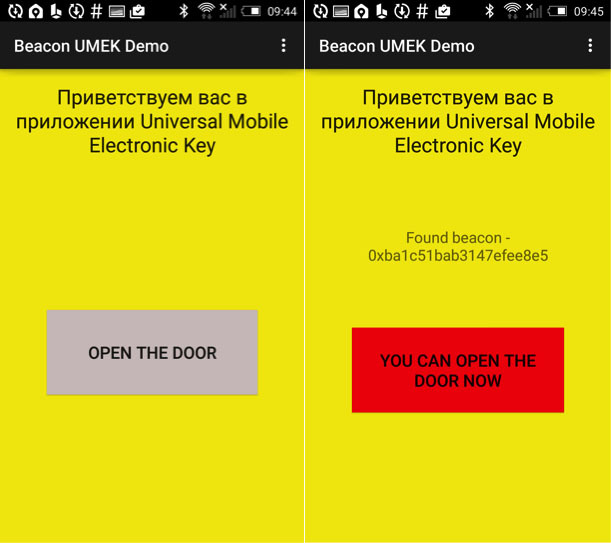
Figure 7. Screenshots of the application
Entire project can be found Github here. Let us dwell on the details. Below is the function called when the beacon is found:
Below is the function of calling the URL on the IVR:
The timer in this application is needed to turn off the button when the phone becomes unavailable 5 seconds after the loss.
Application development for IVR is carried out in a specialized Avaya Aura Orchestration Designer environment and is based on the Eclipse development environment. In fact, under each element is Java code. Building the application to simplify development is carried out in the style of Drag <&> Drop. Figure 8 shows a screenshot of the IVR application development environment screen.

Figure 8. Avaya Aura Orchestration Designer Development Environment
This application has two main modules: Data1 and Outcalling. Screenshots of these modules are shown in Figures 9 and 10.

Figure 9. Data1 Module

Figure 10. Outcalling Module
In the Data1 module, the beacon identifier and IMEI are actually authorized: if both are correct, then the transfer is made to the Outcalling module, in which an outgoing call is made to the pre-configured number stored in the variable CalledNumber. This variable sets the number configured in the ATC to trigger the dry ContactClosure relay connected to the electronic door lock.
The full project can be found here .
And finally, a video was posted on this address , in which a description of the project was given and a finished project was demonstrated. Thanks for attention!
Article author Dmitry Senashenko ( @DmitrySen ), in the framework of the competition "Device Lab from Google . "
On the market now there are many beacons and their manufacturers. And most of them are designed to determine the geolocation inside buildings. There are interesting ideas from the category of embedding beacons in suitcases to search for them at the airport at their signal. But, given the power, it looks like a toy. I wanted to invent and implement something original and useful at the same time. So, a few formalities on the site and in the office of Habr, and the iBKS beacon in my hands:
Much has been written about beacons. For example: “ Google's beacon platform. Part 1 "or" Google's beacon platform. Part 2 ". I will not repeat, but I will say that it was intended to use the beacon with Google's beacon platform and work with it using the API. Reality dotted the “i”, which I will discuss later.
')
In life, I work with telephony and intelligent IVR with support for email, html, sms, etc. Therefore, there are ready-made stands, it is easy to get the necessary equipment, etc. And it was precisely to this subject that I wanted to adapt the beacons.
Idea
So, I got the idea to use beacons as an authorization key to the doors in the office. As everyone knows, every office has doors with electronic locks and a reader at the entrance. Each employee has a key in the form of a card, and to enter the door, he needs to attach this card to the reader, after which the door will open. In the world, the number of such doors amounts to many billions, and the number of cards, probably trillions. Although in reality it is not very convenient to use them. If you are in a hurry for an important meeting, then it is very tiring to waste time trying to remove the card (or remove the object in which this card - the wallet, the folder with documents) lies.
However, every person in his pocket now has a phone. And for some - even worn on hand electronics. It is easier to meet a person who has forgotten the card than the one who has forgotten his phone. Therefore, it is more convenient and cost-effective to replace the card with a telephone and the reader with a beacon. Of course, there are some good ideas in this direction.
For example, doorknob with a fingerprint reader, NFC in the phone, etc. But NFC technology never appeared in every smartphone, but there is Bluetooth just in every smartphone. Therefore, technologically, this idea is actually ready for implementation.
In addition, this solution increases the level of employee comfort. Approaching the door, just click on the application icon, and after passing the authorization the door will open. Those. it can be opened from the elevator or on the way to the door. In addition, you can open the door with a clock or say so in the headphones with a microphone to a personal assistant. An important factor is authorization. Let's take a look at this in more detail. See Figure 1.
Schematic work
The phone enters the visibility area of the beacon, finds it using Beacon Discover, and via Nearby messages API gets its attachment from Google Beacons Registry. Further, via Wifi or mobile Internet in an encrypted session, the phone sends this attachment and its IMEI or other unique code specified when installing the application to the authorization server. The authorization server identifies the access rights and, in the event of a positive decision, commands the electronic lock management server to open the corresponding lock based on data from the attachment, which uniquely characterizes the door. The electronic lock control server instructs the actuator to open the door.
Figure 1. The scheme of the organization of interaction
Here is a solution that occurred to me, and now let's try to implement it.
Embody the idea in the gland
I had at my disposal an Avaya PBX with a G250 gateway. This is an old gateway, long out of production. But its new replacement - the G450 / G430 gateway - also has the components we need, namely the drive for controlling the electronic door lock. A dry relay is built into this gateway for the needs of small offices - the so-called Contact Closure Adjunct (see Figure 2).
Figure 2. Avaya G430 Gateway
This connector can control the dialing of an arbitrary pre-configured telephone number. When you dial this number, the gateway closes the relay and gives a signal to open the electronic lock.
Further, I had a working stand with an IVR (Interactive Voice Response) manufactured by Avaya as well. This is a fully software service with the ability to handle not only voice requests, but also email, sms and, in this solution, it will need html requests. Also, this IVR can initiate not only email and SMS, but also voice calls. Those. in relation to this project, this IVR can receive a request via html with the transfer of variables and, based on the results of processing these variables, initiate an outgoing voice call to a certain number. Request processing in IVR can be carried out both by in-built tools and using the Java programming language. In this regard, just this IVR was used as the authorization server. In the role of an electronic lock management server, an Avaya Aura Communication Manager PBX was used with a G250 gateway. An electronic lock was also available.
Thus, the application on the mobile phone was required to obtain a beacon identifier, contact the Google Beacons Registry and receive its attachment, then in the html request to send this information and its IMEI to IVR, which, having checked it, will dial the PBX, thus giving a signal to close the Contact Closure dry relay on the G250 and thus open the door.
Well, the last step in preparing for the implementation was getting a mobile phone running the Android operating system. It was HTC Desire c Android Lollipop 5.1.1. And, of course, it was also necessary to install Android Studio on your laptop.
Everything was ready, and I started. As usual, reality dotted the “i”.
Underwater rocks
To start the beacon is required to register with Google Beacon Registry. The easiest way to do this is through the Google Beacon Tools mobile app, available in both the Google Play Market and the Apple App Store.
I turned on the beacon, removing the plastic disconnector between the microcircuit and the battery, installed Google Beacon Tools and began to search for the beacon. He did not appear. Then I downloaded the app maker iBKS Config Tool. This application is also available for both Android and IOS devices. And - lo and behold! The beacon appeared.
Figure 3. iBKS Config Tool
However, in Google Beacon Tools, he stubbornly did not want to appear. Having studied the Internet, I read that it is required to enter the editing mode on the iBKS Config Tool and change the type of the beacon. The application persistently refused to enter the editing mode, both on Android and iOS. It was possible to enter this mode only after the beacon was turned off and on again by removing the battery. For everything about everything was about 30 seconds, then the beacon was blocked again. I did not manage to understand whether this is a feature or a bug. It was not described anywhere. See Figure 4.
Figure 4. Edit mode of iBKS Config Tool
Having changed Advertising Mode from 1 to 7 (see Figure 5), I finally saw the beacon in Google Beacon Tools (see Figure 6). But he persistently refused to register.
Figure 5. Selecting Advertising Mode
Figure 6. Google Beacon Tools
For registration, Google Beacon Tools required the beacon to be in iBeacon or Eddystone UUID mode, but in this mode, it was hard to see it. In the Eddystone URL mode, he saw it, but refused to register. The behavior of this application on Android and IOS was the same, although on Android the application first selected the project and only then refused to register the beacon.
It was not possible to find out what caused the behavior of the beacon during the project. It seems that the beacon itself was a problem. It was worth replacing him, of course, but the project was limited in time, and there was no time for a new trip to Habr's office. From experiences with iBKS Config Tool and Google Beacon Tools, it was clear that the beacon radiates, while transmitting its unique identifier. Therefore, it was decided to identify the beacon for the demonstration stand not by the attachment received from Google Beacons Registry, but by its identifier. In general, for a prototype solution such a replacement is quite adequate.
So, it remains only to find a Java library that would allow Android Studio to organize the detection of the beacon identifier. Of course, GitHub and the Radiusnetwork.com.eddystonedemo library came to the rescue. This library allows you to see the identifier transmitted by the beacon, which is also visible through the iBKS Config Tool. The description is given here .
An Activity was organized (see Figure 7), which had a large gray button. This button after finding the beacon changed the color, name and property of Clickable. That is, until the beacon is found, nothing happens when you press the button. As soon as the beacon is found, the button turns red and allows itself to be pressed. When you click on the button, the URL is called leading to the IVR application with the transfer of IMEI, which checks it, and if successful, forms a call using the SIP protocol to the control server of the electronic lock. In case of loss of a beacon signal (increasing the distance to it or turning it off), the button changes color and the Clickable property back.
Figure 7. Screenshots of the application
Code and final implementation
Entire project can be found Github here. Let us dwell on the details. Below is the function called when the beacon is found:
public void didRangeBeaconsInRegion(Collection<Beacon> beacons, Region region) { for (Beacon beacon: beacons) { if (beacon.getServiceUuid() == 0xfeaa && beacon.getBeaconTypeCode() == 0x00) { // This is a Eddystone-UID frame Identifier namespaceId = beacon.getId1(); Identifier instanceId = beacon.getId2(); foundBeacon = namespaceId.toString(); // . . if (foundBeacon.equals("0xba1c51bab3147efee8e5")) { Log.d("Found beacon", foundBeacon); // found = true; runOnUiThread(new Runnable() { public void run() { // , Clickable . mainButton.setText("You can open the door now"); mainButton.setBackgroundColor(0xffef0606); mainButton.setClickable(true); } }); } Log.d("RangingActivity", "I see a beacon transmitting namespace id: " + namespaceId + " and instance id: " + instanceId + " approximately " + beacon.getDistance() + " meters away."); runOnUiThread(new Runnable() { public void run() { ((TextView) RangingActivity.this.findViewById(R.id.foundbeacon)).setText("Found beacon - " + foundBeacon); } }); } } } Below is the function of calling the URL on the IVR:
public void buttonClick(View view) { // IMEI String ret = telephonyManager.getDeviceId(); Log.d("IMEI", ret); //URL IP IVR HTML OpenTheDoor IMEI webview.loadUrl("http://192.168.0.204:7080/Redirector/?AVAYAEP__LaunchId=OpenTheDoor&beacon=" + foundBeacon + "&imei=" + ret.toString()); } The timer in this application is needed to turn off the button when the phone becomes unavailable 5 seconds after the loss.
protected void onCreate(Bundle savedInstanceState) { super.onCreate(savedInstanceState); setContentView(R.layout.activity_ranging); mainButton = (Button) findViewById(R.id.mainbutton); telephonyManager = (TelephonyManager) getSystemService(Context.TELEPHONY_SERVICE); webview = (WebView)findViewById(R.id.webView); // mTimer = new Timer(); mMyTimerTask = new MyTimerTask(); mTimer.schedule(mMyTimerTask, 1000, 5000); } class MyTimerTask extends TimerTask { @Override public void run() { if (found) { found = false; } else { runOnUiThread(new Runnable() { public void run() { // mainButton.setText("Open the door"); mainButton.setBackgroundColor(0xffcfc3c3); mainButton.setClickable(false); ((TextView) RangingActivity.this.findViewById(R.id.foundbeacon)).setText(""); } }); } } } } Application development for IVR is carried out in a specialized Avaya Aura Orchestration Designer environment and is based on the Eclipse development environment. In fact, under each element is Java code. Building the application to simplify development is carried out in the style of Drag <&> Drop. Figure 8 shows a screenshot of the IVR application development environment screen.
Figure 8. Avaya Aura Orchestration Designer Development Environment
This application has two main modules: Data1 and Outcalling. Screenshots of these modules are shown in Figures 9 and 10.
Figure 9. Data1 Module
Figure 10. Outcalling Module
In the Data1 module, the beacon identifier and IMEI are actually authorized: if both are correct, then the transfer is made to the Outcalling module, in which an outgoing call is made to the pre-configured number stored in the variable CalledNumber. This variable sets the number configured in the ATC to trigger the dry ContactClosure relay connected to the electronic door lock.
The full project can be found here .
And finally, a video was posted on this address , in which a description of the project was given and a finished project was demonstrated. Thanks for attention!
Source: https://habr.com/ru/post/310506/
All Articles