Quick integration of Google Chromecast in Android app
Good afternoon, I am Android Team Lead in the Trinity Digital mobile application development company. Our company has been on the market for three years and in 2015 we entered the top 10 best developers in Moscow. Our second office is in Petrozavodsk, where I lead the Android development team. In this article I want to talk about how to quickly add to the application the ability to interact with the Google Chromecast device, namely, to send one video file for playback and control the viewing. Get the device failed due to the competition Device Lab from Google.
If you are not familiar with the Chromecast device, then you can read the review article here . Despite the fact that this article is about the first version of Chromecast, it will give an overview of the entire family of devices and the principle of their work.
The application, on the example of which I will talk about technology - “Recipes of Julia Vysotskaya”.
')

Article author Andrei Sly, in the framework of the competition "Device Lab from Google . "
This is one of our most successful projects, with about half a million users. The application is a collection of more than 1500 recipes, including in video format, which allowed me to integrate Google Chromecast into it. So, let's begin.
Let's start integrating Chromecast into our Android app. We consider the simplest case when the application has an Activity containing some video content (one video file). To do this, we use the library CastCompanionLibrary-android , which simplifies the integration of a few steps.
First, create an empty project in Android Studio and add a dependency to the file app / build.gradle.
The library uses VideoCastManager singleton for organizing interaction. First of all, we need to initialize this singleton using a configuration object. Most options are commented out in the code.
In the CastConfiguration constructor, we pass the Media Receiver ID. This ID identifies the styling of the Chromecast player. We will not dwell on it, you can read in more detail on the official page . Information about other options VideoCastManager can be found in github .
It is worth noting that for the correct operation of the control through alerts and on a locked screen. It is necessary to add in the application manifest declarations of the required Activities, Services and Receivers.
In the example offered by the developers, I did not find these ads, which is rather strange, because Without them, management from the alert area and on the locked screen will not work or will not work correctly.
The library uses the VideoCastConsumerImpl class to organize the interaction between Chromecast and the Android application. Initially, it is designed to work with the queue of video files, but since our application does not assume the presence of a queue; we will somewhat change this class.
The main methods to focus on are onApplicationConnected and onQueueLoad. As you may have noticed, the library uses MediaInfo, MediaMetadata and MediaQueueItem to work with media data. in the onApplicationConnected method, which will be called as soon as the application connects to Chromecast, we will create a queue object and call the abstract method onQueueLoad, which we will later implement in Activity. Description of the methods can be found in the comments to the code.
The next (and last) step will be the implementation of our Activity.
There is nothing complicated in our Activity, we get VideoCastManager in the onCreate method. In the onResume and onPause methods, we manage the life cycle of our connection to Chromecast. And the onCreateOptionsMenu and dispatchKeyEvent methods organize the UX part of our integration. Unfortunately, I did not understand why castManager.disconnect () threw an error, but what program does without crutches.
Now turn to design. Most of the Design Guidelines for us implements the above described library, but some items need to be implemented manually.
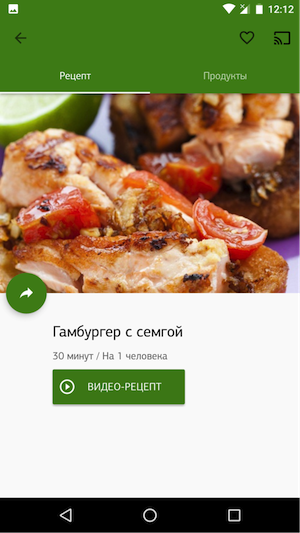
We carried out integration with Google Chromecast in the application "Recipes of Julia Vysotsky." In this application, there are video recipes and it would be nice to add the ability to show them through Chromecast.
If a video file is attached to the recipe, we allow the user to view it through an application of his choice. It looks like this:

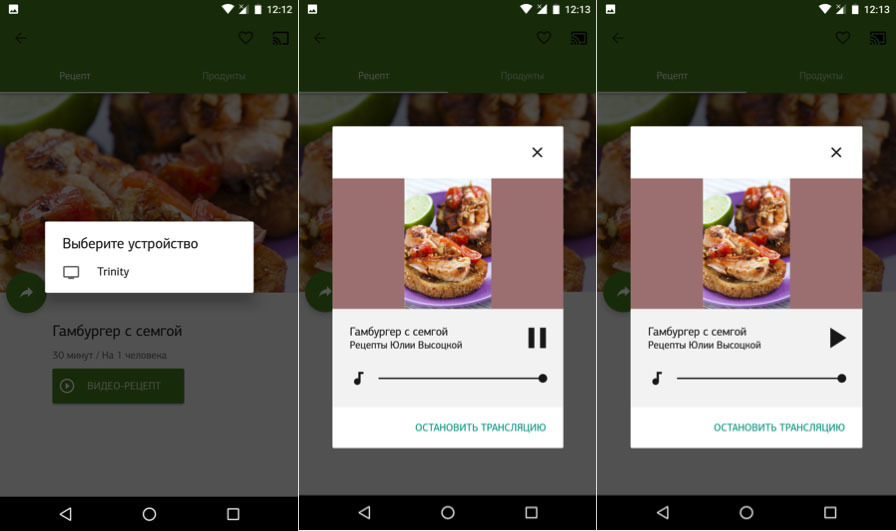
After integration with Chromecast and if there is a configured Chromecast on our network, the screen will look like this:
Now we need to show the user information that Chromecast is available for streaming and he can view the video recipe through it. We will use IntroductoryOverlay from the same library to display this information. I will not describe the parameters of this class, because they are obvious and we need to specify only the accompanying text. It looks like this:

Styling dialogs
After the user clicks on the Cast icon, in addition to displaying the video, he should be able to control playback through dialogs. This functionality is also implemented in the library we use, and all we need is to simply stylize the dialogues.
To do this, we will use the CastConfiguration.Builder and setMediaRouteDialogFactory method.
Here we have specified two styles, for the device selection dialog and for the playback control dialog.
Style parameters have talking names; you can experiment with them to achieve the best result for your application. We did it like this:
Here are some more screenshots from the application that show control from the alert area and on the locked screen:

I hope that you found the article useful, the full source code of the demo project is on github . Ask questions in the comments, in the next article I will try to collect answers to frequently asked questions and talk about Media Receivers, managing the playback queue and styling MediaReceivers. More complete information about integration with other platforms, as well as examples you can find on the official page .
More detailed code examples, including those for other platforms, can be found here . Detailed information on user interaction principles can be found in the Design Checklist .
If you are not familiar with the Chromecast device, then you can read the review article here . Despite the fact that this article is about the first version of Chromecast, it will give an overview of the entire family of devices and the principle of their work.
The application, on the example of which I will talk about technology - “Recipes of Julia Vysotskaya”.
')
Article author Andrei Sly, in the framework of the competition "Device Lab from Google . "
This is one of our most successful projects, with about half a million users. The application is a collection of more than 1500 recipes, including in video format, which allowed me to integrate Google Chromecast into it. So, let's begin.
The first steps
Let's start integrating Chromecast into our Android app. We consider the simplest case when the application has an Activity containing some video content (one video file). To do this, we use the library CastCompanionLibrary-android , which simplifies the integration of a few steps.
First, create an empty project in Android Studio and add a dependency to the file app / build.gradle.
dependencies { compile 'com.google.android.libraries.cast.companionlibrary:ccl:2.8.4' } The library uses VideoCastManager singleton for organizing interaction. First of all, we need to initialize this singleton using a configuration object. Most options are commented out in the code.
// Core.java public class Core extends Application { @Override public void onCreate() { super.onCreate(); CastConfiguration options = new CastConfiguration.Builder("CC1AD845") .enableAutoReconnect() // .enableDebug() // , .enableLockScreen() // .enableNotification() // + .addNotificationAction(CastConfiguration.NOTIFICATION_ACTION_REWIND, false) .addNotificationAction(CastConfiguration.NOTIFICATION_ACTION_PLAY_PAUSE, true) .addNotificationAction(CastConfiguration.NOTIFICATION_ACTION_DISCONNECT, true) .enableWifiReconnection() // , wifi .setForwardStep(10) // .build(); VideoCastManager.initialize(this, options); } } In the CastConfiguration constructor, we pass the Media Receiver ID. This ID identifies the styling of the Chromecast player. We will not dwell on it, you can read in more detail on the official page . Information about other options VideoCastManager can be found in github .
Change application manifest
It is worth noting that for the correct operation of the control through alerts and on a locked screen. It is necessary to add in the application manifest declarations of the required Activities, Services and Receivers.
In the example offered by the developers, I did not find these ads, which is rather strange, because Without them, management from the alert area and on the locked screen will not work or will not work correctly.
<receiver android:name="com.google.android.libraries.cast.companionlibrary.remotecontrol.VideoIntentReceiver" > <intent-filter> <action android:name="android.media.AUDIO_BECOMING_NOISY" /> <action android:name="android.intent.action.MEDIA_BUTTON" /> <action android:name="com.google.android.libraries.cast.companionlibrary.action.toggleplayback" /> <action android:name="com.google.android.libraries.cast.companionlibrary.action.stop" /> </intent-filter> </receiver> <service android:name="com.google.android.libraries.cast.companionlibrary.notification.VideoCastNotificationService" android:exported="false" > <intent-filter> <action android:name="com.google.android.libraries.cast.companionlibrary.action.toggleplayback" /> <action android:name="com.google.android.libraries.cast.companionlibrary.action.stop" /> <action android:name="com.google.android.libraries.cast.companionlibrary.action.notificationvisibility" /> </intent-filter> </service> <service android:name="com.google.android.libraries.cast.companionlibrary.cast.reconnection.ReconnectionService"/> <activity android:name="com.google.android.libraries.cast.companionlibrary.cast.player.VideoCastControllerActivity"/> Play single file
The library uses the VideoCastConsumerImpl class to organize the interaction between Chromecast and the Android application. Initially, it is designed to work with the queue of video files, but since our application does not assume the presence of a queue; we will somewhat change this class.
// SingleVideoCastConsumer.java public abstract class SingleVideoCastConsumer extends VideoCastConsumerImpl { private AppCompatActivity activity; private final String videoUrl; private final String title; private final String subtitle; private final String imageUrl; private final String contentType; public SingleVideoCastConsumer(AppCompatActivity activity, String videoUrl, String title, String subtitle, String imageUrl, String contentType) { this.activity = activity; this.videoUrl = videoUrl; this.title = title; this.subtitle = subtitle; this.imageUrl = imageUrl; this.contentType = contentType; } public abstract void onPlaybackFinished(); public abstract void onQueueLoad(final MediaQueueItem[] items, final int startIndex, final int repeatMode, final JSONObject customData) throws TransientNetworkDisconnectionException, NoConnectionException; @Override public void onMediaQueueUpdated(List<MediaQueueItem>queueItems, MediaQueueItem item, int repeatMode, boolean shuffle) { // , if(queueItems != null && queueItems.size() == 0) { onPlaybackFinished(); } } @Override public void onApplicationConnected(ApplicationMetadata appMetadata, String sessionId, boolean wasLaunched) { // Cast activity.invalidateOptionsMenu(); // MediaMetadata movieMetadata = new MediaMetadata(MediaMetadata.MEDIA_TYPE_MOVIE); // movieMetadata.putString(MediaMetadata.KEY_TITLE, title); // movieMetadata.putString(MediaMetadata.KEY_SUBTITLE, subtitle); // , movieMetadata.addImage(new WebImage(Uri.parse(imageUrl))); // MediaInfo info = new MediaInfo.Builder(videoUrl) .setStreamType(MediaInfo.STREAM_TYPE_BUFFERED) .setContentType(contentType) .setMetadata(movieMetadata) .build(); // MediaQueueItem item = new MediaQueueItem.Builder(info).build(); try { // Chromecast, 1 , .. 1 onQueueLoad(new MediaQueueItem[]{item}, 0, MediaStatus.REPEAT_MODE_REPEAT_OFF, null); } catch (TransientNetworkDisconnectionException e) { e.printStackTrace(); } catch (NoConnectionException e) { e.printStackTrace(); } } @Override public void onDisconnected() { // Cast activity.invalidateOptionsMenu(); } } The main methods to focus on are onApplicationConnected and onQueueLoad. As you may have noticed, the library uses MediaInfo, MediaMetadata and MediaQueueItem to work with media data. in the onApplicationConnected method, which will be called as soon as the application connects to Chromecast, we will create a queue object and call the abstract method onQueueLoad, which we will later implement in Activity. Description of the methods can be found in the comments to the code.
Use in Activity
The next (and last) step will be the implementation of our Activity.
ublic class MainActivity extends AppCompatActivity { private VideoCastManager castManager; private VideoCastConsumer castConsumer; private Toolbar toolbar; @Override protected void onCreate(Bundle savedInstanceState) { super.onCreate(savedInstanceState); setContentView(R.layout.activity_main); toolbar = (Toolbar) findViewById(R.id.toolbar); setSupportActionBar(toolbar); castManager = VideoCastManager.getInstance(); castConsumer = new SingleVideoCastConsumer(this, http://example.com/somemkvfile.mkv", // "Jet Packs Was Yes", "Periphery", // "http://fugostudios.com/wp-content/uploads/2012/02/periphery720p-600x338.jpg", // "video/mkv" // ) { @Override public void onPlaybackFinished() { // disconnectDevice(); } @Override public void onQueueLoad(MediaQueueItem[] items, int startIndex, int repeatMode, JSONObject customData) throws TransientNetworkDisconnectionException, NoConnectionException { // SingleVideoCastConsumer castManager castManager.queueLoad(items, startIndex, repeatMode, customData); } }; } @Override public boolean onCreateOptionsMenu(Menu menu) { getMenuInflater().inflate(R.menu.main, menu); // Cast toolbar castManager.addMediaRouterButton(menu, R.id.media_route_menu_item); return true; } @Override public boolean dispatchKeyEvent(@NonNull KeyEvent event) { // // return castManager.onDispatchVolumeKeyEvent(event, 0.05) || super.dispatchKeyEvent(event); } @Override protected void onResume() { // castConsumer if (castManager != null) { castManager.addVideoCastConsumer(castConsumer); castManager.incrementUiCounter(); } super.onResume(); } @Override protected void onPause() { // castConsumer castManager.decrementUiCounter(); castManager.removeVideoCastConsumer(castConsumer); super.onPause(); } // // , 100-500 , // . private void disconnectDevice() { new Handler().postDelayed(new Runnable() { @Override public void run() { castManager.disconnect(); } },500); } } There is nothing complicated in our Activity, we get VideoCastManager in the onCreate method. In the onResume and onPause methods, we manage the life cycle of our connection to Chromecast. And the onCreateOptionsMenu and dispatchKeyEvent methods organize the UX part of our integration. Unfortunately, I did not understand why castManager.disconnect () threw an error, but what program does without crutches.
Design Checklist
Now turn to design. Most of the Design Guidelines for us implements the above described library, but some items need to be implemented manually.
- Styling dialogs
- Intro display for user
We carried out integration with Google Chromecast in the application "Recipes of Julia Vysotsky." In this application, there are video recipes and it would be nice to add the ability to show them through Chromecast.
If a video file is attached to the recipe, we allow the user to view it through an application of his choice. It looks like this:
After integration with Chromecast and if there is a configured Chromecast on our network, the screen will look like this:
Intro showing to user
Now we need to show the user information that Chromecast is available for streaming and he can view the video recipe through it. We will use IntroductoryOverlay from the same library to display this information. I will not describe the parameters of this class, because they are obvious and we need to specify only the accompanying text. It looks like this:
Styling dialogs
After the user clicks on the Cast icon, in addition to displaying the video, he should be able to control playback through dialogs. This functionality is also implemented in the library we use, and all we need is to simply stylize the dialogues.
To do this, we will use the CastConfiguration.Builder and setMediaRouteDialogFactory method.
options.setMediaRouteDialogFactory(new MediaRouteDialogFactory() { @NonNull @Override public MediaRouteChooserDialogFragment onCreateChooserDialogFragment() { return new MediaRouteChooserDialogFragment() { @Override public MediaRouteChooserDialog onCreateChooserDialog(Context context, Bundle savedInstanceState) { return new MediaRouteChooserDialog(context, R.style.Theme_MediaRouter_Light); } }; } @NonNull @Override public MediaRouteControllerDialogFragment onCreateControllerDialogFragment() { return new MediaRouteControllerDialogFragment(){ @Override public MediaRouteControllerDialog onCreateControllerDialog(Context context, Bundle savedInstanceState) { return new MediaRouteControllerDialog(context, R.style.Theme_MediaRouter_Light); } }; } }) Here we have specified two styles, for the device selection dialog and for the playback control dialog.
<style name="Theme.MediaRouter.Light" parent="Base.Theme.AppCompat.Light.Dialog.Alert"> <item name="android:windowNoTitle">false</item> <item name="mediaRouteButtonStyle">@style/Widget.MediaRouter.Light.MediaRouteButton</item> <item name="MediaRouteControllerWindowBackground">@drawable/mr_dialog_material_background_light</item> <item name="mediaRouteOffDrawable">@drawable/ic_cast_off_light</item> <item name="mediaRouteConnectingDrawable">@drawable/mr_ic_media_route_connecting_mono_light</item> <item name="mediaRouteOnDrawable">@drawable/ic_cast_on_light</item> <item name="mediaRouteCloseDrawable">@drawable/mr_ic_close_light</item> <item name="mediaRoutePlayDrawable">@drawable/mr_ic_play_light</item> <item name="mediaRoutePauseDrawable">@drawable/mr_ic_pause_light</item> <item name="mediaRouteCastDrawable">@drawable/mr_ic_cast_light</item> <item name="mediaRouteAudioTrackDrawable">@drawable/mr_ic_audiotrack_light</item> <item name="mediaRouteDefaultIconDrawable">@drawable/ic_cast_grey</item> <item name="mediaRouteBluetoothIconDrawable">@drawable/ic_bluetooth_grey</item> <item name="mediaRouteTvIconDrawable">@drawable/ic_tv_light</item> <item name="mediaRouteSpeakerIconDrawable">@drawable/ic_speaker_light</item> <item name="mediaRouteSpeakerGroupIconDrawable">@drawable/ic_speaker_group_light</item> <item name="mediaRouteChooserPrimaryTextStyle">@style/Widget.MediaRouter.ChooserText.Primary.Light</item> <item name="mediaRouteChooserSecondaryTextStyle">@style/Widget.MediaRouter.ChooserText.Secondary.Light</item> <item name="mediaRouteControllerTitleTextStyle">@style/Widget.MediaRouter.ControllerText.Title.Dark</item> <item name="mediaRouteControllerPrimaryTextStyle">@style/Widget.MediaRouter.ControllerText.Primary.Light</item> <item name="mediaRouteControllerSecondaryTextStyle">@style/Widget.MediaRouter.ControllerText.Secondary.Light</item> </style> Style parameters have talking names; you can experiment with them to achieve the best result for your application. We did it like this:
Here are some more screenshots from the application that show control from the alert area and on the locked screen:
I hope that you found the article useful, the full source code of the demo project is on github . Ask questions in the comments, in the next article I will try to collect answers to frequently asked questions and talk about Media Receivers, managing the playback queue and styling MediaReceivers. More complete information about integration with other platforms, as well as examples you can find on the official page .
More detailed code examples, including those for other platforms, can be found here . Detailed information on user interaction principles can be found in the Design Checklist .
Source: https://habr.com/ru/post/310498/
All Articles