First steps in Java: how to start developing without installing anything
After many years, I thought, how would I develop my first Java program if I started today?

Acquaintance with Java was at the university and with memories of this throws into a cold sweat. In addition to the new unfamiliar language, I had to install some JDK, then an IDE, then create the first project and manually add libraries to it. Do it by analogy with ready-made programs and catch unknown java.lang.ClassNotFoundException and java.lang.NoSuchMethodException and similar horror. When I knew how to work only in the Windows operating system and access to the Internet was via modem via a telephone line.
I hope it will be interesting to those who take the first steps in java and those who remember jdk 1.4. Let's try online IDE Eclipse Che.
')
I will make a reservation about the main condition - now you should have a stable access to the Internet . And of course, after reading the article, you won’t get a job as a Java architect in New York for $ 180,000 a year, and you won’t even learn Java in 21 days. Simply develop your Hello world in a modern environment with a few lines of code, but with a web server .
Eclipse Che open source software - a new generation of IDE for collaborative software development. We are not so accustomed to "old men", but it allows us to develop with only a modern browser locally and stable access to the network. Che server can be running on the local network. For a quick start, we do not even need to install anything !!!
Follow the Eclipse Che link. There it is possible to create a free account on codenvy.com. You can register it to your email, or use OAuth providers: Github, Google or Microsoft online.
On the server side, a Docker container is automatically created with the development environment already configured. With the help of the agent in the container, the IDE is connected to it in javascript from your browser.
When you create a regular Ubuntu build from a “Java” template in a container, this means that you can install the packages you need to work. The “Eclipse Che” template is based on Alipine - the minimalist linux build under Docker and you don’t have that kind of freedom.

So what am I talking about? If you do not know what it is, as long as you don’t even have to worry about it. Everything works and so “out of the box”, even in the first step, it will seem like magic! Over time, if you want to understand all this is quite simple.
Create a new “Workspace” from the “Java” template. You’ll have to watch a cartoon with a construction crane while you create your development space.
Oracle JDK 8u45 and Maven 3.3.9 will be available in your development environment. Likewise, it’s easy to start a project-based development with Github.
The de facto standard in the Java world is Maven, and probably the best support in different IDEs. Gradle is a younger project and he deserves the right to be your # 1 choice. But when Java developers go to work, the likelihood of meeting Maven is much higher, especially on legacy projects. In addition, he is also trying to get young and get away from the XML format due to the Polyglot project. Atom, Groovy, Clojure, Ruby, Scala, YAML - as the basis for writing an assembly file. There is a story like the programming language in the JVM. Despite the existence of Groovy, Scala, JRuby, Jython, Clojure, all their power and brevity, the Java language is very much alive. And do not even compare Java with the leader - the programming language is alive and slowly, but evolving.
The default console-java-simple project will offer us our favorite Hello World.
I suggest a little complicate our first step and add Apache Camel to the project. Sources and receivers of data and all the complexity of working with technologies are hidden behind the Url syntax within its components and we will not dive deep.
Eclipse Che created a project template for us, which we will now edit and create our web application.
Apache Camel is an open source integration framework and we only need it for a simple Hello World. Add its libraries to pom.xml dependency on the camel core and the jetty component of the web server.
In order to compile the lambda add to the same file:
After that, edit the file /console-java-simple/src/main/java/org/eclipse/che/examples/HelloWorld.java at the same time feel how this online IDE works.
Let's start the project with a team from the terminal
Or edit the launch configuration “on click” in the IDE.
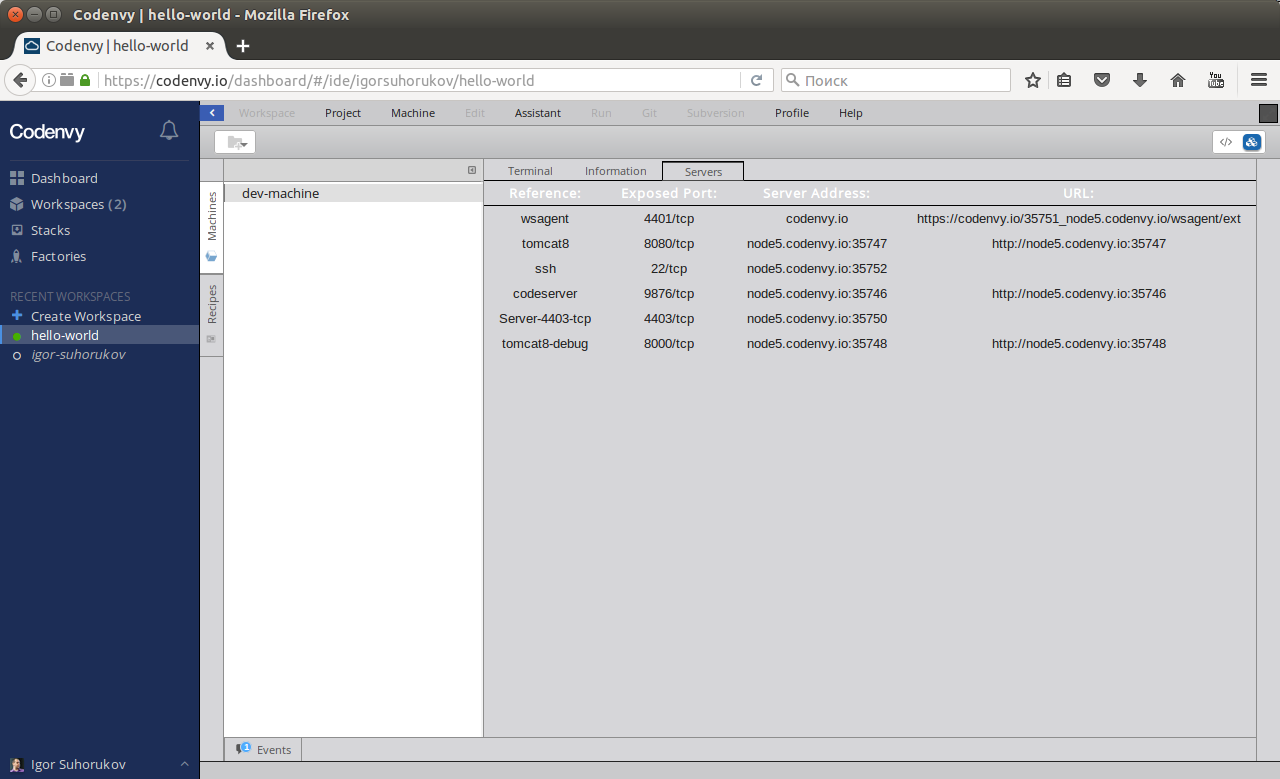
You can connect to our web application from the outside world at the address from the “Server Address” column for the “tomcat8” line. How to do this can be viewed in the video below:
The result of our program:

This example creates Apache Camel and its data processing path. The route begins with the jetty web server, which listens to http requests on port 8080. When we receive a request, we create a response using the process (exchange -> {exchange.getIn (). SetBody ("Hello World");}) line .
Screencast of the process of writing java code (without sound and mate) in Che and running the Hello World program:
Enough internet access and a browser in 2016 to learn how to develop in Java. There is no need to solve 1000 and 1 problems with installing and configuring the IDE and the environment to start learning to program.
And do not believe the courses that you will learn to program in Java for 21 days and the like marketing. To learn zen development in Java takes years. Study, study and study again!
Acquaintance with Java was at the university and with memories of this throws into a cold sweat. In addition to the new unfamiliar language, I had to install some JDK, then an IDE, then create the first project and manually add libraries to it. Do it by analogy with ready-made programs and catch unknown java.lang.ClassNotFoundException and java.lang.NoSuchMethodException and similar horror. When I knew how to work only in the Windows operating system and access to the Internet was via modem via a telephone line.
I hope it will be interesting to those who take the first steps in java and those who remember jdk 1.4. Let's try online IDE Eclipse Che.
')
I will make a reservation about the main condition - now you should have a stable access to the Internet . And of course, after reading the article, you won’t get a job as a Java architect in New York for $ 180,000 a year, and you won’t even learn Java in 21 days. Simply develop your Hello world in a modern environment with a few lines of code, but with a web server .
Cloud IDE and development in Docker container
Eclipse Che open source software - a new generation of IDE for collaborative software development. We are not so accustomed to "old men", but it allows us to develop with only a modern browser locally and stable access to the network. Che server can be running on the local network. For a quick start, we do not even need to install anything !!!
Follow the Eclipse Che link. There it is possible to create a free account on codenvy.com. You can register it to your email, or use OAuth providers: Github, Google or Microsoft online.
On the server side, a Docker container is automatically created with the development environment already configured. With the help of the agent in the container, the IDE is connected to it in javascript from your browser.
When you create a regular Ubuntu build from a “Java” template in a container, this means that you can install the packages you need to work. The “Eclipse Che” template is based on Alipine - the minimalist linux build under Docker and you don’t have that kind of freedom.
So what am I talking about? If you do not know what it is, as long as you don’t even have to worry about it. Everything works and so “out of the box”, even in the first step, it will seem like magic! Over time, if you want to understand all this is quite simple.
Create a new “Workspace” from the “Java” template. You’ll have to watch a cartoon with a construction crane while you create your development space.
Oracle JDK 8u45 and Maven 3.3.9 will be available in your development environment. Likewise, it’s easy to start a project-based development with Github.
We are preparing the environment for the project ...
Dependency management system and build
The de facto standard in the Java world is Maven, and probably the best support in different IDEs. Gradle is a younger project and he deserves the right to be your # 1 choice. But when Java developers go to work, the likelihood of meeting Maven is much higher, especially on legacy projects. In addition, he is also trying to get young and get away from the XML format due to the Polyglot project. Atom, Groovy, Clojure, Ruby, Scala, YAML - as the basis for writing an assembly file. There is a story like the programming language in the JVM. Despite the existence of Groovy, Scala, JRuby, Jython, Clojure, all their power and brevity, the Java language is very much alive. And do not even compare Java with the leader - the programming language is alive and slowly, but evolving.
The default console-java-simple project will offer us our favorite Hello World.
I suggest a little complicate our first step and add Apache Camel to the project. Sources and receivers of data and all the complexity of working with technologies are hidden behind the Url syntax within its components and we will not dive deep.
The magic of "camel"
Eclipse Che created a project template for us, which we will now edit and create our web application.
Apache Camel is an open source integration framework and we only need it for a simple Hello World. Add its libraries to pom.xml dependency on the camel core and the jetty component of the web server.
<dependency> <groupId>org.apache.camel</groupId> <artifactId>camel-core</artifactId> <version>2.18.0</version> </dependency> <dependency> <groupId>org.apache.camel</groupId> <artifactId>camel-jetty</artifactId> <version>2.18.0</version> </dependency> In order to compile the lambda add to the same file:
<properties> <maven.compiler.source>1.8</maven.compiler.source> <maven.compiler.target>1.8</maven.compiler.target> </properties> After that, edit the file /console-java-simple/src/main/java/org/eclipse/che/examples/HelloWorld.java at the same time feel how this online IDE works.
package org.eclipse.che.examples; import org.apache.camel.builder.RouteBuilder; import org.apache.camel.main.Main; public class HelloWorld { public static void main(String[] argvs) throws Exception { Main main = new Main(); main.addRouteBuilder(new RouteBuilder() { @Override public void configure() throws Exception { from("jetty:http://0.0.0.0:8080") .process(exchange -> {exchange.getIn().setBody("Hello World");}); } }); main.run(argvs); } } In order to be able to run the example with the command mvn clean install exec: java must be added to pom.xml exec-maven-plugin
<build> <plugins> <plugin> <groupId>org.codehaus.mojo</groupId> <artifactId>exec-maven-plugin</artifactId> <version>1.5.0</version> <executions> <execution> <goals><goal>java</goal></goals> </execution> </executions> <configuration> <mainClass>org.eclipse.che.examples.HelloWorld</mainClass> </configuration> </plugin> </plugins> </build> Let's start the project with a team from the terminal
mvn clean install exec:java Or edit the launch configuration “on click” in the IDE.
You can connect to our web application from the outside world at the address from the “Server Address” column for the “tomcat8” line. How to do this can be viewed in the video below:
The result of our program:
This example creates Apache Camel and its data processing path. The route begins with the jetty web server, which listens to http requests on port 8080. When we receive a request, we create a response using the process (exchange -> {exchange.getIn (). SetBody ("Hello World");}) line .
Screencast of the process of writing java code (without sound and mate) in Che and running the Hello World program:
What's next?
Enough internet access and a browser in 2016 to learn how to develop in Java. There is no need to solve 1000 and 1 problems with installing and configuring the IDE and the environment to start learning to program.
And do not believe the courses that you will learn to program in Java for 21 days and the like marketing. To learn zen development in Java takes years. Study, study and study again!
Source: https://habr.com/ru/post/310438/
All Articles