Your blog on vibe-d, part 1: a simple web application using encryption
Good day, Habr! If you have long wanted to make a website for yourself, a neighbor or her dog, but have not done it yet, then this article is for you! In this series of articles, I will show the basics of working with vibe to create websites on the example of a simple blog.
In the first part, we will analyze the basic moments and add encryption to the resulting application.
0. Let's start from the beginning.
- install dmd
- set the dub
- create a project that uses vibe with the following commands
mkdir yourblognamecd yourblognamedub init -t vibe.d
then go to the dub questions about the application being created. Most fields will have default values, but I advise you to choose the sdl format, since it is more readable and simpler than json, and the possibilities are the same.
1. Simple web application
So, we already have a stock from Ludwig and we need to expand it. The first thing we will do is create our application class and add a couple of pages.
import vibe.d; shared static this() { auto settings = new HTTPServerSettings; settings.port = 8080; settings.bindAddresses = ["::1", "127.0.0.1"]; auto router = new URLRouter; // router.registerWebInterface(new MyBlog); // router.rebuild(); // =) listenHTTP(settings, router); // } class MyBlog { @path("/") void getHome(scope HTTPServerRequest req, scope HTTPServerResponse res) { res.writeBody("Hello, World! <a href='/page2'>go to page2</a>", "text/html; charset=UTF-8"); } void getPage2(scope HTTPServerRequest req, scope HTTPServerResponse res) { res.writeBody("Page2 <a href='/'>go to index</a>", "text/html; charset=UTF-8"); } } As you can see, the getHome method has a UDA @path("/") , which indicates that this is the root page. UDA - user defined attributes - the attributes declared by the user. In fact, these are any objects of the language: enums, structures, simple data types. Using the essence that has the UDA, we can check the presence of the attribute, its value , as well as get all the fields and methods in the class / structure marked with some UDA. vibe, in this case, uses this to build the routing code. The getPage2 method uses the naming convention and will work on the get request on the path http://127.0.0.1:8080/page2 . @property methods will behave in the same way. Now the methods of their signature does not differ from the hello function in the template and we write the body of the pages by hand. Not comme il faut, add views to the views folder and immediately mind.
Create several files:
Template for all pages of the site
doctype html html head // head block head // title , head title #{title} body header // div, '<div class="mrow">' .mrow // views/header.dt include header main .mrow // main block main footer .mrow // views/footer.dt include footer Comment indents must match the indentation of blocks. Comments fall into the resulting html if you do not want to use // - (with a minus sign).
There will be a site header
div There will be a basement site
div , The main page, the first line we indicate which template we want to expand (without the path, because in the same folder and without the .dt extension)
extends layout block head // , // , D , - auto title = ""; block main // - html, div a(href="/page2") The second page is similar to the main
extends layout block head - auto title = " "; block main div 2 a(href="/") And correct the code of our blog
class MyBlog { @path("/") void getHome() { render!("index.dt"); } void getPage2() { render!("page2.dt"); } } It has become more concise, we do not need to directly write the response body now. Add style!
* { margin: 0; padding: 0; } body { font-family: sans-serif; font-size: 13px; text-align: center; width: 100%; } .mrow { margin: 0 auto; width: 1170px; text-align: left; } header { height: 60px; width: 100%; background: #e2e2e2; border-top: none; border-right: none; border-left: none; border-bottom: 1px solid; border-radius: 0; border-color: #aaa; margin-bottom: 20px; font-size: 24px; } header div { padding-top: 10px; } main { margin-top: 10px; } footer { height: 60px; width: 100%; background: #333; color: #bbb; position: absolute; margin-top: 20px; padding: 0; bottom: inherit; border-top: 2px solid #888; } footer div { padding-top: 10px; } It is necessary to enable the distribution of static files in our application.
shared static this() { ... router.get("*", serveStaticFiles("public/")); ... } And finally, add a style to the head of our layout.dt
... html head link(rel="stylesheet", href="style.css") ... After assembly and launch should look something like this:

Not really, but I hope that the eyes do not fall out and it will be more pleasant to work with it)
2. Secure
We have some kind of basis, now it's time to think about further development. And before adding any functionality, we will take care of security: we will add encryption. About creating certificates you can find a lot of information, for example . Here are the main steps without a description:
Root key
openssl genrsa -out rootCA.key 2048
Root certificate
openssl req -x509 -new -key rootCA.key -days 9999 -out rootCA.crt
Answers to questions are not important, we will make our browser trust him)
Another key
openssl genrsa -out server.key 2048
Certificate request (it is important to specify the domain name)
openssl req -new -key server.key -out server.csr
Sign a new certificate
openssl x509 -req -in server.csr -CA rootCA.crt -CAkey rootCA.key -CAcreateserial -out server.crt -days 9998rootCA.crt to the browser rootCA.crt , rootCA.key kept secret.
Now enable encryption in our application.
shared static this() { ... settings.tlsContext = createTLSContext(TLSContextKind.server); settings.tlsContext.useCertificateChainFile("server.crt"); settings.tlsContext.usePrivateKeyFile("server.key"); ... } Now, if you did everything correctly, the site will no longer be accessible via http and will become accessible without questions about https .
3. The simplest authorization
To begin, create a session in our application.
shared static this() { ... settings.sessionStore = new MemorySessionStore; ... } Add some code. Outside of our class there will be a session variable type.
struct UserSettings { bool loggedIn = false; string email; } For inseparable perception, it would probably be better to show the whole new class.
class MyBlog { mixin PrivateAccessProxy; private SessionVar!(UserSettings, "settings") userSettings; // // _error @path("/") void getHome(string _error) { auto error = _error; auto settings = userSettings; render!("index.dt", settings, error); } /+ @errorDisplay , msg getHome, _error, @auth , , , , auth, , , , , email +/ @auth @errorDisplay!getHome void getWritepost(string _email) { auto email = _email; render!("writepost.dt", email); } // ValidEmail string, @errorDisplay!getHome void postLogin(ValidEmail email, string pass) { enforce(pass == "secret", " "); // userSettings = UserSettings(true, email); // redirect("./"); } void postLogout(scope HTTPServerResponse res) { userSettings = UserSettings.init; res.terminateSession(); redirect("./"); } private: /+ ensureAuth, ensureAuth _email +/ enum auth = before!ensureAuth("_email"); /+ , , email +/ string ensureAuth(scope HTTPServerRequest req, scope HTTPServerResponse res) { if (!userSettings.loggedIn) redirect("/"); return userSettings.email; } } All public class methods are ensureAuth , so ensureAuth created as private . At the same time, the vibe needs to know about this method to call it before the methods marked with @auth , so you need to use the mixin PrivateAccessProxy . The @auth attribute is created using the before template, acting as a hook, calls the specified function before the one marked and passes the result of the hook function as an argument. There is also an @after that will force the function to execute after and requires the hook function to accept the result flagged as an argument. Unfortunately, I did not find the documentation on the vibe site, but there is documentation on these points in the code. We also renamed (deleted) the method page2. In its place stood getWritepost, which will return the page to create a new post.
You should also slightly modify the remaining files.
Insert a block into
views/layout.dt, which will contain ablock errordisplay (it will be inserted into the layout from other files)In
views/index.dtadd an error display block, it may look like this... block error - if (error.length) div#error #{error} ...As you most likely understood, the code on D should follow the '-' sign, and
#{value}escapes and inserts the value variable in html.Create a
views/logindesk.dtfile where to add a form for a logindiv form#loginform(action="/login", method="POST") div input(class="form-control",name="email",placeholder="Email",type="email",required) div input(class="form-control",name="pass",placeholder="",type="password",required) div button(type="submit")It is necessary to carefully treat the indents, they work as in python (and here the formatting sometimes eats spaces).
In the file
views/index.dtchange the main block... block main - if (!settings.loggedIn) include logindesk - else divThe variables
settingsanderrorare passed to the template by the functionrender!("index.dt", settings, error);in thegetHomemethod. Each presentation template takes its own set of variables.- In the
views/writepost.dtwrite a form that so far will not do anything
extends layout block head - auto title = " "; block main div #{email} form#postform(action="/posts", method="POST") div input(class="from-control", name="title") div textarea(class="form-contorl", name="text") div button(type="submit") - Create a link to "New Post" and "Home" on your own.
- Make out the styles of all this at your own discretion (I'll post my code in the final form at the end)
Now we have a site where you can log in and there is a page on the site (writepost) that you cannot go to if you are not logged in.
4. Simplest blog entries
The article turned out to be quite voluminous, but I want to bring it to some logical comma)
Add a record of new articles in the usual class field, and the field type will be an array of structures
struct Post { string author; string title; string text; } Add this array to our class, pass it in parameters to the render function of the getHome method, and add a method that writes these posts to the array.
class MyBlog { ... public: Post[] posts; @path("/") void getHome(string _error) { ... render!("index.dt", posts, settings, error); } ... // getWritepost @auth @errorDisplay!getWritepost void postPosts(string title, string text, string _email) { posts ~= Post(_email, title, text); redirect("./"); } ... } Be careful - the names of the parameters of the methods must coincide with the names of the form fields! It remains a major change that will allow us to see the posts. In the file views/index.dt replace the entry "Content" to the code
... - if (!settings.loggedIn) include logindesk - else - foreach(post; posts) div.post div.title #{post.title} div.text #{post.text} div.author #{post.author} By this time you should have already created an application in which there is:
- the simplest form of authorization
- traffic encryption
- authorization check
- add and display posts
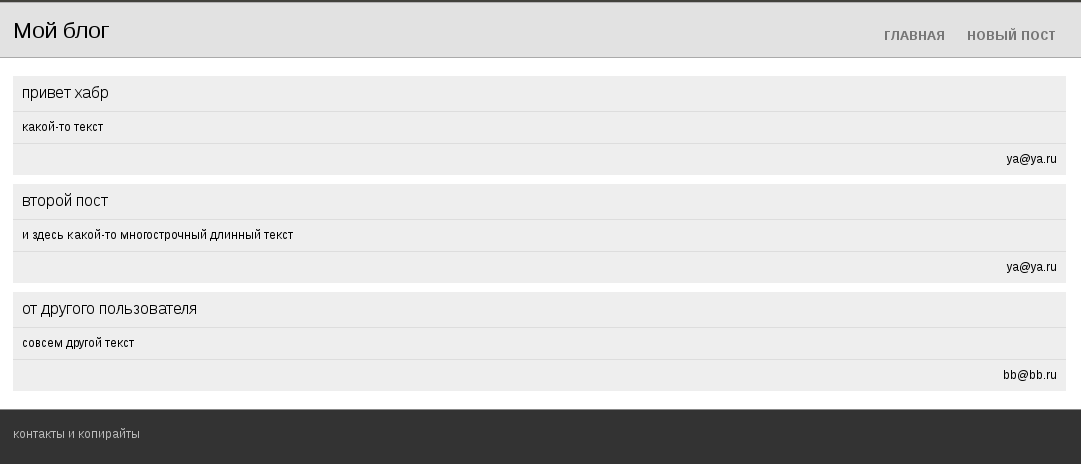
I did this:
The source of this part is here .
In the following parts, I will tell you how to use mongo, make pages for posts (url will contain an index or name of the post) and commenting, show more adequate authorization and some more trivia.
Write in the comments that it was not completely clear, I will be glad to modify this part.
')
Source: https://habr.com/ru/post/310436/
All Articles