We raise Owncloud from scratch with dynamic IP and Let's Encrypt. A thousand elephants! *

I have long wanted to write a holistic tutorial on raising Owncloud in a home server or a small company with up to 500 users. Owncloud is a great open-source project that allows you to raise your version of the synchronization server on your own infrastructure. By capabilities it is very similar to Dropbox, and in some ways it is superior. A huge plus is the lack of storage restrictions, full control over the server. The disadvantages are also obvious: you yourself will have to monitor all this disgrace and worry about the reliability of the server, lying on the mezzanine or in the closet.
Most recently, I turned up the task of deploying Owncloud in home-combat conditions. I honestly worked my two liters of kosher Russian imperial stout and decided to share my experience, putting everything together. So today we look at:
')
- Deploying the current LEMP stack
- Https. Let's Encrypt for Nginx with automatic certificate renewal
- Configuring Nginx for Owncloud
- Php-apcu caching
- Connecting external main storage via NFS
Starter kit
The operating system for our server is Ubuntu 04/16/1 Server ( torrent ). The best option is a virtual machine. This is quite a good solution due to the ease of migration, the ability to dynamically allocate resources, snapshots and other goodies. The size of the virtual machine is 10-15 GB. This is more than enough under the system.
External storage (data directory for owncloud), where all your data will be stored. Size - depending on your needs. I would recommend to consider the option of 100 GB. Separating storage and server core logic provides more configuration flexibility. In this case, SSD for the system and HDD from the NAS for data. When an external data partition is connected, there is flexibility in terms of migration and the ability to increase speed or volume, if it is suddenly needed.
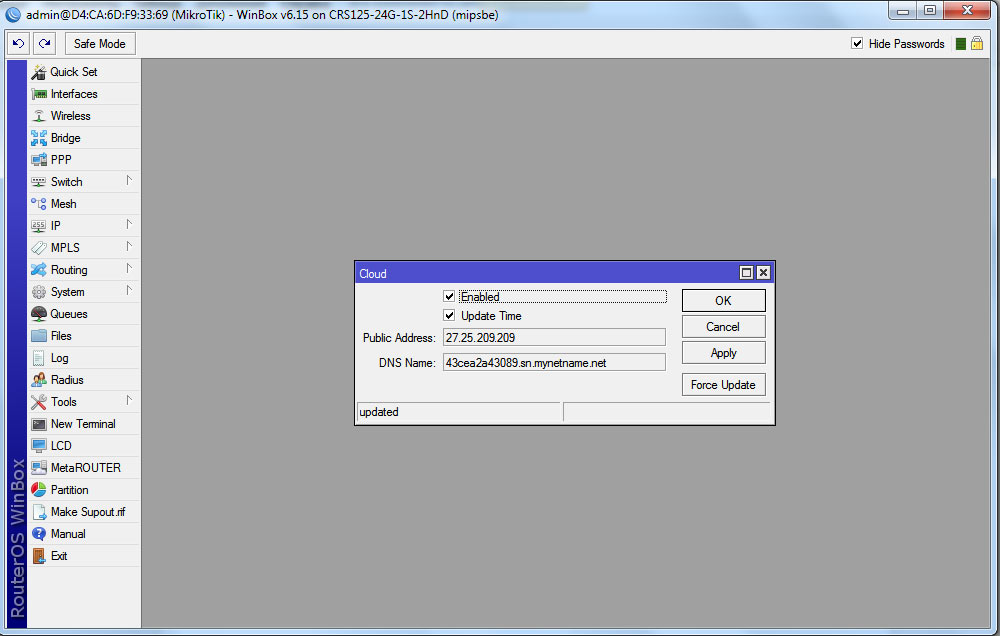
Domain and external ip-address - in the conditions of a dying pool of free ipv4 addresses, providers less and less often give up just white external address. If you have a gray address, then there is little that can be done. Only forward the VPN tunnel to your VPS with a white IP and dance from there. But sometimes providers give completely white addresses, but not statics, but dynamics. Moreover, the address can be changed simply at the behest of the left heel, the session breaks at midnight, and the subscriber receives a new IP. The current case is a router MikroTik, which is able to free dynamic DNS, starting with RouterOS v6.14. This joy is in the IP / Cloud section. After connecting the function, the router receives a domain name of the form 123456b7890f.sn.mynetname.net . This domain always points to the ipv4 address issued by the provider.
Domain give 4th level. Normal StartSSL and other certification centers will not work with you if you do not own Level 2. Previously, this led to the use of a self-signed certificate, which the browser cursed. Now let's appear Encrypt, which solves the problem.
There are alternatives that are well described in the publication Home hosting sites with dynamic IP user spectreob .
Deploy LEMP
It’s probably worth starting with installing the most familiar utilities for work: htop, iotop, iftop, mc. Then we proceed to LEMP itself — Linux, Nginx (pronounced Engine X), MySQL / MariaDB, and PHP. We already have Linux. Why Ubuntu 16.04, and not, say, Debian or CentOS? I do not like rpm, and with Ubuntu it is easier in terms of repositories with fresh versions of software. I really do not like the practice of "make install" on combat servers. Nevertheless, the way of using the package manager is more optimal. We will adhere to this principle.
UPD First, do the usual sudo apt install nginx, so that after updating to a fresh repository, all configs remain in their usual places.
Add a repository with more recent versions of nginx. There were closed some bugs and vulnerabilities. Copy GPG key Nginx developers and create a new source repository for apt:
wget http://nginx.org/keys/nginx_signing.key sudo apt-key add nginx_signing.key sudo nano /etc/apt/sources.list.d/nginx.list We add links to the repository for Ubuntu 16.04 Xenial to the file:
deb http://nginx.org/packages/mainline/ubuntu/ xenial nginx
deb-src http://nginx.org/packages/mainline/ubuntu/ xenial nginx
Install nginx, configure later:
sudo apt-get update sudo apt-get install nginx Deploy MariDB (actual fork of MySQL) and check service performance:
sudo apt-get install mariadb-server mariadb-client sudo systemctl status mysql.service We perform a hardening procedure, disabling test bases and other potential security holes:
sudo mysql_secure_installation A dialogue will be launched in which you will have to answer a series of questions. In the same dialog, we set the password for root . You will need it later when we create the base for our owncloud.
Install PHP7.0, php-fpm and the modules required for owncloud to work with related services:
sudo apt-get install php7.0 php7.0-mysql php7.0-fpm php7.0-gd php7.0-json php7.0-curl php7.0-zip php7.0-xml php7.0-mbstring Also, for Owncloud to work, you need to edit the environment variables:
sudo nano /etc/php/7.0/fpm/pool.d/www.conf You need to uncomment the following lines:
env[HOSTNAME] = $HOSTNAME env[PATH] = /usr/local/bin:/usr/bin:/bin env[TMP] = /tmp env[TMPDIR] = /tmp env[TEMP] = /tmp Configure Let's Encrypt and configure Nginx

Let's Encrypt is a nonprofit initiative that provides a free, automated, and open certification authority. For which many thanks to them. Probably, certification centers that trade, in fact, their reputation, will now be forced to make the most of the high-end certificates from the Organization Validation (OV) or Extended Validation (EV) certificates. This type of certificate is available only to legal entities and confirms the existence of a conditional LLC “Horns and Hooves”. This checks the ownership of the domain, the company itself, notarized documents and other nuances.
For personal use, the Domain Validation certificate from Let's Encrypt will be enough for us. This option essentially only certifies the fact that you are connected to the example.com domain. And at the same time protects us from Man-in-the-Middle attacks, injection of all sorts of rubbish on the landing page (say hello to MosMetro Wi-Fi and mobile operators) and interception of passwords when using public networks. Ideal for your own owncloud. Why not use a self-signed certificate?

Owncloud has a great share link function that allows you to transfer a link to a file or directory to a person. It is very convenient when you suddenly need to transfer something weighing 50 GB, and the more familiar Dropbox and Google Drive do not allow this. You definitely do not want to explain to the accountant Olympiad Sigmundovna why her browser is glowing red and screaming that
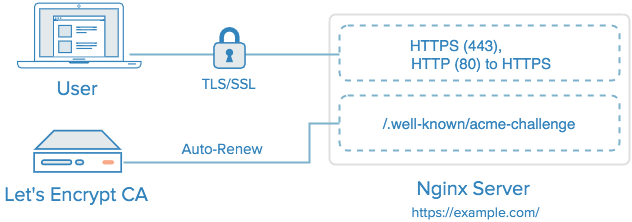
The main idea of Let's Encrypt is automatically issuing certificates with a short validity period of 90 days. According to the authors of the project, it will increase security due to the automatic removal from circulation of compromised certificates. For domain validation, the service offers certbot-auto with several scenarios:
- Apache - automatically obtains and installs a certificate for Apache 2.4. Uses port 443
- Nginx - automatically receives and installs a certificate for Nginx. Alpha version , for production early. Uses port 443
- webroot - creates in the root directory of the current server the files necessary for domain validation. Uses port 80
- standalone - raises a standalone server that responds to necessary requests from outside for validation. Uses port 80 or 443. For systems that do not have a valid web server and other cases.
- manual - full manual mode, requiring manual copy-paste. It is used when you generate keys not on the target machine. For example, for a router.
As a result, we have a good universal set for different use cases, including situations when you do not have full control on the server. We will not use the automatic installation of the certificate in Nginx because of its alpha status, and editing the working web server config is an extremely intimate process. I really do not want to face the curve of the work is not debugged script. Nevertheless, we automate the process of obtaining a certificate.
First, let's download and install the latest version of certbot:
cd /usr/local/sbin sudo wget https://dl.eff.org/certbot-auto sudo chmod a+x /usr/local/sbin/certbot-auto We edit the nginx config and allow access to the directory to which the webroot version of the certbot will write:
sudo nano /etc/nginx/sites-available/default Add the lines:
location ~ /.well-known { allow all; } Restart the nginx service:
sudo service nginx restart Now you can run certbot and generate certificates for our domain. In our particular case, this is the fourth level domain from Mikrotik DDNS. No one else is valid for browsers certificates you will not sign even for the third. UPD : I was wrong with the default webroot path. In Ubuntu 16.04, not / usr / share / nginx / html, but / var / www / html. Just in case, check what is written in / etc / nginx / sites-available / default after the root directive. For example root / var / www / html;
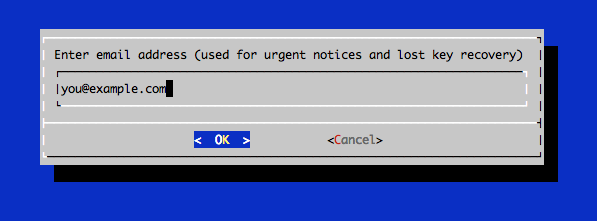
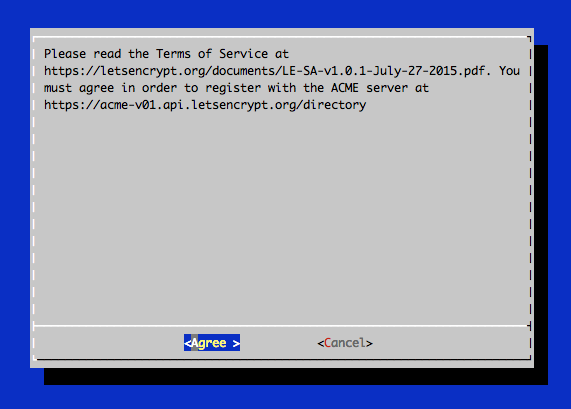
sudo certbot-auto certonly -a webroot --webroot-path=/var/www/html -d example.sn.mynetname.net In the dialog box, you will need to enter an email address and agree to the terms of use:
Certbot adds the current versions of certificates to the / etc / letsencrypt / live / directory, creating symlinks. Inside there will be files:
- cert.pem: certificate of your domain
- chain.pem: chain certificate Let's Encrypt
- fullchain.pem: combined certificate from cert.pem and chain.pem
- privkey.pem: private key of your certificate
Generating the Diffie - Hellman key:
sudo openssl dhparam -out /etc/ssl/certs/dhparam.pem 4096 Fine. Now, having written a link to / etc / letsencrypt / live / in the Nginx config, we will always have the current version. Create a new config for our domain:
sudo nano /etc/nginx/sites-available/example.sn.mynetname.net The configuration file was rewritten in the light of comments, a special thank you to grozaman . Now at the cost of abandoning support for Windows XP and some outdated systems, we have increased the level of security. The Diffie - Hellman key has also been increased to 4096. This will slightly increase the time of the handshake, but should not be significant. However, you can use 2048 bits. Added ssl_stapling and a number of additional headers to increase security.

With this configuration option, the site dials A + at https://www.ssllabs.com .
Also with this config we get A-grade at https://securityheaders.io .
Corrected config
upstream php-handler { #server 127.0.0.1:9000; server unix:/run/php/php7.0-fpm.sock; } server { listen 80; server_name meklon.net; # HTTPS . return 301 https://$server_name$request_uri; } server { # HTTPS listen 443 ssl; server_name meklon.net; # index index.php index.html index.htm index.nginx-debian.html; # error_log /var/log/nginx/cloud.error.log; access_log /var/log/nginx/cloud.access.log; ### SSL CONFIGURATION ### ssl on; ssl_certificate /etc/letsencrypt/live/meklon.net/fullchain.pem; ssl_certificate_key /etc/letsencrypt/live/meklon.net/privkey.pem; ssl_trusted_certificate /etc/letsencrypt/live/meklon.net/fullchain.pem; ssl_dhparam /etc/ssl/certs/dh4096.pem; ssl_protocols TLSv1 TLSv1.1 TLSv1.2; ssl_prefer_server_ciphers on; ssl_ciphers "EECDH+AESGCM:EECDH+CHACHA20:EECDH+AES256:!AES128"; ssl_stapling on; ssl_stapling_verify on; resolver 8.8.4.4 8.8.8.8; ### SSL ### # , , HSTS add_header Strict-Transport-Security 'max-age=631138519; includeSubDomains; preload' always; add_header Content-Security-Policy "default-src 'self'; script-src 'self' 'unsafe-eval'; style-src 'self' 'unsafe-inline'; img-src 'self' blob data:"; add_header X-Content-Security-Policy "default-src 'self'; script-src 'self' 'unsafe-eval'; style-src 'self' 'unsafe-inline'; img-src 'self' blob data:"; add_header X-WebKit-CSP "default-src 'self'; script-src 'self' 'unsafe-eval'; style-src 'self' 'unsafe-inline'; img-src 'self' blob data:"; add_header X-Frame-Options "SAMEORIGIN" always; add_header X-Xss-Protection "1; mode=block" always; add_header X-Content-Type-Options "nosniff" always; add_header X-Proxy-Cache "EXPIRED" always; # Nextcloud add_header X-Robots-Tag "none" always; add_header X-Download-Options "noopen" always; add_header X-Permitted-Cross-Domain-Policies "none" always; # root /var/www/; # , client_max_body_size 3G; fastcgi_buffers 64 4K; # C gzip Nextcloud, gzip off; # 403 404. error_page 403 /core/templates/403.php; error_page 404 /core/templates/404.php; ### / ### ### URL ### rewrite ^/.well-known/carddav /remote.php/carddav/ permanent; rewrite ^/.well-known/caldav /remote.php/caldav/ permanent; # Add index.php to the list if you are using PHP index index.html index.htm index.nginx-debian.html; location ~ /.well-known { allow all; } location / { # First attempt to serve request as file, then # as directory, then fall back to displaying a 404. try_files $uri $uri/ =404; } location = /robots.txt { allow all; log_not_found off; access_log off; } location ~ ^/(?:\.htaccess|data|config|db_structure\.xml|README){ deny all; } location ~ ^/(build|tests|config|lib|3rdparty|templates|data)/ { deny all; } location ~ ^/(?:\.|autotest|occ|issue|indie|db_|console) { deny all; } location ~ \.php(?:$|/) { fastcgi_split_path_info ^(.+\.php)(/.+)$; include fastcgi_params; fastcgi_param SCRIPT_FILENAME $document_root$fastcgi_script_name; fastcgi_param PATH_INFO $fastcgi_path_info; fastcgi_param HTTPS on; fastcgi_param modHeadersAvailable true; #Avoid sending the security headers twice fastcgi_pass php-handler; fastcgi_intercept_errors on; } } old nginx config
upstream php-handler { #server 127.0.0.1:9000; server unix:/run/php/php7.0-fpm.sock; } #Redirect from 80 to 443 server { listen 80; server_name example.sn.mynetname.net; return 301 https://$host$request_uri; } # HTTPS server { listen 443 ssl; server_name example.sn.mynetname.net; ssl_certificate /etc/letsencrypt/live/example.sn.mynetname.net/fullchain.pem; ssl_certificate_key /etc/letsencrypt/live/example.sn.mynetname.net/privkey.pem; ssl_protocols TLSv1 TLSv1.1 TLSv1.2; ssl_prefer_server_ciphers on; ssl_dhparam /etc/ssl/certs/dhparam.pem; ssl_ciphers 'ECDHE-RSA-AES128-GCM-SHA256:ECDHE-ECDSA-AES128-GCM-SHA256:ECDHE-RSA-AES256-GCM-SHA384:ECDHE-ECDSA-AES256-GCM-SHA384:DHE-RSA-AES128-GCM-SHA256:DHE-DSS-AES128-GCM-SHA256:kEDH+AESGCM:ECDHE-RSA-AES128-SHA256:ECDHE-ECDSA-AES128-SHA256:ECDHE-RSA-AES128-SHA:ECDHE-ECDSA-AES128-SHA:ECDHE-RSA-AES256-SHA384:ECDHE-ECDSA-AES256-SHA384:ECDHE-RSA-AES256-SHA:ECDHE-ECDSA-AES256-SHA:DHE-RSA-AES128-SHA256:DHE-RSA-AES128-SHA:DHE-DSS-AES128-SHA256:DHE-RSA-AES256-SHA256:DHE-DSS-AES256-SHA:DHE-RSA-AES256-SHA:AES128-GCM-SHA256:AES256-GCM-SHA384:AES128-SHA256:AES256-SHA256:AES128-SHA:AES256-SHA:AES:CAMELLIA:DES-CBC3-SHA:!aNULL:!eNULL:!EXPORT:!DES:!RC4:!MD5:!PSK:!aECDH:!EDH-DSS-DES-CBC3-SHA:!EDH-RSA-DES-CBC3-SHA:!KRB5-DES-CBC3-SHA'; ssl_session_timeout 1d; ssl_session_cache shared:SSL:50m; ssl_stapling on; ssl_stapling_verify on; add_header Strict-Transport-Security max-age=15552001; add_header Cache-Control "public, max-age=7200"; # Add headers to serve security related headers add_header X-Content-Type-Options nosniff; add_header X-Frame-Options "SAMEORIGIN"; add_header X-XSS-Protection "1; mode=block"; add_header X-Robots-Tag none; add_header "X-Download-Options" "noopen"; add_header "X-Permitted-Cross-Domain-Policies" "none"; root /var/www/; rewrite ^/.well-known/carddav /remote.php/carddav/ permanent; rewrite ^/.well-known/caldav /remote.php/caldav/ permanent; # Add index.php to the list if you are using PHP index index.html index.htm index.nginx-debian.html; location ~ /.well-known { allow all; } location / { # First attempt to serve request as file, then # as directory, then fall back to displaying a 404. try_files $uri $uri/ =404; } location = /robots.txt { allow all; log_not_found off; access_log off; } location ~ ^/(?:\.htaccess|data|config|db_structure\.xml|README){ deny all; } location ~ ^/(build|tests|config|lib|3rdparty|templates|data)/ { deny all; } location ~ ^/(?:\.|autotest|occ|issue|indie|db_|console) { deny all; } location ~ \.php(?:$|/) { fastcgi_split_path_info ^(.+\.php)(/.+)$; include fastcgi_params; fastcgi_param SCRIPT_FILENAME $document_root$fastcgi_script_name; fastcgi_param PATH_INFO $fastcgi_path_info; fastcgi_param HTTPS on; fastcgi_param modHeadersAvailable true; #Avoid sending the security headers twice fastcgi_pass php-handler; fastcgi_intercept_errors on; } } Of course, if you need compatibility with older versions of Java, Windows XP, and the like, you will need to resolve some potentially unsafe protocols.
Automating certificate renewal
We check the renewal of the certificate with the key --dry-run, which simulates the update, but does not change anything in reality:
sudo certbot-auto renew --dry-run When you run this command, certbot will contact the EFF servers and try to update its version, if possible, and then the certificates. And not only on all available domains. Very comfortably. If the period for changing the certificate did not fit, then nothing will happen, and the script will inform about it.
------------------------------------------------------------------------------- Processing /etc/letsencrypt/renewal/example.sn.mynetname.net.conf ------------------------------------------------------------------------------- Cert not yet due for renewal The following certs are not due for renewal yet: /etc/letsencrypt/live/example.sn.mynetname.net/fullchain.pem (skipped) No renewals were attempted. Now you can add a regular run of the crontab script:
sudo crontab -e Inside we add the regular task of renewing certificates and reloading them in nginx:
30 2 * * 1 /usr/local/sbin/certbot-auto renew >> /var/log/le-renew.log 35 2 * * 1 /etc/init.d/nginx reload We activate our site:
sudo ln -s /etc/nginx/sites-available/418402b5554f.sn.mynetname.net /etc/nginx/sites-enabled/ Install owncloud

There are several options, but most preferred in most cases is to install from the repository. Let the package manager have a headache about the updates. The main thing is not to forget to make a backup before rolling in new packages. Sometimes there are unpleasant surprises. First you need to add a GPG-key:
wget -nv https://download.owncloud.org/download/repositories/stable/Ubuntu_16.04/Release.key -O Release.key sudo apt-key add - < Release.key After that, add the repository and install the package owncloud-files. The usual owncloud package will also attract Apache, depending on its dependencies, but we do not need it.
sudo sh -c "echo 'deb http://download.owncloud.org/download/repositories/stable/Ubuntu_16.04/ /' > /etc/apt/sources.list.d/owncloud.list" sudo apt-get update sudo apt-get install owncloud-files As a result, in / var / www / owncloud you will have everything you need. Since Nginx considers the root directory / var / www, access to the service will look like this: example.com/owncloud
Customize MariaDB
Since our installation is small, we will not go into the subtleties of optimization. Therefore, we deploy with a more or less default config. Username and password substitute those that will use owncloud to access its database.
sudo mysql -uroot -p create database owncloud; create user username@localhost identified by 'password'; grant all privileges on owncloud.* to username@localhost identified by 'password'; flush privileges; exit; We connect external storage
As I said before, it seems to me a good idea to share a virtual machine with the very logic of the service and storage, where synchronized data will fall. Here you can do as you please. You can do nothing, and then the default storage will be / var / www / owncloud / data. You can do as I do and create the directory / mnt / data, where the external volume will be mounted via fstab. This may be SSD / HDD, it may lie locally, or it may be located on NAS-storage in the same local network. Do not forget to just test the speed of the resulting hybrid. This is a potential bottleneck . In my home version, this is a samba server on the host machine, someone might prefer NFS.
Additional convenience of such a hybrid design - ease of moving to faster or more capacious options, if necessary. It is enough to stop the services and upload all the files from the old / mnt / data to the new connected volume, then change the mount point to fstab and restart the service again. Suddenly you decide to transfer data from the old HDD to SSD RAID?
Caching
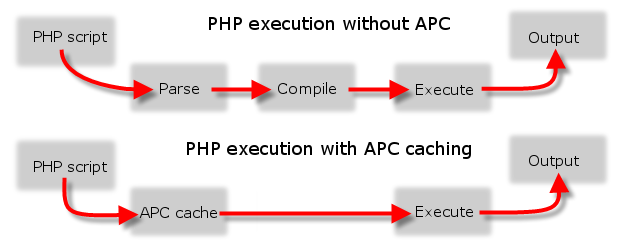
An important point. Without memory caching, owncloud can work significantly more thoughtfully. And he will certainly remind you of this on the admin page. The choice of caching method depends on the system architecture. With recommendations from the developers you can find here . In short, for personal use and small installations it is recommended to use only APCu . For small organizations, when installed on a single server - APCu for local caching and Redis for file locking . For installation on a cluster in a large organization: Redis for everything except local caching .
Developers consider APCu the fastest option for a local cache. If there is enough RAM, it is better to use APCu for local caching and Redis for file locking. If there is not enough memory, then it is recommended to use Redis for both.
In our variant we will use only APCu . Install the appropriate module for php:
sudo apt-get install php-apcu Now it will be enough just to add them to the owncloud configuration file - config.php :
'memcache.local' => '\OC\Memcache\APCu', The first launch of our brainchild

Reboot the machine just in case to restart all services. Go to example.com/owncloud and carefully
* Thousand Elephants
Terry Pratchett, Moving Pictures
But Sustain no longer listened. He pointed to a few planks leaning against the wall.
- What it is? - he asked.
“And this is my idea,” Zilberkit said. “We thought it would be a manifestation of ... er, business sense,” he clearly relished these words as an unusual but exquisite delicacy, “telling people about new moving pictures that we produce here.”
Sustain picked up one of the planks and, holding it in his outstretched hand, examined it with a critical eye. It read:
On the next week we will
"PELIAS AND MELISANDRA"
Raman Trogy in 2 parts
Thanks for attention
“Yeah," he said, without any expression.
- Is it bad? - Zilberkit uttered dumbly. - Well, it is, because there is everything that the viewers need to know.
“Resolve,” said Doubt, taking a piece of chalk from Zilberkit’s table.
For some time he scratched something on the back of the board, and then allowed me to read what was written:
GODS AND PEOPLE SAID THIS THAT NEVER BE BUT BUT THEY HAVE NOTHING ANYTHING HEARED
"PELIAS AND MELISANDRA",
Hysteria of the Forbidden Lupvi
Passion Pabradit Prasranstvo and Time!
You will be stoned
With the participation of 1000 slans!
Victor and Zilberkit read the text with cautious attention. So learn the lunch menu in a foreign language. And the language really was a stranger. But what is the worst, in appearance he was the same, dear.
“Well, I don’t know ...” Zilberkit said carefully. - As a matter of fact ... What is so forbidden there ... Uh ... Everything is based on a real story, only the names are changed. I thought that the picture would be useful, so to speak, to the younger generation. Heroes, if you please, never met - that's what the tragedy is. All this, uh ... very, very sad. - He looked at the tablet. - Although, on the other hand, there is undoubtedly something in this. Uh ... - He was obviously worried about something. “But I really don’t remember any elephants.” - His voice sounded extremely guilty. - On the day of the clicks, I was at work all day, but I don’t remember thousands of elephants at all, although I would have noticed them.
Sustable bore him unblinking gaze. Where the elephants came from, he didn’t know himself, but every new mental effort gave him another, very definite idea of how to produce paintings. A thousand elephants - for starters, this is not bad at all.
Thanks to all who read this sheet to the end. I wanted to describe all the details as fully as possible, so that I would not have to rummage through various, often contradictory sources. I do not exclude that I could have made typos or inaccuracies somewhere, although I checked everything twice. I would be very grateful to be stuck in the error.
UPD
As I correctly pointed out - you need to go to Nextcloud, where all the developers have fled. I missed this moment due to the fact that I have been sitting on this system for quite a long time.
UPD2
The grozaman user contacted me and pointed out some non-optimal nginx settings related to encryption strength and other nuances. A good additional manual can be found here: Setting up Nextcloud based on NGINX
UPD3
I have already been told several times that certbot / letsencrypt is in repositories and there is no point in dragging it separately. For Ubuntu, this is:
sudo apt-get install letsencrypt UPD4
Fixed the error with the default webroot and finalized the configuration file.
Source: https://habr.com/ru/post/310144/
All Articles