How to stop being afraid and fall in love with mbed [Part 3]
We continue a series of publications devoted to the use of the ARM mbed environment for creating a prototype measuring device.
Today we connect the sensor.

')
Content of the publication cycle:
The third part under the cut.
The previous article ended with a description of the project, which was created in mbed IDE and implements the output of the seconds counter on the Riverdi TFT display.
Today we connect the sensor of temperature and relative humidity of the HYT series. The sensor is a complete digital node - it contains a capacitive sensing element for measuring humidity, a temperature sensor, and a signal processing circuit; in addition, like most similar sensors, the HYT is factory calibrated. All this means one thing - to use the sensor, it is enough to connect it to the controlling controller and learn the protocol by which the sensor is interrogated.
The format of the packages and an example of the implementation of the corresponding functions in C are described in detail in this article . Now I will try not to duplicate much of what has already been said and will focus on the issues of using the HYT-271 * sensor in the mbed project.
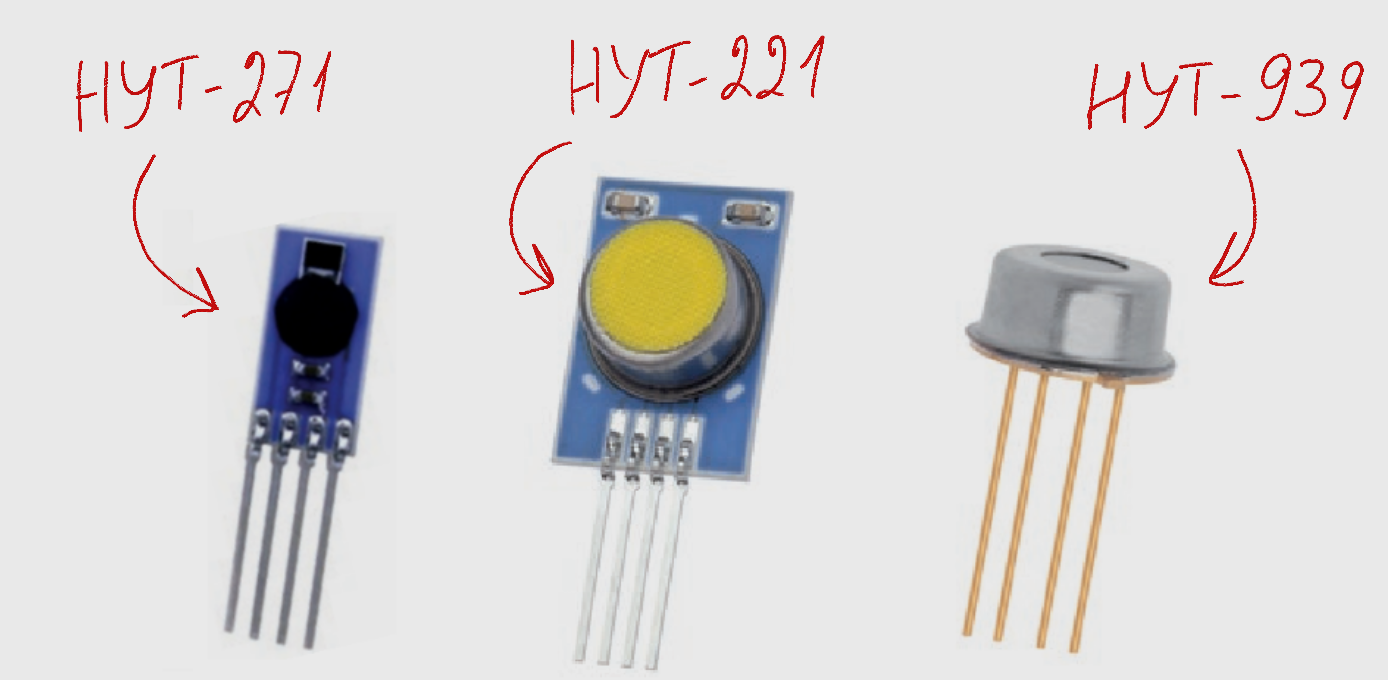
* HYT series consists of three models - HYT-271, HYT-221 and HYT-939. They differ only in the case, so everything that I am writing about switching on the HYT-271 is also relevant for other models.
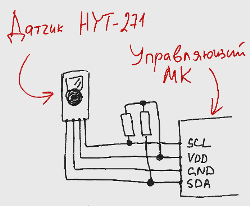
To connect sensors of the HYT series, I2C interface is usually used (sensors with SPI are available on request). Accordingly, to connect the sensor, you need four lines:
The recommended pull-up resistors for SDA and SLC lines are 2.4 kΩ.
HYT series sensors support several types of commands. For direct polling of the sensor, use the Measuring Request and Data Fetch commands, and the remaining instructions will be needed only if it is necessary to change the standard address of the sensor on the I2C bus.
At once I will say that in the mbed-library HYT there are no functions for changing the I2C-address. The reasons for this are my natural laziness and the lack of a direct need, because in most cases a single sensor hangs on the bus and for work it is sufficient to implement the polling and measurement procedures.
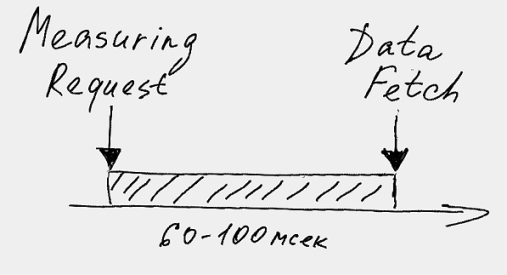
So, on receipt of the Measuring Request command, the HYT sensor goes out of sleep mode, takes measurements and generates a package with data on temperature and humidity. To receive data, a Data Fetch command must be sent to the sensor, and there should be a delay of 100 ms between the transmission of these two commands, since it is exactly the time it takes for the sensor to measure and form the package.
Measuring Request is a packet consisting only of a header byte — the address of the sensor and the record flag. The corresponding function MRCommand () sends an empty packet to I2C.
The Data Fetch command is a header byte with a read flag and four bytes of data that the controller receives from the sensor.
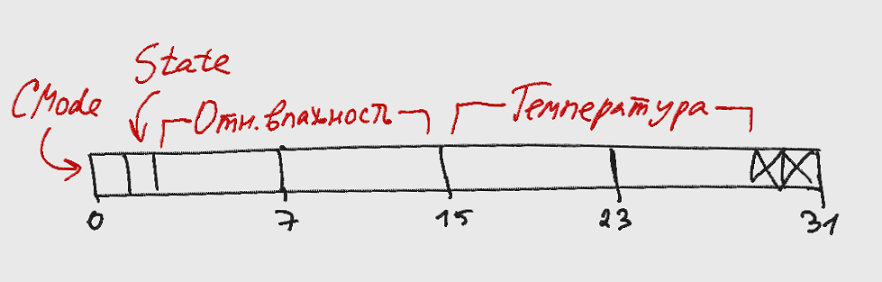
The first bit of the first byte is the service CMode bit. If it is set to "1", then the sensor is in a special mode of operation in which you can change its address on the bus.
The second bit of the first byte is the service Stale bit. If it is set to “1”, then after performing the next measurement cycle, the same temperature and humidity values are obtained as in the previous cycle.
The next 14 digits encode the relative humidity, the next 14 digits encode temperature. Next come two insignificant bits.
The corresponding function DFCommand () transfers the corresponding packet to I2C and decodes the data received from the sensor. The values of relative humidity and temperature are calculated by the following formulas:
Thus, the HYT sensor polling library should implement two functions — MRCommand () and DFCommand ().
Let me remind you that mbed supports various ARM platforms and paired devices (components) - displays, drives, sensors, transceivers, and so on.
Naturally, only the microcontroller manufacturer can provide support for the new debug board, but with the support of new peripheral components, everything is more interesting. A couple of months ago, any user could add any device and the Add new component button hung above the list of supported components. Now ARM changes the policy: any registered user can publish a library and a description for a new component, but in order to add my driver to the list of supported components, extended rights are required (I now have these, hee-hee-hee).
All mbed-libraries for peripheral devices are C ++ classes that contain the necessary functions for working with the device. As a rule, the constructor of such a class accepts as arguments the I / O lines to which the component is connected. If the device requires some initialization procedure, then it is also logical to include this procedure in the class constructor. An example of a library containing an initialization procedure is the FT800 graphics controller library, which was described in detail in a previous article .
In the case of the HYT sensor, everything is much simpler: sensor initialization is not required, and only two functions are needed to obtain measurement results.
HYT.h file
HYT.cpp file
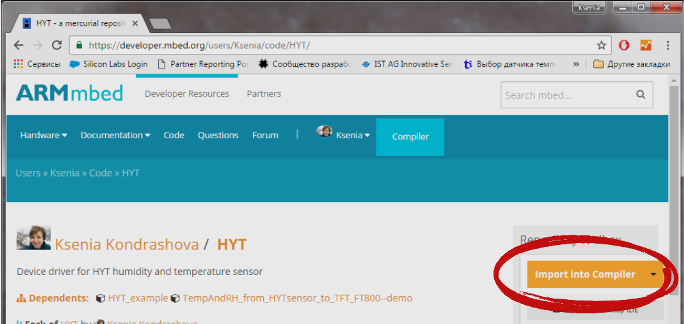
To use the library in your own project, just follow the link to the page with its description and import the library into your online compiler.
When publishing the mbed library for a new component, it is assumed not only to create and properly document the code. In addition, it is desirable to provide the library with a description of the hardware module, a typical device enablement scheme and the Hello World program - a simple example of using the library. To create such an example, I again use the blank project from the first article in this publication cycle .
We connect the HYT library to the draft project and make some simple changes:
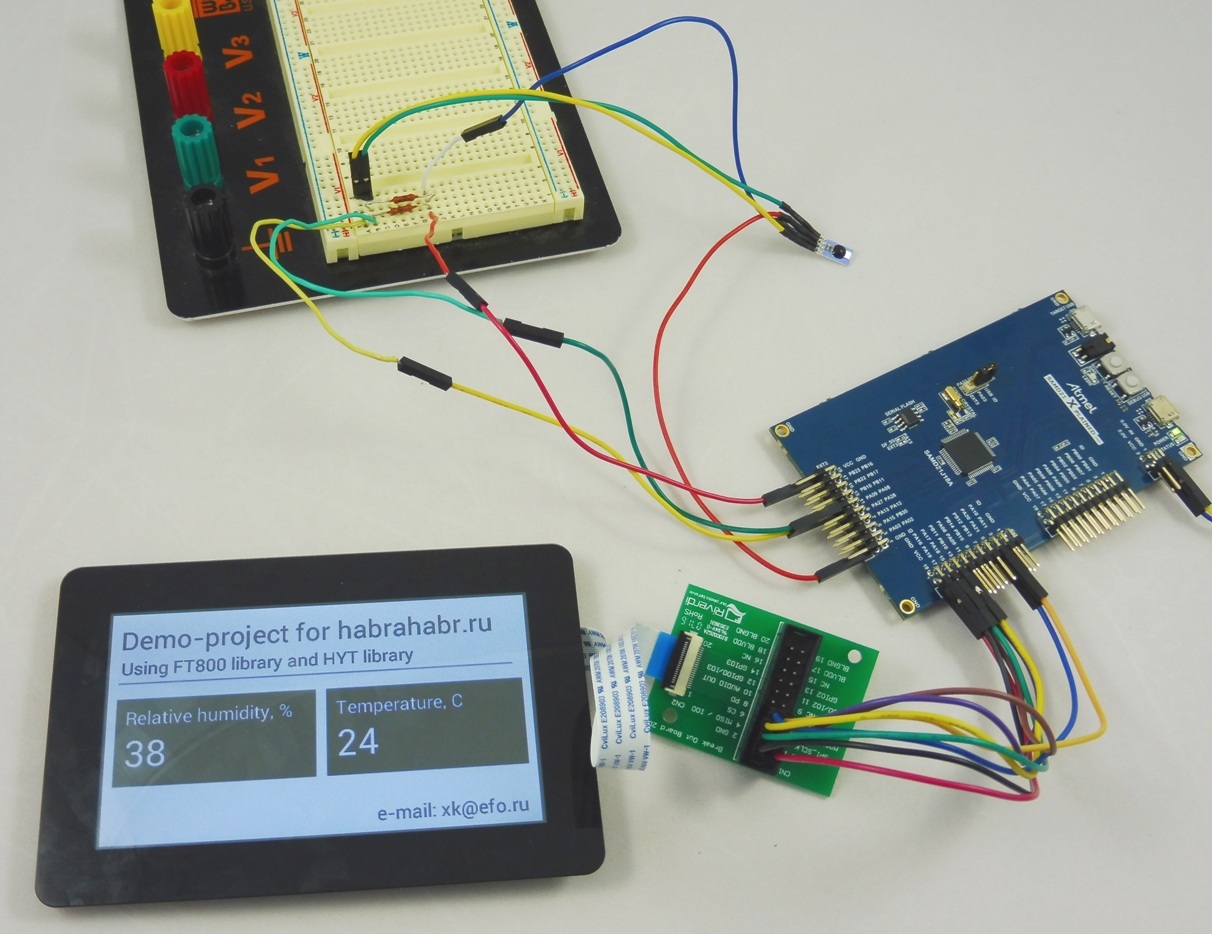
Thus we get a demo example for the created library:
The project is available on developer.mbed.org and works correctly on various debugging boards supported by ARM mbed.

On the publication of the example of use, the process of creating a library for HYT sensors ends.
Now you can go back to our main project, we will not output the seconds to the touchscreen TFT display, but the data received from the HYT-271 sensor.
To do this, create a new project in mbed and import the HYT and FT800_2 libraries there.
Then we create objects of the classes HYT and FT800, using as arguments the names of I / O lines, on which the interfaces I2C and SPI are available, respectively:
Add sensor polling function:
Add a function that forms and loads the display list on the graphics controller:
And continuously update and display data:
The project is available at developer.mbed.org .
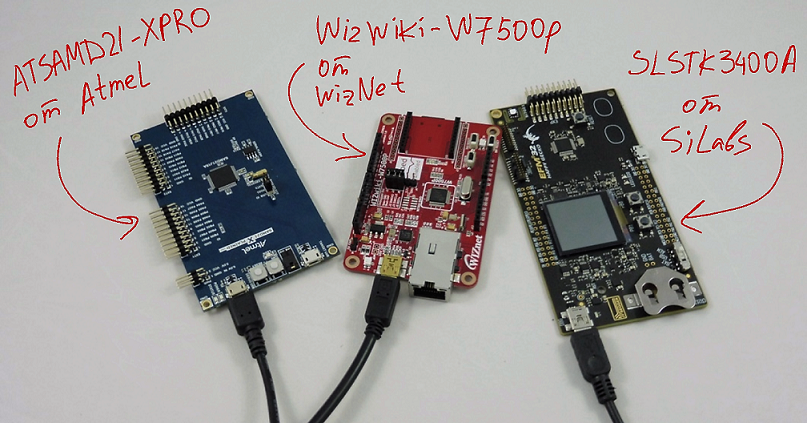
As in the rest of the project development stages, I run the resulting program on three different boards - SLSTK3400A from SiLabs, ATSAMD21-XPRO from Atmel and WIZwiki-W7500P from Wiznet.
In the last article, when we looked at a demo example for displaying information on a TFT display, it took to switch from one board to another:
a) change the target platform (in the upper right corner of the compiler),
b) reassign the pins used to connect the display (in the code),
c) connect the display to the new board.
The transition went smoothly and the mbed-ov program earned on the move on all three boards. For the program that polls the HYT sensor you will also need:
d) reassign the leads used to connect the sensor (in the code),
e) connect the sensor to the new board, not forgetting the pull-up resistors.
When the sensor was connected, the differences in the debug boards finally began to emerge.
Wiznet worked without surprises - it was enough to connect the sensor according to the recommended scheme and download the firmware.
Data from the SiLabs board was obtained even without the use of discrete resistors. The fact is that all GPIO EFM32 microcontrollers have built-in pull-up resistors, when working in the desktop IDE Simplicity Studio, the mode of operation of each line (open-drain push-pull, etc.) is configured manually. Apparently, mbed automatically pulled up to power those lines on which SDA and SCL are implemented.

Atmel is announced today as the weakest link - on the ATSAMD21-XPRO board, the I2C interface (also known as TWI) is available on lines that are simultaneously used by the Atmel Embedded Debugger debugger. I didn’t understand this question in detail, but the fact remains: when powering the board from USB, I2C data reception stops after 2-3 seconds. If you apply power to a separate 5.0V IN connector, then the whole program works correctly.
However, we must admit that there were no complaints about the work of the software, which means it makes sense to continue the development using mbed.
The next article will give a brief overview of the program structure and detailed instructions for working with touch input on the Riverdi TFT module. Thus, we are getting closer and closer to the full-fledged application, whose work is shown on video.
In conclusion, I traditionally thank the reader for his attention and remind you that questions about the use of products, about which we write on Habré, can also be asked by email, specified in my profile.
Today we connect the sensor.
')
Content of the publication cycle:
- [Part 1] Overview of the used software and hardware solutions.
- [Part 2] Getting Started with the FT800 Graphics Controller. Use of ready mbed-libraries for peripheral devices.
- [Part 3] Connecting the sensor HYT-271. Create and publish in mbed your own library for peripherals.
- [Part 4] Application development: Program structure, working with a touch screen.
- [Part 5] Application development: Display images, Russification problems.
- [Part 6] Printing Body Parts
The third part under the cut.
The previous article ended with a description of the project, which was created in mbed IDE and implements the output of the seconds counter on the Riverdi TFT display.
Today we connect the sensor of temperature and relative humidity of the HYT series. The sensor is a complete digital node - it contains a capacitive sensing element for measuring humidity, a temperature sensor, and a signal processing circuit; in addition, like most similar sensors, the HYT is factory calibrated. All this means one thing - to use the sensor, it is enough to connect it to the controlling controller and learn the protocol by which the sensor is interrogated.
The format of the packages and an example of the implementation of the corresponding functions in C are described in detail in this article . Now I will try not to duplicate much of what has already been said and will focus on the issues of using the HYT-271 * sensor in the mbed project.
* HYT series consists of three models - HYT-271, HYT-221 and HYT-939. They differ only in the case, so everything that I am writing about switching on the HYT-271 is also relevant for other models.
Inclusion scheme
To connect sensors of the HYT series, I2C interface is usually used (sensors with SPI are available on request). Accordingly, to connect the sensor, you need four lines:
- Power supply (suitable for 3.3 and 5 V)
- Land
- SDA Data Line
- SLC clocking line
The recommended pull-up resistors for SDA and SLC lines are 2.4 kΩ.
Sensor polling order
HYT series sensors support several types of commands. For direct polling of the sensor, use the Measuring Request and Data Fetch commands, and the remaining instructions will be needed only if it is necessary to change the standard address of the sensor on the I2C bus.
At once I will say that in the mbed-library HYT there are no functions for changing the I2C-address. The reasons for this are my natural laziness and the lack of a direct need, because in most cases a single sensor hangs on the bus and for work it is sufficient to implement the polling and measurement procedures.
So, on receipt of the Measuring Request command, the HYT sensor goes out of sleep mode, takes measurements and generates a package with data on temperature and humidity. To receive data, a Data Fetch command must be sent to the sensor, and there should be a delay of 100 ms between the transmission of these two commands, since it is exactly the time it takes for the sensor to measure and form the package.
Measuring Request is a packet consisting only of a header byte — the address of the sensor and the record flag. The corresponding function MRCommand () sends an empty packet to I2C.
The Data Fetch command is a header byte with a read flag and four bytes of data that the controller receives from the sensor.
The first bit of the first byte is the service CMode bit. If it is set to "1", then the sensor is in a special mode of operation in which you can change its address on the bus.
The second bit of the first byte is the service Stale bit. If it is set to “1”, then after performing the next measurement cycle, the same temperature and humidity values are obtained as in the previous cycle.
The next 14 digits encode the relative humidity, the next 14 digits encode temperature. Next come two insignificant bits.
The corresponding function DFCommand () transfers the corresponding packet to I2C and decodes the data received from the sensor. The values of relative humidity and temperature are calculated by the following formulas:
RH [%] = (100 / (2 14 - 1)) * RH in
T [° C] = (165 / (2 14 - 1)) * T in - 40
Thus, the HYT sensor polling library should implement two functions — MRCommand () and DFCommand ().
Creating and publishing a library in mbed
Let me remind you that mbed supports various ARM platforms and paired devices (components) - displays, drives, sensors, transceivers, and so on.
Naturally, only the microcontroller manufacturer can provide support for the new debug board, but with the support of new peripheral components, everything is more interesting. A couple of months ago, any user could add any device and the Add new component button hung above the list of supported components. Now ARM changes the policy: any registered user can publish a library and a description for a new component, but in order to add my driver to the list of supported components, extended rights are required (I now have these, hee-hee-hee).
All mbed-libraries for peripheral devices are C ++ classes that contain the necessary functions for working with the device. As a rule, the constructor of such a class accepts as arguments the I / O lines to which the component is connected. If the device requires some initialization procedure, then it is also logical to include this procedure in the class constructor. An example of a library containing an initialization procedure is the FT800 graphics controller library, which was described in detail in a previous article .
In the case of the HYT sensor, everything is much simpler: sensor initialization is not required, and only two functions are needed to obtain measurement results.
HYT.h file
#define HYT_ADDR 0x50 // 01010000 class HYT { public: /** * HYT constructor. * * @param sda mbed pin to use for SDA line of I2C interface. * @param scl mbed pin to use for SCL line of I2C interface. * * Remember about pull-up resistors on sda and scl. Recommended value is 2.4 kΩ */ HYT(PinName sda, PinName scl); /** * @brief The totals (temperature in Celsius, relative humidity in percentages) */ float humidity; float temperature; /** * @brief Send "Measuring Request" command * @details Initiates a measuring cycle of HYT sensor * @details More information: http://www.ist-ag.com/eh/ist-ag/resource.nsf/imgref/Download_AHHYTM_E2.2.5.pdf/$FILE/AHHYTM_E2.2.5.pdf */ void MRCommand(void); /** * @brief Send "Data Fetch" command & processing the data * @details Fetch the last measured value of humidity and temperature from sensor * @details Calculate values of temperature in Celsius, relative humidity in percentages * @details More information: http://www.ist-ag.com/eh/ist-ag/resource.nsf/imgref/Download_AHHYTM_E2.2.5.pdf/$FILE/AHHYTM_E2.2.5.pdf * @returns 0 if no errors, -1 if no new value received from sensor. */ int DFCommand(void); private: I2C _i2c; }; HYT.cpp file
#include "HYT.h" #include "mbed.h" HYT::HYT(PinName sda, PinName scl) : _i2c(sda, scl) { } /*************************************************************************************************************************/ void HYT::MRCommand(void) { _i2c.write(HYT_ADDR, 0, 0); } /*************************************************************************************************************************/ int HYT::DFCommand(void) { char dataI2C[4]; int stateBit; int humidityRaw; int temperatureRaw; _i2c.read(HYT_ADDR, dataI2C, 4); stateBit = (dataI2C[0] & 0x40) >> 6; if (stateBit == 0) { humidityRaw = ((dataI2C[0] & 0x3F) << 8) | dataI2C[1]; temperatureRaw = ((dataI2C[2] << 8) | dataI2C[3]) >> 2; if (temperatureRaw < 0x3FFF && humidityRaw < 0x3FFF) { temperature = ((float)(temperatureRaw) * 165.0f / 16383.0f) - 40.0f; humidity = (float)humidityRaw * 100.0f / 16383.0f; } else { // sensor returns wrong data (1111...11) return -1; } } else { // no new value received from sensor return 0; } return 0; } To use the library in your own project, just follow the link to the page with its description and import the library into your online compiler.
When publishing the mbed library for a new component, it is assumed not only to create and properly document the code. In addition, it is desirable to provide the library with a description of the hardware module, a typical device enablement scheme and the Hello World program - a simple example of using the library. To create such an example, I again use the blank project from the first article in this publication cycle .
Let me remind you that the blank project is a simple program that outputs a seconds counter to a serial interface (to a virtual COM port)
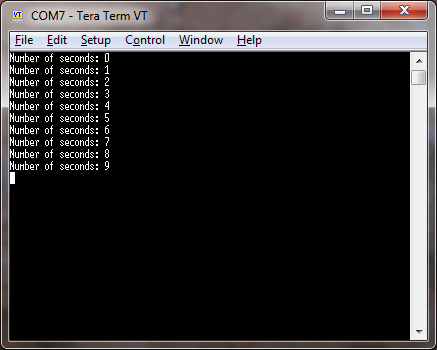
#include "mbed.h" Serial pc(USBTX, USBRX); Ticker timeKeeping; volatile uint64_t seconds = 0; void secondsCallback(void) { pc.printf("Number of seconds: %x\r\n", seconds); seconds ++; } int main() { timeKeeping.attach(&secondsCallback, 1.0f); while(1) {} } We connect the HYT library to the draft project and make some simple changes:
- create a SENSOR object of the HYT class, passing as arguments the names of the pins on which the I2C interface is available
- add the polling function of the dataUpdate () sensor and call it in an infinite loop
- instead of the seconds counter, we output the obtained data on temperature and relative humidity to a serial interface
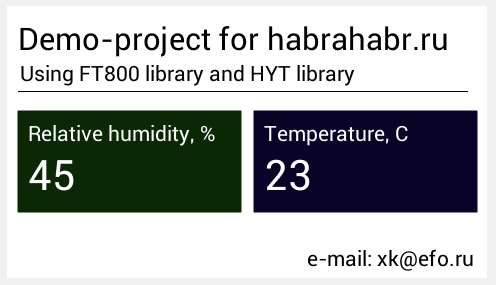
Thus we get a demo example for the created library:
#include "mbed.h" #include "HYT.h" Serial pc(USBTX, USBRX); Ticker timeKeeping; HYT SENSOR (PD6, PD7); // sda, scl [SLSTK3400A] //HYT SENSOR (D14, D15); // sda, scl [WIZwiki-W7500P] //HYT SENSOR (PA08, PA09); // sda, scl [ATSAMD21-XPRO] // HYT sensor polling cycle void dataUpdate(void) { SENSOR.MRCommand(); wait_ms(100); SENSOR.DFCommand(); } void secondsCallback(void) { pc.printf("Humidity level: %.1f\r\n%", SENSOR.humidity); pc.printf("Temperature level: %.1f\r\n%", SENSOR.temperature); pc.printf("-------------------------------\r\n%", SENSOR.temperature); } int main() { timeKeeping.attach(&secondsCallback, 1.0f); while(1) { dataUpdate(); } } The project is available on developer.mbed.org and works correctly on various debugging boards supported by ARM mbed.
On the publication of the example of use, the process of creating a library for HYT sensors ends.
Using the library in your own project
Now you can go back to our main project, we will not output the seconds to the touchscreen TFT display, but the data received from the HYT-271 sensor.
To do this, create a new project in mbed and import the HYT and FT800_2 libraries there.
Then we create objects of the classes HYT and FT800, using as arguments the names of I / O lines, on which the interfaces I2C and SPI are available, respectively:
HYT SENSOR (PD6, PD7); // sda, scl [SLSTK3400A] FT800 TFT (PE10, PE11, PE12, PE13, PB11, PD4); // mosi, miso, sck, ss, int, pd [SLSTK3400A] //HYT SENSOR (D14, D15); // sda, scl [WIZwiki-W7500P] //FT800 TFT (D11, D12, D13, D10, D9, D8); // mosi, miso, sck, ss, int, pd [WIZwiki-W7500P] //HYT SENSOR (PA08, PA09); // sda, scl [ATSAMD21-XPRO] //FT800 TFT (PA18, PA16, PA19, PA17, PA20, PA21); // mosi, miso, sck, ss, int, pd [ATSAMD21-XPRO] Add sensor polling function:
void dataUpdate(void) { SENSOR.MRCommand(); wait_ms(100); SENSOR.DFCommand(); } Add a function that forms and loads the display list on the graphics controller:
- Beginning of the display list, setting the white color as the default color
- Set to black, display two text lines
- Setting the dark green color, the output of the graphic primitive "Rectangle"
- White setting, text string and number output (relative humidity values)
- Setting the dark blue color, the output of the graphic primitive "Rectangle"
- White setting, text string and number output (temperature values)
- Set to black, text line output
- Displaying the straight line graphic primitive
- End of the display list, loading pictures on the display
void drawTimeScreen(void) { TFT.DLstart(); TFT.DL(CLEAR_COLOR_RGB(255, 255, 255)); TFT.DL(CLEAR(1, 1, 1)); TFT.DL(COLOR_RGB(0, 0, 0)); TFT.Text(11, 15, 30, 0, "Demo-project for habrahabr.ru"); TFT.Text(13, 15 + 40, 28, 0, "Using FT800 library and HYT library"); TFT.DL(COLOR_RGB(9, 40, 3)); TFT.DL(BEGIN(RECTS)); TFT.DL(VERTEX2II(11, 105, 0, 0)); TFT.DL(VERTEX2II(11 + 222, 105 + 100, 0, 0)); TFT.DL(COLOR_RGB(255, 255, 255)); TFT.Text(11 + 10, 105 + 10, 28, 0, "Relative humidity, %"); TFT.Number(11 + 10, 105 + 10 + 30, 31, 0, SENSOR.humidity); TFT.DL(COLOR_RGB(9, 3, 40)); TFT.DL(BEGIN(RECTS)); TFT.DL(VERTEX2II(11 + 222 + 14, 105, 0, 0)); TFT.DL(VERTEX2II(11 + 222 + 14 + 222, 105 + 100, 0, 0)); TFT.DL(COLOR_RGB(255, 255, 255)); TFT.Text(11 + 222 + 14 + 10, 105 + 10, 28, 0, "Temperature, C"); TFT.Number(11 + 222 + 14 + 10, 105 + 10 + 30, 31, 0, SENSOR.temperature); TFT.DL(COLOR_RGB(0, 0, 0)); TFT.Text(300, 105 + 100 + 35, 28, 0, "e-mail: xk@efo.ru"); TFT.DL(BEGIN(LINES)); TFT.DL(LINE_WIDTH(8)); TFT.DL(VERTEX2II(11, 15 + 40 + 30, 0, 0)); TFT.DL(VERTEX2II(460, 15 + 40 + 30, 0, 0)); TFT.DL(DISPLAY()); TFT.Swap(); } And continuously update and display data:
int main() { while(1) { dataUpdate(); drawTimeScreen(); } } The project is available at developer.mbed.org .
As in the rest of the project development stages, I run the resulting program on three different boards - SLSTK3400A from SiLabs, ATSAMD21-XPRO from Atmel and WIZwiki-W7500P from Wiznet.
In the last article, when we looked at a demo example for displaying information on a TFT display, it took to switch from one board to another:
a) change the target platform (in the upper right corner of the compiler),
b) reassign the pins used to connect the display (in the code),
c) connect the display to the new board.
The transition went smoothly and the mbed-ov program earned on the move on all three boards. For the program that polls the HYT sensor you will also need:
d) reassign the leads used to connect the sensor (in the code),
e) connect the sensor to the new board, not forgetting the pull-up resistors.
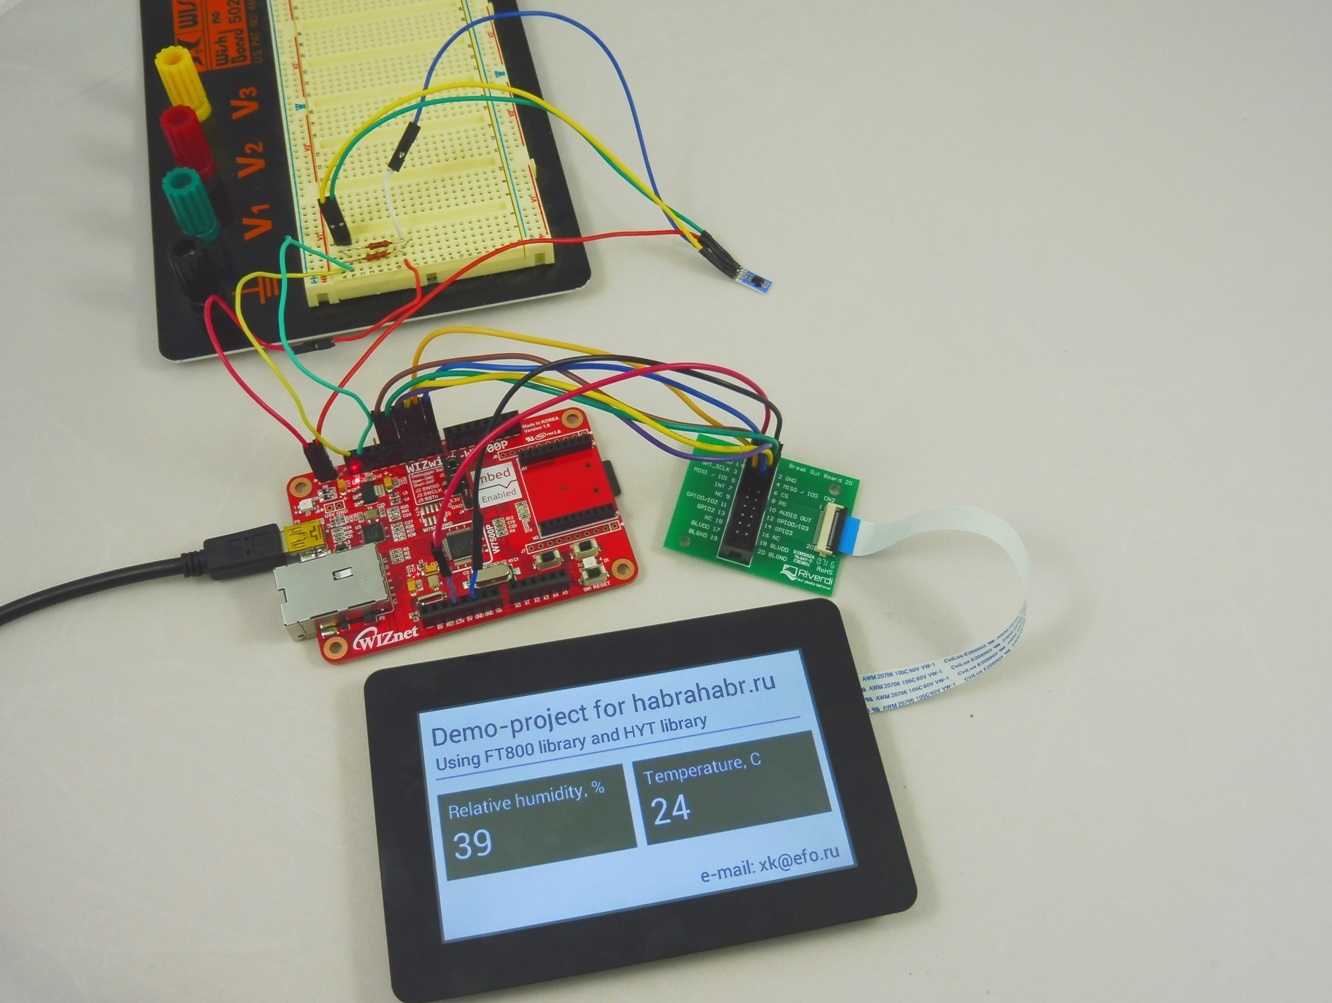
When the sensor was connected, the differences in the debug boards finally began to emerge.
Wiznet worked without surprises - it was enough to connect the sensor according to the recommended scheme and download the firmware.
Data from the SiLabs board was obtained even without the use of discrete resistors. The fact is that all GPIO EFM32 microcontrollers have built-in pull-up resistors, when working in the desktop IDE Simplicity Studio, the mode of operation of each line (open-drain push-pull, etc.) is configured manually. Apparently, mbed automatically pulled up to power those lines on which SDA and SCL are implemented.
Atmel is announced today as the weakest link - on the ATSAMD21-XPRO board, the I2C interface (also known as TWI) is available on lines that are simultaneously used by the Atmel Embedded Debugger debugger. I didn’t understand this question in detail, but the fact remains: when powering the board from USB, I2C data reception stops after 2-3 seconds. If you apply power to a separate 5.0V IN connector, then the whole program works correctly.
However, we must admit that there were no complaints about the work of the software, which means it makes sense to continue the development using mbed.
The next article will give a brief overview of the program structure and detailed instructions for working with touch input on the Riverdi TFT module. Thus, we are getting closer and closer to the full-fledged application, whose work is shown on video.
Conclusion
In conclusion, I traditionally thank the reader for his attention and remind you that questions about the use of products, about which we write on Habré, can also be asked by email, specified in my profile.
Source: https://habr.com/ru/post/310058/
All Articles