Remote annunciator of critical temperature and humidity based on AVR MK and DHT22 sensor
After a row of 2 air conditioner breakdowns in the server room and subsequent overheating of the room for several days, the question arose of monitoring the temperature in it. It would be possible daily (hourly / every minute) to watch the temperature from the temperature sensors built into the servers using the IPMI control interface. But in this case there is a human factor on which, in this case, has its negative realization that it would be possible to automate everything much better. It so happened that I just recently became fascinated with such an extremely interesting thing as microcontrollers, so the task of automation using the MC was a new and interesting opportunity to realize the accumulated knowledge in a project useful to the world.
The general scheme of the device and the tools used.
As a basis, it was decided to take one of the Arduino boards. Prices for Chinese counterparts are low and all the necessary MK strapping is compactly placed on the module. Originally intended to use the Arduino Pro + DHT22. Arduino Pro - as the cheapest, small, but quite functional board. DHT22 - because this sensor can, in contrast to the cheaper DS18B20, also detect humidity. And it is also useful to us. The server, by a funny coincidence, is located next to the toilet, which can flood everything around it completely without raising the temperature, for example.
With such a scheme, the MK, in case of exceeding the critical temperature or humidity, was supposed to send a twisted pair (~ 70m long) cable to the IT department's office. Well, here it is to sound a buzzer and blink with multicolored LEDs in every way informing us about the approaching apocalypse. Unfortunately, this simple solution turned out to be unsuitable due to the absence of a direct line (without intermediate hubs) between the server and our office.
Photo of the 1st version of the device:
Then it was decided to connect the arduinka to a computer via USB and transfer data on temperature and humidity over the UART. This means that the Arduino Nano, which is already more sophisticated, is needed (I have an ATMega328 at 16 MHz). It was necessary to make it communicate with a computer that runs under Windows 7. On this computer, the server part of the program should be installed, which should receive data on the UART and notify all client modules connected to it that work somewhere on the local network about critical values temperature and humidity. At that time I didn’t have the tools to write programs for this OS, so I had to urgently get acquainted with some popular programming language with a convenient Windows writing environment. I stopped at C #. The firmware for MK, in fact, was written in AVR Studio 6 in C.
So, since during the implementation of the project I did not find information with examples of C code for the DHT22 sensor, then in this article I decided to focus on working with him. Also at the end of the article you will find all references to the sources and tools used to solve their similar problems.
Briefly about the work of the sensor DHT22.
| Its main parameters are: | |
|---|---|
| Tension | 3.3-6 V |
| Measurement options | Humidity 0-100%; temperature from -40 to 80C |
| Measurement accuracy | Humidity + -2% (max. + - 5%); temperature + -0,5C |
| Duration of measurement period | About 2 seconds |
Here I note that in the program for MK, I survey the sensor approximately every second. It works for me. If you start having problems with the survey, then start by increasing this period to 2 seconds.
Pinout and wiring diagram of the younger fellow datasheet:
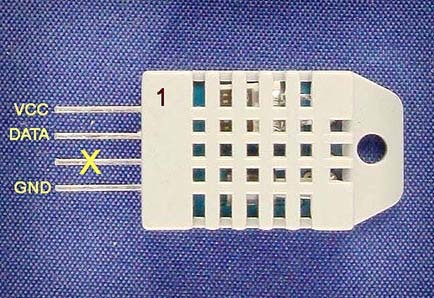
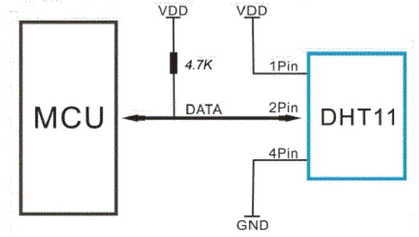
The sensor data line is connected via a 4.7kΩ resistor to the power supply, which means that if the sensor is silent or broken / is missing, then there will be a logical unit on the line. To receive a response from the sensor, you need to press the data line to the ground at 18 mS.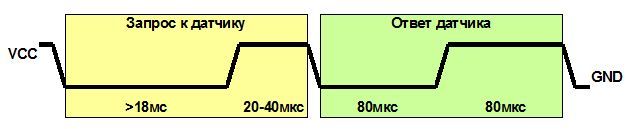
After the sensor has responded, it begins to transmit data. The transmission of each bit starts at a low level of 50 µs.
Total data is transmitted 40 bits or 5 bytes. Data is transmitted starting from the high bit of the high byte.
Byte 5 - High byte of the humidity value.
Byte 4 - Low byte humidity value.
Byte 3 - High byte temperature value.
Byte 2 - Low byte temperature value.
Byte 1 - Checksum.
Well, the device diagram:

A sensor data bus is connected to the Arduin's D2 foot. A power LED is connected to the foot of the D4. By the way, if it flashes, then the sensor did not pass the initialization check, in other words, it was not found.
Go to the firmware code.
First, a brief description of the modules.
UART_ATMEGA328.h
This is a module with functions for receiving and transmitting messages via UART. By the way, it includes the function void send_int_Uart(int i) . It receives an integer 2 byte signed number, converts it to a string and transmits it over the UART. Do not look for where this function is used - it was not useful in this project.
DHT11-22_def.h
Contains macros of sensor connection settings. The model of the sensor used is indicated here: _DHT22 or its simplified version _DHT11 . PORT, DDR and PIN to which the sensor is connected. And the pin number to which the data line is connected. These macros are used in the following module:
DHT11-22.h
Contains functions for working with the DHT22 or DHT11 sensor.
Module code DHT11-22_def.h:
#define _DHT22 /* . _DHT11 _DHT22. */ #define _PORT_DHT PORTD #define _DDR_DHT DDRD #define _PIN_DHT PIND #define _PINNUM_DHT 2 /* 0 */ Module code DHT11-22.h:
#define F_CPU 16000000UL #include "DHT11-22_def.h" #define _MASK_DHT ( 0b00000001 << _PINNUM_DHT ) #define _PIN_DHT_GET ( (_PIN_DHT & _MASK_DHT)>>_PINNUM_DHT ) #define _PORT_DHT_SET(x) ( ((x)==0) ? (_PORT_DHT&= ~_MASK_DHT) : (_PORT_DHT|= _MASK_DHT) ) #define _DDR_DHT_SET(x) ( ((x)==0) ? ( _DDR_DHT&= ~_MASK_DHT) : ( _DDR_DHT|= _MASK_DHT) ) static unsigned char checkSum, packDHT[5]= {0,0,0,0,0}, dhtHighDuration=0, minLevel=0, maxLevel=0, dhtSplitLevel=0; static float temperature, humidity; float getTemp() { return temperature; } float getHum() { return humidity; } unsigned char getCheckSum() { return checkSum; } unsigned char getMinLevel() {return minLevel; } unsigned char getMaxLevel() {return maxLevel; } unsigned char getDhtSplitLevel() {return dhtSplitLevel; } static char initDHT() { // , 0. char dhtErr=0; _DDR_DHT_SET(1); _PORT_DHT_SET(0); _delay_ms(19); asm("cli"); _DDR_DHT_SET(0); _PORT_DHT_SET(1); _delay_us(10); if (!_PIN_DHT_GET) dhtErr = 1; _delay_us(22); if ( (_PIN_DHT_GET)&&(!dhtErr) ) dhtErr = 2; _delay_us(88); if ( (!_PIN_DHT_GET)&&(!dhtErr) ) dhtErr = 3; _delay_us(77); if ( (_PIN_DHT_GET)&&(!dhtErr) ) dhtErr = 4; return dhtErr; } static void DhtMinMaxCalc() { // . dhtSplitLevel. dhtHighDuration= 0; // , . while ( !_PIN_DHT_GET ) _delay_us(1); while ( _PIN_DHT_GET ) { _delay_us(1); dhtHighDuration++; } if (minLevel > dhtHighDuration) minLevel= dhtHighDuration; else if (maxLevel < dhtHighDuration) maxLevel= dhtHighDuration; } unsigned char calibrateDHT() { // dhtSplitLevel. 1, 0. if ( initDHT() ) { // asm("cli"); asm("sei"); return 0; } for ( char bit=0; bit < 40; bit++) DhtMinMaxCalc(); asm("sei"); dhtSplitLevel= (minLevel + maxLevel) / 2; // dhtSplitLevel - , , , 1. return 1; } static char getDhtBit() { // . dhtHighDuration= 0; // , . while ( !_PIN_DHT_GET ) _delay_us(1); while ( _PIN_DHT_GET ) { _delay_us(1); dhtHighDuration++; } if ( dhtHighDuration < dhtSplitLevel ) return 0; return 1; } //############################################### #if defined _DHT11 static void calcResults() { // humidity, temperature, checkSum DHT11. temperature= packDHT[2]; humidity= packDHT[0]; checkSum= packDHT[4]; } //############################################### #elif defined _DHT22 static void calcResults() { // humidity, temperature, checkSum DHT22. temperature= packDHT[3]*0.1 + (packDHT[2] & 0b01111111)*25.6; if (packDHT[2] & 0b10000000) temperature*= -1; humidity= packDHT[1]*0.1 + packDHT[0]*25.6; checkSum= packDHT[4]; } #endif //############################################### unsigned char readDHT() { // 1, , 0. if ( initDHT() ) { // asm("cli"); asm("sei"); return 0; } for (unsigned char byte=0; byte < 5; byte++) { // . packDHT[byte] = 0; for ( char bit=0; bit < 8; bit++) packDHT[byte]= (packDHT[byte] << 1) | getDhtBit(); } asm("sei"); calcResults(); return 1; } Comments on the code.
1. I did not add the analysis of the checksum, although I save it in the checkSum variable.
2. When calculating the duration of the high-level period on the data bus to determine the value of the resulting bit, I decided not to use the MK timer since I considered this an acceptable simplification for this project. But he added the unsigned char calibrateDHT() function, in which the dhtSplitLevel variable containing the arithmetic average value between the shortest high level period (when transmitting bit 0) and the longest period of high level (transmitting bit 1) is calculated. This variable is then used to determine the values of the data bits for subsequent calls to the sensor.
3. To use a cheaper DHT11 sensor in a project, you need to specify it in the DHT11-22_def.h module instead of the DHT22. True, the work with him could not be tested because of his absence.
Usage example:
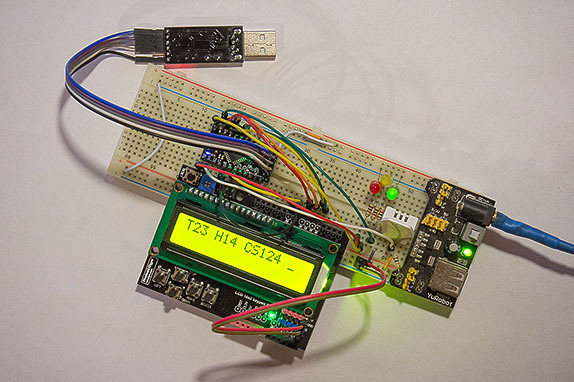
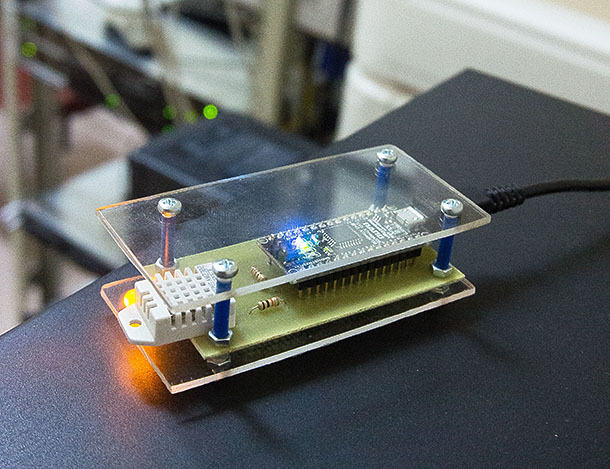
int main() { // ... char st[6]; _delay_ms(999); calibrateDHT(); while(1) { _delay_ms(999); if ( !readDHT() ) continue; itoa( getTemp(), st, 10); // st . // st UART, LCD - ... itoa( getHum(), st, 10); // st . // st UART, LCD - ... } } And finally, photos and videos of the resulting device:
Resources:
- For the record .hex in Arduino used the program Xloader v1.00
- For receiving and transmitting messages via UART during debugging and testing, I used the program Terminal v1.9b by Br @ y ++
- Ready firmware for Arduino Nano (ATMega328, 16 MHz), server and client under Windows, as well as PCB print ( link )
- Firmware code
- Server code
- Client code
')
Source: https://habr.com/ru/post/309994/
All Articles